Multi Timeframe Support and Resistance Zones
Product Page MT5 : click here
Product Page MT4 : click here
You can download the demo version from bottom of the page.
INPUT PARAMETERS:

S/R Zones Main Settings:
- Find Weak Fresh (Untested) Zones: If set to false, weak zones won't show in zone panel and alert won't trigger for them.
- Find Fresh (Untested) Zones: If set to false, untested zones won't show in zone panel and alert won't trigger for them.
- Find Broken Zones: If set to false, broken zones won't show in zone panel and alert won't trigger for them.
- Find Verified Zones: If set to false, verified zones won't show in the panel and alerts won't trigger for them.
- Find Proven Zones: If set to false, proven zones won't show in the panel and alerts won't trigger for them.
By changing the following parameters, you can change the S/R zones, you can tweak them to see what works best for you or just leave them with default values.
- Ignore Near Weak & Wide Zones: If set to true, weak and broken zones that their distance to next stronger zone is less than their width, won't be show on chart.
- Zone Extend: if set to true, indicator goes dipper in history bars to find zones. The result will be wider zones.
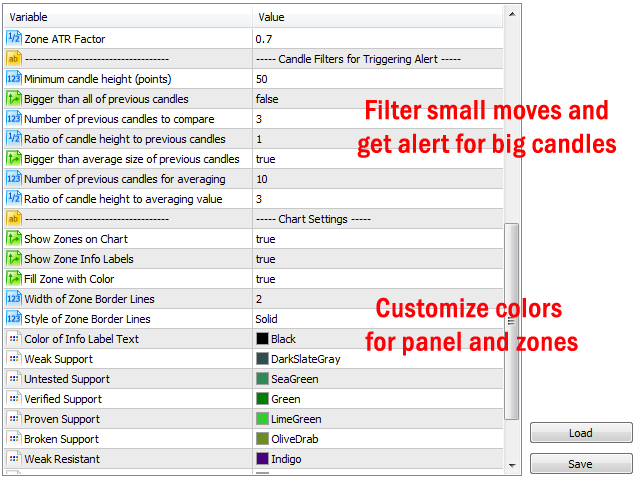
- Zone ATR Factor: Changes zone height based on ATR indicator values, less value means thinner and more accurate zones, but less chance to trigger the alert.
- Fractal Fast Factor: This parameter changes the sensitivity of fractals for calculating the S/R zones. It added for more compatibility with "Shved Supply and Demand" indicator, and you don't need to change it unless you want to do an extended customization on the calculating of zones.
- Fractal slow Factor: Same as above parameter.
S/R Zones Timeframe Filters:
- Show zones of these TFs on smaller TFs (comma separated): You can input a list of comma separated timeframes to show their zones on smaller timeframes.
- Don't show zones of current TF if above field isn't empty: Set to false if you want to see only zones of above timeframes on chart.
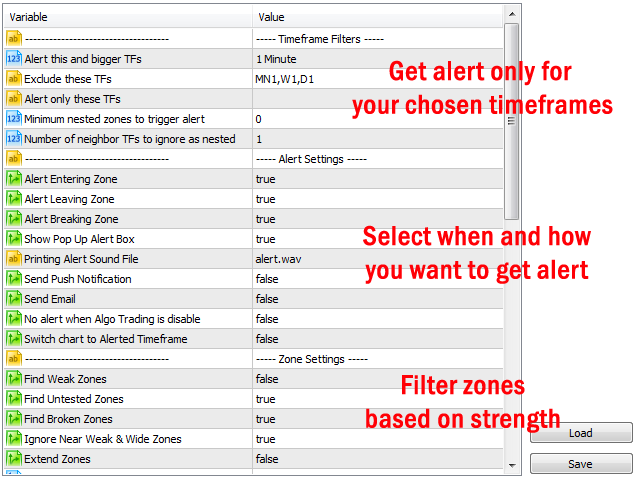
- Alert this and bigger TFs: Receive alert for timeframes >= selected timeframe
- Exclude alert for these TFs: Receive alert only on selected timeframes (comma separated timeframes, E.g. M5,M15,H2,H6). You can mix this parameter with previous one.
- Alert only these TFs: Receive alert only on these timeframes (comma separated timeframes, E.g. M5,M15,H2,H6).
- Minimum nested zones to trigger alert: Receive alert when there is interaction with a zone on more than one TF at the same time. For example if you set this parameter=3, then alert will trigger only if there is at least 3 more timeframe that price has same interaction with them, for example in all timeframes price enters into support zone.
- Number of neighbor TFs to ignore as nested (MT5 only): Sometimes there is similar interaction with support resistance zones in near timeframes (like M10 and M12 or H2 and H3). If you set this parameter bigger than zero then when indicator finds an interaction with a zone in a timeframe, it ignores the same zone(support, resistance) with the same interaction(enter, leave, break) in near timeframes as a nested zone. For example if you set this parameter=2 and price enters the support zone in M4, M5 and M6, only M4 will be counted as nested zone.
S/R Zones Alert Filters:
- Check S/R zone alerts on: Update dashboard every minute or on candle close of related timeframe.
- Use alert filters (for S/R zones): Set to true if you want to use following filters for maximizing the quality of signals.
- Minimum Candle Height (points): Receive alert only if difference between high and low of the candle that deals with a zone (last closed candle) is >= this parameter (in points).
- Min. candle body to height ratio: By using this parameter, you can ignore the doji candles. For example, if set to 0.5, then the signal candle body must be bigger than half of the candle height (body+shadows) to receive alert for the signal.
- Min. candle height to zone height ratio: By using this parameter, you receive the alert if the price movement is big enough in compare with zone height. For example, if set to 0.5, then the height of the signal candle must be bigger than half of the zone height to receive alert for the signal.
- Candle height bigger than height of all previous candles: Alert triggers if difference between high and low of the candle that deals with a zone is bigger than all previous candles (check two following parameters).
- Number of Previous Candles to Compare: Number of previous candles that must be compared with last candle to check if it is big enough or not.
- Ratio of candle height to height of previous candles: How many times last candle must be bigger than previous candles to not consider as small candle. For example, if you set this parameter=1.2, then candle must be at least 1.2 times bigger than previous candles. If this parameter=1 then this candle must be just bigger than previous candles.
- Candle body bigger than average body of previous candles: Alert triggers if body (difference between close and open) of the candle that deals with a zone is bigger than average body of previous candles (check two following parameters) .
- Number of previous candles for averaging: Number of previous candles to use for averaging.
- Ratio of candle body to average body value: How many times last candle's body must be bigger than average size of previous candles.
Pivot Points Settings:
- Enable Pivot Points: Receive alert when price breaks the pivot point levels or returns to them.
- Time interval between pivot alerts: Time interval between pivot alerts for each symbol. Smaller periods give more alert, because price can multiple times break the pivot level and return to it.
- Show Pivot Lines on Chart: Show pivot level lines on the chart, you can hide the lines but still receive the alerts.
- Show Pivot Lines on this Timeframe: By changing the default value, you can choose to show the pivot lines only on the selected timeframe (to have a cleaner chart).
- Pivot Points Calculation Type: You can choose to calculate pivot levels base on the one of the five different methods (Standard, Fibonacci, Camarilla, Woodie and Demark).
- Fibonacci Pivot Levels (up to 4 comma separated levels): You can set up to 4 level for fibonacci pivot levels.
- Calculate Daily Pivot Points: Calculate and give alert for daily pivot levels.
- Calculate Weekly Pivot Points: Calculate and give alert for weekly pivot levels.
- Calculate Monthly Pivot Points: Calculate and give alert for monthly pivot levels.
- Calculate Pivot Level: Calculate the main (center) pivot level
- Calculate S1/R1 Levels: Calculate S1/R1 pivot levels.
- Calculate S2/R2 Levels (if exist): Calculate S2/R2 pivot levels (demark method only has S1/R1 levels).
- Calculate S3/R3 Levels (if exist): Calculate S3/R3 pivot levels (woodie method doesn't have S3/R3 and S4/R4 levels).
- Calculate S4/R4 Levels (if exist): Calculate S4/R4 pivot levels (standard method doesn't have S4/R4 level).
Alert Settings:
- Alert Entering Zone: Alert triggers when price enters in a support or resistance zone (candle opens outside the zone and closes inside the zone).
- Alert Leaving Zone: Alert triggers when price leaves a support or resistance zone (price turns back from the zone and candle opens inside the zone and closes outside the zone).
- Alert Breaking Zone: Alert when price breaks a support or resistance zone (price goes through the zone and candle opens inside the zone and closes outside the zone).
- Alert Breaking Pivot Level: Alert when price breaks a pivot level (candle opens below/above the one of pivot resistance/support levels and then breaks it).
- Alert Returning to Pivot Level: Alert when price returns to a pivot level (all the previous candle must be beyond the pivot level before price returning to it).
- Show Pop Up Alert Box: Show alert window when alert triggers, also alert sound will be played and message will be printed in terminal experts tab. In MT5 version when alert triggers, chart timeframe will change to alerted timeframe.
- Send Push Notification: Send push notification to mobile phone when indicator alert triggers (you should set metatrader Notifications options).
- Send Email: Send email when indicator alert triggers (you should set metatrader Email options).
- No alert when Algo Trading is disable: If true, then you can disable alerts by disabling "Algo trading" button of metatrader terminal. This is useful when you are running indicator on many charts and you want to disable alert for all of them at once.
- Switch to Alerted Timeframe: If true, when alert triggers, the chart timeframe will switch to biggest alerted timeframe.

S/R Zones Drawing Settings:
- Show zones on chart: If set to false, zones won't show on chart. Doesn't affect map panel and alerts.
- Only show nearest zones to price: To have a cleaner chart, you can choose to show only nearest zones to price on the chart.
- Show zone name: If set to false, zone names won't show on chart.
- Show zone price labels: Set true to add price labels to top and bottom levels of zones.
- Fill zone with color: If set to false, only borders of zones will draw on chart.
- Style of zone border lines: Style of zone border (If above parameter is false).
- Width of solid zone border lines: Size of zone border (only for solid lines).
- Zone colors: In last parameters you can change the color of each zone as you want.
- By clicking on timeframe buttons: Choose between changing the timeframe or opening a new chart when you click on timeframe buttons.
- Template for new opened chart: Template name for opened chart, if you choose to open chart by clicking on timeframe buttons.
Pivot Points Drawing Settings
- Lines length: The length of pivot lines.
- Show Level Names: Show pivot level name on chart.
- Show Level Prices: Show pivot level price on chart.
- Daily Pivot Line Style: Line style for daily pivot levels.
- Weekly Pivot Line Style: Line style for weekly pivot levels.
- Monthly Pivot Line Style: Line style for monthly pivot levels.
- Daily Pivot Line Width (for solid style): Line width for daily pivot levels.
- Weekly Pivot Line Width (for solid style): Line width for weekly pivot levels.
- Monthly Pivot Line Width (for solid style): Line width for monthly pivot levels.
- Pivot line colors: In the last parameters, you can change the color of pivot level lines as you want.
How to use the Support Resistance Zones Bridge in expert advisors:
This bridge is a fast and lightweight version of Support and Resistance zones indicator (a separate file from the main indicator) that you can use it in the code of expert advisors and indicators for accessing the values of nearest S/R zones to symbol price for all metatrader timeframes.
Graphical objects are removed in the bridge but all necessary options are preserved so you can control the specs of zones like in the main indicator.
There are 6 buffers in the bridge that you can load them with iCustom function in your EA or indicator code to get info about the nearest S/R zones. With these buffers you will have upper and lower prices plus strength (weak,broken,untested,verified,proven) of the nearest zones for all chart timeframes.
So in your EA you will have 6 buffers, 3 buffer for nearest resistance zone and 3 buffer for nearest support zone and each buffer has 9 value for 9 timeframe of MT4 (21 values for 21 timeframe of MT5), first value for M1 and the last value for MN1 timeframe. For example you can name buffers such as:
- R_high[] // high prices of nearest resistance zones for all timeframes
- R_low[] // low prices of nearest resistance zones for all timeframes
- R_strength[] // strength values of nearest resistance zones for all timeframes
- S_high[] // high prices of nearest support zones for all timeframes
- S_low[] // low prices of nearest support zones for all timeframes
- S_strength[] // strength values of nearest support zones for all timeframes
Each of the above buffers will have 9 (for MT4) or 21 (for MT5) values.
For MT4 the range of arrays will be from 0 to 8, 0 for M1 timeframe and 8 for MN1 timeframe. For example:
- R_high[0] is high value of the nearest resistance zone for M1 timeframe
- S_low[5] is low value of the nearest support zone for H4 timeframe
- S_strength[8] is strength value of the nearest support zone for MN1 timeframe
For MT5 the range of arrays will be from 0 to 20, 0 for M1 timeframe and 20 for MN1 timeframe. For example:
- R_high[0] is high value of the nearest resistance zone for the M1 timeframe
- S_low[4] is low value of the nearest support zone for the M5 timeframe
- S_strength[14] is strength value of the nearest support zone for the H4 timeframe
To see how to implement the bridge in your code, please refer to the sample EA you received with the bridge.
Notes:
- Bridge shows the values of the nearest S/R zones to the chart price (first upper and first lower zones), not all zones on the chart.
- Bridge is only included in the lifetime license of the indicator (not for rented indicator).
- Bridge doesn't have time limit, when your indicator activation's finished, you still can use the bridge in your EAs.
DOWNLOAD DEMO:
(Demo version works on GBPUSD, EURJPY and NZDUSD symbols)


