![[USER GUIDE] - PZ Grid Trading EA (MT4/MT5)](https://c.mql5.com/6/839/splash-729097-1566475901.png "[USER GUIDE] - PZ Grid Trading EA (MT4/MT5)")

Grid trading is an efficient mechanical trading strategy which has no reliance on direction, profits from volatility and uses the intrinsic
wavy nature of the market. It uses fixed price levels to enter and exit trades in one or both directions. Such trades, generally spaced at
20-200 pip intervals, create a trading grid. Grid trading is used to profit from a long-term trading range, without need for timing
individual entries and exits.
Product Links
- For Metatrader4: https://www.mql5.com/en/market/product/36209
- For Metatrader5: https://www.mql5.com/en/market/product/36205
1. Welcome
This tutorial will explain what grid trading is, its advantages, downsides, risks and procedural considerations.
To successfully complete this tutorial, you'll need to know your way around Metatrader. You need to know how to navigate through charts, install expert advisors in your trading platform and load them to charts. It also helps if you are knowledgeable in risk management: exposure, leverage and margin are terms you should be familiarized with.
The expert advisors covered in this tutorial implement a fully functional and fully featured grid trading strategy, made simple as much as possible for the average user. Input parameters are limited and understandable. Most inputs of the EAs are drop-down menus which makes it almost impossible for the user to enter unreasonable values. Any parameter that can be auto-calculated by the EA has been removed from the inputs to avoid confusion. Others have been broken down into ratios based on others.
This expert advisor is, probably, the best grid trading expert advisor you can find on the internet, but also the easiest one to use. I have spent a tremendous amount of time coding the visual elements of this tool, to make sure you understand how it works and to make the EA behave as you'd expect it to, in a predictable fashion.
Since risk management is crucial to grid trading, the EA implements automatic risk calculations on the chart, which has never been implemented in a grid trading expert advisor in the past and makes your life much easier.
Kindly note an important point: grids and averaging are different approaches, even though more traders and developers
confuse these two terms.
I do hope you enjoy this tutorial and find grid trading as profitable as I do.
2. What is Grid Trading
Grid trading is a highly profitable and mechanical trading strategy which has no reliance on direction, profits from volatility and uses the intrinsic wavy nature of the market. It is a trading approach which uses fixed price intervals to enter and exit trades in any given direction.
3. Advantages of Grid Trading
-
It requires little screen time: As a grid trader, all you need to do is to configure your grid, which you can probably do in a few minutes. After that, the grid trades for you inside your price and risk boundaries. Down the line, as the market changes or your equity changes, you will need to change the grid configuration, but a grid can trade with the same settings for months or years.
-
No hard analysis or guru-forecasting needed: Unlike regular predictive trading, grid trading does not require you to predict what the market will do and when it will do it. You can pick a trading direction and be literally be wrong a thousand pips before you need to worry.
-
It is timeframe-independent: Grid trading strategies do not evaluate high-low-close-open prices to make decisions, and will behave exactly the same regardless the timeframe of the chart. This means you can switch between timeframes in the chart without any risk of affecting the trading activity.
-
Extracts money out of the market regularly: Grid Trading closes trades regularly -as soon as the spacing is met-. So, unless you are using a very big spacing to cover a very wide price range, you will cash-in trades on a daily fashion.
-
Risk and exposure are pre-calculated: The size in trades and total exposure of the grid is pre-calculated before the grid starts trading.
-
You can profit even if the market does not go your way: Grid trading is the only trading approach that can profit even if the market goes against your trading direction. For example, if you enter a long grid but the market falls, if the market fluctuated enough during that fall, you might have netted a profit during the movement.
4. Challenges of Grid Trading
-
Grid trading can appear illogical and complex initially: Normally, people are used to place one trade in a predictive fashion, with stop-loss and take-profit orders. But in grid trading, we place several trades without stop-loss and take-profit. Instead of worrying about a single trade, we need to worry about the validity of the price range we are covering.
-
Incorrectly designed grids can cause big drawdowns: If you configure your grid to behave very aggressively, you can very well fall into a margin call. It is imperative to measure risk before starting a grid. But do not worry, because my Grid Trading EA does that for you, and it won't trade if the risk is too high.
-
Grids are not a set-and-forget solution. It needs an educated trader. There are no grid settings that can be profitable forever, because the market trading range and your equity changes over time. Playing on the Metatrader Tester is fantastic, but you won't find any settings that yield profits forever.
-
It requires a great deal of patience: Sometimes the grid will expand without closing any trades at a profit. And liquidating a grid can also take quite a lot of time: weeks or months. Thus, this particular trading approach requires patience. If you are in trading for the thrill of it, grid trading is not for you.
-
It requires a paradigm shift: Focusing on a single trade is the usual behavior of retail traders, but makes no sense for grid traders. Instead, we focus on the trading range and evaluate the grid as a single deal.
-
It requires a deep account: Grid Trading is not suitable for low account balances, unless you are trading in a cent account in which the impact of one pip is divided by ten. In a micro-lot account, you need at least a 5,000$ balance to create meaningful grids which are able to cash-in regularly. If your account is very small, your spacing between trades will have to be higher and the cash-in frequency will decrease.
-
It is not NFA/FIFO compliant: Grid trading is so profitable that big banks and institutions have convinced the NFA to forbid you to trade them. In the market, usually that with more adaptability ends up winning. You won't be able to trade grids with an US-based broker.
In essence, if you have little time to trade the market and you need a trading approach that can cash-in trades regularly with little intervention, grid trading is for you. The downside however is the following.
5. How does it work
A grid trading system places and cashes-in trades at fixed price intervals, which we call the spacing. With a spacing of 10 pips, for instance, the system will place new orders when the market moves up or down 10 pips, and cash-in trades at the same interval. Every time the system places a new trade, it will cash-in a trade with 10 pips in profit.
The image below illustrates the result of a sell grid with a spacing of 10 pips in an adverse movement scenario. Notice how the system places a new trade every time the market moves 10 pips up or down. It also cashes-in every time the market moves 10 pips down. Even though the market moves against our trading direction, we are able to make a 100 pip profit.
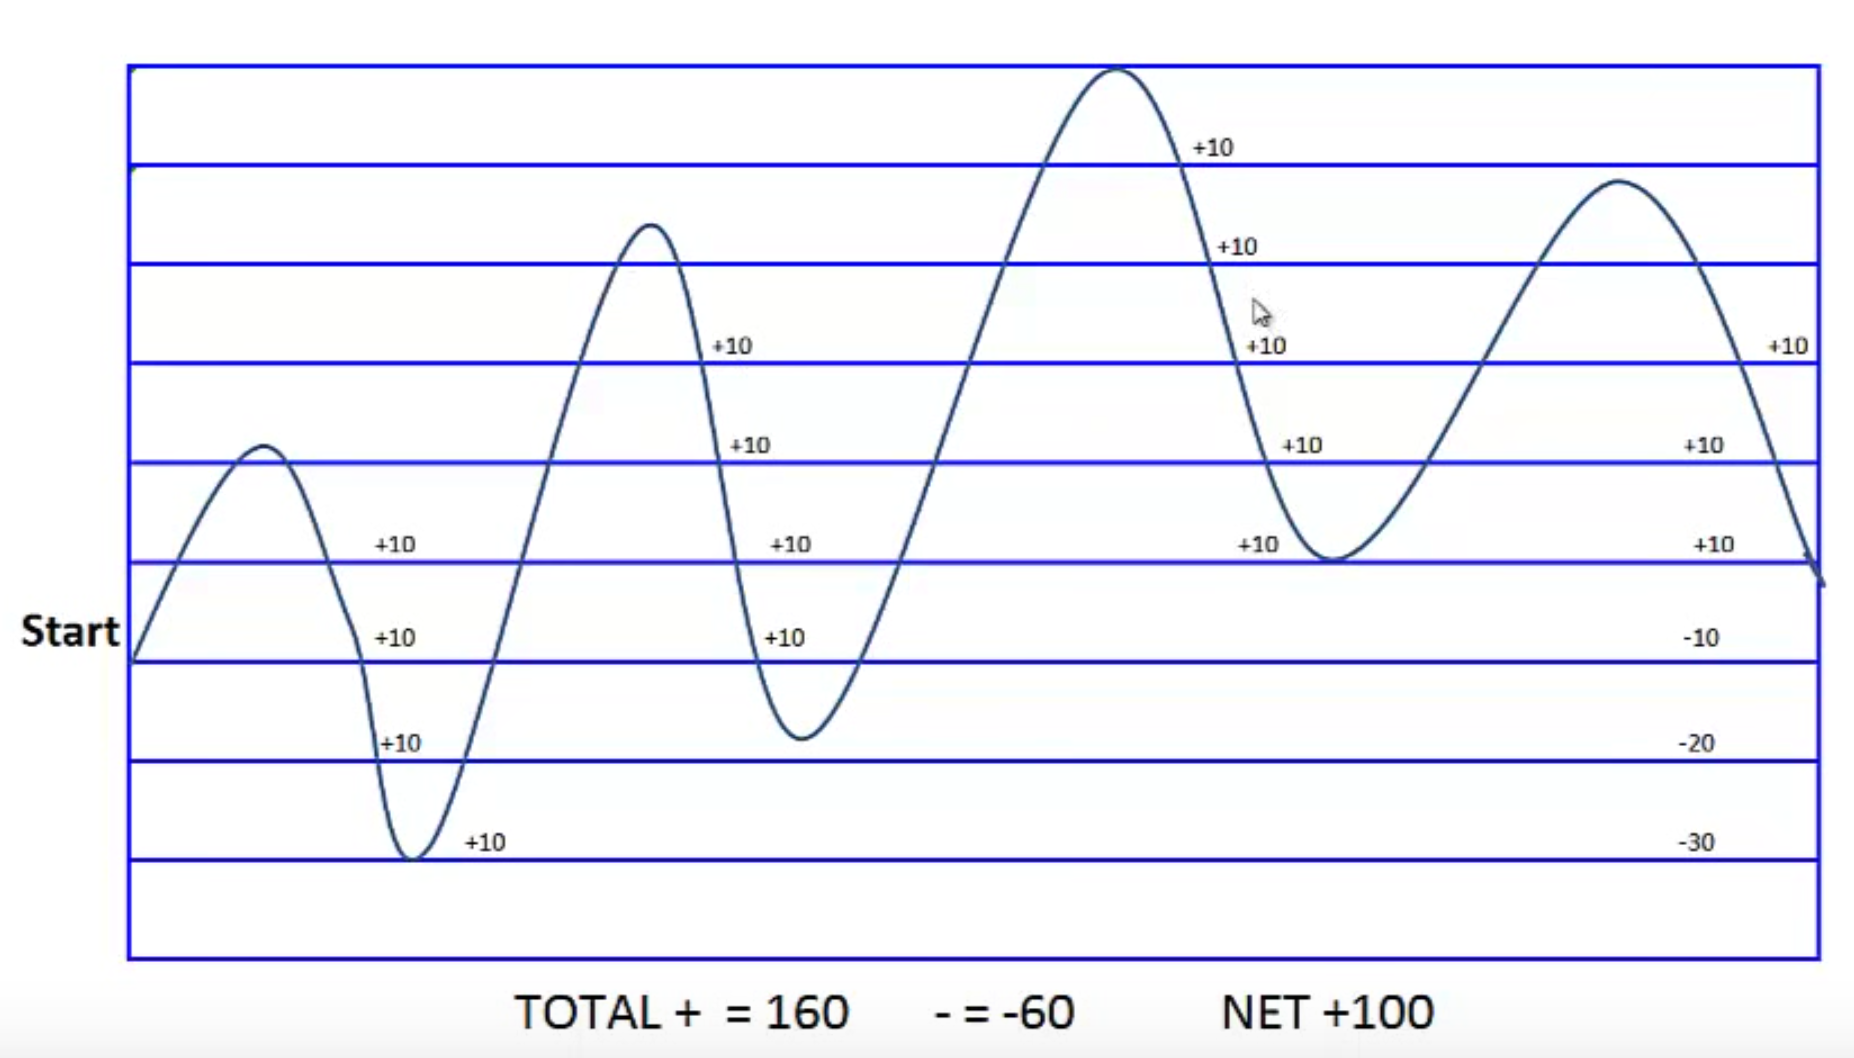
In the above example, you can see the result of a single-directional grid. This is, a grid which trades only in one direction. In real trading, you can have two active grids, a buy grid and a short grid. This is known as bidirectional grid trading.
6. Bidirectional Grids
A bidirectional grid simply means that you have two active grids in the chart, one performing buy orders and another performing sell orders. For the sake of convenience we use a singular name to describe it, but never forget that a bidirectional grid are actually two independent grids, which can trade with completely different settings.
A bidirectional grid allows you to profit from fluctuations, without the need of absolute price movement in the market. Each grid will have its own settings. You will almost never have the same spacing or amount of trades for both buy and sell grids, because the price anchor for both grids will be different -more on this later-.
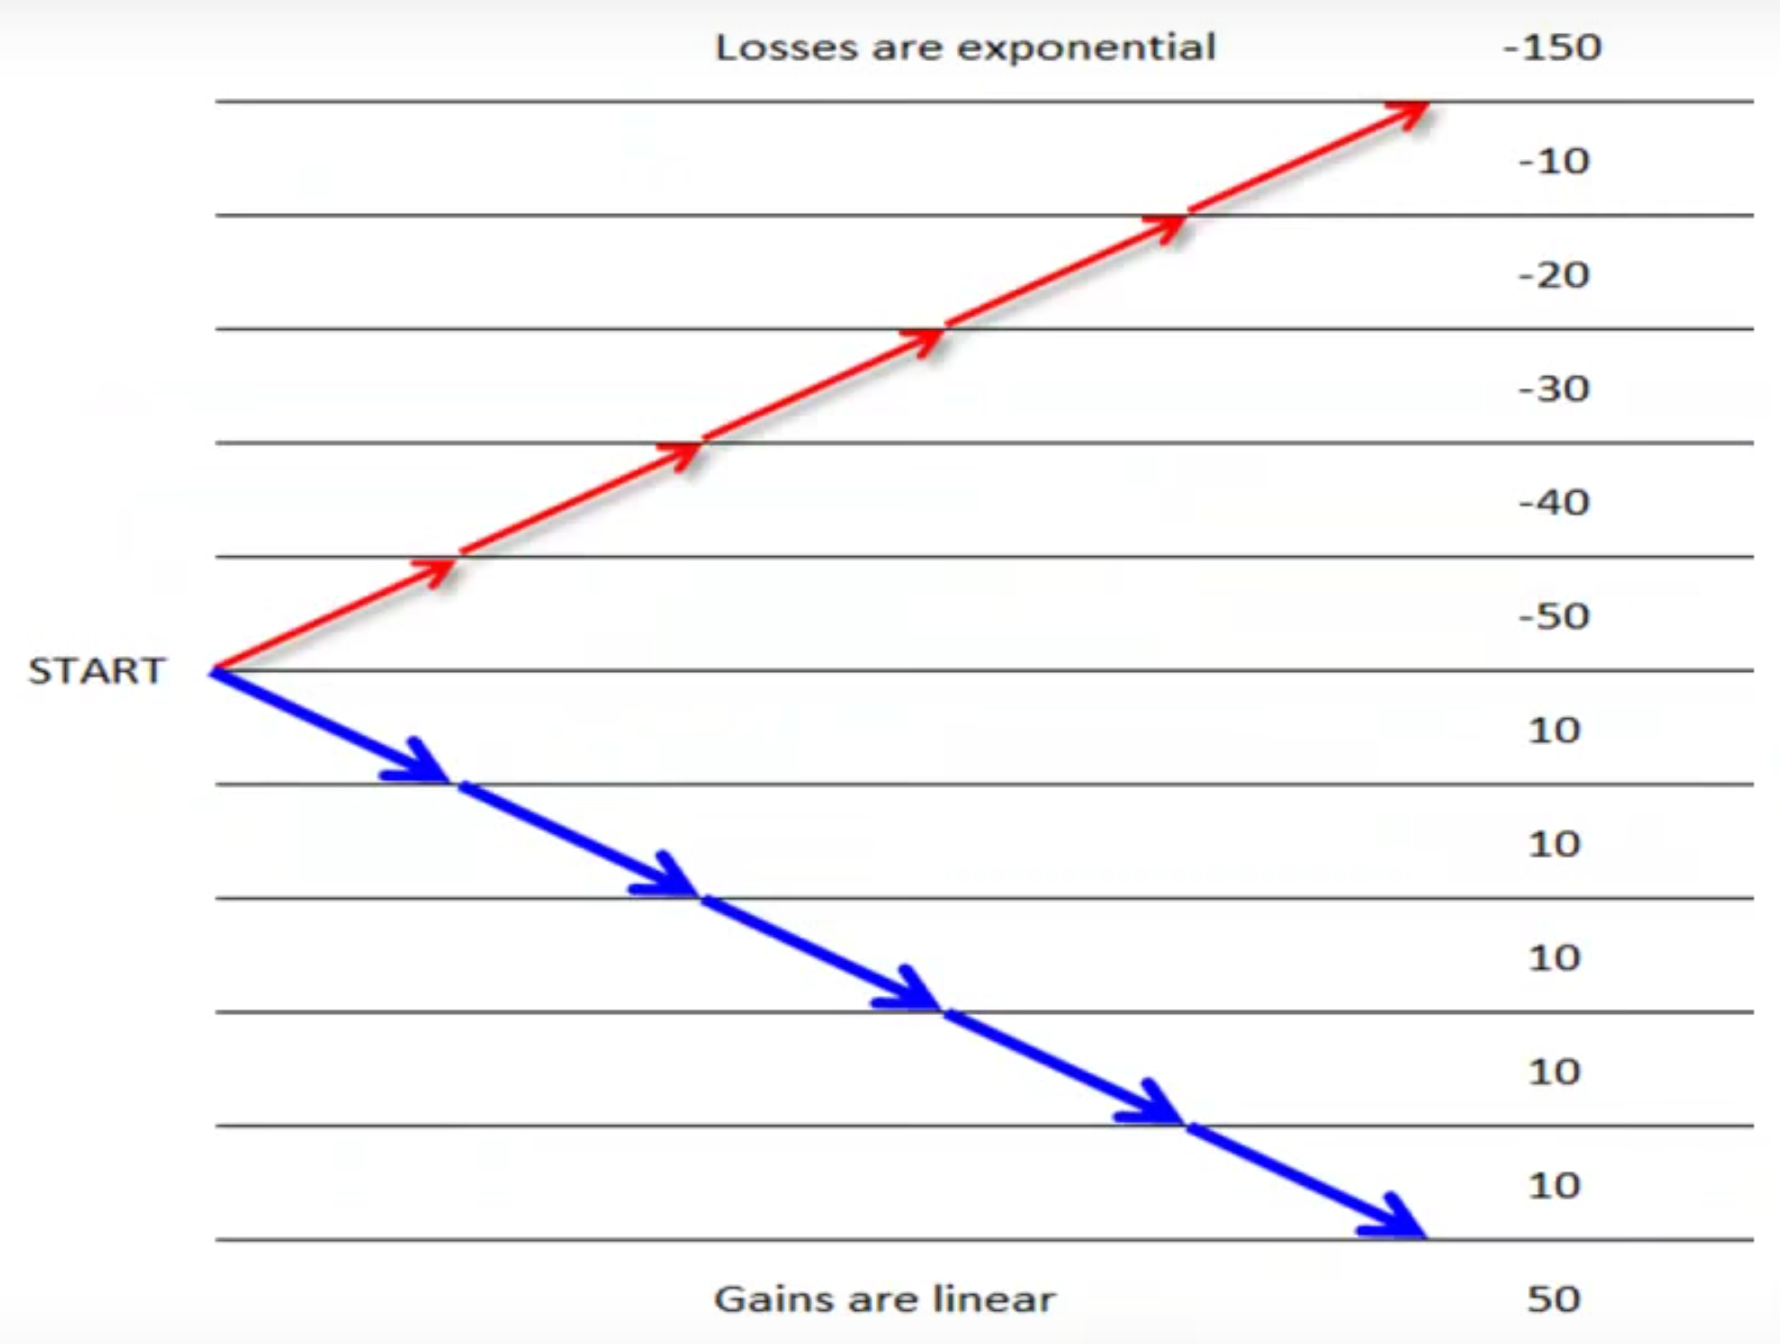
The beauty of bidirectional grid lies in the cash-in frequency and the compensating effect. As one grid expands into a negative floating point, the opposite grid is cashing profits and placing new trades which partially compensates the losses of the first grid. However, the compensating effect is partial, because as trades pile up losses are exponential, while gains are linear. This is why it is very important to limit the grid size in trades and exposure, and to calculate the total possible loss in balance terms before a single trade is even placed.
The more wavy and volatile the price movement is, the higher is the compensation effect, as more trades are cashed-in before the negative grid goes off-range. It the market fluctuates enough and you are using a higher phase parameter for the positive grid, the compensation can be complete. More on this later. That being said, most of the time you'll be trading single directional grids.
7. The 100% retracement example
For the sake of demonstration, let's assume we are running a bidirectional grid of 200 pips spacing, and the market moves up and down 200 pips. As you can see below, without any actual market movement, we can make a nice +200 pip profit.
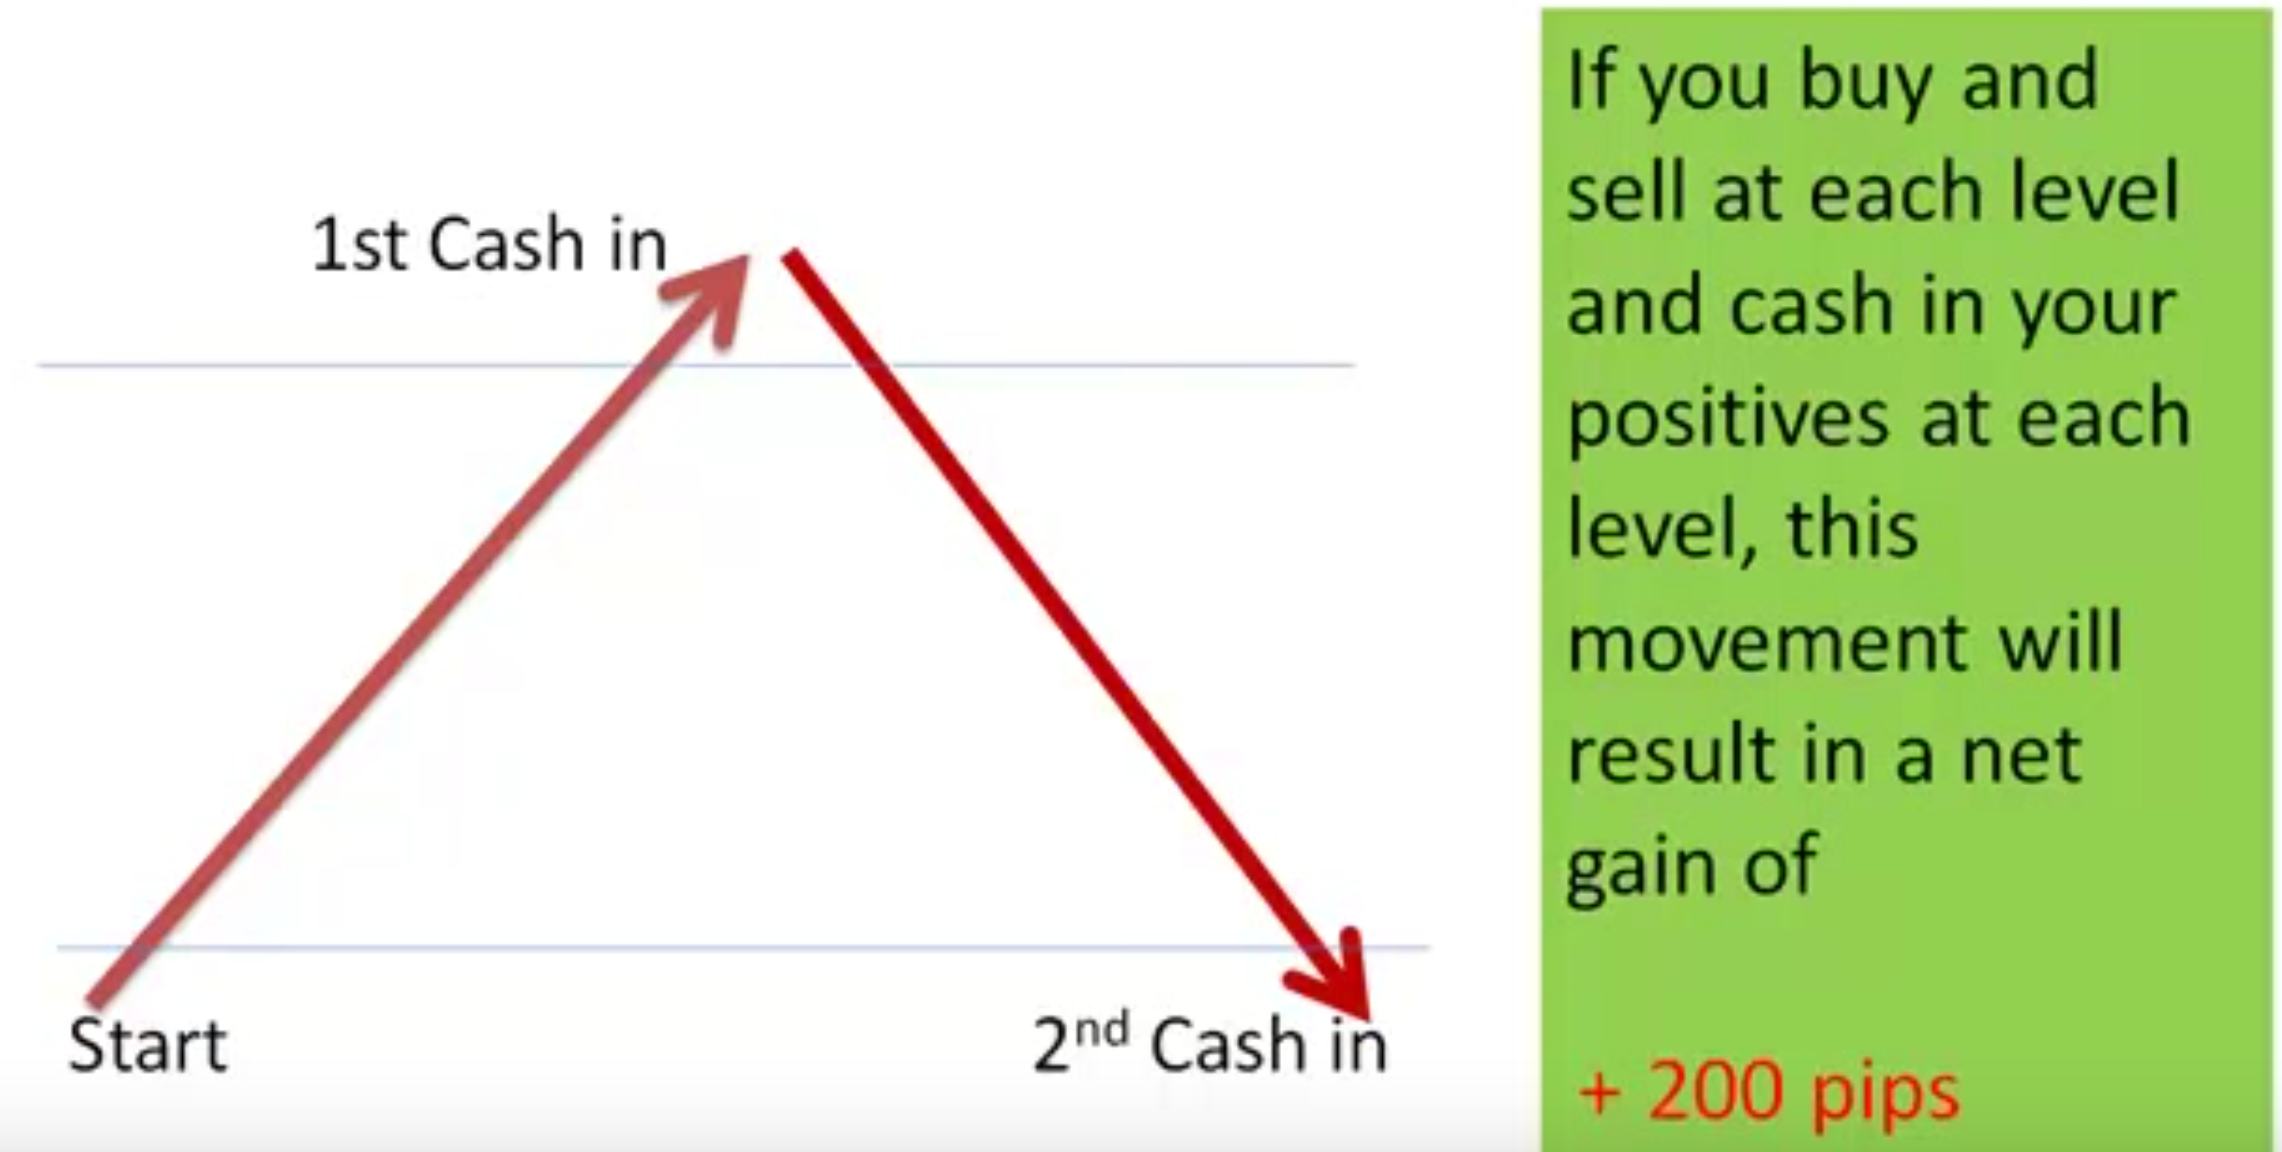
Don't worry if you don't understand the above example. Let's break it down in baby steps.
-
At the start line, the EA buys and sells simultaneously
-
At the first line:
- The 1st buy trade is cashed-in with +200 pip profit
- The 1st sell trade has -200 pip floating point
- A 2nd buy trade is entered
- A 2nd sell trade is entered
-
Then, the market retraces back to the start line
- The 2nd sell trade is closed with +200pip profit
- The 2nd buy trade has -200 pip floating point
- The 1st sell trade is neutral
So, if we liquidate this bidirectional grid right now, our overall profit will be +200 pips.
8. The 50% retracement example
Let's look at another and more complex example, in which the market rallies and later retraces 50%, allowing us to book a profit. As usual, we are trading bidirectionally with a spacing of 200 pips.
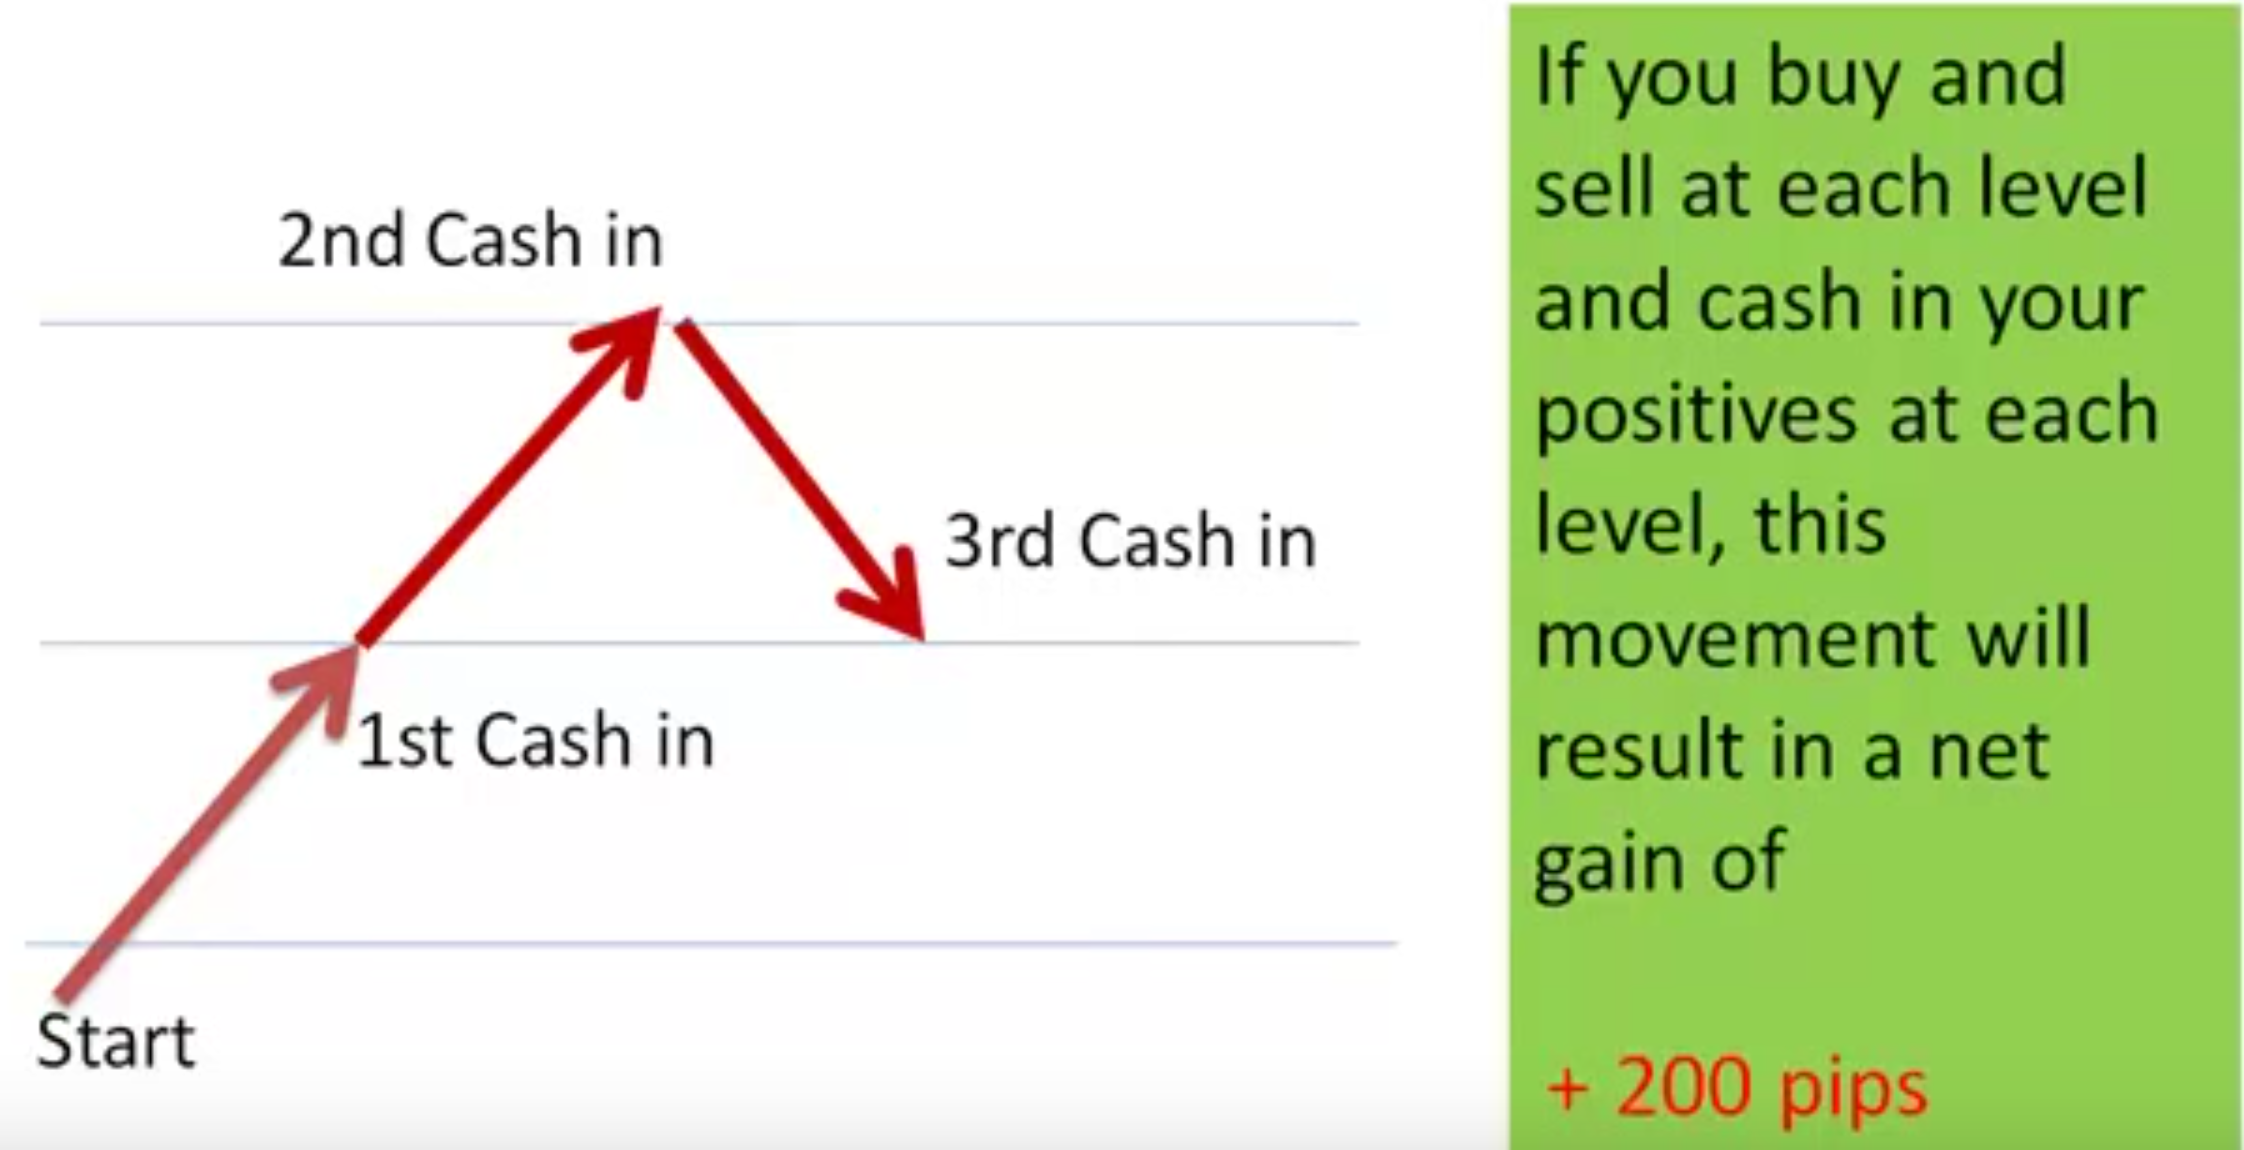
Again, we made 200 pips! How is this possible trading both sides? Let's break it down:
-
At the start line, the EA buys and sells simultaneously
-
At the first line:
- The 1st buy trade is cashed-in with +200 pip profit
- The 1st sell trade has -200 pip floating point
- A 2nd buy trade is entered
- A 2nd sell trade is entered
-
At the second line:
- The 2nd buy is cashed-in with +200pip profit
- The 1st sell is -400 pip floating point
- The 2nd sell is -200 pip floating point
- A 3rd buy trade is entered
- A 3rd sell trade is entered
-
The market retraces 50% to the first line:
- The 3rd sell trade is cashed-in with +200 pip profit
- The 3rd buy is -200 pip floating point
- The 1st sell is -200 pip floating point
- The 2nd sell is neutral
So, if we liquidate this bidirectional grid now, we will have gained +200 pips. Why? Because we cashed in +600 pips and we
have -400 pips floating point from the remaining open trades. The profits of a grid are always calculated by adding all the already cashed-in
trades minus the current floating point.
9. The break-even example
In the following example, we won't be booking a profit, but instead closing the grids at break-even, without any loss or gain. In this particular example, the price will move three levels away from us and retrace one.
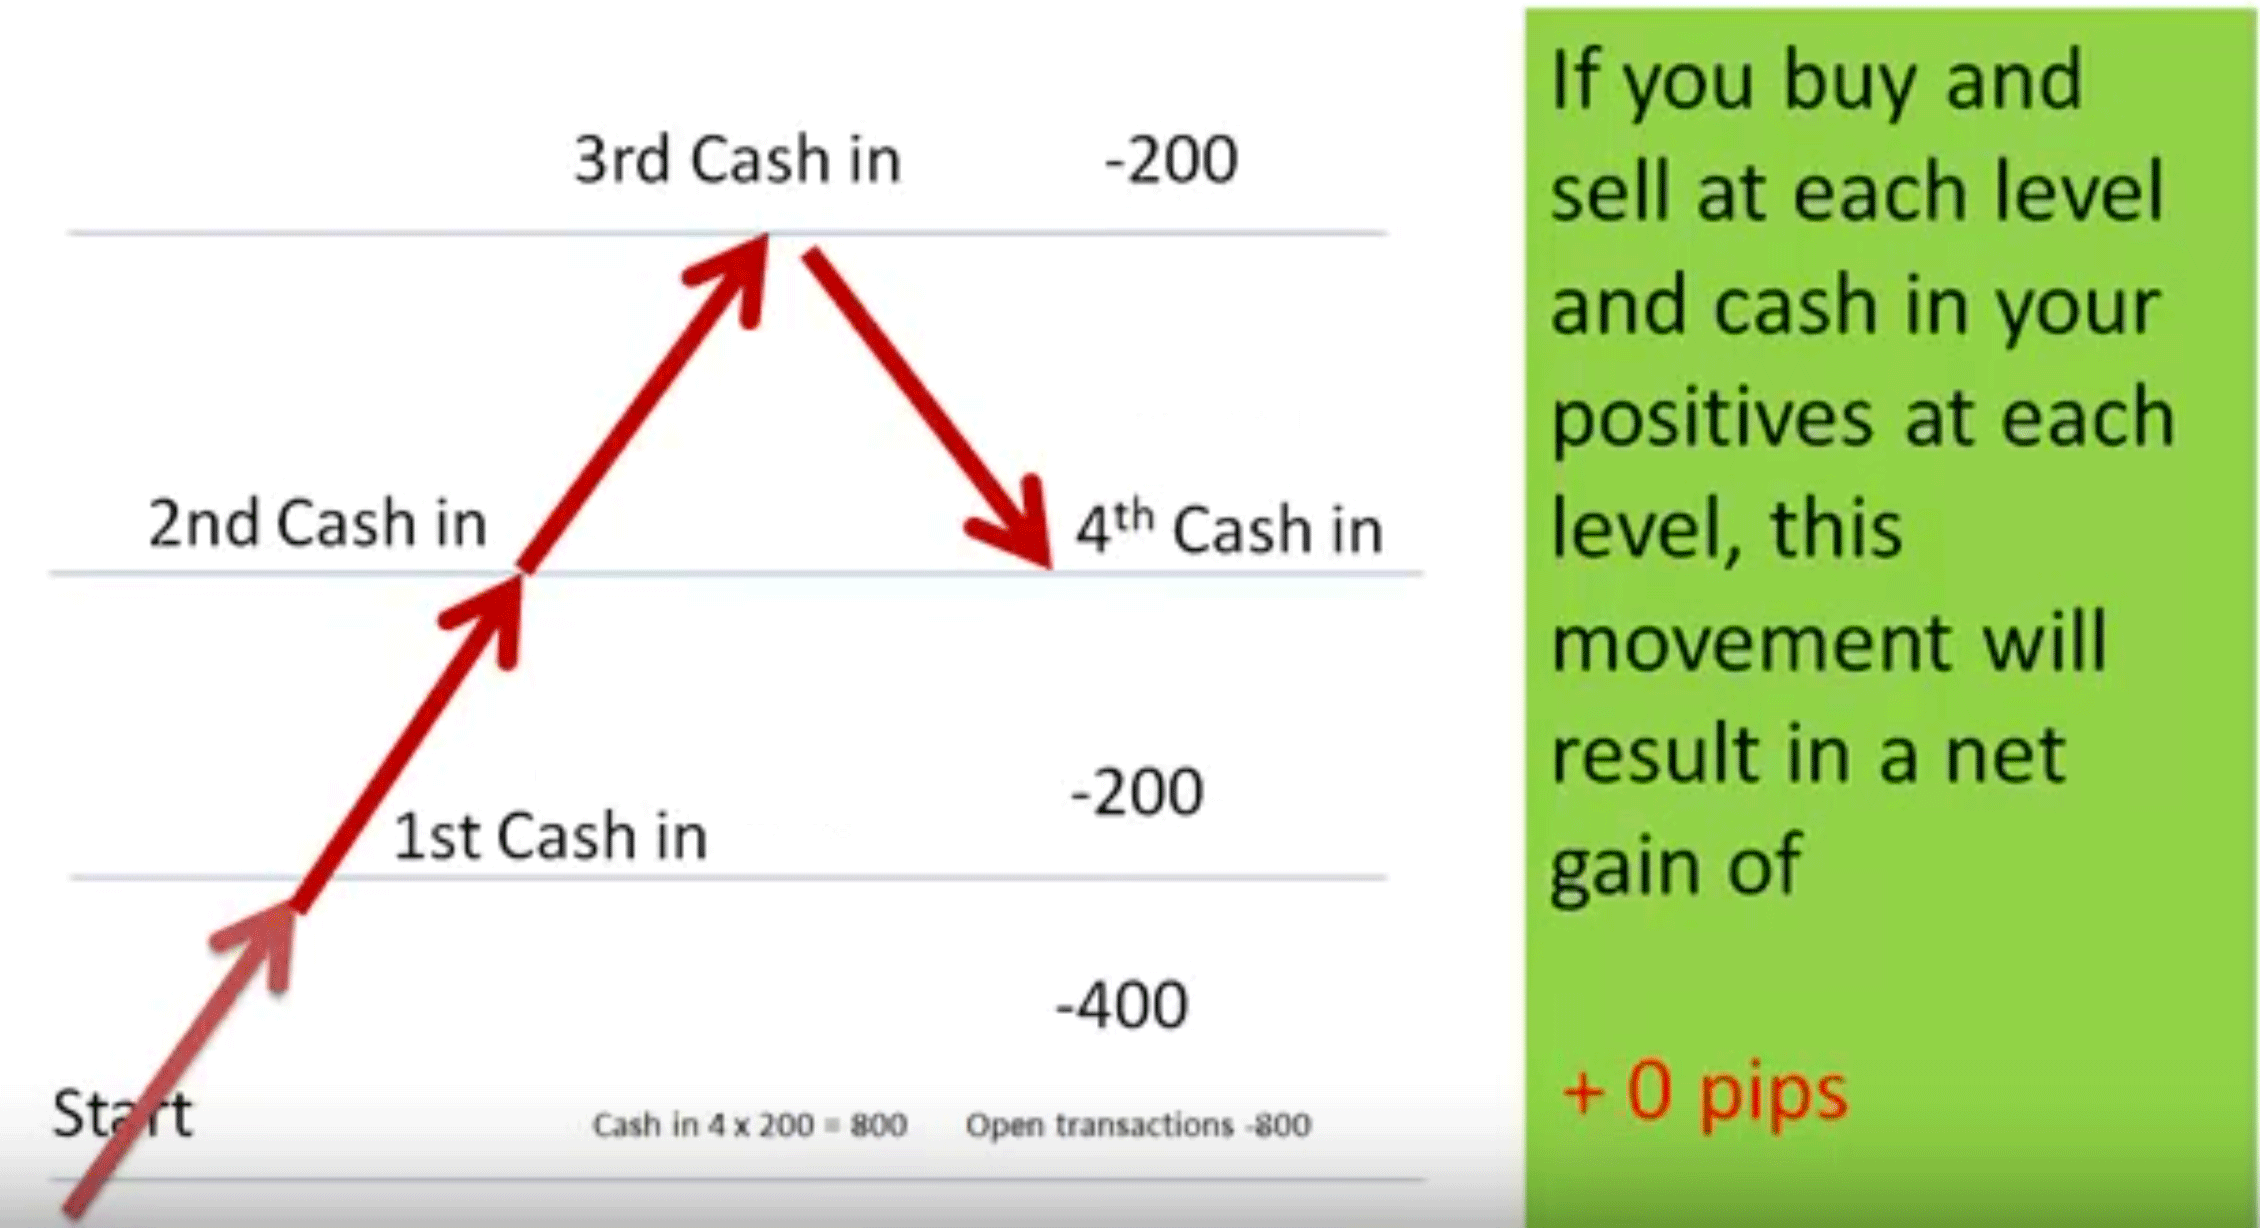
During live trading, you would probably not close the grid at this particular point unless your grid is poorly designed and represents a substantial risk if the market keeps moving up. But for the sake of understanding, lets just close the grids and break down what happened in between.
-
At the start line, the EA buys and sells simultaneously
-
At the first line:
- The 1st buy trade is cashed-in with +200 pip profit
- The 1st sell trade has -200 pip floating point
- A 2nd buy trade is entered
- A 2nd sell trade is entered
-
At the second line:
- The 2nd buy is cashed-in with +200 pip profit
- The 1st sell is -400 pip floating point
- The 2nd sell is -200 pip floating point
- A 3rd buy trade is entered
- A 3rd sell trade is entered
-
At the third line:
- The 3rd buy is cashed-in with +200 pip profit
- The 1st sell is -600 pip floating point
- The 2nd sell is -400 pip floating point
- The 3rd sell is -200 pip floating point
- A 4th buy trade is entered
- A 4th sell trade is entered
-
The market retraces 33% to the seecond line:
- The 4th sell trade is cashed-in with +200 pip profit
- The 4th buy trade is -200 pip floating point
- The 1st sell is -400 pip floating point
- The 2nd sell is -200 pip floating point
- The 3rd sell is neutral
So, now, if we want to, we can liquidate this bidirectional grid without any losses to our account. Many developers sell recovery EAs using the
principle outlined above.
There are many other market movements which will yield easy profits to our account if you are trading bidirectional grids with exactly the same spacing, two of which are illustrated below.

But, as explained earlier. You will almost never trade a bidirectional grid with the same settings because the price anchor for both grids will be different, so you will need a different spacing and grid size for each trading direction. I've mentioned the price anchor several times, but don't despair, we'll cover the price anchor later.
10. Your first trading grid
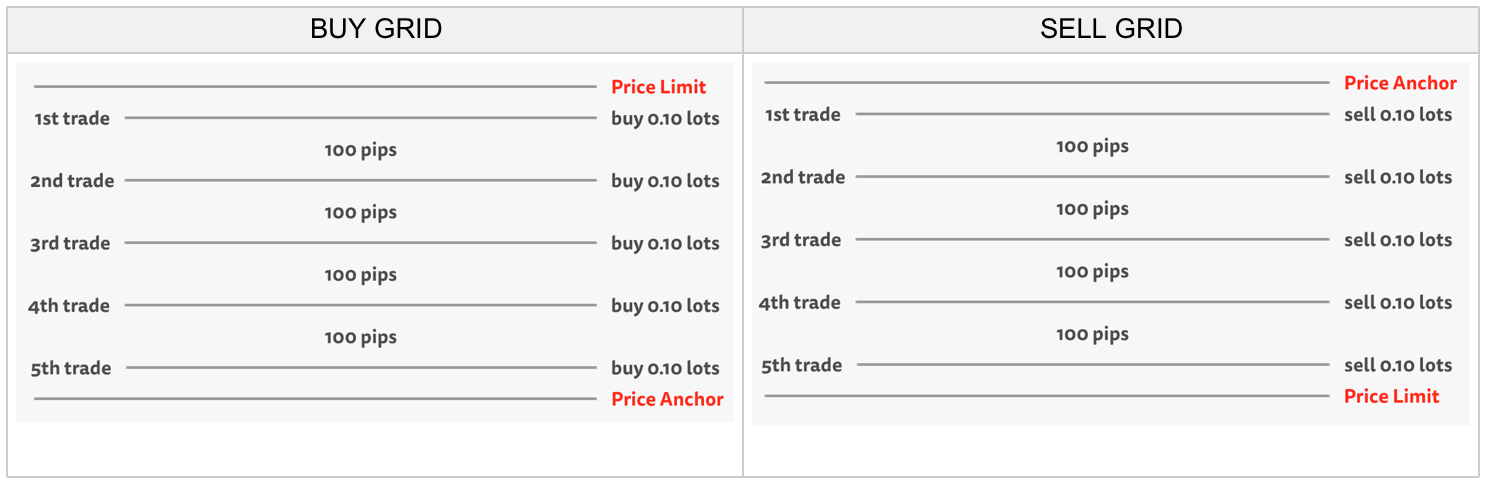
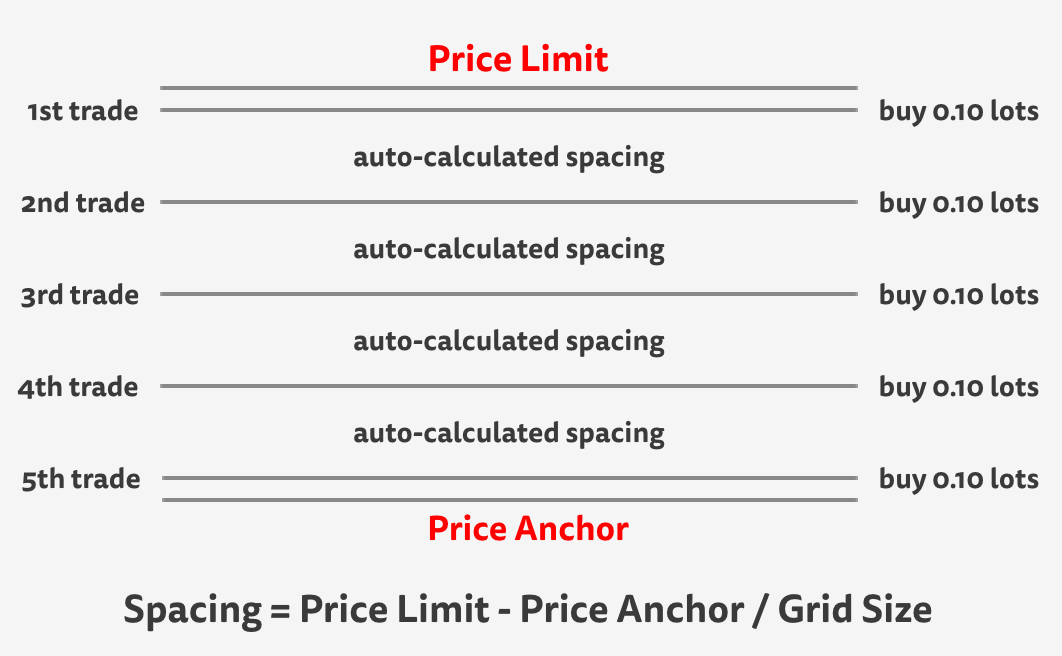
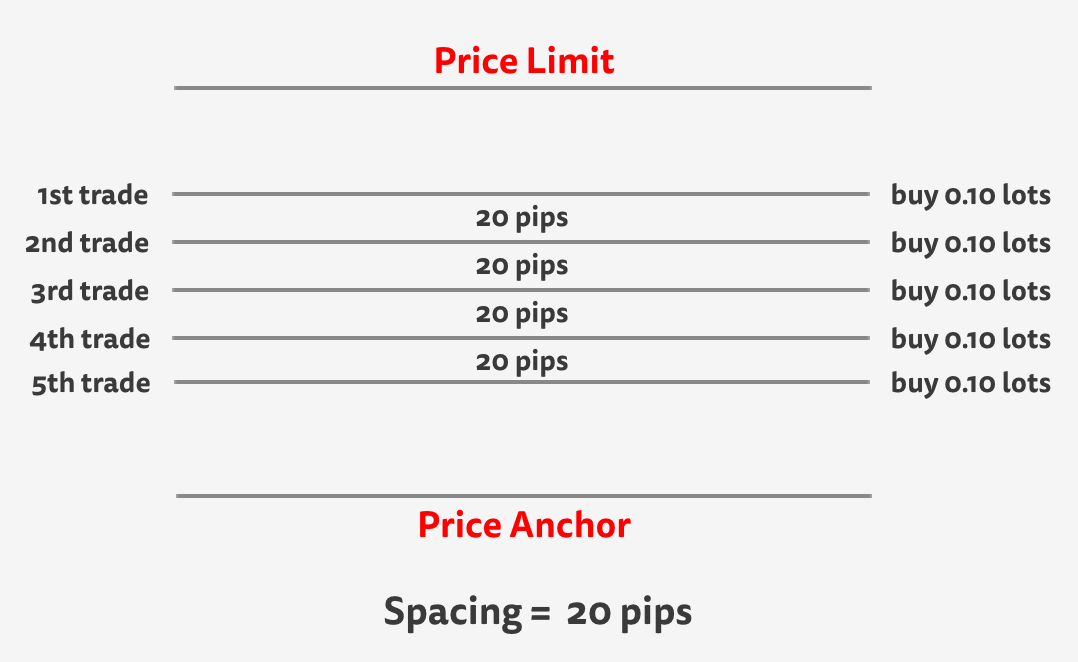
The simplest of grids is defined by the following parameters or attributes.
-
Direction - A grid can place buy order or sell orders. Your choice.
-
Size - The grid size is the amount of trades in the grid.
-
Spacing - The spacing is the distance between orders and the profit target for each trade.
-
Lot size - This is the lot size for each trade in the grid.
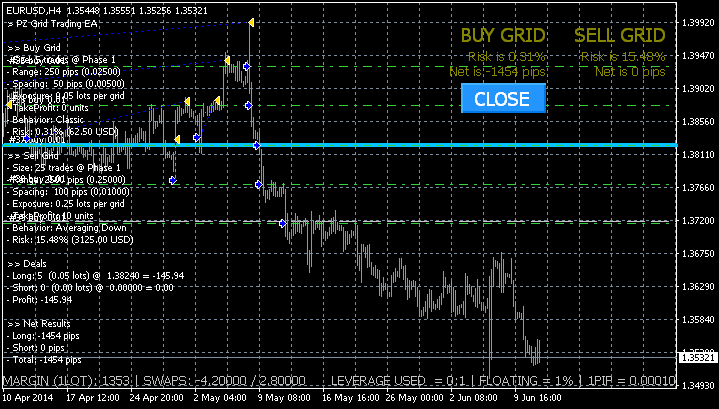
The illustration below illustrates the basic properties of a grid.
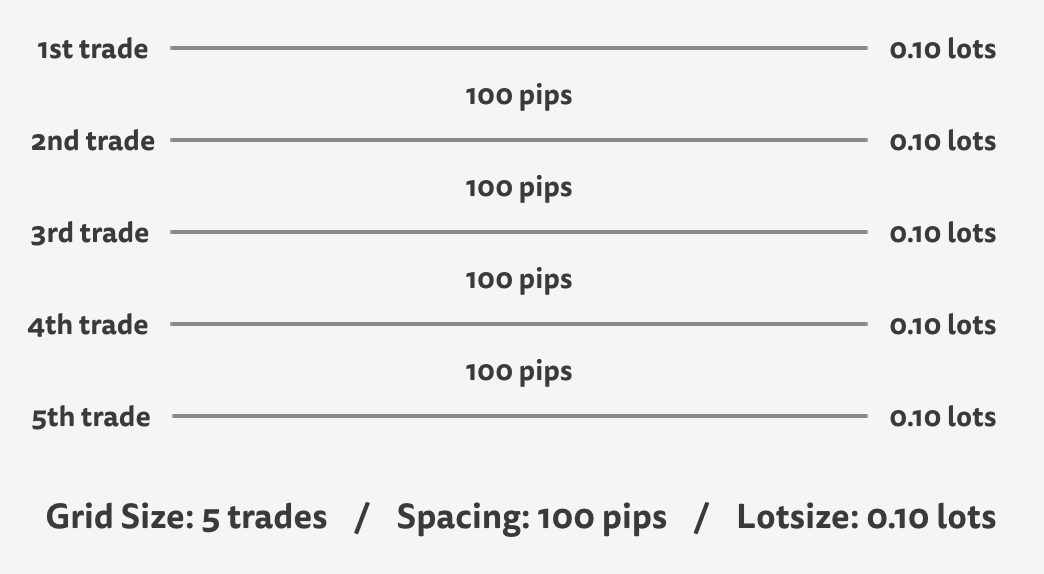
If we set a grid of 5 trades, 100 pip spacing and 0.10 lots per trade, the above trading grid is exactly what we'll get on the
chart once the EA is trading and fully allocated. So, now that we are here, lets do it. If you notice, the input parameters of the EA match
exactly the properties described above.
Enter the above settings and load the EA to the chart. If you did it properly, the EA will buy and sell at the same time. Perfect. So, what do we have here? We have a bidirectional grid of 5 trades, 100 pip spacing and 0.10 lot size for each trade. I am sure you are asking yourself what are those numbers displayed on the chart comment, right?
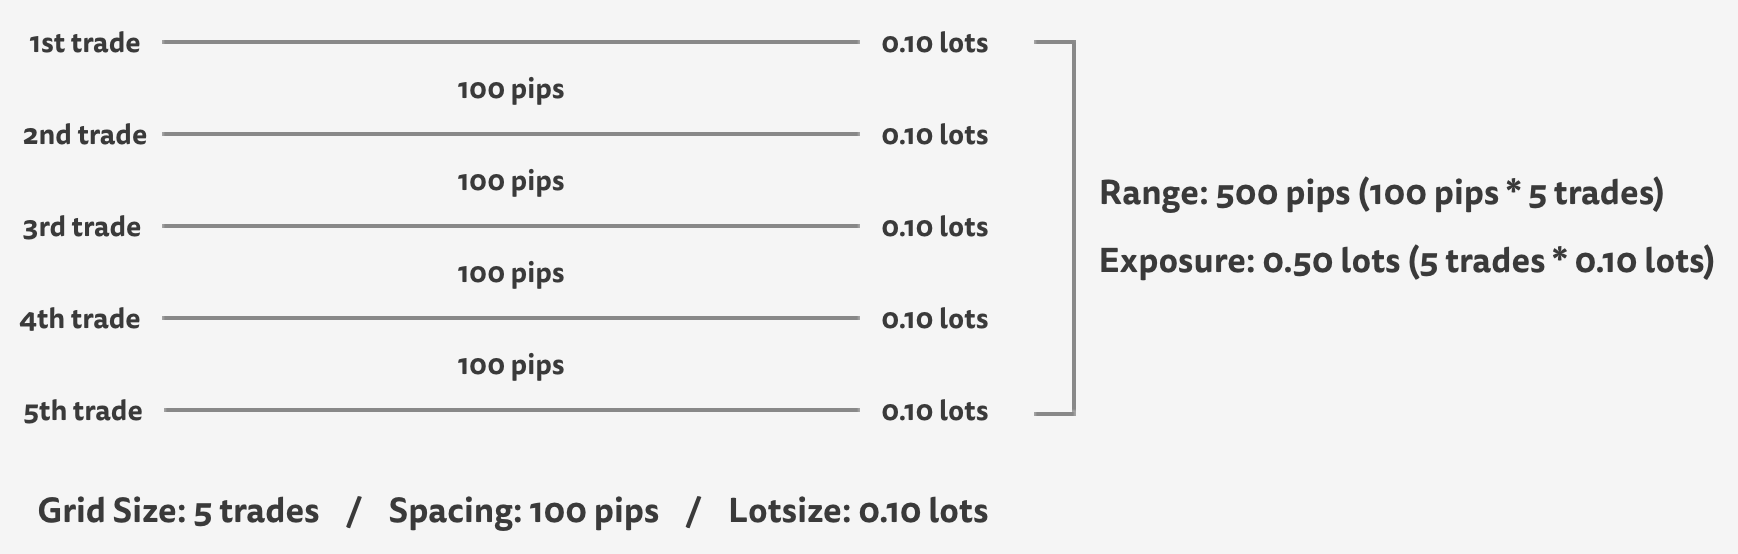
So far we know that a basic grid is defined by trading direction, size, spacing and lot size. These are the parameters you actively decide. But grids have more properties, which derive from your inputs, and are just as important.
-
Range: The grid range is the price distance covered in total by the grid, if all trades are allocated. For example, a grid of 5 trades with a spacing of 100 pips covers a range of 500 pips (100 * 5 = 500 pips).
-
Exposure: The grid exposure is the theoretical total market exposure acquired if the grid is fully allocated. For example, 5 trades of 0,10 lots represent a total exposure of 0,50 lots.
-
Risk: The risk is the drawdown the account can suffer if the grid is fully allocated and the market goes out of range. In the above example, if the market moves more than 500 pips above or below your grid range. The risk is calculated by the EA for you and displayed on the chart.
As you probably guessed, running a bidirectional grid is not always the best decision. You have to select the trading direction
according to what the market is doing.
If the market is during an uptrend or at strong support levels, you should start a long grid. Likewise, if the market is during a downtrend or at strong resistance levels, you should start a short grid. A bidirectional grid only makes sense if both market directions seem feasible at the time.
Trading grids based on trends is quite easy because timing is not involved. You can pick a trading direction and literally be wrong a thousand pips or more before you need to worry. Think of it not as a prediction of market direction, but a prediction of where it won't go.
Make sure not to trade a grid in a direction with huge swap costs. Try to earn swaps while grid trading.
Swap costs are displayed at the bottom of the chart.

Most of the time you will be trading single-directional grids. Or you should!
11. Which is the risk of my grid?
Trading grids is perfectly safe if risks are properly pre-calculated and assessed. Before the release of my Grid Trading EAs, traders had to calculate the risk of their grids manually by calculating the grid range, the average price of the grid -if fully allocated- and the pip value in account currency.
Of course, most people neglected to do such thing and got into a lot of trouble. That is why grid trading has such a bad name and is regarded as risky. But grid trading is not risky, being a bad trader is.

Luckily for us mortals, my EAs calculate the balance risk of each grid separately and displays it on the top-right corner chart. In the example above, the grid has a 35.83% risk. What does it mean? It means that if the grid is completely allocated and all trades closed, the loss will be 35.83% of your current account balance. As the EA cashes-in trades and your balance grows, this number will become smaller.
You don't have to worry about the aggregated risk between the buy and sell grids, because only one of them can be fully allocated at any given time. If the buy grid is fully allocated, the sell grid will be cashing-in profits like a machine gun, and the other way around.
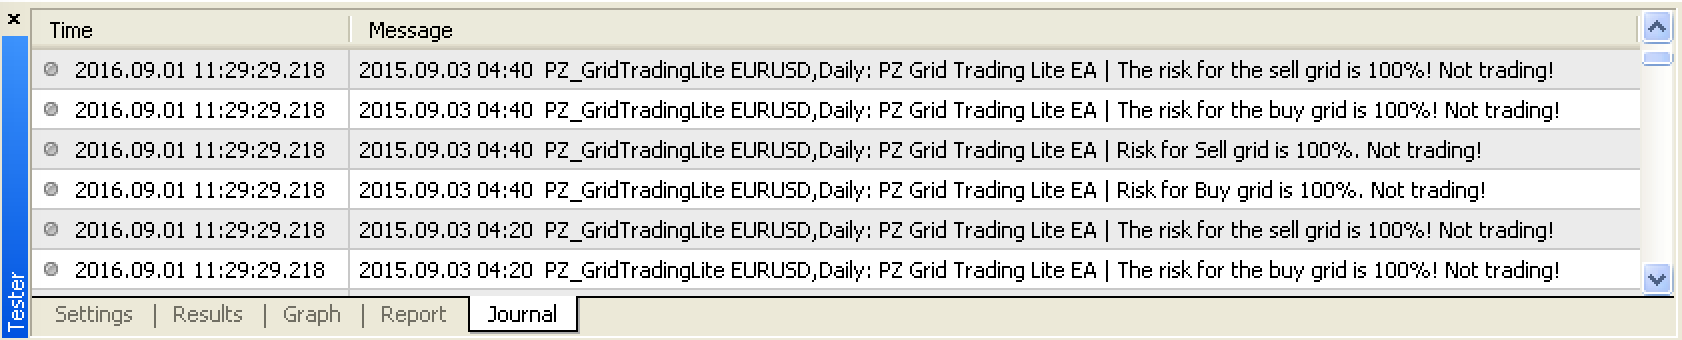
The EA has a built-in safety mechanism to protect users from themselves: it won't trade if the risk is more than 50% of your account balance. This also protects my reputation, as many users would blame me after busting their accounts. God knows I received some of this complaints already. The EA calculates the risk and categorizes it as safe, aggressive or dangerous.
-
A risk between 1% and 24% is a safe grid
-
A risk between 25% and 49% is an aggressive grid
-
A risk over 50% is a dangerous grid, and the EA won't trade.
To decrease the risk of the grid, you have to edit the grid settings to make it safer. This can be achieved by decreasing the exposure of the grid, by decreasing the spacing or by decreasing the amount of trades. The first parameter you should change is always the lot size, as decreasing the price range covered by the EA is less desirable.
Once the grid no longer poses a risk to your account, the EA will trade. By the way, this precaution is ignored in the tester to facilitate
backtesting. The EA can bust your account in the tester, but it won't in live trading.
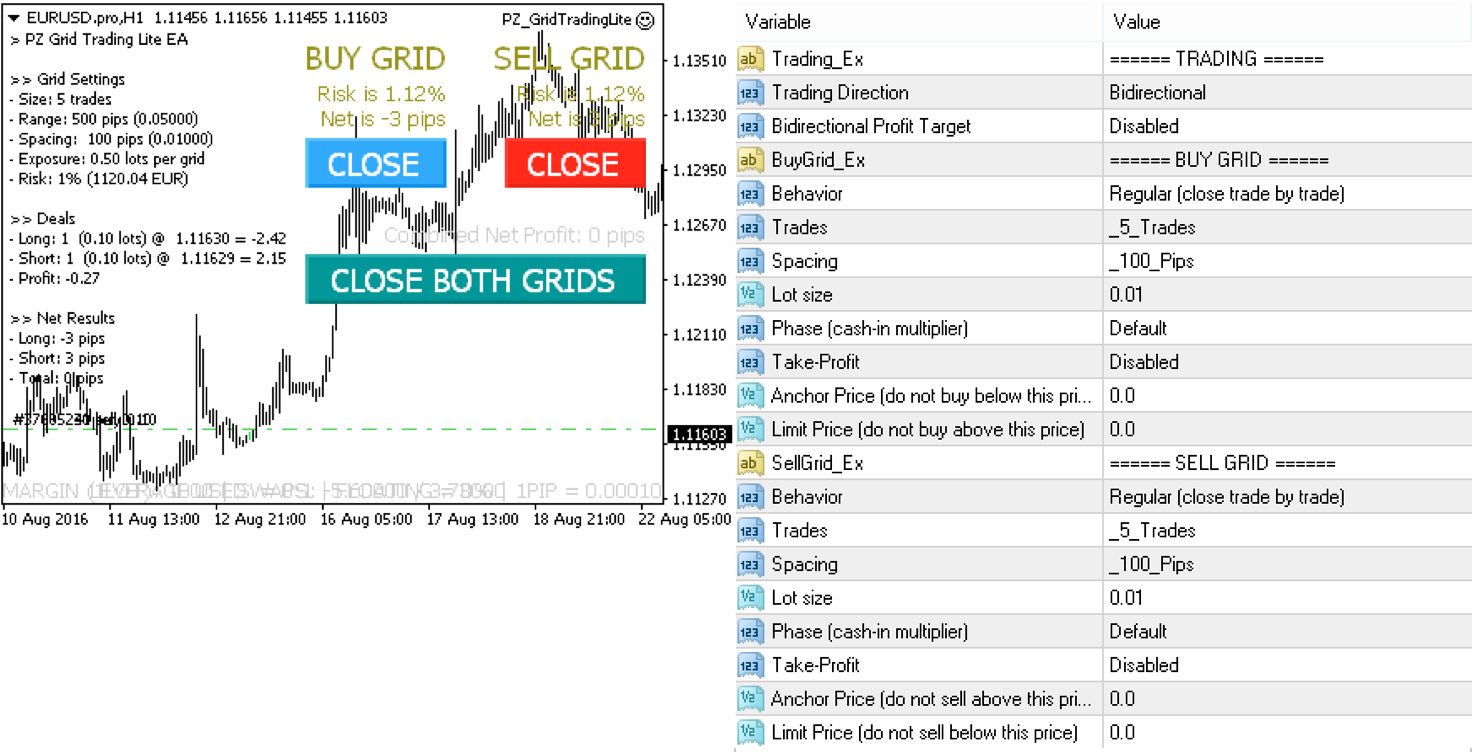
12. How do I close the grid?
So far you've learned what a grid is and its basic anatomy, and now you have the EA placing grid trades on your chart. Fantastic. Now you are going to learn how to close grids using the buttons located at the top-right corner of the chart.
-
To close the buy grid, click on the blue close button
-
To close the sell grid, click on the red close button
-
To close both grids, click on the green close button.
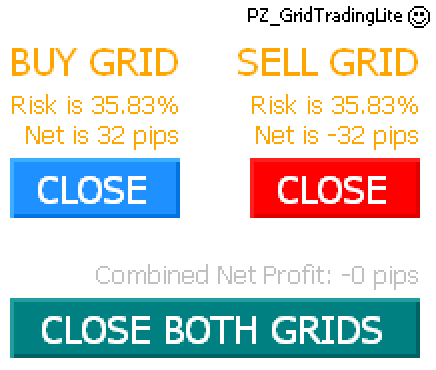
You can close the grid manually at any given time by clicking on those buttons. If you do, the floating point will be completely liquidated. To help you make this decision, the EA displays the net profit in pips for each grid separately, as well as combined.
The combined net profit only makes sense if both grids are trading with exactly the same lot size, which will almost always be the case. If the buy and sell grids are trading with different lot sizes, the pip gain or loss will be irrelevant to make decisions and you'll have to use your best judgement. The total profit or loss in account currency is displayed on the chart comment as well.
In some situations, you won't want to take losses in the current grid, but you'd like it to liquidate and stop further trading as soon as possible. For example, if you were riding an uptrend with a long grid for the past few months and the market just turned into a down trend, you might want to start a short grid and close the buy grid as soon as possible, without assuming losses. In that case, you only have to select “Short” in the Trading Direction parameter of the EA. This will cause the EA to keep trading in both directions, until the buy grid is liquidated. Then it won't execute buy orders any more and the EA will continue the short grid only.
The same behavior applies if you select “None” in the Trading Direction parameter of the EA. If there are trades opened, the EA will keep trading until the grid is closed, or until you close it. But it will stop there, without opening further orders.
Other option is, when you want to liquidate a grid, you can set a small profit target for it and it will be closed at a net profit as soon as possible. Other option is to change the trading behavior to one that favors a fast liquidation. More on this later.
13. Stepping over the edge
I know what you have been thinking all this time. It's all good but what happens if the market trends strongly and executes all my grid trades? So let's assume it happened and get into the issue. Firstly, your negative floating point will be roughly the pre-calculated risk for the grid. Your account is not busted and you are not in a margin call. You have a negative floating point.
The above illustration depicts a long grid of 5 trades that went off-range. What now? The can manage off-range grids using different approaches. You can decide what to do handle off-range grids using the Behavior parameter of the EA. You can set a different behavior for each grid direction, which makes a lot of sense if you think about it. First, only one grid direction can go out at the same time, and secondly, depending the situation of the market you might want a different behavior for each side.

The default behavior of the EA with an off-range grid is to start cutting exposure. It consists in closing the oldest trade of the grid, which
has the open price further from the current price. It takes a partial loss and allows the grid range to move one spacing in the direction of the
market. To achieve this behavior, select “Regular” in the Behavior parameter of the EA. This is the recommended behavior to select and it'll
be safe inasmuch as your grid range covers a wide price range.
If you have an active grid and the market starts to look ugly, you can intervene right away and prevent the exposure from increasing before the grid goes off-range. The obvious option is to decrease the grid size on the fly, but there are other two available behaviors which can help you to achieve this:
-
Average down the grid: Averaging means to treat the grid trades as a single trade located at the average price of all the existing trades. If you select “Averaging” from the Behavior parameter, the EA will wait until the market reaches the average price of the deal, and close it completely at zero loss or profit.
-
Pause the grid: Pausing the grid prevents the grid from expanding: no more trades will be added. If you select “Paused” from the Behavior parameter, the EA won't place any more trades. It will still cash-in trades given the opportunity, but it won't start new ones.
During your trading career, several grids will go out of range and it is not a pleasant experience. However, a well designed grid is very unlikely to go off range.
14. How to prevent a grid from going off range
A well designed grid is a safe grid: a grid that allows for a bucket-load of profits before it goes out of range, if it ever does. Creating a grid does not mean to pick a trading direction and start firing trades like mad pirate. You must design your grid in such a way that the chances of going off-range are small. There are three different ways to prevent a grid from going out of range, which can be combined -or not- as desired.
-
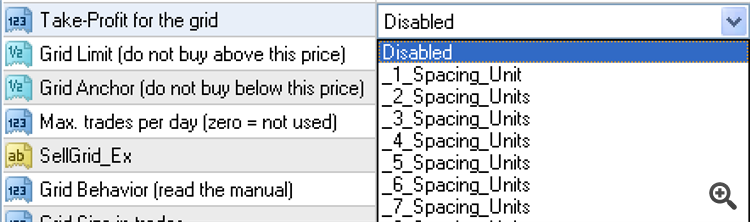
Using the take-profit option: Selecting a value from the take-profit parameter sets a profit target for the grid, measured in spacing units. The profit is calculated by adding all the profitable closed trades from the start of the grid, minus the current floating point.As soon as the profit target is achieved and a net gain is realized, all trades are closed and the process starts again. This prevents the grid from expanding by resetting regularly, making sure that the amount of trades in the grid remains small. Using this option is a good idea if you are entering grids based on trends, or if you are trading grids with a very narrow spacing between trades, far away from suitable supports and resistances to hold the deal together.
-
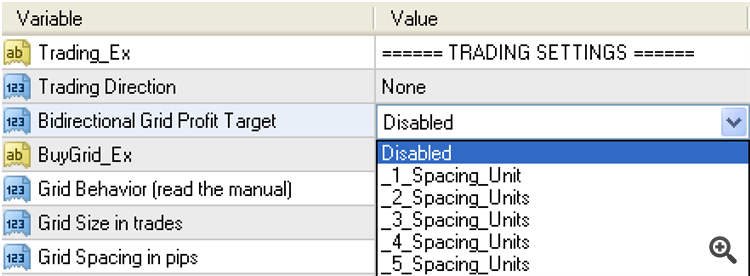
Using the bidirectional take profit option: The EA also implements a bidirectional take profit, which closes the buy and the sell grid simultaneously when a profit target is reached between the two. Similar to the explained above, this option can be used if you run a bidirectional grid. This option is not enabled by default and should be used if your perception of the market changed and your goal is to liquidate both grids and exit the market.
- Using price anchors: A price anchor is a technical or fundamental price which is likely to hold in the long term. For
example, the mining cost of an ounce of gold is 800$, which means that as long as your grid range covers until that price -or almost-, you
are trading safely. The same basic concept applies to some currency pairs. For example, it is very unlikely for EURUSD to fall below
parity (1EUR = 1USD). In absence of fundamental prices like this, you can use strong support or resistance levels as anchors.
If you locate a price anchor in the chart, be sure to insert the value into the Price Anchor parameter of the EA. Don't worry much about why for now, just know that the EA will never trade beyond the price anchor. Long grids have the price anchor below the trading activity, and short grids have the price anchor above the trading activity. You can think of it as building a long grid on top of an anchor, and hanging a short grid from the anchor. - Using price limits: A price limit is a trading boundary for the trading activity. It prevents the EA from buying when the
underlying is expensive or overpriced, or from selling when the underlying is cheap or oversold. For example, you might want to start a
sell grid for EURUSD because of the current trend, but adding short trades below 1.12250 seems like an historical bad bet. So, you would
type this value into the Price Limit parameter of the short grid.
Long grids have the price limit above the trading activity, and short grids have the price limit below the trading activity. You can think of it as a boundary or a frontier for the trades, preventing orders to fall into a dangerous territory.

15. Introducing positional grids
There is other cool feature of limits and anchors! They can be used to trade in the future if the market moves into our desired levels. For example, at the time of writing, the price of Wti Crude Oil is 44$ per barrel, a price I am not willing to trade at. But I can configure a long grid that starts trading as soon as the price of oil falls below 40$ per barrel: all I have to do is setting a price limit of 40 and enabling a long grid. Think of it as a buy limit order, but to start a long grid.
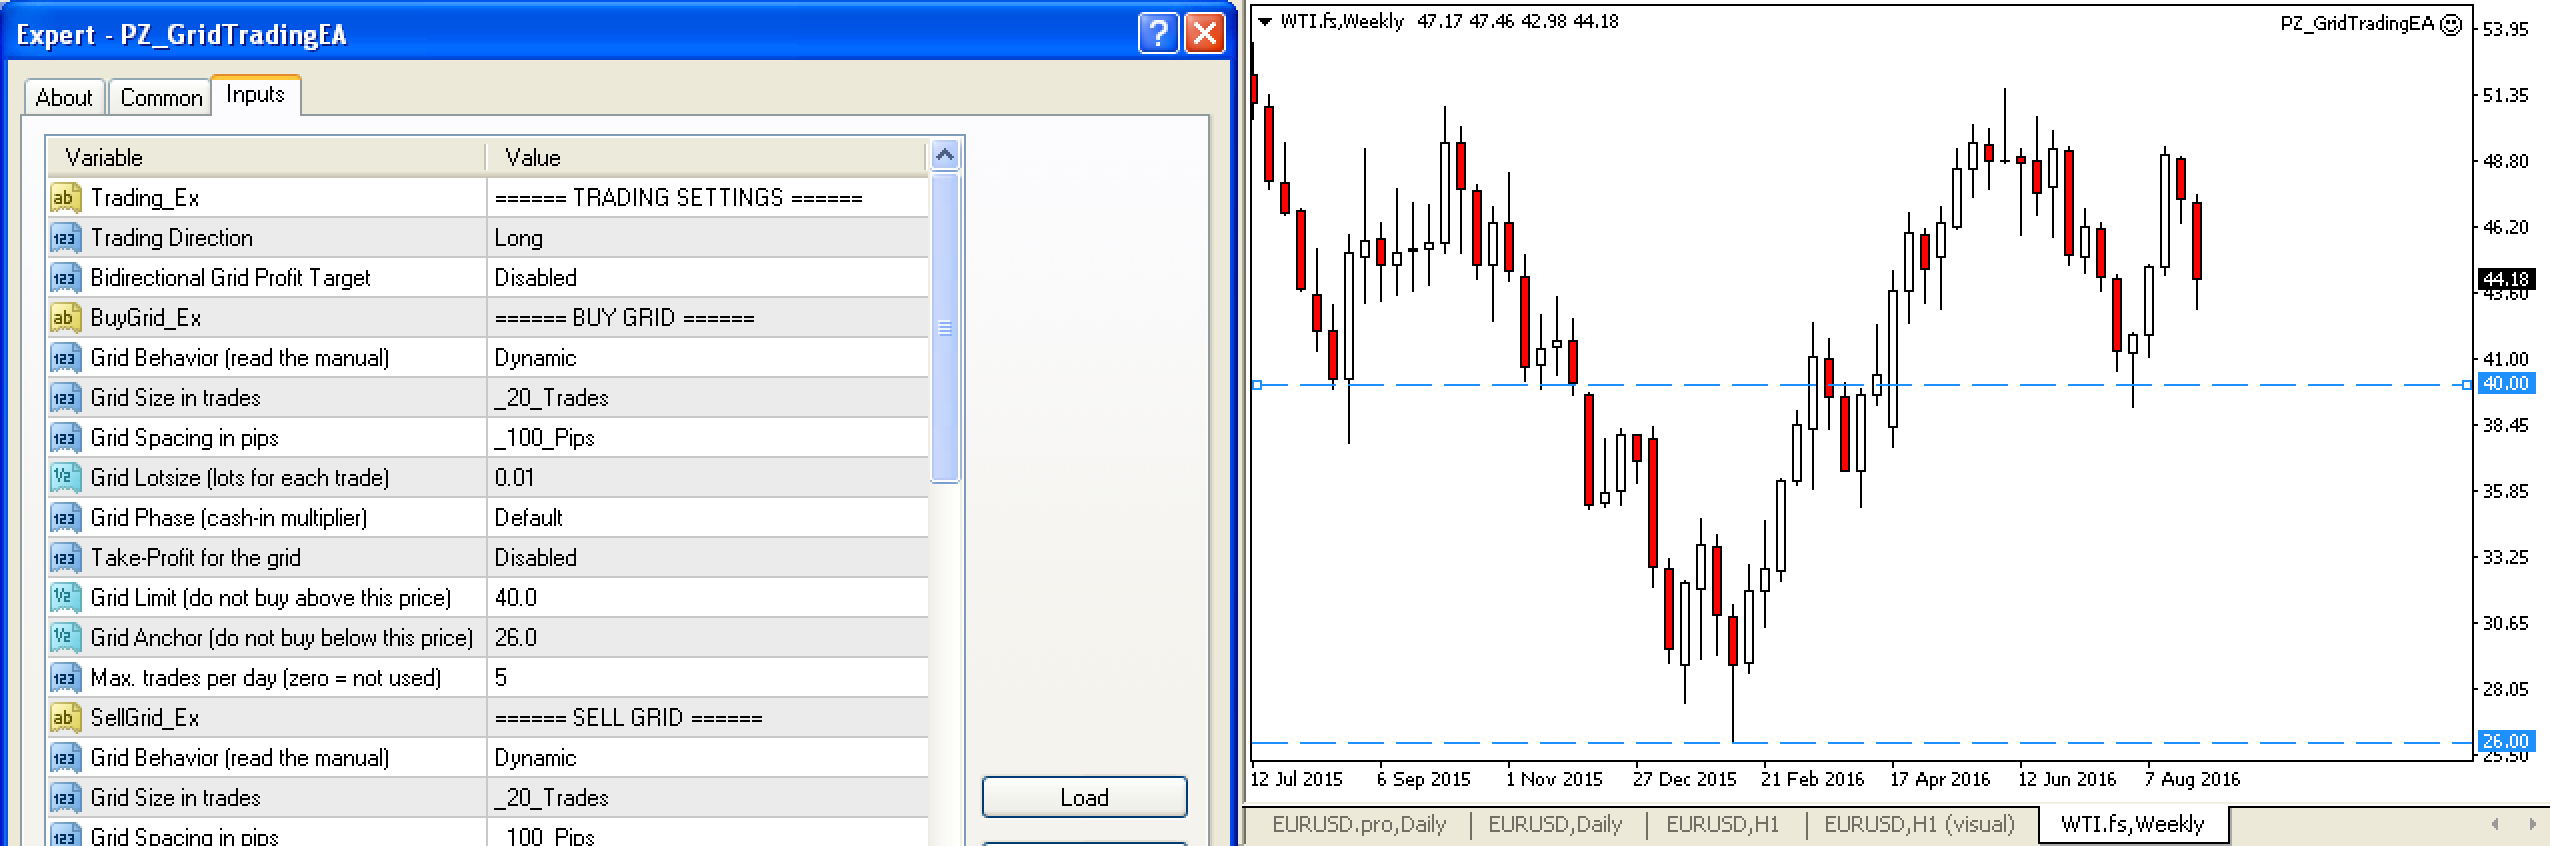
In the example above, the EA will start the grid as soon as the price falls below 40$ per barrel, and keep expanding the grid until 26$ per barrel. Hopefully, the grid will make a bunch of profits before the price rallies again above 40$ per barrel, moment at which the EA will sit idle again, waiting for the price to fall back again into its range.
If, on the other hand, oil falls below 26$ per barrel, my grid will be out of range. As explained on the last chapter, I'll be able to liquidate the trades or keep them as a single deal: a long position in oil at 33$ per barrel is not such a bad deal after all.
Of course, you can configure pending grids both ways, even in the same chart. You can very well have a pending buy grid in EURUSD from 1.000 to 1.1500 and a pending sell grid on EURUSD from 1.1800 to 1.3600. If you do this, you would be shorting EURUSD when It goes up, and buying when it goes down.
This trading approach is called positional grid trading, and it absolutely bonkers. Positional grid traders configure a group of pending grids at certain price ranges across forex pairs, commodities and indices, and just wait until the market bites the fish hook. All they have to do is changing the anchors and limits from time to time.
Furthermore, if a grid goes off range, they know they'll have a positional trade which they won't hate, with a risk allocation they are fine with. And only a few of them will go off range!
The EA draws dotted lines at your limit and anchor prices, for visual reference.
16. Optimizing positional grids
In the last chapter you learned what a positional grid is: a grid that has a price anchor and a price limit, which acts as a pending grid if the market is not inside your desired price range. This is fantastic. What I did not explain in the last chapter is that the Grid Trading EA is able to auto-calculate the spacing from your price limit and price anchor values. This is especially useful when you configure pending grids which will be triggered in the future, because the likelihood of going off-range is smaller.
The difference might not be that obvious, so let's use a visual example. The next illustration depicts a positional grid which spacing has been auto-calculated. As you will quickly realize, your price anchor must be broken in order for your grid to go off range. You won't face a tough decision unless your price anchor is proven wrong.
Now, let's take other example. The next illustration depicts a grid that has the same price limit and anchor values that the one above, but the spacing has been manually set to 20 pips instead of allowing the EA to auto-calculate the spacing. As you will quickly realize, this grid is much more dangerous because it can go off-range several times, without your price anchor being broken.
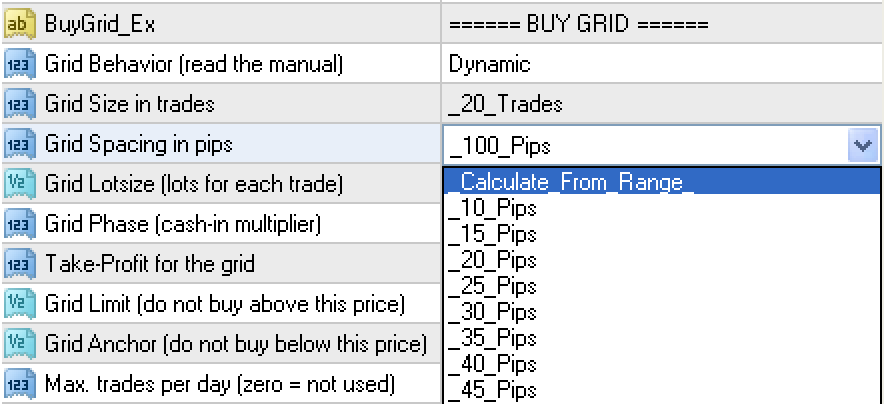
For safety reasons, you should instruct the EA to auto-calculate the spacing for positional grids. This decreases the risk of an out of range event to almost null levels, if your price anchor is sound. To do so, select the option “Calculate From Range” from the spacing parameter of your grid. If you haven't properly defined the price anchor and price limit, or the values are wrong, the EA will raise an alert and stand idle until you enter proper values or set a manual spacing. For a buy grid, the price anchor must always be below the limit price, and the opposite applies for a sell grid.
That being said, sometimes it makes sense to use an anchor price and a limit price and set a spacing manually. For example, if you are running a grid based on a trend, but you don't want the EA to trade above a certain resistance or below a certain retracement level. This is completely up to you. In this situation it is wise to set a take-profit level for the grid to make sure it resets frequently.
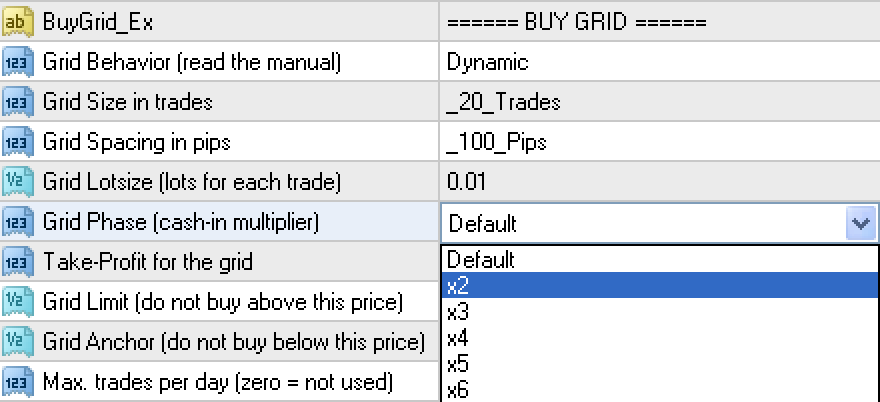
17. The cash-in multiplier
We are not done yet! The EA has even more features. A particularly useful one is the phase parameter. The phase is the cash-in multiplier for each trade of the grid and can be used to amplify the profits of the remaining activity of the grid. Sounds difficult? Let's go over it.
The default behavior of the EA is to cash-in trades once the spacing is met in pips. For example, if you set a spacing of 100 pips, the EA will cash-in trades when they are +100 pips in profit, and place new trades every time a 100 pip move happens in the market. So far so good.
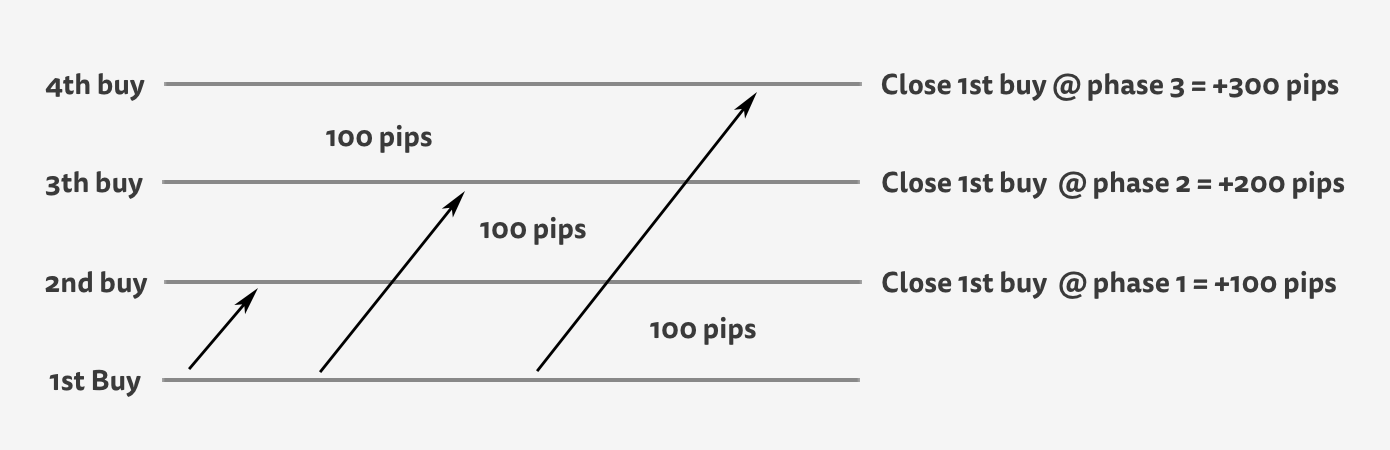
Well, the phase parameter can be used to multiply the price movement needed to cash-in a trade. In the above example, if we set a phase of “x2” the EA will still place new trades every 100 pips, but will cash-in trades when they are +200 pips in profit.
With a phase of “x3”, trades will be closed with a profit of +300 pips, and so on. It acts as a simple multiplier.
Why do you need this feature? Because sometimes you'll be trading a bidirectional grid and the market will start trending
strongly in one direction, cashing-in linear profits in one direction and accumulating exponential negative floating point in the
opposite direction. Your protection here is to increase the phase of the grid that trades in favor of the trend, multiplying the profits
which are cashed-in and offsetting further negative floating point.
If you are using a bidirectional take-profit level, the grids will be closed much faster if you use the phase smartly. The phase can also be used in single-directional grids if you expect a strong price movement in your grid direction.
18. Backtesting the EA
As you probably noticed if you read the user manual up to this point, grids are a discretionary tool which settings depend not only in what the market is doing at the time, but also on your account equity. Even if you came up with the perfect backtesting settings and saved a set file, it would only be useful to users with approximately your own account balance, because the total exposure of your grid could be dangerous for accounts with a lower account balance.
I am well aware that this EA will be losing thousands of users which will download it, run a backtest with default parameters or with a set file, and discard the EA completely forever if the equity curve they see in the tester is not parabolic. But if you are willing to go through some speed-bumps, the EA is testable.
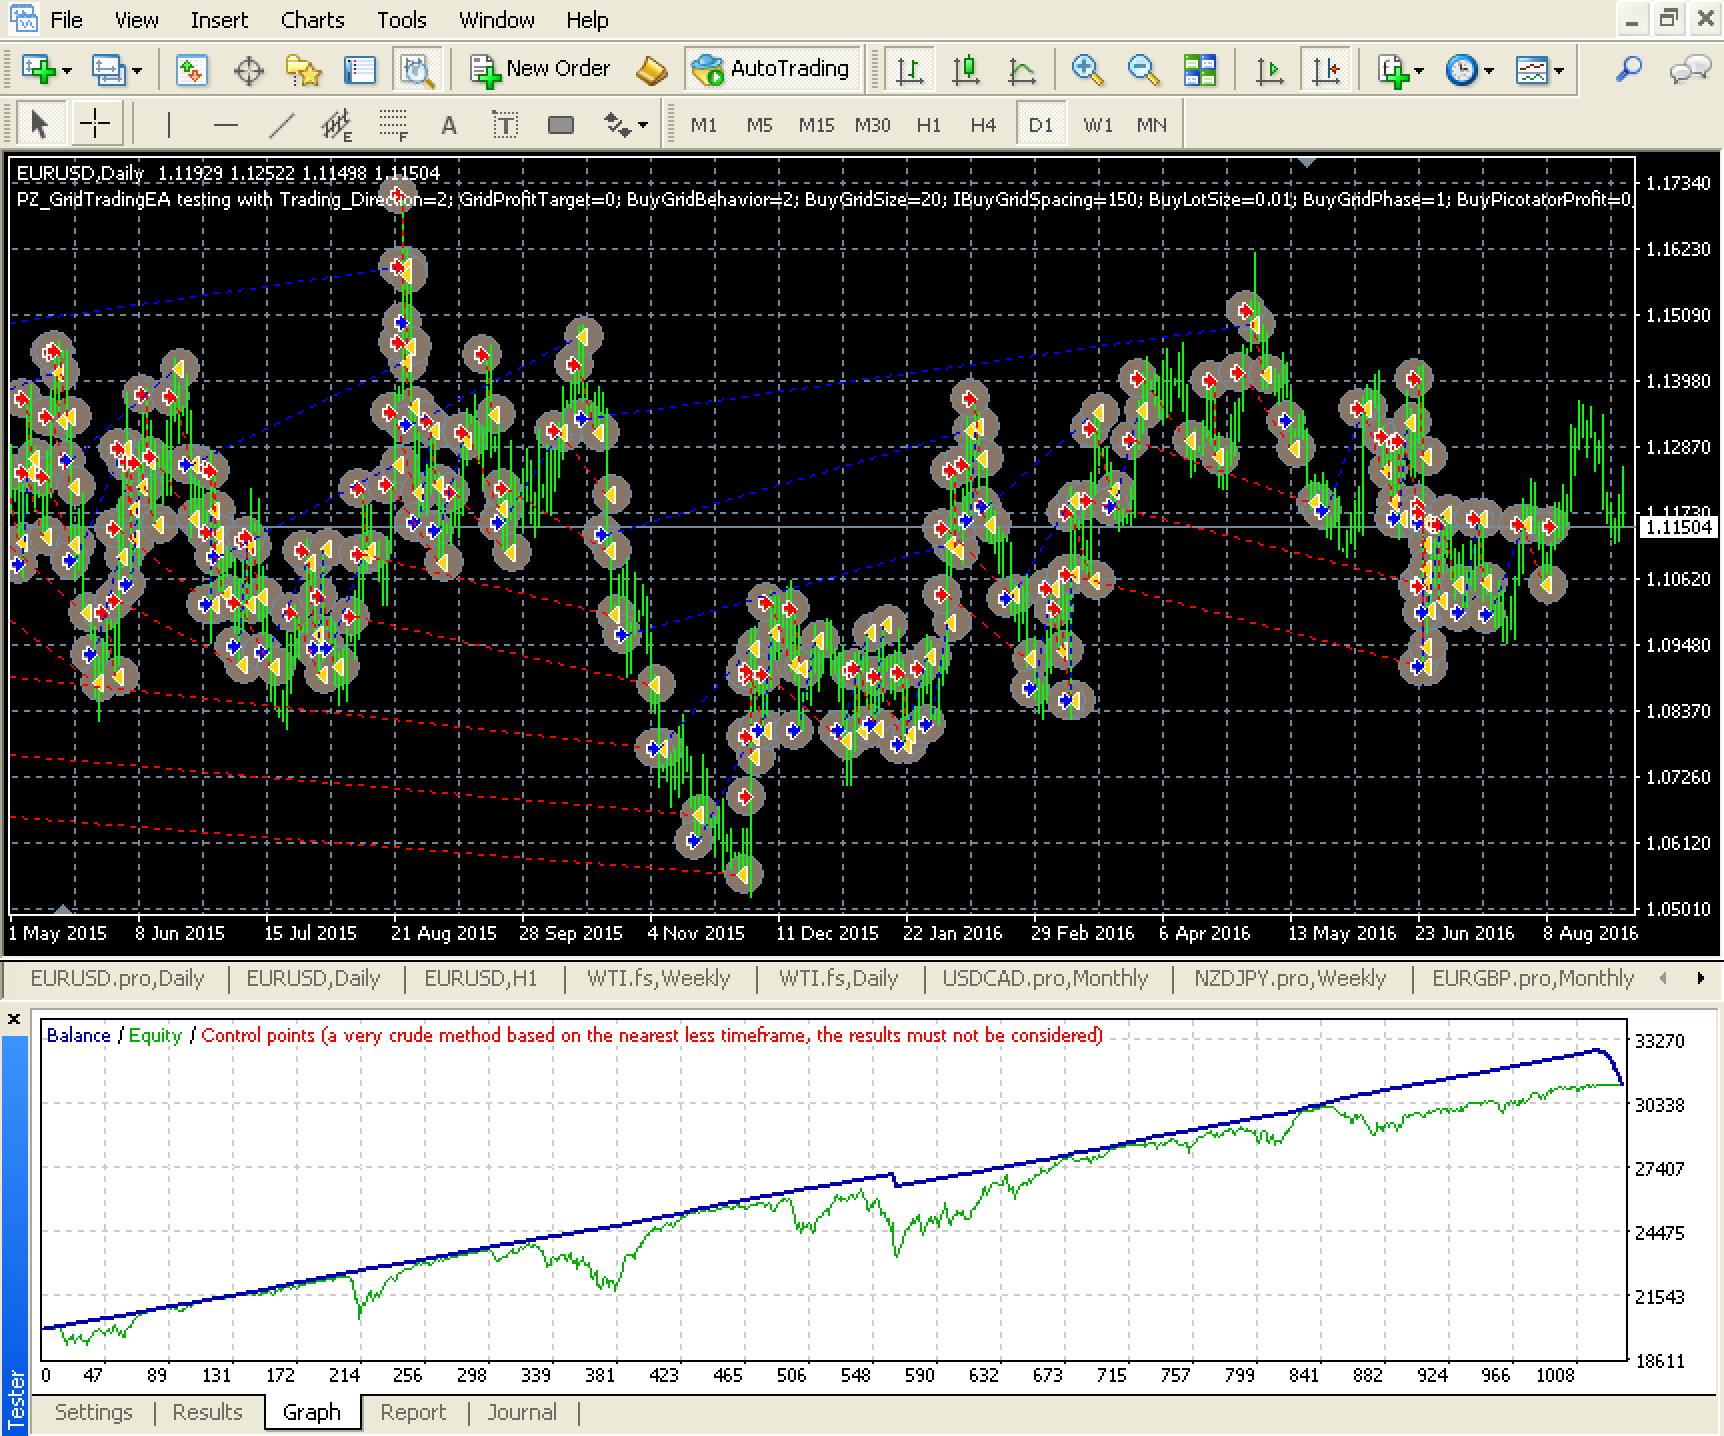
To backtest this EA and get realistic results, you will need to make sure the risk is safe before running the test. To do so, you'll need to launch the tester in a visual mode first, and make sure that the risk allocation displayed on the chart is safe for the tester balance.

When the visual tester opens, look at the right-top corner of the chart for the equity risk of both grids. Remember what I explained in chapter 12, the EA won't trade live if the equity risk for the grid is over 50%. So, opening the visual test first is required to make sure that the test will run smoothly.
As you see above, I am testing using control points mode instead of every tick. The reason for that is that this EA does not
use sub-m1 data to trade, as it is only executed on M15 bar closing in the tester. During live trading, it is executed every minute, when the 1M
bar closes. So, backtesting in control points mode is more then enough for the spacing I am using in the test.
Once we are sure that the risk for our grid is safe, we can launch the test and play around with different behaviors, profit targets, price limits and anchors. And what's more important, you'll be able to see how the EA trades. I highly recommend running the tester in visual mode as much as you can, because you'll be able to understand how the EA works -visually-. This will prevent you from losing your nerve during live trading.
You won't find the perfect, optimized settings, that can be profitable forever. In the tester you will find good settings for any given period, but as soon as the market dynamics change, you'll have to stop the test and continue with other settings, just as you would do in live trading. During live trading, you won't even be in the market at all times. If you find no grounds to start a buy grid or a sell grid, you can configure a pending grid as explained in chapter 16 or find other symbol to trade.
19. Input parameters
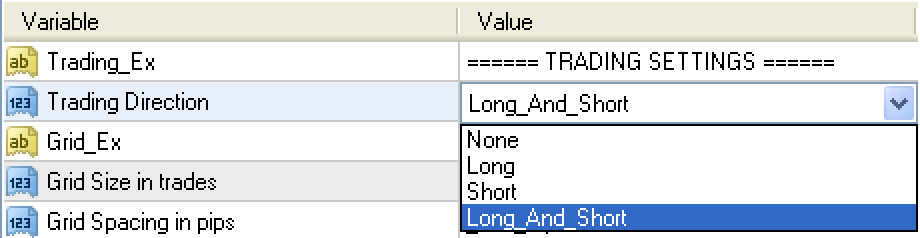
- Trading Direction: It can be long, short or bidirectional. Each grid can have different settings.
- Bidirectional Profit Target: Combined profit target for the bidirectional grid. If zero, this feature is not used.
- For each trading direction there is a parameter block titled "BUY GRID" or "SELL GRID".
- Behavior
- Regular: The grid operates normally, adding trades at fixed intervals and closing the oldest one when off range.
- Paused: It sits idle. Trades are not placed nor closed.
- Averaging: Tries to exit the grid at the average price of all trades.
- Trades: The amount of trades in the grid. More trades means more risk.
- Spacing: Distance in pips between trades. More spacing means more risk.
- Lotsize: The lotsize of each trade of the grid. More lotsize means more risk.
- Phase: The cash-in multiplier for the trades. Use it to amplify profits.
- Take Profit: The profit target to reset the grid. Use it when you want to contract the grid.
- Limit Price: The price at which you don't want the EA to keep trading (zero = not used)
- Anchor Price: The reference price for the grid at which the EA also stops trading (zero = not used)
- Behavior
-
Color of lines of buy grid: This parameter controls the color of the lines drawn on the chart related to the buy grid. The average buy price, limit and anchor lines.
-
Color of lines of sell grid: This parameter controls the color of the lines drawn on the chart related to the sell grid. The average sell price, limit and anchor lines.
-
Color of grid levels: Color of the lines indicating the next grid order level on the chart
-
Color for text labels: Color of the informative text labels on the chart
-
Safe risk color: Color of chart information if the risk allocation is safe
-
Aggressive risk color: Color of the chart information if the risk allocation is aggressive
-
Dangerous risk color: Color of the chart information if the risk allocation is dangerous
-
Font size for labels: Size of the informative text labels on the chart
-
Size of lines: Size of the average price lines
-
Manual Pip Value: Use it to override the broker pip-value in price (Useful for CFDs)
-
Magic Number: The EA uses the magic number to identify its trades
- Custom Comment: Enter your custom comment for trades
20. Questions
This is the end of the user guide. I have covered the usage of the EA in the simplest way I could and still came up with a lengthy guide. If you have any
questions about this expert advisor, please post your question below, send me a private message or open a support ticket at help [at]
pointzero-trading.com. Thanks for reading!


")
