
如何在 MQL5 中集成 ONNX 模型的示例
概述
为了稳定进行交易,通常建议采用多样化得交易工具和交易策略。 这同样是指机器学习模型:创建几个更简单的模型比创建一个复杂的模型更容易。 但是,将这些模型汇集到一个 ONNX 模型可能很困难。
不过,可以在一个 MQL5 程序中组合多个经过训练的 ONNX 模型。 在本文中,我们将研究融合方式之一,称为表决分类器。 我们将向您展示如何轻松地实现这样的融合。
项目的模型
对于我们的示例,我们将用到两个简单的模型:回归价格预测模型,和分类价格变动预测模型。 模型之间的主要区别在于回归模型预测数量,而分类模型预测分类。
第一个模型是回归。
它依据 2003 年至 2022 年底的 EURUSD D1 数据进行训练。 训练是基于一个 10 OHLC 价格序列进行。 为了提高模型的可训练性,我们对价格进行归常规化,并将序列中的平均价格除以序列中的标准差。 因此,我们将一个序列纳入某个范围,平均值为 0,扩散为 1,这提高了训练期间的收敛性。
结果就是,模型应能预测下一个交易日的收盘价。
模型非常简单。 此处提供的仅用于演示目的。
# Copyright 2023, MetaQuotes Ltd.
# https://www.mql5.com

from datetime import datetime
import MetaTrader5 as mt5
import tensorflow as tf
import numpy as np
import pandas as pd
import tf2onnx
from sklearn.model_selection import train_test_split
from tqdm import tqdm
from sys import argv

if not mt5.initialize():
    print("initialize() failed, error code =",mt5.last_error())
    quit()

# we will save generated onnx-file near the our script
data_path=argv[0]
last_index=data_path.rfind("\\")+1
data_path=data_path[0:last_index]
print("data path to save onnx model",data_path)

# input parameters
inp_model_name = "model.eurusd.D1.10.onnx"
inp_history_size = 10
inp_start_date = datetime(2003, 1, 1, 0)
inp_end_date = datetime(2023, 1, 1, 0)

# get data from client terminal
eurusd_rates = mt5.copy_rates_range("EURUSD", mt5.TIMEFRAME_D1, inp_start_date, inp_end_date)
df = pd.DataFrame(eurusd_rates)


#
# collect dataset subroutine
#
def collect_dataset(df: pd.DataFrame, history_size: int):
    """
    Collect dataset for the following regression problem:
    - input: history_size consecutive H1 bars;
    - output: close price for the next bar.

    :param df: D1 bars for a range of dates
    :param history_size: how many bars should be considered for making a prediction
    :return: features and labels
    """
    n = len(df)
    xs = []
    ys = []
    for i in tqdm(range(n - history_size)):
        w = df.iloc[i: i + history_size + 1]

        x = w[['open', 'high', 'low', 'close']].iloc[:-1].values
        y = w.iloc[-1]['close']
        xs.append(x)
        ys.append(y)

    X = np.array(xs)
    y = np.array(ys)
    return X, y
###


# get prices
X, y = collect_dataset(df, history_size=inp_history_size)

# normalize prices
m = X.mean(axis=1, keepdims=True)
s = X.std(axis=1, keepdims=True)
X_norm = (X - m) / s
y_norm = (y - m[:, 0, 3]) / s[:, 0, 3]

# split data to train and test sets
X_train, X_test, y_train, y_test = train_test_split(X_norm, y_norm, test_size=0.2, random_state=0)

# define model
model = tf.keras.Sequential([
    tf.keras.layers.LSTM(64, input_shape=(inp_history_size, 4)),
    tf.keras.layers.BatchNormalization(),
    tf.keras.layers.Dropout(0.1),
    tf.keras.layers.Dense(32, activation='relu'),
    tf.keras.layers.BatchNormalization(),
    tf.keras.layers.Dropout(0.1),
    tf.keras.layers.Dense(32, activation='relu'),
    tf.keras.layers.Dense(1)
])

model.compile(optimizer='adam', loss='mse', metrics=['mae'])

# model training for 50 epochs
lr_reduction = tf.keras.callbacks.ReduceLROnPlateau(monitor='val_loss', factor=0.1, patience=3, min_lr=0.000001)
history = model.fit(X_train, y_train, epochs=50, verbose=2, validation_split=0.15, callbacks=[lr_reduction])

# model evaluation
test_loss, test_mae = model.evaluate(X_test, y_test)
print(f"test_loss={test_loss:.3f}")
print(f"test_mae={test_mae:.3f}")

# save model to onnx
output_path = data_path+inp_model_name
onnx_model = tf2onnx.convert.from_keras(model, output_path=output_path)
print(f"saved model to {output_path}")

# finish
mt5.shutdown()
设我们的回归模型被执行,得到的预测价格应该转换为以下分类:价格下降,价格不变,价格上涨。 这是组织表决分类器所必需的。
第二个模型是分类模型。
它依据 2010 年至 2022 年底的 EURUSD D1 数据进行训练。 训练是基于一个 63 收盘价序列进行。 必须在输出端定义三个分类之一:价格将下降,价格将保持在 10 点以内,或者价格将上涨。 正是由于第二分类,我们不得不从 2010 年开始使用数据训练模型 — 在此之前,在 2009 年,市场从 4 位小数精度转变为 5 位小数精度。 因此,一个旧点数变成了十个新点数。
与以前的模型一样,价格已常规化。 常规化是相同的:我们将序列中平均价格的偏差除以序列中的标准偏差。 该模型的思路已在文章“在 Keras 中使用 MLP 进行金融时间序列预测”(俄语)中进行了阐述。 该模型也仅用于演示目的。
# Copyright 2023, MetaQuotes Ltd.
# https://www.mql5.com
#
# Classification model
# 0,0,1 - predict price down
# 0,1,0 - predict price same
# 1,0,0 - predict price up
#

from datetime import datetime
import MetaTrader5 as mt5
import tensorflow as tf
import numpy as np
import pandas as pd
import tf2onnx
from sklearn.model_selection import train_test_split
from tqdm import tqdm
from keras.models import Sequential
from keras.layers import Dense, Activation,Dropout, BatchNormalization, LeakyReLU
from keras.optimizers import SGD
from keras import regularizers
from sys import argv

# initialize MetaTrader 5 client terminal
if not mt5.initialize():
    print("initialize() failed, error code =",mt5.last_error())
    quit()

# we will save the generated onnx-file near the our script
data_path=argv[0]
last_index=data_path.rfind("\\")+1
data_path=data_path[0:last_index]
print("data path to save onnx model",data_path)

# input parameters
inp_model_name = "model.eurusd.D1.63.onnx"
inp_history_size = 63
inp_start_date = datetime(2010, 1, 1, 0)
inp_end_date = datetime(2023, 1, 1, 0)

# get data from the client terminal
eurusd_rates = mt5.copy_rates_range("EURUSD", mt5.TIMEFRAME_D1, inp_start_date, inp_end_date)
df = pd.DataFrame(eurusd_rates)


#
# collect dataset subroutine
#
def collect_dataset(df: pd.DataFrame, history_size: int):
    """
    Collect dataset for the following regression problem:
    - input: history_size consecutive H1 bars;
    - output: close price for the next bar.

    :param df: H1 bars for a range of dates
    :param history_size: how many bars should be considered for making a prediction
    :return: features and labels
    """
    n = len(df)
    xs = []
    ys = []
    for i in tqdm(range(n - history_size)):
        w = df.iloc[i: i + history_size + 1]
        x = w[['close']].iloc[:-1].values

        delta = x[-1] - w.iloc[-1]['close']
        if np.abs(delta)<=0.0001:
           y = 0, 1, 0
        else:
           if delta<0:
              y = 1, 0, 0
           else:
              y = 0, 0, 1

        xs.append(x)
        ys.append(y)

    X = np.array(xs)
    Y = np.array(ys)
    return X, Y
###


# get prices
X, Y = collect_dataset(df, history_size=inp_history_size)

# normalize prices
m = X.mean(axis=1, keepdims=True)
s = X.std(axis=1, keepdims=True)
X_norm = (X - m) / s

# split data to train and test sets
X_train, X_test, Y_train, Y_test = train_test_split(X_norm, Y, test_size=0.1, random_state=0)

# define model
model = Sequential()
model.add(Dense(64, input_dim=inp_history_size, activity_regularizer=regularizers.l2(0.01)))
model.add(BatchNormalization())
model.add(LeakyReLU())
model.add(Dropout(0.3))
model.add(Dense(16, activity_regularizer=regularizers.l2(0.01)))
model.add(BatchNormalization())
model.add(LeakyReLU())
model.add(Dense(3))
model.add(Activation('softmax'))

opt = SGD(learning_rate=0.01, momentum=0.9)
model.compile(optimizer=opt, loss='categorical_crossentropy', metrics=['accuracy'])

# model training for 300 epochs
lr_reduction = tf.keras.callbacks.ReduceLROnPlateau(monitor='val_loss', factor=0.9, patience=5, min_lr=0.00001)
history = model.fit(X_train, Y_train, epochs=300, validation_data=(X_test, Y_test), shuffle = True, batch_size=128, verbose=2, callbacks=[lr_reduction])

# model evaluation
test_loss, test_accuracy = model.evaluate(X_test, Y_test)
print(f"test_loss={test_loss:.3f}")
print(f"test_accuracy={test_accuracy:.3f}")

# save model to onnx
output_path = data_path+inp_model_name
onnx_model = tf2onnx.convert.from_keras(model, output_path=output_path)
print(f"saved model to {output_path}")

# finish
mt5.shutdown()
这些模型已基于直至 2022 年底之前的数据进行了训练,因此在策略测试器中保留该段区间演示其操作。
在 MQL5 智能系统中集成 ONNX 模型
下面是一个简单的智能交易系统,用于演示模型集成的可行性。 在 MQL5 中采用 ONNX 模型的主要原则在上一篇文章的第二章节中进行了阐述。
前向声明和定义
#include <Trade\Trade.mqh>

input double InpLots = 1.0;              // Lots amount to open position

#resource "Python/model.eurusd.D1.10.onnx" as uchar ExtModel1[]
#resource "Python/model.eurusd.D1.63.onnx" as uchar ExtModel2[]

#define SAMPLE_SIZE1 10
#define SAMPLE_SIZE2 63

long     ExtHandle1=INVALID_HANDLE;
long     ExtHandle2=INVALID_HANDLE;
int      ExtPredictedClass1=-1;
int      ExtPredictedClass2=-1;
int      ExtPredictedClass=-1;
datetime ExtNextBar=0;
CTrade   ExtTrade;

//--- price movement prediction
#define PRICE_UP   0
#define PRICE_SAME 1
#define PRICE_DOWN 2
OnInit 函数
//+------------------------------------------------------------------+
//| Expert initialization function                                   |
//+------------------------------------------------------------------+
int OnInit()
  {
   if(_Symbol!="EURUSD" || _Period!=PERIOD_D1)
     {
      Print("model must work with EURUSD,D1");
      return(INIT_FAILED);
     }

//--- create first model from static buffer
   ExtHandle1=OnnxCreateFromBuffer(ExtModel1,ONNX_DEFAULT);
   if(ExtHandle1==INVALID_HANDLE)
     {
      Print("First model OnnxCreateFromBuffer error ",GetLastError());
      return(INIT_FAILED);
     }
//--- since not all sizes defined in the input tensor we must set them explicitly
//--- first index - batch size, second index - series size, third index - number of series (OHLC)
   const long input_shape1[] = {1,SAMPLE_SIZE1,4};
   if(!OnnxSetInputShape(ExtHandle1,0,input_shape1))
     {
      Print("First model OnnxSetInputShape error ",GetLastError());
      return(INIT_FAILED);
     }

//--- since not all sizes defined in the output tensor we must set them explicitly
//--- first index - batch size, must match the batch size of the input tensor
//--- second index - number of predicted prices (we only predict Close)
   const long output_shape1[] = {1,1};
   if(!OnnxSetOutputShape(ExtHandle1,0,output_shape1))
     {
      Print("First model OnnxSetOutputShape error ",GetLastError());
      return(INIT_FAILED);
     }

//--- create second model from static buffer
   ExtHandle2=OnnxCreateFromBuffer(ExtModel2,ONNX_DEFAULT);
   if(ExtHandle2==INVALID_HANDLE)
     {
      Print("Second model OnnxCreateFromBuffer error ",GetLastError());
      return(INIT_FAILED);
     }

//--- since not all sizes defined in the input tensor we must set them explicitly
//--- first index - batch size, second index - series size
   const long input_shape2[] = {1,SAMPLE_SIZE2};
   if(!OnnxSetInputShape(ExtHandle2,0,input_shape2))
     {
      Print("Second model OnnxSetInputShape error ",GetLastError());
      return(INIT_FAILED);
     }

//--- since not all sizes defined in the output tensor we must set them explicitly
//--- first index - batch size, must match the batch size of the input tensor
//--- second index - number of classes (up, same or down)
   const long output_shape2[] = {1,3};
   if(!OnnxSetOutputShape(ExtHandle2,0,output_shape2))
     {
      Print("Second model OnnxSetOutputShape error ",GetLastError());
      return(INIT_FAILED);
     }
//--- ok
   return(INIT_SUCCEEDED);
  }
我们仅采用 EURUSD、D1 运行它。 这是因为我们用的是当前品种周期的数据,而模型则用日线价格进行训练。
这些模型已作为资源包含在智能交易系统之中。
显式定义输入和输出数据形状非常重要。
OnTick 函数
//+------------------------------------------------------------------+
//| Expert tick function                                             |
//+------------------------------------------------------------------+
void OnTick()
  {
//--- check new bar
   if(TimeCurrent()<ExtNextBar)
      return;
//--- set next bar time
   ExtNextBar=TimeCurrent();
   ExtNextBar-=ExtNextBar%PeriodSeconds();
   ExtNextBar+=PeriodSeconds();

//--- predict price movement
   Predict();
//--- check trading according to prediction
   if(ExtPredictedClass>=0)
      if(PositionSelect(_Symbol))
         CheckForClose();
      else
         CheckForOpen();
  }
所有交易操作仅在一天开始时执行。
预测函数
//+------------------------------------------------------------------+
//| Voting classification                                            |
//+------------------------------------------------------------------+
void Predict(void)
  {
//--- evaluate first model
   ExtPredictedClass1=PredictPrice(ExtHandle1,SAMPLE_SIZE1);
//--- evaluate second model
   ExtPredictedClass2=PredictPriceMovement(ExtHandle2,SAMPLE_SIZE2);
//--- vote
   if(ExtPredictedClass1==ExtPredictedClass2)
      ExtPredictedClass=ExtPredictedClass1;
   else
      ExtPredictedClass=-1;
  }
当两个模型均收到相同的分类时,将认定已选择分类。 这是多数投票。 而且由于融合中只有两种模型,多数投票意味着“一致”。
据以前的 10 个 OHLC 价格预测日收盘价
//+------------------------------------------------------------------+
//| Predict next price (first model)                                 |
//+------------------------------------------------------------------+
int PredictPrice(const long handle,const int sample_size)
  {
   static matrixf input_data(sample_size,4);    // matrix for prepared input data
   static vectorf output_data(1);               // vector to get result
   static matrix  mm(sample_size,4);            // matrix of horizontal vectors Mean
   static matrix  ms(sample_size,4);            // matrix of horizontal vectors Std
   static matrix  x_norm(sample_size,4);        // matrix for prices normalize

//--- prepare input data
   matrix rates;
//--- request last bars
   if(!rates.CopyRates(_Symbol,_Period,COPY_RATES_OHLC,1,sample_size))
      return(-1);
//--- get series Mean
   vector m=rates.Mean(1);
//--- get series Std
   vector s=rates.Std(1);
//--- prepare matrices for prices normalization
   for(int i=0; i<sample_size; i++)
     {
      mm.Row(m,i);
      ms.Row(s,i);
     }
//--- the input of the model must be a set of vertical OHLC vectors
   x_norm=rates.Transpose();
//--- normalize prices
   x_norm-=mm;
   x_norm/=ms;

//--- run the inference
   input_data.Assign(x_norm);
   if(!OnnxRun(handle,ONNX_NO_CONVERSION,input_data,output_data))
      return(-1);
//--- denormalize the price from the output value
   double predicted=output_data[0]*s[3]+m[3];
//--- classify predicted price movement
   int    predicted_class=-1;
   double delta=rates[3][sample_size-1]-predicted;
   if(fabs(delta)<=0.0001)
      predicted_class=PRICE_SAME;
   else
     {
      if(delta<0)
         predicted_class=PRICE_UP;
      else
         predicted_class=PRICE_DOWN;

     }

   return(predicted_class);
  }
准备输入数据时,应按照与训练模型时相同的规则。 模型执行完毕,结果值将转换回价格。 该分类是根据序列中最后收盘价与结果价格之间的差额计算得出的。
基于一个 63 个日线收盘价序列的价格变动预测:
//+------------------------------------------------------------------+
//| Predict price movement (second model)                            |
//+------------------------------------------------------------------+
int PredictPriceMovement(const long handle,const int sample_size)
  {
   static vectorf input_data(sample_size);    // vector for prepared input data
   static vectorf output_data(3);             // vector to get result

//--- request last bars
   if(!input_data.CopyRates(_Symbol,_Period,COPY_RATES_CLOSE,1,sample_size))
      return(-1);
//--- get series Mean
   float m=input_data.Mean();
//--- get series Std
   float s=input_data.Std();
//--- normalize prices
   input_data-=m;
   input_data/=s;

//--- run the inference
   if(!OnnxRun(handle,ONNX_NO_CONVERSION,input_data,output_data))
      return(-1);
//--- evaluate prediction
   return(int(output_data.ArgMax()));
  }
按照第一个模型中相同的规则进行价格常规化。 不过,这次的代码更紧凑,因为输入是向量,而非矩阵。 该分类据三个概率的最大值进行选择。
交易策略很简单。 交易操作在每天开始时执行。 如果预测是“价格会上涨”,那么我们买入;如果是“价格会下跌”,我们卖出。
//+------------------------------------------------------------------+
//| Check for open position conditions                               |
//+------------------------------------------------------------------+
void CheckForOpen(void)
  {
   ENUM_ORDER_TYPE signal=WRONG_VALUE;
//--- check signals
   if(ExtPredictedClass==PRICE_DOWN)
      signal=ORDER_TYPE_SELL;    // sell condition
   else
     {
      if(ExtPredictedClass==PRICE_UP)
         signal=ORDER_TYPE_BUY;  // buy condition
     }

//--- open position if possible according to signal
   if(signal!=WRONG_VALUE && TerminalInfoInteger(TERMINAL_TRADE_ALLOWED))
      ExtTrade.PositionOpen(_Symbol,signal,InpLots,
                            SymbolInfoDouble(_Symbol,signal==ORDER_TYPE_SELL ? SYMBOL_BID:SYMBOL_ASK),
                            0,0);
  }
//+------------------------------------------------------------------+
//| Check for close position conditions                              |
//+------------------------------------------------------------------+
void CheckForClose(void)
  {
   bool bsignal=false;
//--- position already selected before
   long type=PositionGetInteger(POSITION_TYPE);
//--- check signals
   if(type==POSITION_TYPE_BUY && ExtPredictedClass==PRICE_DOWN)
      bsignal=true;
   if(type==POSITION_TYPE_SELL && ExtPredictedClass==PRICE_UP)
      bsignal=true;

//--- close position if possible
   if(bsignal && TerminalInfoInteger(TERMINAL_TRADE_ALLOWED))
     {
      ExtTrade.PositionClose(_Symbol,3);
      //--- open opposite
      CheckForOpen();
     }
  }
我们已经取用直到 2023 年初的数据训练了我们的模型。 如此,我们从年初开始设置测试间隔。
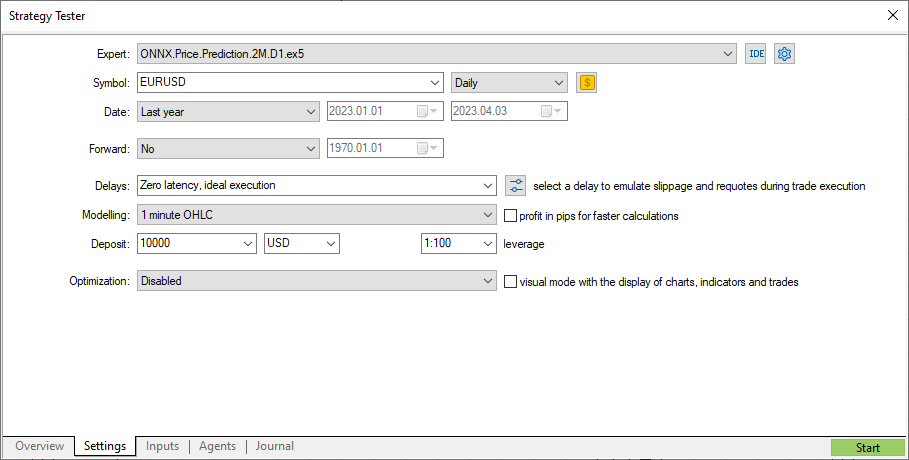
此处是基于年初以来数据的测试结果。
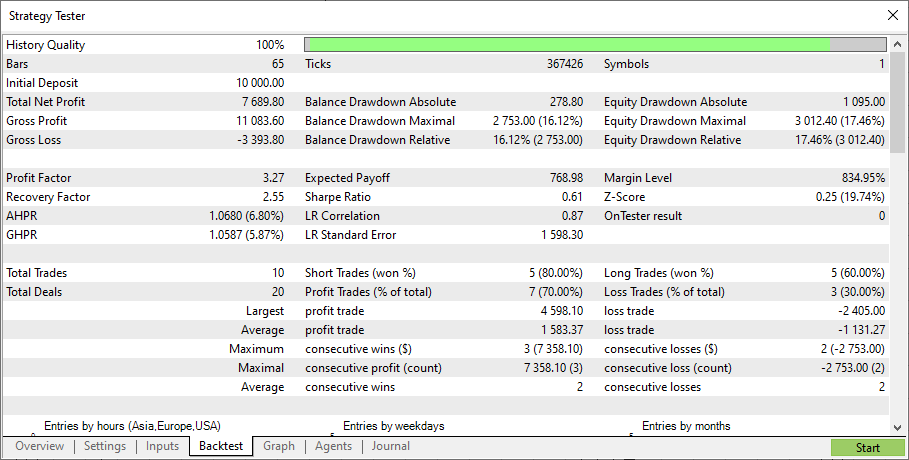
了解每个单独模型的测试结果会很有趣。
为此,我们修改 EA 源代码,如下所示:
enum EnModels
  {
   USE_FIRST_MODEL,    // Use first model only
   USE_SECOND_MODEL,   // Use second model only
   USE_BOTH_MODELS     // Use both models
  };
input EnModels InpModels = USE_BOTH_MODELS;  // Models using
input double   InpLots   = 1.0;              // Lots amount to open position

...

//+------------------------------------------------------------------+
//| Voting classification                                            |
//+------------------------------------------------------------------+
void Predict(void)
  {
//--- evaluate first model
   if(InpModels==USE_BOTH_MODELS || InpModels==USE_FIRST_MODEL)
      ExtPredictedClass1=PredictPrice(ExtHandle1,SAMPLE_SIZE1);
//--- evaluate second model
   if(InpModels==USE_BOTH_MODELS || InpModels==USE_SECOND_MODEL)
      ExtPredictedClass2=PredictPriceMovement(ExtHandle2,SAMPLE_SIZE2);

//--- check predictions
   switch(InpModels)
     {
      case USE_FIRST_MODEL :
         ExtPredictedClass=ExtPredictedClass1;
         break;
      case USE_SECOND_MODEL :
         ExtPredictedClass=ExtPredictedClass2;
         break;
      case USE_BOTH_MODELS :
         if(ExtPredictedClass1==ExtPredictedClass2)
            ExtPredictedClass=ExtPredictedClass1;
         else
            ExtPredictedClass=-1;
     }
  }
启用参数 "Use first model only"。
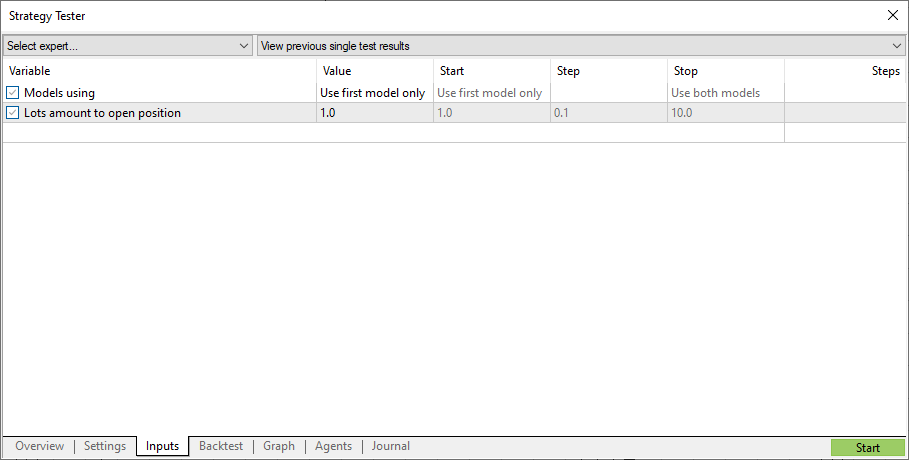
第一个模型测试结果
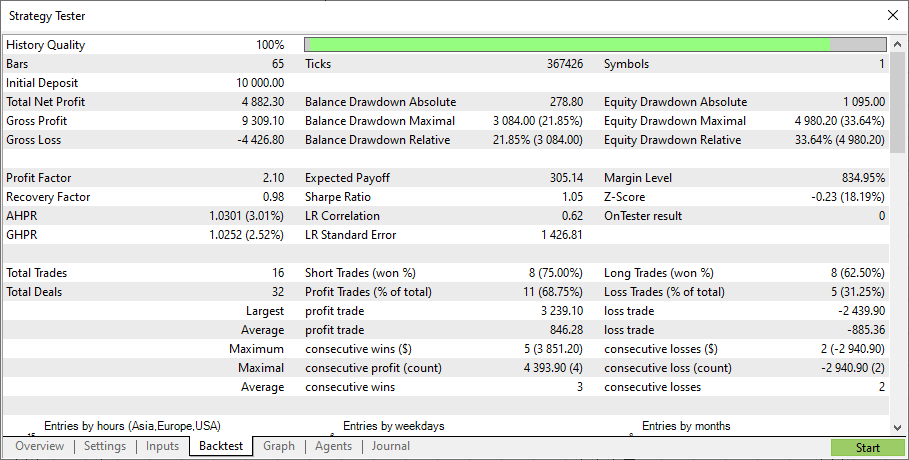
现在我们测试第二个模型。 此处是第二个模型的测试结果。
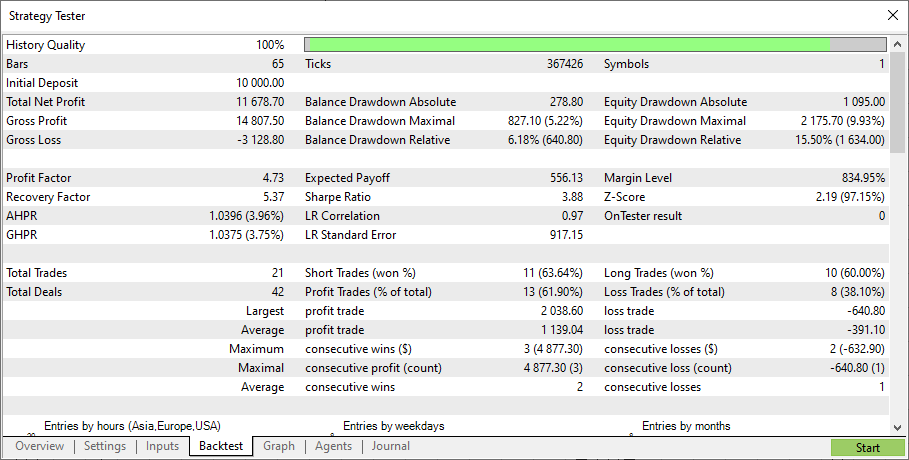
事实证明,第二个模型比第一个模型强得多。 结果确认了弱模型需要集成的理论。 然而,本文不是关于集成理论,而是关乎实际应用。
重要提示:请注意,本文中所用的模型仅用于演示如何以 MQL5 语言运用 ONNX 模型。 智能交易系统不适用于真实账户交易。
结束语
我们提供了一个非常简单,但颇具说明性的示例,其中包含集合两个 ONNX 模型。 能同时运用的模型数量有限,不能超过 256 个模型。 然而,即使用到两个以上的模型,也需要不同的智能系统编程方法,即需要面向对象的编程。
但这是另一篇文章的主题。
本文由MetaQuotes Ltd译自俄文
原文地址: https://www.mql5.com/ru/articles/12433
注意: MetaQuotes Ltd.将保留所有关于这些材料的权利。全部或部分复制或者转载这些材料将被禁止。
我设置了相同的日期和相同的设置,但结果却不同。有人知道为什么吗?
第一个模型测试结果第二个模型测试结果
可能是因为您的交易服务器不是 MetaQuotes-Demo
我设置了相同的日期和相同的设置,但结果却不同。有人知道为什么吗?
第一个模型测试结果第二个模型测试结果
首先,非常感谢你将这些内容整合在一起,很高兴能从不同的方向进行研究。它简单易懂,编排合理。
对我来说,使用模拟账户的成功率和交易次数都差不多,但使用 Meta Trader 模拟账户的成功率和交易次数略低。我的交易账户只交易一次。我想这与经纪商的时区有关,我的经纪商在澳大利亚(GMT+10)。模拟账户的第一笔交易是:Core 1 2023.01.02 07:02:00 deal #2 sell 1 EURUSD at 1.07016 done(根据订单#2)。
我的 澳大利亚 经纪商(GMT+10) 的 第一笔交易 是: Core 1 2023.01.03 00:00:00 市场失败,卖出 1 EURUSD [市场关闭],不确定如何解决这个问题。整个模型可能与时区有关。但2023.01.02 07:02:00 的开始交易是如何变成2023.01.03 00:00:00 的?
如果能找到原因,我们将不胜感激。
交易服务
我也是一样,在我的 MetaQuates 演示账户上使用原始 onnx文件 ,我设法重现了非常相似的结果。
然后,我设法重新训练 Python ML,并完成了训练;不过出现了以下警告/错误,可以忽略不计:
两个 ML 脚本均以
接下来,我重新编译原始的 ONNX.Price.Prediction.2M.D1.mq5 以使用新训练的 ML。
使用相同的 MetaQuates 演示账户进行的回溯测试结果与原始结果大相径庭,看起来不太妙。
如果能知道出了什么问题,我将非常感激。
非常感谢。