
MQL5에서 ONNX 모델을 앙상블하는 방법의 예시
소개
안정적인 트레이딩을 위해서는 일반적으로 거래하는 상품과 트레이딩 전략을 다양화할 것을 권장합니다. 머신 러닝 모델도 마찬가지입니다: 하나의 복잡한 모델보다 여러 개의 간단한 모델을 만드는 것이 더 쉽습니다. 하지만 이러한 모델을 하나의 ONNX 모델로 조립하는 것은 어려운 작업입니다.
그러나 하나의 MQL5 프로그램에서 학습된 여러 ONNX 모델을 결합할 수 있습니다. 이 글에서는 투표 분류기라는 앙상블 중 하나를 살펴볼 것입니다. 이러한 앙상블을 구현하는 것이 얼마나 쉬운지 보여드리겠습니다.
프로젝트 모델
이 예에서 우리는 회귀 가격 예측 모델과 분류 가격 변동 예측 모델이라는 두 가지의 간단한 모델을 사용할 것입니다. 두 모델의 주요 차이점은 회귀는 수량을 예측하는 반면 분류는 클래스를 예측한다는 것입니다.
우리가 살펴볼 첫 번째 모델은 회귀 모델입니다.
2003년부터 2022년 말까지 EURUSD D1 데이터를 사용하여 모델을 학습합니다. 학습은 일련의 10 OHLC 가격을 사용하여 수행됩니다. 모델의 학습 능력을 개선하기 위해 우리는 가격을 정규화하고 계열의 평균 가격을 계열의 표준 편차로 나눕니다. 따라서 학습 중에 수렴이 잘 되도록 하기 위해 평균이 0이고 스프레드가 1인 특정 범위에 계열을 배치합니다.
결과적으로 모델은 다음날 종가를 예측해야 합니다.
모델은 매우 간단합니다. 모델은 데모 목적으로만 제공됩니다.
# Copyright 2023, MetaQuotes Ltd.
# https://www.mql5.com

from datetime import datetime
import MetaTrader5 as mt5
import tensorflow as tf
import numpy as np
import pandas as pd
import tf2onnx
from sklearn.model_selection import train_test_split
from tqdm import tqdm
from sys import argv

if not mt5.initialize():
    print("initialize() failed, error code =",mt5.last_error())
    quit()

# we will save generated onnx-file near the our script
data_path=argv[0]
last_index=data_path.rfind("\\")+1
data_path=data_path[0:last_index]
print("data path to save onnx model",data_path)

# input parameters
inp_model_name = "model.eurusd.D1.10.onnx"
inp_history_size = 10
inp_start_date = datetime(2003, 1, 1, 0)
inp_end_date = datetime(2023, 1, 1, 0)

# get data from client terminal
eurusd_rates = mt5.copy_rates_range("EURUSD", mt5.TIMEFRAME_D1, inp_start_date, inp_end_date)
df = pd.DataFrame(eurusd_rates)


#
# collect dataset subroutine
#
def collect_dataset(df: pd.DataFrame, history_size: int):
    """
    Collect dataset for the following regression problem:
    - input: history_size consecutive H1 bars;
    - output: close price for the next bar.

    :param df: D1 bars for a range of dates
    :param history_size: how many bars should be considered for making a prediction
    :return: features and labels
    """
    n = len(df)
    xs = []
    ys = []
    for i in tqdm(range(n - history_size)):
        w = df.iloc[i: i + history_size + 1]

        x = w[['open', 'high', 'low', 'close']].iloc[:-1].values
        y = w.iloc[-1]['close']
        xs.append(x)
        ys.append(y)

    X = np.array(xs)
    y = np.array(ys)
    return X, y
###


# get prices
X, y = collect_dataset(df, history_size=inp_history_size)

# normalize prices
m = X.mean(axis=1, keepdims=True)
s = X.std(axis=1, keepdims=True)
X_norm = (X - m) / s
y_norm = (y - m[:, 0, 3]) / s[:, 0, 3]

# split data to train and test sets
X_train, X_test, y_train, y_test = train_test_split(X_norm, y_norm, test_size=0.2, random_state=0)

# define model
model = tf.keras.Sequential([
    tf.keras.layers.LSTM(64, input_shape=(inp_history_size, 4)),
    tf.keras.layers.BatchNormalization(),
    tf.keras.layers.Dropout(0.1),
    tf.keras.layers.Dense(32, activation='relu'),
    tf.keras.layers.BatchNormalization(),
    tf.keras.layers.Dropout(0.1),
    tf.keras.layers.Dense(32, activation='relu'),
    tf.keras.layers.Dense(1)
])

model.compile(optimizer='adam', loss='mse', metrics=['mae'])

# model training for 50 epochs
lr_reduction = tf.keras.callbacks.ReduceLROnPlateau(monitor='val_loss', factor=0.1, patience=3, min_lr=0.000001)
history = model.fit(X_train, y_train, epochs=50, verbose=2, validation_split=0.15, callbacks=[lr_reduction])

# model evaluation
test_loss, test_mae = model.evaluate(X_test, y_test)
print(f"test_loss={test_loss:.3f}")
print(f"test_mae={test_mae:.3f}")

# save model to onnx
output_path = data_path+inp_model_name
onnx_model = tf2onnx.convert.from_keras(model, output_path=output_path)
print(f"saved model to {output_path}")

# finish
mt5.shutdown()
여기서 우리는 회귀 모델을 실행하면 결과 예측 가격이 다음의 클래스로 변환되어야 한다고 가정합니다: 가격 하락, 가격 변동 없음, 가격 상승 이는 투표 분류기를 구성하기 위해 필요한 것입니다.
두 번째 모델은 분류 모델입니다.
이 모델은 2010년부터 2022년 말까지 EURUSD D1로 훈련됩니다. 훈련은 일련의 63 종가를 사용하여 수행됩니다. 출력에는 가격 하락, 가격 10포인트 이내 유지, 가격 상승의 세 가지 클래스 중 하나가 정의 되어야 합니다. 우리가 2010년부터 데이터를 사용하여 모델을 학습시켜야 했던 이유는 두 번째 클래스 때문인데 그 이전인 2009년에 시장이 4자리에서 5자리로 가격으로 전환되었습니다. 따라서 이전 포인트 1이 새로운 포인트 10이 되었습니다.
이전 모델에서와 마찬가지로 가격은 정규화 됩니다. 정규화는 동일합니다: 계열의 평균 가격과의 편차를 계열의 표준 편차로 나눕니다. 이 모델의 아이디어는 Keras에서 MLP를 사용한 시계열 예측" (러시아어) 문서에 설명되어 있습니다. 이 모델은 데모용으로만 설계된 모델입니다.
# Copyright 2023, MetaQuotes Ltd.
# https://www.mql5.com
#
# Classification model
# 0,0,1 - predict price down
# 0,1,0 - predict price same
# 1,0,0 - predict price up
#

from datetime import datetime
import MetaTrader5 as mt5
import tensorflow as tf
import numpy as np
import pandas as pd
import tf2onnx
from sklearn.model_selection import train_test_split
from tqdm import tqdm
from keras.models import Sequential
from keras.layers import Dense, Activation,Dropout, BatchNormalization, LeakyReLU
from keras.optimizers import SGD
from keras import regularizers
from sys import argv

# initialize MetaTrader 5 client terminal
if not mt5.initialize():
    print("initialize() failed, error code =",mt5.last_error())
    quit()

# we will save the generated onnx-file near the our script
data_path=argv[0]
last_index=data_path.rfind("\\")+1
data_path=data_path[0:last_index]
print("data path to save onnx model",data_path)

# input parameters
inp_model_name = "model.eurusd.D1.63.onnx"
inp_history_size = 63
inp_start_date = datetime(2010, 1, 1, 0)
inp_end_date = datetime(2023, 1, 1, 0)

# get data from the client terminal
eurusd_rates = mt5.copy_rates_range("EURUSD", mt5.TIMEFRAME_D1, inp_start_date, inp_end_date)
df = pd.DataFrame(eurusd_rates)


#
# collect dataset subroutine
#
def collect_dataset(df: pd.DataFrame, history_size: int):
    """
    Collect dataset for the following regression problem:
    - input: history_size consecutive H1 bars;
    - output: close price for the next bar.

    :param df: H1 bars for a range of dates
    :param history_size: how many bars should be considered for making a prediction
    :return: features and labels
    """
    n = len(df)
    xs = []
    ys = []
    for i in tqdm(range(n - history_size)):
        w = df.iloc[i: i + history_size + 1]
        x = w[['close']].iloc[:-1].values

        delta = x[-1] - w.iloc[-1]['close']
        if np.abs(delta)<=0.0001:
           y = 0, 1, 0
        else:
           if delta<0:
              y = 1, 0, 0
           else:
              y = 0, 0, 1

        xs.append(x)
        ys.append(y)

    X = np.array(xs)
    Y = np.array(ys)
    return X, Y
###


# get prices
X, Y = collect_dataset(df, history_size=inp_history_size)

# normalize prices
m = X.mean(axis=1, keepdims=True)
s = X.std(axis=1, keepdims=True)
X_norm = (X - m) / s

# split data to train and test sets
X_train, X_test, Y_train, Y_test = train_test_split(X_norm, Y, test_size=0.1, random_state=0)

# define model
model = Sequential()
model.add(Dense(64, input_dim=inp_history_size, activity_regularizer=regularizers.l2(0.01)))
model.add(BatchNormalization())
model.add(LeakyReLU())
model.add(Dropout(0.3))
model.add(Dense(16, activity_regularizer=regularizers.l2(0.01)))
model.add(BatchNormalization())
model.add(LeakyReLU())
model.add(Dense(3))
model.add(Activation('softmax'))

opt = SGD(learning_rate=0.01, momentum=0.9)
model.compile(optimizer=opt, loss='categorical_crossentropy', metrics=['accuracy'])

# model training for 300 epochs
lr_reduction = tf.keras.callbacks.ReduceLROnPlateau(monitor='val_loss', factor=0.9, patience=5, min_lr=0.00001)
history = model.fit(X_train, Y_train, epochs=300, validation_data=(X_test, Y_test), shuffle = True, batch_size=128, verbose=2, callbacks=[lr_reduction])

# model evaluation
test_loss, test_accuracy = model.evaluate(X_test, Y_test)
print(f"test_loss={test_loss:.3f}")
print(f"test_accuracy={test_accuracy:.3f}")

# save model to onnx
output_path = data_path+inp_model_name
onnx_model = tf2onnx.convert.from_keras(model, output_path=output_path)
print(f"saved model to {output_path}")

# finish
mt5.shutdown()
이 모델은 2022년 말까지의 데이터로 학습되었습니다. 그러므로 전략 테스터에서 작동을 입증할 수 있는 기간이 남아 있습니다.
MQL5 Expert Advisor의 ONNX 모델 앙상블
아래는 모델 앙상블의 활용 가능성을 보여주는 간단한 EA입니다. 이전 글의 두 번째 부분에는 MQL5에서 ONNX 모델을 사용하는 주요 원칙에 대해 설명이 되어 있습니다.
전달 선언 및 정의
#include <Trade\Trade.mqh>

input double InpLots = 1.0;              // Lots amount to open position

#resource "Python/model.eurusd.D1.10.onnx" as uchar ExtModel1[]
#resource "Python/model.eurusd.D1.63.onnx" as uchar ExtModel2[]

#define SAMPLE_SIZE1 10
#define SAMPLE_SIZE2 63

long     ExtHandle1=INVALID_HANDLE;
long     ExtHandle2=INVALID_HANDLE;
int      ExtPredictedClass1=-1;
int      ExtPredictedClass2=-1;
int      ExtPredictedClass=-1;
datetime ExtNextBar=0;
CTrade   ExtTrade;

//--- price movement prediction
#define PRICE_UP   0
#define PRICE_SAME 1
#define PRICE_DOWN 2
OnInit 함수
//+------------------------------------------------------------------+
//| Expert initialization function                                   |
//+------------------------------------------------------------------+
int OnInit()
  {
   if(_Symbol!="EURUSD" || _Period!=PERIOD_D1)
     {
      Print("model must work with EURUSD,D1");
      return(INIT_FAILED);
     }

//--- create first model from static buffer
   ExtHandle1=OnnxCreateFromBuffer(ExtModel1,ONNX_DEFAULT);
   if(ExtHandle1==INVALID_HANDLE)
     {
      Print("First model OnnxCreateFromBuffer error ",GetLastError());
      return(INIT_FAILED);
     }
//--- since not all sizes defined in the input tensor we must set them explicitly
//--- first index - batch size, second index - series size, third index - number of series (OHLC)
   const long input_shape1[] = {1,SAMPLE_SIZE1,4};
   if(!OnnxSetInputShape(ExtHandle1,0,input_shape1))
     {
      Print("First model OnnxSetInputShape error ",GetLastError());
      return(INIT_FAILED);
     }

//--- since not all sizes defined in the output tensor we must set them explicitly
//--- first index - batch size, must match the batch size of the input tensor
//--- second index - number of predicted prices (we only predict Close)
   const long output_shape1[] = {1,1};
   if(!OnnxSetOutputShape(ExtHandle1,0,output_shape1))
     {
      Print("First model OnnxSetOutputShape error ",GetLastError());
      return(INIT_FAILED);
     }

//--- create second model from static buffer
   ExtHandle2=OnnxCreateFromBuffer(ExtModel2,ONNX_DEFAULT);
   if(ExtHandle2==INVALID_HANDLE)
     {
      Print("Second model OnnxCreateFromBuffer error ",GetLastError());
      return(INIT_FAILED);
     }

//--- since not all sizes defined in the input tensor we must set them explicitly
//--- first index - batch size, second index - series size
   const long input_shape2[] = {1,SAMPLE_SIZE2};
   if(!OnnxSetInputShape(ExtHandle2,0,input_shape2))
     {
      Print("Second model OnnxSetInputShape error ",GetLastError());
      return(INIT_FAILED);
     }

//--- since not all sizes defined in the output tensor we must set them explicitly
//--- first index - batch size, must match the batch size of the input tensor
//--- second index - number of classes (up, same or down)
   const long output_shape2[] = {1,3};
   if(!OnnxSetOutputShape(ExtHandle2,0,output_shape2))
     {
      Print("Second model OnnxSetOutputShape error ",GetLastError());
      return(INIT_FAILED);
     }
//--- ok
   return(INIT_SUCCEEDED);
  }
우리는 이 함수를 EURUSD, D1으로만 실행할 것입니다. 그 이유는 우리는 현재 심볼 기간의 데이터를 사용하는 반면 모델은 일일 가격을 사용하여 학습하기 때문입니다.
이 모델은 EA에 리소스로 포함되어 있습니다.
입력 및 출력 데이터 형태를 명시적으로 정의하는 것이 중요합니다.
OnTick 함수
//+------------------------------------------------------------------+
//| Expert tick function                                             |
//+------------------------------------------------------------------+
void OnTick()
  {
//--- check new bar
   if(TimeCurrent()<ExtNextBar)
      return;
//--- set next bar time
   ExtNextBar=TimeCurrent();
   ExtNextBar-=ExtNextBar%PeriodSeconds();
   ExtNextBar+=PeriodSeconds();

//--- predict price movement
   Predict();
//--- check trading according to prediction
   if(ExtPredictedClass>=0)
      if(PositionSelect(_Symbol))
         CheckForClose();
      else
         CheckForOpen();
  }
모든 트레이딩 작업은 매일의 시작에만 수행됩니다.
예측 함수
//+------------------------------------------------------------------+
//| Voting classification                                            |
//+------------------------------------------------------------------+
void Predict(void)
  {
//--- evaluate first model
   ExtPredictedClass1=PredictPrice(ExtHandle1,SAMPLE_SIZE1);
//--- evaluate second model
   ExtPredictedClass2=PredictPriceMovement(ExtHandle2,SAMPLE_SIZE2);
//--- vote
   if(ExtPredictedClass1==ExtPredictedClass2)
      ExtPredictedClass=ExtPredictedClass1;
   else
      ExtPredictedClass=-1;
  }
두 모델 모두 동일한 클래스를 받으면 클래스가 선택된 것으로 간주됩니다. 이것이 과반수 투표입니다. 앙상블에는 두 개의 모델만 있으므로 과반수 투표는 '만장일치'를 의미합니다.
10개의 이전 OHLC 가격으로부터 당일 종가 예측
//+------------------------------------------------------------------+
//| Predict next price (first model)                                 |
//+------------------------------------------------------------------+
int PredictPrice(const long handle,const int sample_size)
  {
   static matrixf input_data(sample_size,4);    // matrix for prepared input data
   static vectorf output_data(1);               // vector to get result
   static matrix  mm(sample_size,4);            // matrix of horizontal vectors Mean
   static matrix  ms(sample_size,4);            // matrix of horizontal vectors Std
   static matrix  x_norm(sample_size,4);        // matrix for prices normalize

//--- prepare input data
   matrix rates;
//--- request last bars
   if(!rates.CopyRates(_Symbol,_Period,COPY_RATES_OHLC,1,sample_size))
      return(-1);
//--- get series Mean
   vector m=rates.Mean(1);
//--- get series Std
   vector s=rates.Std(1);
//--- prepare matrices for prices normalization
   for(int i=0; i<sample_size; i++)
     {
      mm.Row(m,i);
      ms.Row(s,i);
     }
//--- the input of the model must be a set of vertical OHLC vectors
   x_norm=rates.Transpose();
//--- normalize prices
   x_norm-=mm;
   x_norm/=ms;

//--- run the inference
   input_data.Assign(x_norm);
   if(!OnnxRun(handle,ONNX_NO_CONVERSION,input_data,output_data))
      return(-1);
//--- denormalize the price from the output value
   double predicted=output_data[0]*s[3]+m[3];
//--- classify predicted price movement
   int    predicted_class=-1;
   double delta=rates[3][sample_size-1]-predicted;
   if(fabs(delta)<=0.0001)
      predicted_class=PRICE_SAME;
   else
     {
      if(delta<0)
         predicted_class=PRICE_UP;
      else
         predicted_class=PRICE_DOWN;

     }

   return(predicted_class);
  }
입력 데이터는 모델 학습 시와 동일한 규칙에 따라 준비되어야 합니다. 모델이 실행된 후 결과값은 다시 가격으로 변환됩니다. 클래스는 시리즈의 마지막 종가와 결과 가격의 차이를 기준으로 계산됩니다.
63개의 일일 종가를 기준으로 한 가격 변동 예측입니다:
//+------------------------------------------------------------------+
//| Predict price movement (second model)                            |
//+------------------------------------------------------------------+
int PredictPriceMovement(const long handle,const int sample_size)
  {
   static vectorf input_data(sample_size);    // vector for prepared input data
   static vectorf output_data(3);             // vector to get result

//--- request last bars
   if(!input_data.CopyRates(_Symbol,_Period,COPY_RATES_CLOSE,1,sample_size))
      return(-1);
//--- get series Mean
   float m=input_data.Mean();
//--- get series Std
   float s=input_data.Std();
//--- normalize prices
   input_data-=m;
   input_data/=s;

//--- run the inference
   if(!OnnxRun(handle,ONNX_NO_CONVERSION,input_data,output_data))
      return(-1);
//--- evaluate prediction
   return(int(output_data.ArgMax()));
  }
가격은 첫 번째 모델에서 사용한 동일한 규칙을 사용하여 정규화 됩니다. 하지만 이번에는 입력이 행렬이 아닌 벡터이기 때문에 코드가 더 간결해졌습니다. 클래스는 세 가지 확률의 최대값으로 선택됩니다.
거래 전략은 간단합니다. 거래 작업은 매일 장이 시작될 때 수행됩니다. "가격이 오를 것" 이라는 예측이 맞으면 매수하고 "가격이 내릴 것" 이라는 예측이 맞으면 매도합니다.
//+------------------------------------------------------------------+
//| Check for open position conditions                               |
//+------------------------------------------------------------------+
void CheckForOpen(void)
  {
   ENUM_ORDER_TYPE signal=WRONG_VALUE;
//--- check signals
   if(ExtPredictedClass==PRICE_DOWN)
      signal=ORDER_TYPE_SELL;    // sell condition
   else
     {
      if(ExtPredictedClass==PRICE_UP)
         signal=ORDER_TYPE_BUY;  // buy condition
     }

//--- open position if possible according to signal
   if(signal!=WRONG_VALUE && TerminalInfoInteger(TERMINAL_TRADE_ALLOWED))
      ExtTrade.PositionOpen(_Symbol,signal,InpLots,
                            SymbolInfoDouble(_Symbol,signal==ORDER_TYPE_SELL ? SYMBOL_BID:SYMBOL_ASK),
                            0,0);
  }
//+------------------------------------------------------------------+
//| Check for close position conditions                              |
//+------------------------------------------------------------------+
void CheckForClose(void)
  {
   bool bsignal=false;
//--- position already selected before
   long type=PositionGetInteger(POSITION_TYPE);
//--- check signals
   if(type==POSITION_TYPE_BUY && ExtPredictedClass==PRICE_DOWN)
      bsignal=true;
   if(type==POSITION_TYPE_SELL && ExtPredictedClass==PRICE_UP)
      bsignal=true;

//--- close position if possible
   if(bsignal && TerminalInfoInteger(TERMINAL_TRADE_ALLOWED))
     {
      ExtTrade.PositionClose(_Symbol,3);
      //--- open opposite
      CheckForOpen();
     }
  }
우리는 2023년 초까지 데이터로 모델을 학습시켰습니다. 이제 연초부터 테스트 간격을 설정해 보겠습니다.
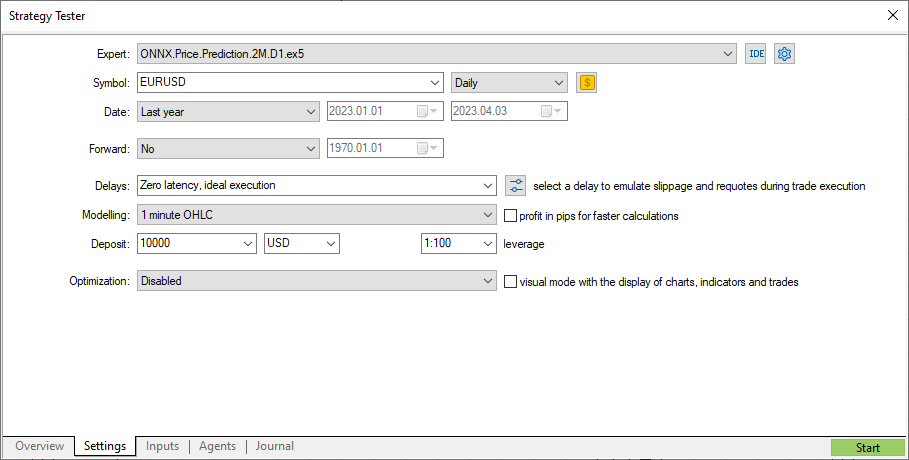
다음은 연초 이후의 데이터를 기반으로 한 테스트 결과입니다.
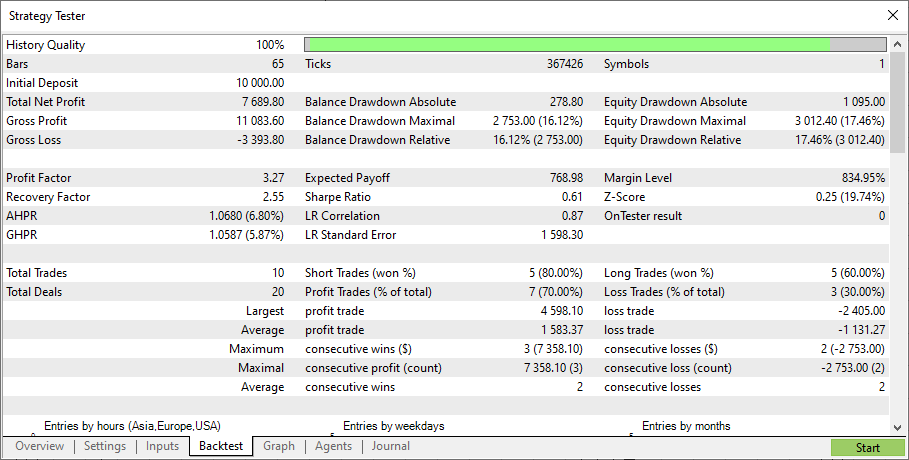
개별 모델에 대한 테스트 결과를 알게 되는 것은 흥미로울 것입니다.
이를 위해 우리는 EA 소스 코드를 다음과 같이 수정하겠습니다:
enum EnModels
  {
   USE_FIRST_MODEL,    // Use first model only
   USE_SECOND_MODEL,   // Use second model only
   USE_BOTH_MODELS     // Use both models
  };
input EnModels InpModels = USE_BOTH_MODELS;  // Models using
input double   InpLots   = 1.0;              // Lots amount to open position

...

//+------------------------------------------------------------------+
//| Voting classification                                            |
//+------------------------------------------------------------------+
void Predict(void)
  {
//--- evaluate first model
   if(InpModels==USE_BOTH_MODELS || InpModels==USE_FIRST_MODEL)
      ExtPredictedClass1=PredictPrice(ExtHandle1,SAMPLE_SIZE1);
//--- evaluate second model
   if(InpModels==USE_BOTH_MODELS || InpModels==USE_SECOND_MODEL)
      ExtPredictedClass2=PredictPriceMovement(ExtHandle2,SAMPLE_SIZE2);

//--- check predictions
   switch(InpModels)
     {
      case USE_FIRST_MODEL :
         ExtPredictedClass=ExtPredictedClass1;
         break;
      case USE_SECOND_MODEL :
         ExtPredictedClass=ExtPredictedClass2;
         break;
      case USE_BOTH_MODELS :
         if(ExtPredictedClass1==ExtPredictedClass2)
            ExtPredictedClass=ExtPredictedClass1;
         else
            ExtPredictedClass=-1;
     }
  }
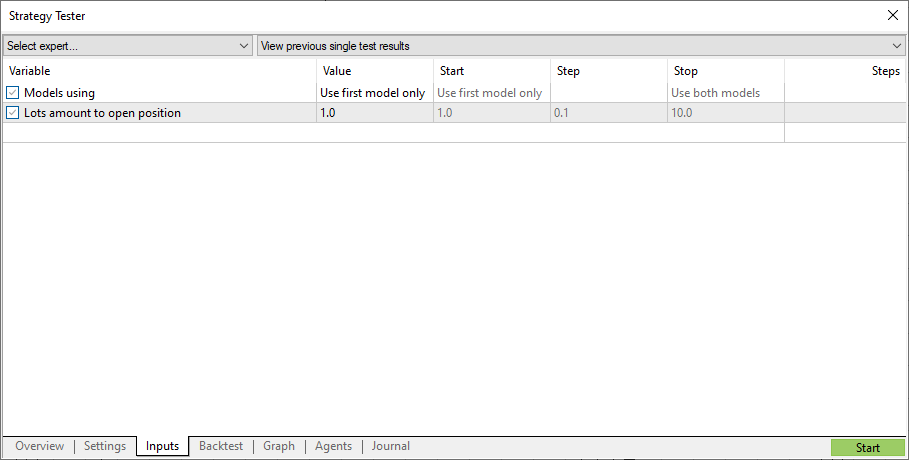
"Use first model only"이란 매개변수를 활성화합니다.
첫 번째 모델 테스트 결과
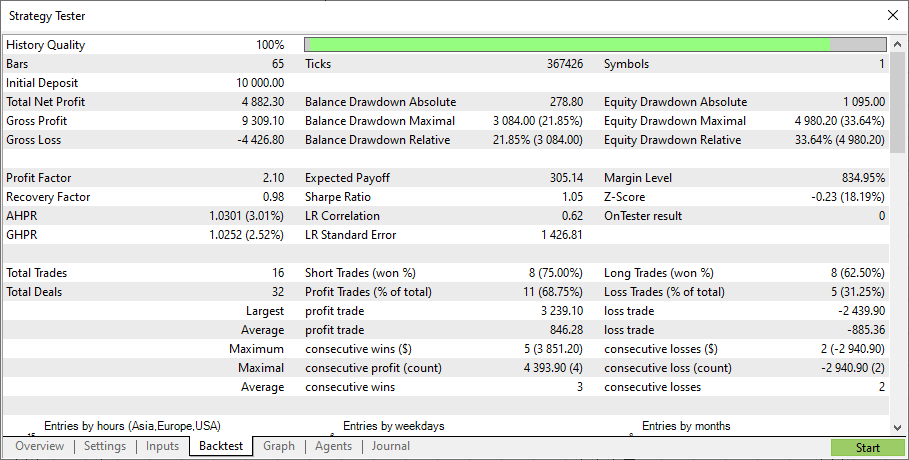
이제 두 번째 모델을 테스트해 보겠습니다. 두 번째 모델 테스트 결과는 다음과 같습니다.
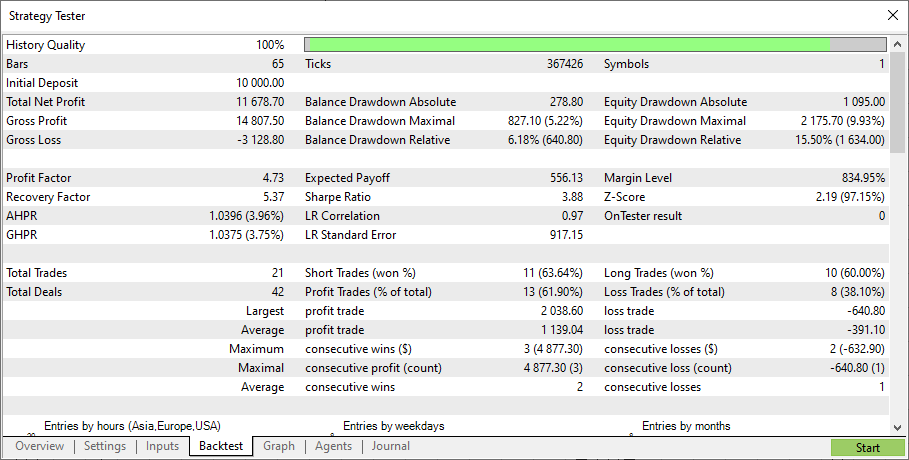
두 번째 모델은 첫 번째 모델보다 훨씬 더 강력한 것으로 밝혀졌습니다. 결과는 약한 모델들을 조합해야 한다는 이론을 확인시켜줍니다. 그러나 이 글은 앙상블 이론에 대한 것이 아니라 실제의 적용에 대한 글입니다.
중요 참고 사항: 여기서 사용하는 모델은 MQL5 언어를 사용하여 ONNX 모델로 작업하는 방법을 보여주기 위한 용도로만 제공된 것입니다. 이 EA는 실계좌에서 거래를 위한 용도로 만든 것이 아닙니다.
결론
우리는 두 가지 ONNX 모델의 앙상블에 대한 매우 간단하면서도 설명적인 예를 제시했습니다. 동시에 사용할 수 있는 모델의 수는 제한되어 있으며 모델의 수는 256개를 초과할 수 없습니다. 그러나 두 가지 이상의 모델을 사용하더라도 Expert Advisor 프로그래밍은 다른 접근 방식이 필요합니다. 다시 말해 객체 지향 프로그래밍이 필요합니다.
하지만 객체 지향 프로그래밍은 다른 글에서 다룰 주제입니다.
MetaQuotes 소프트웨어 사를 통해 러시아어가 번역됨.
원본 기고글: https://www.mql5.com/ru/articles/12433
경고: 이 자료들에 대한 모든 권한은 MetaQuotes(MetaQuotes Ltd.)에 있습니다. 이 자료들의 전부 또는 일부에 대한 복제 및 재출력은 금지됩니다.
 Expert Advisor 개발 기초부터(25부): 시스템 견고성 확보(II)
 Expert Advisor 개발 기초부터(24부): 시스템 견고성(I)
같은 날짜, 같은 설정을 했는데 결과가 다르게 나왔는데 이유를 아시는 분 있나요?
첫 번째 모델 테스트 결과두 번째 모델 테스트 결과
거래 서버가 메타쿼츠 데모용이 아니기 때문일 수 있습니다.
같은 날짜, 같은 설정을 했는데 결과가 다르게 나왔는데 이유를 아시는 분 있나요?
첫 번째 모델 테스트 결과두 번째 모델 테스트 결과
첫째, 이것을 함께 모아 주셔서 감사합니다. 다른 방향을 보는 것이 좋습니다. 따라하기 쉽고 잘 정리되어 있습니다.
저에게는 데모 계좌와 비슷한 성공률과 약간 낮은 거래 횟수를 얻었지만 메타 트레이더 데모 계좌를 사용할 때입니다. 내 거래 계좌로 한 번만 거래합니다 . 브로커의 시간대가 호주 (GMT+10) 라고 가정하고 있습니다. 데모 계좌의 첫 거래는 다음과 같습니다; 코어 1 2023.01.02 07:02:00 거래 #2 1 EURUSD 1.07016에 매도 완료(주문 #2기준 )
내 브로커 호주 (GMT+10) 의첫 거래는 다음과 같습니다; 코어 1 2023.01.03 00:00:00 시장가 1 EURUSD 매도 실패 [시장 마감], 해결 방법을 정확히 알 수 없습니다. 전체 모델이 시간대에 따라 달라질 수 있습니다. 그렇다면 시간은 전체 시간으로 나와야 하는데 어떻게 시작 거래 2023.01.02 07:02:00이 2023.01.03 00:00:00이 되 나요?
그 원인에 대한 제안을 주시면 감사하겠습니다.
거래 서비스
여기서도 마찬가지로 MetaQuates-Demo 계정의 원본 onnx 파일로 매우 유사한 결과를 재현할 수 있었습니다.
그런 다음 다음과 같은 경고/오류가 발생하지만 무시해도 될 정도로 Python ML을 다시 학습시켜 완료할 수 있었습니다:
두 ML 스크립트가 모두 완료됩니다:
다음으로 원본 ONNX.Price.Prediction.2M.D1.mq5를 다시 컴파일하여 학습한 새 ML을 사용합니다.
동일한 메타쿼츠 데모 계정으로 백테스트한 결과는 원본과 많이 달라서 좋지 않습니다.
무엇이 잘못되었는지 알려주시면 정말 감사하겠습니다.
감사합니다.