Sunday Open Eng
- Indicatori
- Versione: 1.0
- Attivazioni: 5
Russian version https://www.mql5.com/ru/market/product/148571?source=Site+Profile+Seller
This guide is designed to help beginner traders understand how the "Sunday Open " indicator works and is configured, as well as how to properly interpret its signals for making informed trading decisions.
Part 1: What is the Sunday Open Indicator and How to Use It?
Core Concept
The indicator is based on a simple but powerful concept: the weekly opening price is a key support and resistance level.
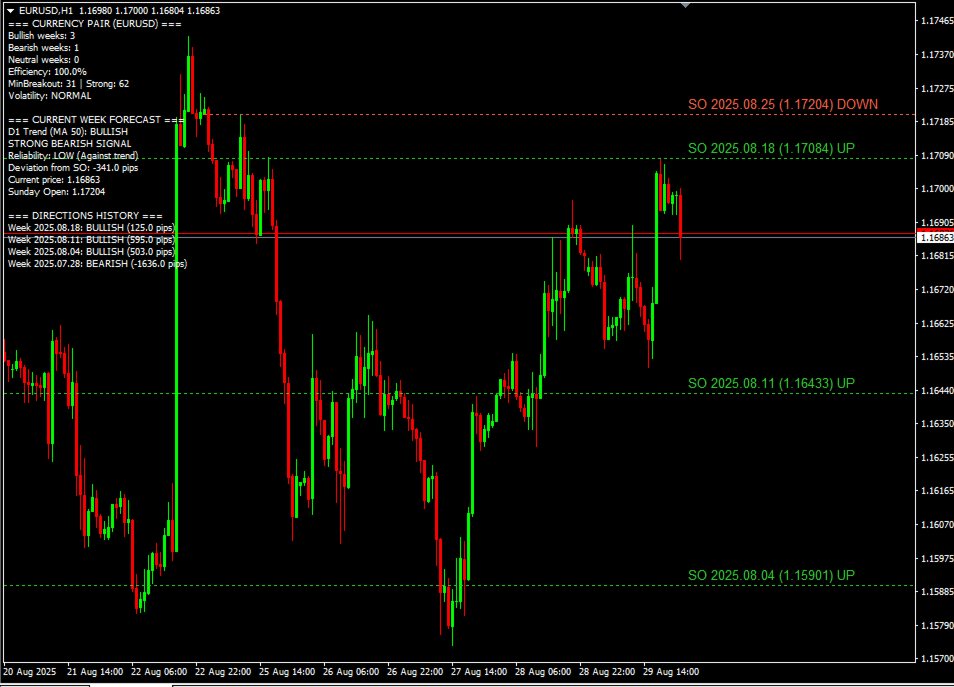
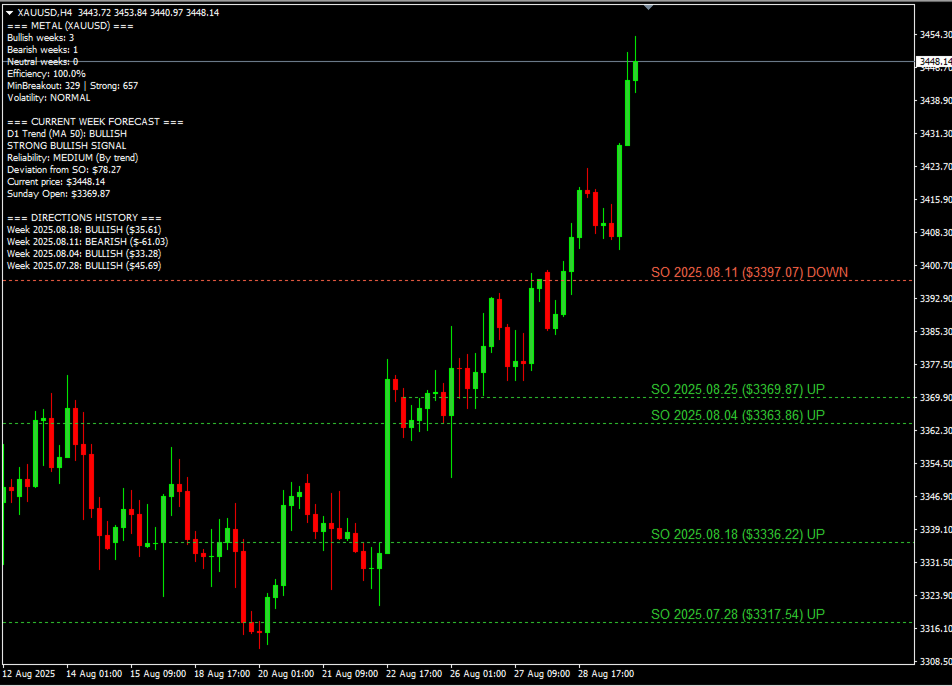
Imagine that at the beginning of the week (Sunday evening or Monday morning, depending on your broker), the price of an asset, for example, gold (XAUUSD), opens at $3300. This price, "Sunday Open" (SO), becomes the reference point. Throughout the week, major players — banks, funds, market makers — will orient themselves around this level.
If the price moves above the SO level and stays there, it indicates buyer strength. The week will likely be "bullish" (rising).
If the price drops below the SO level and consolidates under it, it indicates seller strength. The week will probably be "bearish" (falling).
If the price oscillates around the SO level, it indicates market uncertainty or sideways movement ("flat").
The indicator automatically finds these levels for the past several weeks, plots them on the chart, and analyzes how price behaved relative to them. This gives you a clear picture of market sentiment and helps forecast movement for the current week.
How to Properly Apply the Indicator?
1. Determine the Main Trend. The indicator is your assistant, not a "holy grail." Always look at the big picture. If the global trend on the daily chart (D1) is rising, then buy signals from the SO level (for example, a bounce from below) will be more reliable.
2. Use SO levels as entry zones. Don't enter a trade the moment price simply touches the line. Wait for confirmation:
- Bounce: Price touches the level and begins moving in the opposite direction.
- Breakout and Retest: Price breaks the level, then returns to it to "test" it from the other side, and only after that continues the movement. This is one of the strongest signals.
- False Breakout: Price breaks the level but quickly returns back. This signals that the "breakout" was a trap, and price will likely go in the opposite direction.
3. Combine with Other Tools. Use the indicator together with other analysis methods: candlestick patterns (pin bars, engulfing), other levels (previous day's highs/lows), or oscillators (RSI, Stochastic) to confirm signals.
4. Pay Attention to Statistics. The indicator shows how many previous weeks were bullish versus bearish. If 4 out of the last 5 weeks were bullish, this indicates strong upward pressure.
Part 2: Detailed Breakdown of Indicator Settings
Below is a "plain English" explanation of each setting so you can adapt the indicator to your trading style and any financial instrument.
General Settings
MaxSundays = 5
- What it means: Number of historical Sunday Open levels that will be displayed on the chart. A value of "5" means you'll see the current week's level and four previous ones.
- Why it's needed: Old levels can also act as support or resistance. Price "remembers" these marks. Analyzing several weeks gives you a more complete picture of key price zones.
- How to use:
- For EURUSD: 5 is optimal. The market isn't as volatile, and 4-5 weeks provide sufficient context.
- For XAUUSD (gold): You can keep 5, but if you're day trading on lower timeframes (M15-H1), you can reduce to 3-4 to avoid chart clutter. Gold is more "trending," and the most relevant levels are those from the last 2-3 weeks.
Visual Settings
LineStyle = DOT (Line Style)
- What it means: Determines how the level line will look on the chart: solid (SOLID), dashed (DASH), dotted (DOT), etc.
- Why it's needed: Purely for your visual convenience.
- How to use: Choose the style you prefer that doesn't interfere with chart analysis. Dotted (DOT) or dashed (DASH) lines are often preferred as they don't clutter the chart as much as solid lines.
LineWidth = 1 (Line Width)
- What it means: Line thickness in pixels.
- Why it's needed: Allows making important levels more noticeable.
- How to use: If you want to highlight the freshest SO level, you can manually change it on the chart, making it thicker. For standard display, "1" or "2" is sufficient.
ShowLabel = true (Show Labels)
- What it means: A text label with the week's opening date and level price will be displayed next to each line.
- Why it's needed: You won't need to hover over the line to know its exact value and date. Very convenient for quick analysis.
- How to use: Recommended to always keep enabled (true).
ShowDirection = true (Show Direction Analysis)
- What it means: Enables display of the previous week's direction (whether it was bullish or bearish) directly on the line label and in the information window.
- Why it's needed: Allows instant assessment of how the previous week closed relative to its opening, providing hints about current market sentiment.
- How to use: Definitely true. This is one of the key analytical functions.
ShowStatistics = true (Show Statistics)
- What it means: A statistics block will be displayed in the chart corner showing: how many weeks were bullish, bearish, neutral, and overall strategy "effectiveness" (percentage of weeks that closed in trend).
- Why it's needed: Provides understanding of overall market context. If 80% of recent weeks were bullish, it's a clear sign of strong upward trend.
- How to use: Recommended true for strategic analysis.
ShowPrediction = true (Show Current Week Prediction)
- What it means: Enables display of the current week's forecast based on its current position relative to Sunday Open, as well as considering trend and volume filters.
- Why it's needed: This is your "operational summary." The indicator analyzes the current situation and provides hints, for example: "BULLISH TREND, Reliability: HIGH (Trend+Volume)".
- How to use: Definitely true. This is dynamic real-time situation assessment.
UseMondayOpen = true (Use Monday Opening)
- What it means: Some brokers open trading on Sunday, but liquidity at this time is very low, which can lead to false "gaps" (price jumps). This setting allows considering the full trading session opening on Monday as the reference point, not Sunday opening.
- Why it's needed: To get a cleaner and more representative weekly opening level that isn't distorted by low liquidity.
- How to use: In 99% of cases, recommended to set true. This increases level accuracy.
Adaptive Settings
These parameters are automatically adjusted by the indicator, but understanding their essence is important.
MinBreakoutPips = 15 (Minimum Pips for Breakout)
- What it means: Minimum distance in pips that price must move from the SO level for it to be considered the beginning of a trend (bullish or bearish). If price moved less, the week is considered "neutral."
- Why it's needed: To filter market "noise." Fluctuations of a few pips aren't significant.
- How it works: The indicator automatically selects this value based on instrument volatility. For EURUSD it might be 10-15 pips, and for XAUUSD gold — 150-200 pips (15-20 pips).
StrongSignalPips = 30 (Pips for Strong Signal)
- What it means: Distance in pips from the SO level that indicates strong and confident movement.
- Why it's needed: To distinguish ordinary trend movement from powerful impulse.
- How it works: Also automatically adjusted. If for gold MinBreakoutPips equals 150 pips, then StrongSignalPips might be 300-400. This helps in forecasting signal reliability.
Filters
Use_D1_Trend_Filter = true (Use D1 Trend Filter)
- What it means: The indicator will analyze the global trend direction on the daily chart (D1) using a moving average (MA). Signals coinciding with this trend will be considered more reliable.
- Why it's needed: This is one of the most important filters. Trading with the trend is always safer. If the D1 trend is bullish, then a buy signal from the SO level has much better chances of success.
- How to use: Strongly recommended true. D1_MA_Period (MA period) and D1_MA_Method (MA method) can be left at default (50, EMA) — these are classic trend determination settings.
Use_Volume_Filter = true (Use Volume Filter)
- What it means: The indicator analyzes trading volume. A level breakout confirmed by a volume spike is considered more genuine and strong.
- Why it's needed: Volume is "fuel" for price. If price breaks an important level but trading volumes are low, it might be a trap. Abnormally high volume confirms major player interest.
- How to use: Definitely true. Settings Volume_MA_Period (period for average volume calculation) and Volume_StdDev_Ratio (deviation coefficient for "spike" detection) are better left at default.
Alert System
EnableAlerts = true (Enable Alerts)
- What it means: Activates sound and text notification system.
- Why it's needed: So you don't miss important trading signals even when away from the monitor.
- How to use: true if you actively trade using the indicator.
Alert_Cooldown_Bars = 3
- What it means: After the indicator issues a similar signal (for example, "touch"), it will "be silent" for 3 bars (candles) and won't repeat the same signal.
- Why it's needed: On volatile instruments like XAUUSD, price can "saw" the level for a long time, causing a barrage of identical notifications. This setting protects from spam.
- How to use:
- For XAUUSD: Can set higher (for example, 5-10 bars on H1) as price often moves in jerks.
- For EURUSD: 3-5 bars is usually sufficient.
Max_Consecutive_Touches = 5 (Maximum Consecutive Touches)
- What it means: If price touches the level 5 times in a row without clear breakout or bounce, the indicator will stop sending "touch" alerts for this level to avoid spam during flat periods.
- Why it's needed: Protects from annoying signals when the market is in sideways movement and price "sticks" to the level.
- How to use: Value 5 is balanced. Don't decrease it, can increase to 7-8 if your instrument tends to long-term level "trading."
Retest_Tolerance_Pips = 2.0 (Retest Tolerance in Pips)
- What it means: Price doesn't always return to the level pip by pip during retest. This setting creates a small "zone" around the level (in this case, 2 pips) for retest detection.
- Why it's needed: To not miss a good retest signal just because price didn't reach the level by 1-2 pips.
- How to use: 2-3 pips is optimal for most currency pairs. For gold, can increase to 5-10 pips.
Alert_On_Momentum = true (Consider Movement Strength)
- What it means: Enables analysis of the "strength" of the candle on which the breakout occurred. A breakout made by a large, confident candle will have higher priority than a breakout by a small, indecisive candle.
- Why it's needed: To filter weak, uncertain breakouts that often turn out to be false.
- How to use: Definitely true. This significantly improves breakout signal quality.
EnablePushNotifications = true (Enable Push Notifications)
- What it means: If you've configured MetaTrader on your smartphone, the indicator will send notifications directly to your phone.
- Why it's needed: To stay informed of events even when far from the computer.
- How to use: true if you use the mobile application.
AlertOnOldLevels = false (Alerts on Old Levels)
- What it means: By default, notifications come only when interacting with the current week's level. If set to true, alerts will come for old levels too.
- Why it's needed: Allows focusing on the most current level or, conversely, tracking the entire grid of key levels.
- How to use:
- For beginners: false to avoid confusion.
- For experienced traders: true if you use old levels in your strategy.
Sound and Color Settings (Sound_Touch, BullishColor, etc.)
- What it means: These parameters allow you to configure sound signals for different events (touch, breakout, bounce) and colors for bullish, bearish, and neutral weeks.
- Why it's needed: For personalization. You can set different sounds for different events to audibly determine what happened in the market. Color indication helps quickly assess the visual picture.
- How to use: Configure to your taste. Recommended to set a more "alarming" sound for breakout (news.wav) and calmer for touch (alert.wav).
Part 3: How to Read and Understand Indicator Alerts
Let's examine a real alert example and break it down part by part.
Alert Example:
2025.08.25 21:28:35.324 Sunday_Open XAUUSD,H4: Alert: FALSE BREAKOUT: XAUUSD bounced from level below [Strength: 0.3] from 2025.08.25 Level price: $3369.87 > Matches D1 trend!
Part-by-Part Breakdown:
FALSE BREAKOUT: XAUUSD bounced from level below
- What it means: The strongest signal after retest occurred. Gold price (XAUUSD) first broke the Sunday Open level ($3369.87) from top to bottom but couldn't consolidate and quickly returned back up. "Bounced from level below" means price tried to break the level downward but was "bought up" and bounced upward.
- How to interpret: This is a strong bullish signal. Sellers' attempt to "push" price down failed. The upward movement will likely continue. This is an excellent opportunity to consider buying.
[Strength: 0.3]
- What it means: This is a "movement strength" indicator calculated as the ratio of candle body size to average volatility (ATR).
- Strength < 0.5: Weak, uncertain movement
- Strength 0.5 - 1.2: Normal, healthy movement
- Strength > 1.2: Very strong, impulsive surge
- How to interpret: In this case, Strength: 0.3 refers to the candle before the false breakout, showing that the downward movement was weak and uncertain, which led to the bounce. If this were a "BREAKOUT" alert with strength 0.3, such a breakout should be ignored.
from 2025.08.25
- What it means: The week opening date to which this level relates. This helps identify which specific Sunday Open level price is interacting with.
Level price: $3369.87
- What it means: The exact price value of the Sunday Open level where the event occurred.
- How to interpret: This is your reference point for stop-loss placement. For example, when buying after this false breakout, stop-loss can be placed slightly below this level.
> Matches D1 trend!
- What it means: The most important context line! It says that your buy signal (bullish false breakout) fully coincides with the global upward trend on the daily chart.
- How to interpret: This greatly amplifies your signal. The probability of successful trade significantly increases as you're trading not against the "current" but with it. If it said "Against D1 trend!" here, the signal should be treated with great caution.
Final Alert Conclusion:
The indicator reported a high-probability buy entry point for gold, as a bullish false breakout of a key level occurred, and this signal is confirmed by the global trend. This is a comprehensive and quality trading setup.