Partial take profit, breakeven and trailing: managing a trade step by step

Most of a trade's result is decided after the entry. Take profit too early and the winners stay small; leave the stop where it was and a winner can turn into a full loss. A trade plan written before the entry, with partial closes, a break-even rule and a trailing stop, takes those decisions out of the heat of the moment. This article goes through each rule, a worked example on gold, and how to set it up in DuoFX Trade Manager (user guide) so the plan runs by itself after the fill.
Think in R
R is the distance from entry to the initial stop. A buy at 4,058.15 with the stop at 4,053.53 has 1R = US$4.62. A target at 2R is 4,067.39, at 3R 4,072.01. Writing the plan in R makes it work on any stop size and any symbol: "close half at 1R" means the same thing on a tight scalp and a wide swing trade.
Partial take profit
A partial close banks part of the position at a level and lets the rest run.
- Why: it locks in some profit on trades that reach 1R and then turn, and it lets you hold the rest for a larger move with less pressure.
- The cost: a trade that runs all the way to the final target earns less than the full position would have. Partials trade some of the big winners for more steady small ones.
- Typical plans: half at 1R and the rest at 2R or 3R; or a third at 1R, a third at 2R and the last third trailed.
In DuoFX Trade Manager the Manage tab holds up to three partials, TP1, TP2 and TP3. Each sits at an R level (0.5R to 5R) and closes a share of the starting volume (20% to 75%), so the parts always add up the way you planned.
Break-even
Moving the stop to the entry turns a trade into one that can no longer lose much. Done too early, it closes trades that only needed a little room.
- When: at a fixed R (often 1R), or when TP1 is hit, so the stop moves once part of the profit is banked.
- Where: exactly at the entry still costs the commission and any swap. A break-even that covers costs sets the stop a little past the entry so the trade closes at about zero.
The Manage tab sets break-even at 0.5R to 2R (1R by default), and "BE after TP1" moves it when TP1 fills. With "+ costs" the stop goes to the entry plus the commission and swap paid so far, rounded to the tick. On gold with a US$7 round turn commission, that is about US$0.07 past the entry. The spread is not included.
The panel never sets a break-even stop on the wrong side of the price: if the price is already back past it, it waits until the price allows.
Trailing stop
A trailing stop follows the price and only ever tightens. Three common ways to set its distance:
- Fixed distance: a set number of points or a share of R. Simple, but it ignores how fast the market is moving.
- ATR: a multiple of the Average True Range, so the stop gives more room in fast markets and less in quiet ones.
- Candle lows and highs: the lowest low of the last few closed candles for a buy (the highest high for a sell). It follows market structure and moves in steps.
When to start matters as much as how: at once, after break-even, or after 1R in profit. Starting at once on a tight stop often closes the trade on normal noise.
On the Manage tab, Trailing cycles Off, Fixed, ATR and Candle. The value chip steps the distance (Fixed 0.5R to 2R, ATR 1 to 3 times ATR(14), Candle 1 to 8 bars), and the start chip reads now, after BE or after 1R. ATR and candles use closed bars of the chart timeframe or one you choose in the inputs; a sell's candle stop adds the spread, since a sell's stop fills on the ask. The stop moves in steps of at least the spread, so the broker is not asked for a new stop on every tick.
A worked example on gold
Buy 0.12 lots of XAUUSD at 4,058.15, stop 4,053.53 (1R = US$4.62), final target at 3R, 4,072.01. The plan on the Manage tab:
- TP1 at 1R, closing 50%: 0.06 lots at 4,062.77.
- TP2 at 2R, closing 25%: 0.03 lots at 4,067.39.
- Break-even after TP1, with costs.
- ATR trailing at 1 times ATR(14), starting after break-even.
The screenshot below shows this plan on the Manage tab with the target still at 2R. Its note "TP1 0.06 of 0.12, final TP 2.0R" shows that TP2 at 2R is left out while the final TP sits at the same level, since the TP closes the trade there. Drag the TP to 3R and TP2 comes back into play.

What happens next:
- 1. Price reaches 4,062.77: TP1 closes 0.06 lots, and the stop on the remaining 0.06 moves to about 4,058.22, the entry plus costs.
- 2. Trailing starts once break-even is set and pulls the stop up behind the price, never down.
- 3. Price reaches 4,067.39: TP2 closes 0.03 lots.
- 4. The last 0.03 lots close at the final target, or at the trailing stop if price turns first.
If price turns at 4,061 before TP1, the full position closes at the original stop: break-even waits for 1R or TP1. That is the trade-off of a later break-even, and it is yours to set.
Note that a 0.01 lot trade cannot be split. Each part is rounded down to the broker's lot step and always leaves at least the minimum lot open; a part with nothing left to close is skipped and logged.
Changing the plan on a running trade
The Pos tab lists every open trade with its lots, profit, R and plan tags such as "BE TP1 trail".
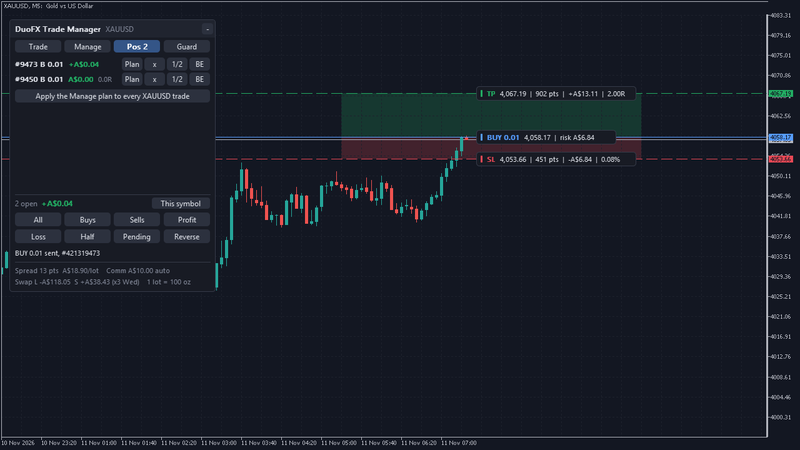
- Plan opens that trade's own plan on the Manage tab. Change it, then click "Apply to #". A level the price has already passed is refused, so a new plan never fires late at a worse price.
- BE sets break-even now, 1/2 closes half and x closes the trade, each with a second click.
- "Apply the Manage plan to every XAUUSD trade" gives the current plan to all trades on the symbol, also manual ones, and skips levels already passed.
If you move a stop by hand, the plan respects it: a tighter stop becomes the new base, and a looser one pauses break-even and trailing for that trade, so the panel never drags your stop back.
Reliability details
- Each level fires once, also across a restart or a timeframe change. The state is saved on every change.
- Levels are checked against every tick since the last check, so a brief wick to a level still counts.
- If a partial level was reached while the terminal was off and the price is back, the part is not closed at a worse price; an alert says so.
- The plan runs while the terminal runs. Broker SL and TP stay at the broker either way. For plans that run around the clock, use a VPS.
A short checklist
- Write the plan in R before the entry.
- Decide how much to bank at TP1 and what the rest is for.
- Choose break-even at a fixed R or after TP1, and cover costs.
- Choose a trailing method that fits how the symbol moves, and when it starts.
- Let the plan run; change it on purpose from the Pos tab, not by dragging stops in the moment.
DuoFX Trade Manager is available for MT5 and MT4. For sizing the trade before the entry, read How to size every trade from your risk in MT5 and MT4 (with drag lines).
Risk note: trading forex, gold and CFDs carries a high risk of loss. Partials, break-even and trailing manage a trade by your rules; they do not change where the market goes. Stops can fill worse than their level in gaps and fast markets. The example above is an illustration, not a trade recommendation. Test any plan on a demo account first, and never risk money you cannot afford to lose.