DuoFX Trade Manager user guide: lot size from risk, drag lines, one-click trading

This is the user guide for DuoFX Trade Manager for MT5 and MT4, a trade panel that plans the trade on the chart and runs it after the fill. You drag three lines (entry, stop loss and take profit), the panel works out the lot size from your risk, and one click sends the order with the SL and TP on it. After the fill your trade plan takes over: partial closes, break-even that covers costs, and a trailing stop.
How-tos and articles: How to size every trade from your risk in MT5 and MT4 (with drag lines) and Partial take profit, breakeven and trailing: managing a trade step by step.
What it is
- An Expert Advisor with a panel. It never opens a trade by itself: an order is sent only when you click (or press a hotkey you switched on).
- A lot size calculator on the chart: risk as % of balance, % of equity, a money amount or fixed lots.
- Drag lines for entry, SL and TP, each with a card showing price, points, money and R.
- One-click orders: market BUY and SELL, or BUY LIMIT, BUY STOP, SELL LIMIT and SELL STOP from the entry line.
- A trade plan per trade: partials at TP1, TP2 and TP3, break-even, trailing stop, optional hidden SL and TP.
- A prop firm guard: daily loss limit, max drawdown, a pre-trade check and locks.
- A news filter around high impact releases, close tools, auto-manage, hotkeys and alerts.
Install and first run
- 1. Install it from the Market: in the terminal press Ctrl+T, open the Market tab, then Purchased, and click Install.
- 2. Open the chart of the symbol you want to trade. In the Navigator, find DuoFX Trade Manager under Expert Advisors, Market, and drag it onto the chart.
- 3. On the Common tab, allow Algo Trading (MT4: "Allow live trading"), and switch on the Algo Trading button in the toolbar (MT4: AutoTrading).
- 4. Check the Inputs tab, at least the risk mode and value. Then press OK.
The panel opens at the top left with four tabs: Trade, Manage, Pos and Guard. Drag its header to move it, and click the minus to shrink it to a one-line bar. A chart holds one Expert Advisor, so the Trade Manager takes the place of any other EA on that chart.
The Trade tab: lot size from your risk
The top row reads Risk, a minus, the risk value and a plus, with the lot size on the right.
- Minus and plus step the risk: 0.05% below 0.5%, 0.10% up to 2%, 0.25% above, up to 10%. A money risk steps by 5, 10, 25 or 100 depending on its size, and fixed lots by the broker's lot step.
- Click the value to switch the mode: % of balance, % of equity, money, fixed lots. The value converts so the money at risk stays about the same.
- Prop accounts: set "Account size for % risk" in the inputs (for example 100,000) and the % is taken from that size, not from the balance. The chip then reads "% size".
- Lots round down to the broker's step, so the risk after rounding is never above your target. If even the minimum lot would risk more, the panel says what the minimum lot would risk and keeps the button off.
- An optional lot cap ("Never more lots than this") limits every order.
Below the risk row:
- SL in points with the money at risk, and TP in points with the reward.
- R:R with "locked" when the lock is on, the net R after commission, and at risk as a share of the account.
- Margin for the order and the free margin after it, in red when the order would not fit.
The money at risk counts the move from entry to SL, the commission per lot, and by default one spread more as a cushion for a stop that fills while the spread is wider ("Add the spread to the risk" under Advanced).
Drag lines and cards
Three lines plan the trade: the entry (blue), the SL (red) and the TP (green), with a risk zone and a reward zone between them. Hover within a few pixels of a line and it thickens; press and move to drag it. Each line has a card:
- Entry: "BUY 0.09 | 4,054.77 | risk A$82.74".
- SL: price, points, money and % of the account.
- TP: price, points, money and R.
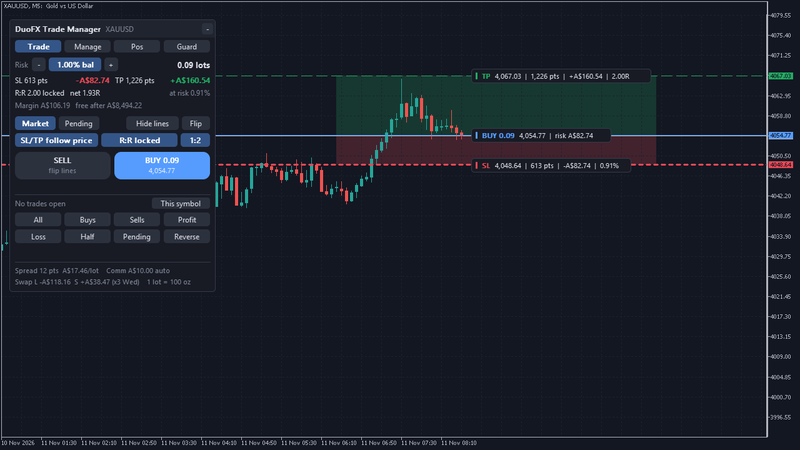
The default stop is 1.5 times the average bar range of the last 14 bars on the chart timeframe, never under 5 spreads, or a fixed distance in points from the inputs. The default target is 2R.
How the lines move together
- SL/TP follow entry (on by default): drag the entry line of a pending order and the SL and TP move with it by the same distance. On a market plan the entry is the price, so the chip reads "SL/TP follow price". Click it for "SL/TP stay put" to keep the SL and TP where they are.
- R:R lock (on by default, 1:2): drag the SL and the TP moves so the target stays twice the stop. Drag the TP and the SL moves to half that distance. Click the ratio chip to choose 1:1, 1:1.5, 1:2, 1:3, 1:4 or 1:5. Click "R:R locked" to switch to "R:R free" and drag the lines on their own.
- The lot size follows the stop, so the money at risk stays at your setting whichever line you move.
- The lock rounds the moved line to the tick size and never puts it inside the broker's minimum stop distance: the line stays at that minimum and the status line says so. If the other line cannot exist (a target below zero), the order button is off until you move a line.
- The lock works on the planning lines before the order is sent. Open trades keep their SL and TP when you move one of them by hand.
Sending orders
- Market: the BUY and SELL buttons show the lots and the price. The side the lines are planned for carries the lot. A first click on the other side flips the lines to it, and the next click sends.
- Pending: click Pending, or drag the entry away from the price. The button names the order, PLACE BUY LIMIT, BUY STOP, SELL LIMIT or SELL STOP, and turns into the other type when the price crosses the line.
- Flip turns the plan to the other side.
- Hide lines and Show lines at any time. After an order, the planning lines hide by default, so the chart never looks like a second order is set up. The button then reads SHOW PLAN: one click brings back a new plan, a second click sends it. The choice is kept when you change the timeframe.
- Confirm each order (off by default): the first click arms the button ("CONFIRM BUY"), a second click within 3 seconds sends. A double click never sends two trades.
- Optional pending expiry in hours, and a maximum slippage (3 times the spread by default).
The cost footer
The bottom of the panel lists the costs of the chart symbol from your broker's own data:
- Spread in points and in your account currency per lot. It turns to a warning colour, with the usual figure next to it, when it is above twice its median of the last 30 minutes.
- Commission per lot round turn. "auto" means it was read from your closed trades on the symbol. If the symbol has none yet, the rate of another symbol of the same kind on the account is used and named, for example "Comm A$7.01 (from EURUSD)". If nothing is found, the footer reads "Comm not found, set it in inputs": the panel never guesses a number. A typed value under Advanced always wins.
- Swap long and short per lot per night, with the day the triple swap is charged, for example "(x3 Wed)".
- Contract size: 1 lot = 100 oz on gold, 100,000 units on a currency pair. Check your broker's contract spec.
- The broker's stops and freeze levels in points, when the symbol has them.
The Manage tab: partials, break-even and trailing
The Manage tab holds the plan given to each new trade. Every chip steps its value with a click.
- Partials on or off, and BE after TP1.
- TP1, TP2, TP3: each at an R level (0.5R to 5R, or off) closing a share of the starting volume (20% to 75%). Defaults: TP1 at 1R closing 50%, TP2 and TP3 off. Levels at or beyond the final TP are left out, since the TP closes the trade first.
- Break-even on or off, at 0.5R to 2R (1R by default), with "+ costs" to set the stop at entry plus the commission and swap so far.
- Trailing: Off, Fixed, ATR or Candle, its value, and when it starts: now, after BE (default) or after 1R.
- Hidden SL and TP, with an optional backup broker stop.
A line under the chips shows what TP1 would close on the current lot, for example "TP1 0.06 of 0.12, final TP 2.0R". The how-to Partial take profit, breakeven and trailing goes through each rule with a worked example.
The Pos tab: open trades
One row per trade in scope on the chart symbol (or all symbols, with the scope chip): ticket, side, lots, profit, R and short tags of its plan, such as "BE TP1 trail". Each row has four buttons:
- Plan: opens the Manage tab on that trade's own plan. Changes are a draft until you click "Apply to #", and the panel refuses a level the price has already passed.
- x closes the trade and 1/2 closes half of it, each after a second click.
- BE moves its stop to break-even now.
"Apply the Manage plan to every XAUUSD trade" gives the current plan to all trades on the symbol, skipping levels the price has already passed.
Close tools
Under every tab: All, Buys, Sells, Profit, Loss, Half, Pending and Reverse, for this symbol or all symbols. A close that hits more than one trade asks for a second click within 3 seconds and shows the count. Reverse always asks twice: it checks the new trade first, closes the open trades on the symbol, and only then opens the other side with the panel's lot and lines, so it never leaves you flat by surprise.
The panel acts on manual trades, on its own magic number and on any magic numbers you list. Trades of other Expert Advisors are left alone.
Hidden SL and TP
With Hidden on, the stop and target stay in the terminal instead of at the broker. They show as dotted lines you can drag, and the trade closes on the first tick past a level. An optional backup broker stop sits further out (0.25, 0.5 or 1 times the stop distance) in case the terminal goes offline. Without one, a red banner says the trade has no broker stop. Hidden levels are set when a trade opens and only work while the terminal runs, so use a VPS for them.
The Guard tab: prop firm loss limits
The guard is off until you set a loss limit. Choose a preset (common 2-step, 1-step and instant funding rules, plus a personal one) or type your own values, and check them against your firm's current rules. The tab shows:
- Day and Max DD meters: the loss so far against the limit, in money and %.
- Rules, Room to the nearest floor, Day start, the Target when one is set, Locks, Caps, the next Reset and the next News release.
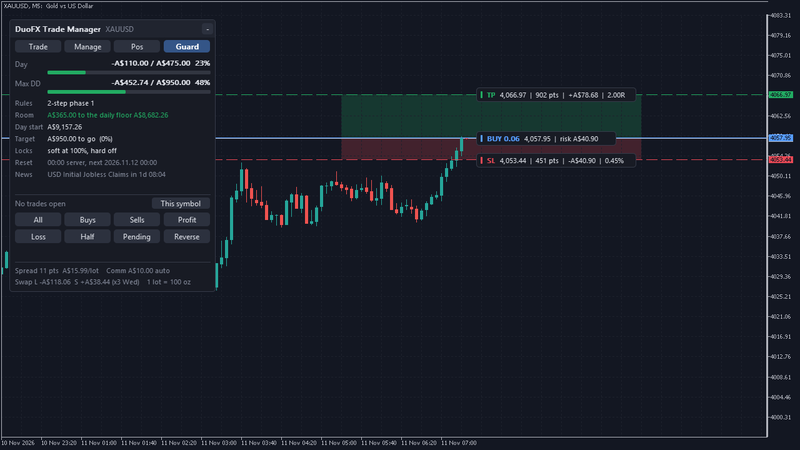
Before each order the guard checks that the trade, plus the risk already open at its stops, cannot breach a limit, and refuses it if it could. While a limit is set, orders without an SL are refused unless you allow them.
- Soft lock (at 100% of a limit by default): no new panel orders until the reset.
- Hard lock (optional, at 95%): closes trades, and trades opened elsewhere after the lock, until the reset, for the whole account or only trades in scope.
- Caps: risk per trade, trades per day and open trades.
- Day reset at your firm's time, at a server time or a time in a chosen zone. The server clock is detected.
News filter
By default new panel orders are blocked from 2 minutes before to 5 minutes after high impact releases for the symbol's currencies (FOMC, CPI, NFP and the like). The minutes, the importance and extra currencies are inputs. On MT5 the terminal's economic calendar is used. MT4 has no calendar, so it uses a built-in US table of FOMC, CPI, NFP, PPI, retail sales, GDP and PCE. Optionally, pending orders are deleted or positions closed when the window opens. The Guard tab shows the next release.
Auto-manage, hotkeys and alerts
- Auto-manage (off by default): a trade on this symbol opened from the phone or by hand without SL or TP gets both after a short wait (SL 1.5 times ATR(14) on M15, TP at 2R), plus the Manage plan. Trades already open when it starts are covered too.
- Hotkeys (off by default): B buy, S sell, P place, C close all (press twice within 2 seconds), E break-even, L show or hide the lines. On MT5 with Shift, on MT4 by pressing the key twice. The chart must have focus. The letters are inputs.
- Alerts by popup, push, email or sound: guard locks, news windows, auto-manage actions, and anything the plan could not do, such as a broker that refuses a stop.
Panel size and themes
Dark, light or auto (from the chart background), any corner, font and font size, start minimised. On a short chart the panel shrinks its font, then drops sections, then minimises itself.
Settings
- Risk: risk mode, risk value, account size, lot cap.
- New trades: default stop, default target, R:R lock and locked R:R, hide the lines after an order, confirm each order, magic number, hidden SL/TP, backup stop.
- Trade plan: partials, TP1 R and %, break-even R, break-even after TP1, trailing mode.
- Prop guard: preset, daily loss limit, max drawdown, soft lock, hard lock and its scope.
- News, alerts, automation: news block and its minutes, popup, push, sound, email, auto-manage, hotkeys.
- Panel: theme, corner, offsets, font, font size, start minimised.
- Advanced: commission, spread in risk, SL/TP follow entry, comment, slippage, pending expiry, extra magic numbers, TP2 and TP3, break-even offset and costs, trailing fine tuning, guard units, reset time and zone, server clock, caps, news importance and currencies, auto-manage SL and TP, hotkey letters.
FAQ
- Does it open trades by itself? No. It sends an order only when you click or press a hotkey you switched on. It manages the trades it is set to manage.
- Which trades does it manage? Its own panel trades and manual trades, plus any magic numbers you list. Auto-manage adds SL, TP and the plan to manual trades on the symbol.
- Does it work on gold, indices and crypto? Yes. The lot size comes from the broker's own contract and tick value, so it works on any symbol your broker offers.
- What if I close the terminal? Broker SL and TP stay at the broker. The plan and hidden levels run while the terminal runs: use a VPS for them. Each part closes once, also across a restart or a timeframe change.
- Can I use it on several charts? Yes. One chart per symbol runs that symbol's plans, and the status line says so on the others. Run plans in one terminal per account.
- Does it work for prop firm challenges? It has a daily loss limit, max drawdown, a pre-trade check and locks. Set the values to match your firm's rules.
- Is the money at risk exact? It uses the symbol's tick value, your commission and a spread cushion. A stop can fill further away in gaps and fast markets.
- MT4 and MT5? Yes, one version for each, with the same features.
Risk note: trading forex, gold and CFDs carries a high risk of loss. DuoFX Trade Manager sizes and manages trades by your rules: the trading decisions stay yours. Stops can fill worse than their level in fast markets, and hidden levels need a running terminal. It is not financial advice and does not promise any result. Try it on a demo account first.