1. Introduction
SMC Prime X is a Smart Money Concepts trade assistant for MetaTrader 5. It reads market structure, liquidity, order blocks and fair value gaps on four timeframes, draws them on your chart and turns them into trade setups with entry, stop, target and lot size already calculated.
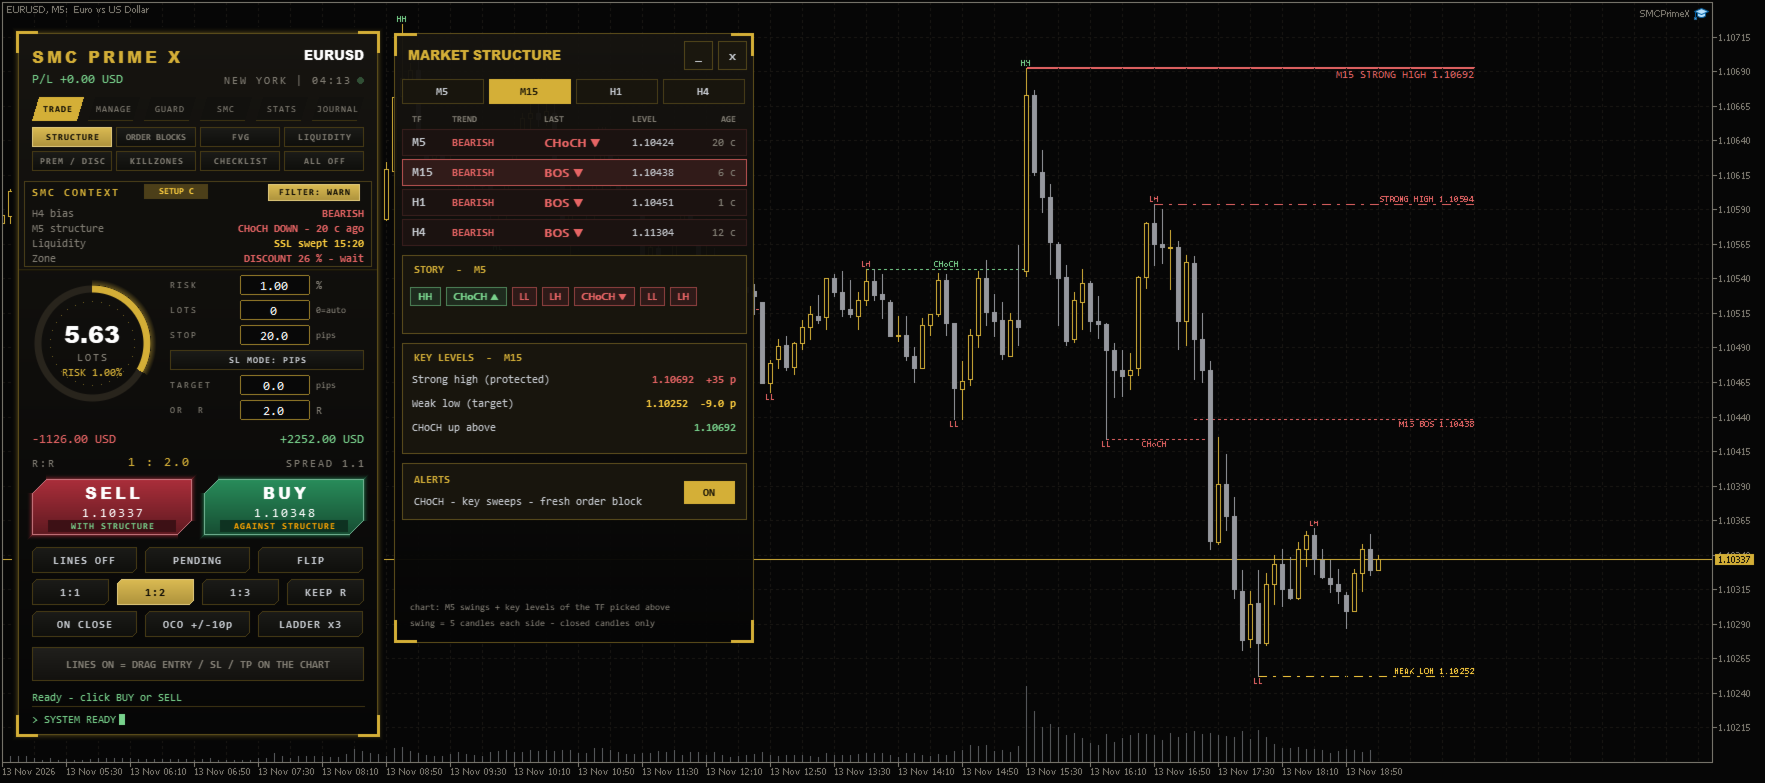
It is a manual trading tool. It never opens a trade by itself: every order is placed only when you press a button.
What it does
- Detects swings (HH, HL, LH, LL), BOS and CHoCH on M5, M15, H1 and H4.
- Finds order blocks, breakers and fair value gaps, and removes zones that are already used up.
- Maps buy-side and sell-side liquidity and checks every sweep.
- Shows premium / discount with the OTE zone, and the Asia, London and New York killzones.
- Grades setups with a 7-rule checklist (A+ / A / B / C).
- Calculates the lot size from your risk and places, manages and protects your trades.
Requirements
- MetaTrader 5, any broker, hedging or netting account.
- Works on forex, gold, silver and indices, on any timeframe from M1 to D1.
- Algo Trading must be enabled to place orders.
- All drawings use closed candles only, so they do not repaint.
2. Installation and first start
- Buy SMC Prime X on the MQL5 Market and press Install on the product page, or in MT5 open Toolbox → Market → Purchased and press Install. You need to be logged in to your MQL5 account (Tools → Options → Community).
- Find it in the Navigator under Expert Advisors → Market → SMC Prime X.
- Drag SMC Prime X onto a chart. On the Common tab, tick Allow Algo Trading.
- Press Algo Trading on the MT5 toolbar so it turns green.
- Set your risk and preferences on the Inputs tab (see section 6), then press OK.
On the first start the EA loads history for M5, M15, H1 and H4. This can take a few seconds; the tools panel shows the results as soon as the data is ready.
Good to know
- Use one SMC Prime X per symbol. Settings and the last tool you used are remembered per chart.
- Switching the chart's symbol or timeframe is fine; the EA recalculates everything, including the pip size.
- When you remove the EA, your chart colours come back.
3. The main panel
The main panel sits on the left of the chart. From top to bottom:
Header. Symbol, open P/L, the active session (e.g. NEW YORK) with a countdown, and the _ button to minimize the panel.
Tabs. TRADE · MANAGE · GUARD · SMC · STATS · JOURNAL. TRADE is where you place orders; the others are described in section 5.
Tool buttons. Two rows of four: STRUCTURE, ORDER BLOCKS, FVG, LIQUIDITY, PREM / DISC, KILLZONES, CHECKLIST, ALL OFF. Each opens its panel on the right of the main panel (section 4).
SMC CONTEXT box. A one-glance summary:
| Line | Meaning |
|---|---|
| H4 bias | Trend of the higher timeframe (BULLISH / BEARISH) |
| Structure | Last BOS or CHoCH on the chart timeframe and its age in candles |
| Liquidity | The last sweep (e.g. SSL swept 15:20) |
| Zone | Premium / discount position of the price, or ABOVE / BELOW RANGE |
| SETUP | Current checklist grade (A+, A, B, C or -) |
| FILTER | Structure filter mode (OFF / WARN / BLOCK) |
Risk gauge. Shows the lot size for your risk. Fields:
- RISK: % of balance (or money, see RiskMode).
- LOTS: 0 = calculated automatically; type a number to force a fixed lot.
- STOP: stop in pips. SL MODE switches between pips and ATR.
- TARGET in pips, or R: target as a multiple of the risk.
SELL / BUY buttons. Show the price and a tag: WITH STRUCTURE, AGAINST STRUCTURE or mixed structure. With the filter on WARN, a trade against the structure needs a second click; on BLOCK it is refused.
Order tools
| Button | What it does |
|---|---|
| LINES OFF / ON | Shows draggable ENTRY, SL and TP lines on the chart; press PLACE to send |
| PENDING | Next order is a limit / stop order at the ENTRY line |
| FLIP | Mirrors the lines to the other side |
| 1:1 · 1:2 · 1:3 | Sets the target as a multiple of the stop |
| KEEP R | Keeps the R:R fixed when you drag the stop |
| ON CLOSE | Arms an entry that fires when a candle closes beyond the line |
| OCO ±p | BUY STOP and SELL STOP around the price; one cancels the other |
| LADDER x3 | Splits the order into several entries between entry and stop |
The status line at the bottom shows what the EA is doing, e.g. Ready – click BUY or SELL or SYSTEM LOCKED – spread 3.5 > 3.0.
4. The SMC tools
Each tool button opens a panel to the right of the main panel and draws its levels on the chart. The panel can be minimized with _ (the drawings stay) or closed with x (the drawings are removed). Only one tool is open at a time.
4.1 Structure
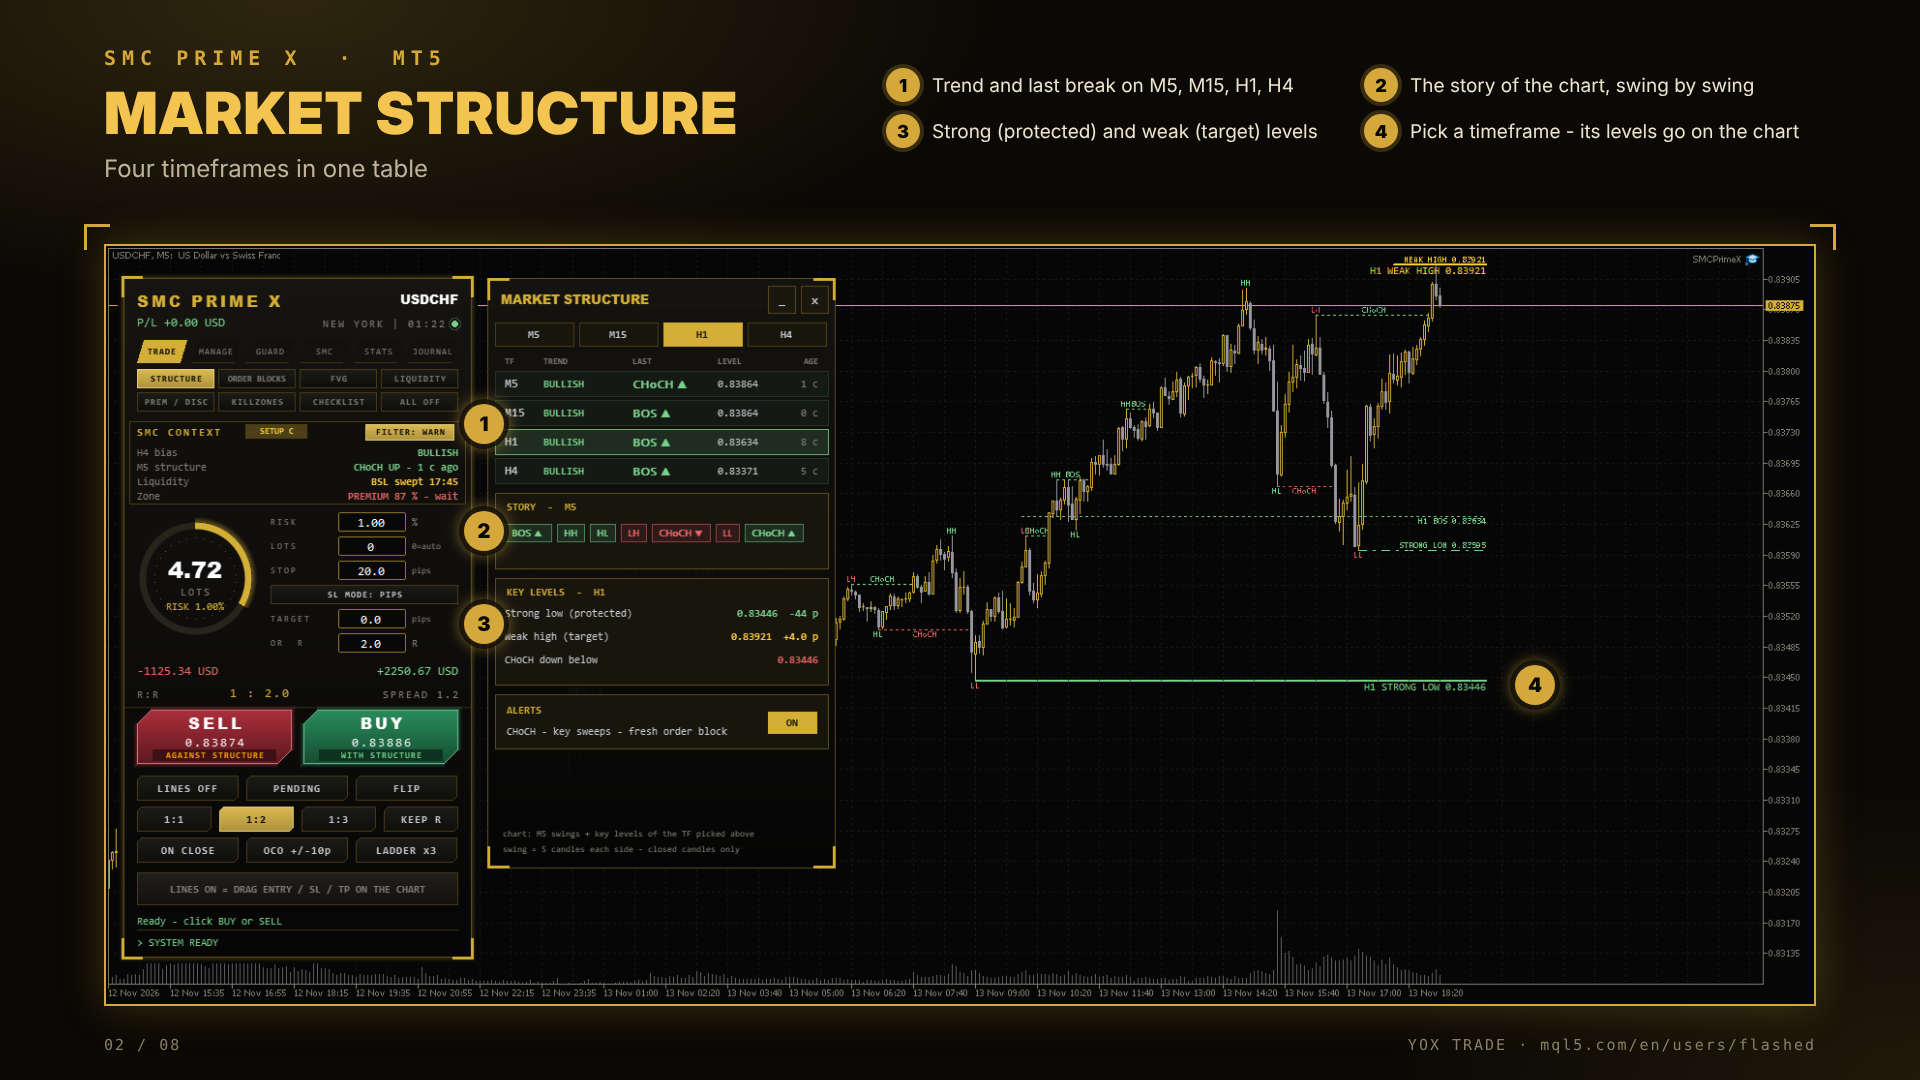
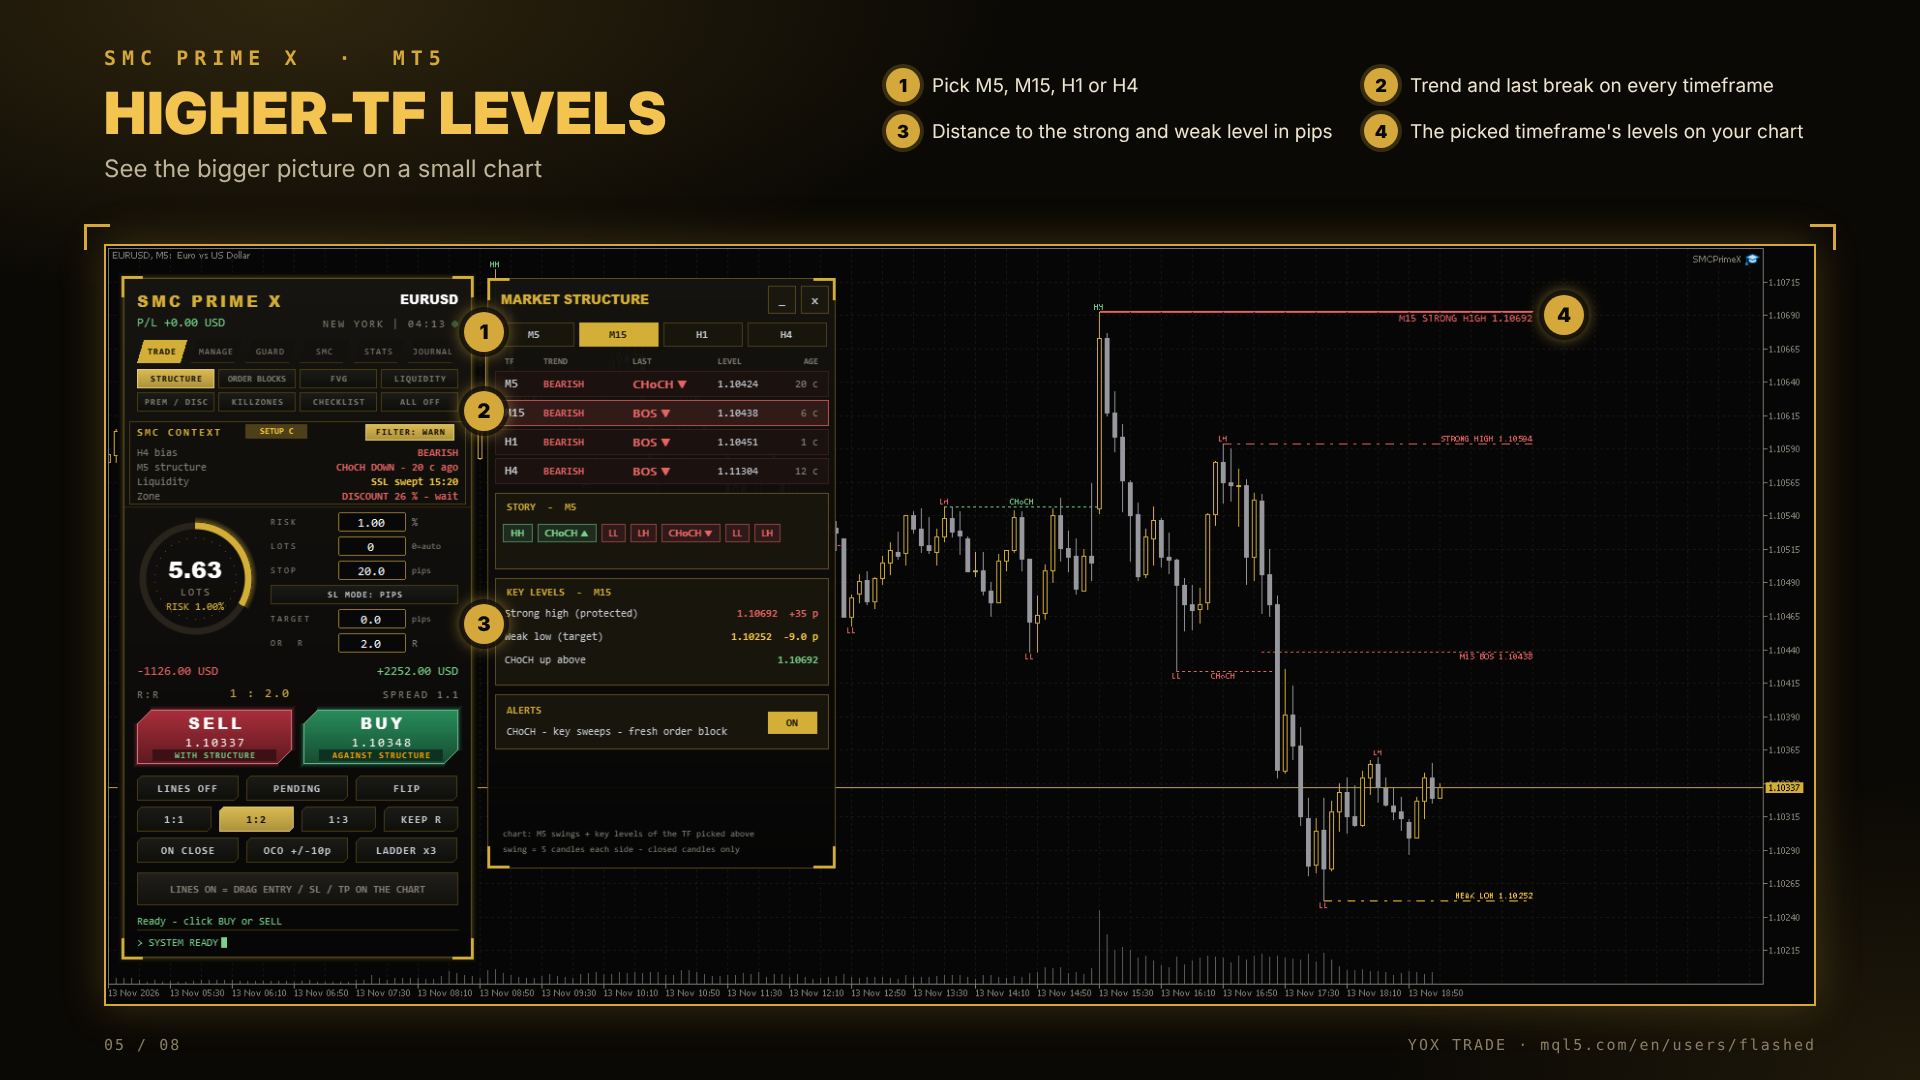
- Table of 4 timeframes (M5, M15, H1, H4): trend, last break (BOS or CHoCH), its level and age in candles.
- Story: the last swings and breaks in order, e.g. HH · HL · BOS ▲ · LH · CHoCH ▼.
- Key levels of the picked timeframe: strong (protected) high or low, weak (target) high or low, and where a CHoCH would happen.
- On the chart: HH / HL / LH / LL labels, BOS and CHoCH lines of the chart timeframe. Click M15, H1 or H4 at the top and that timeframe's key levels are added as thick lines labelled with its name.
- ALERTS button switches the SMC alerts on or off.
How to read it: BOS = the trend continues. CHoCH = the first break against the trend, a possible turn. The strong level is what must hold for the trend to stay valid; the weak level is the next target.
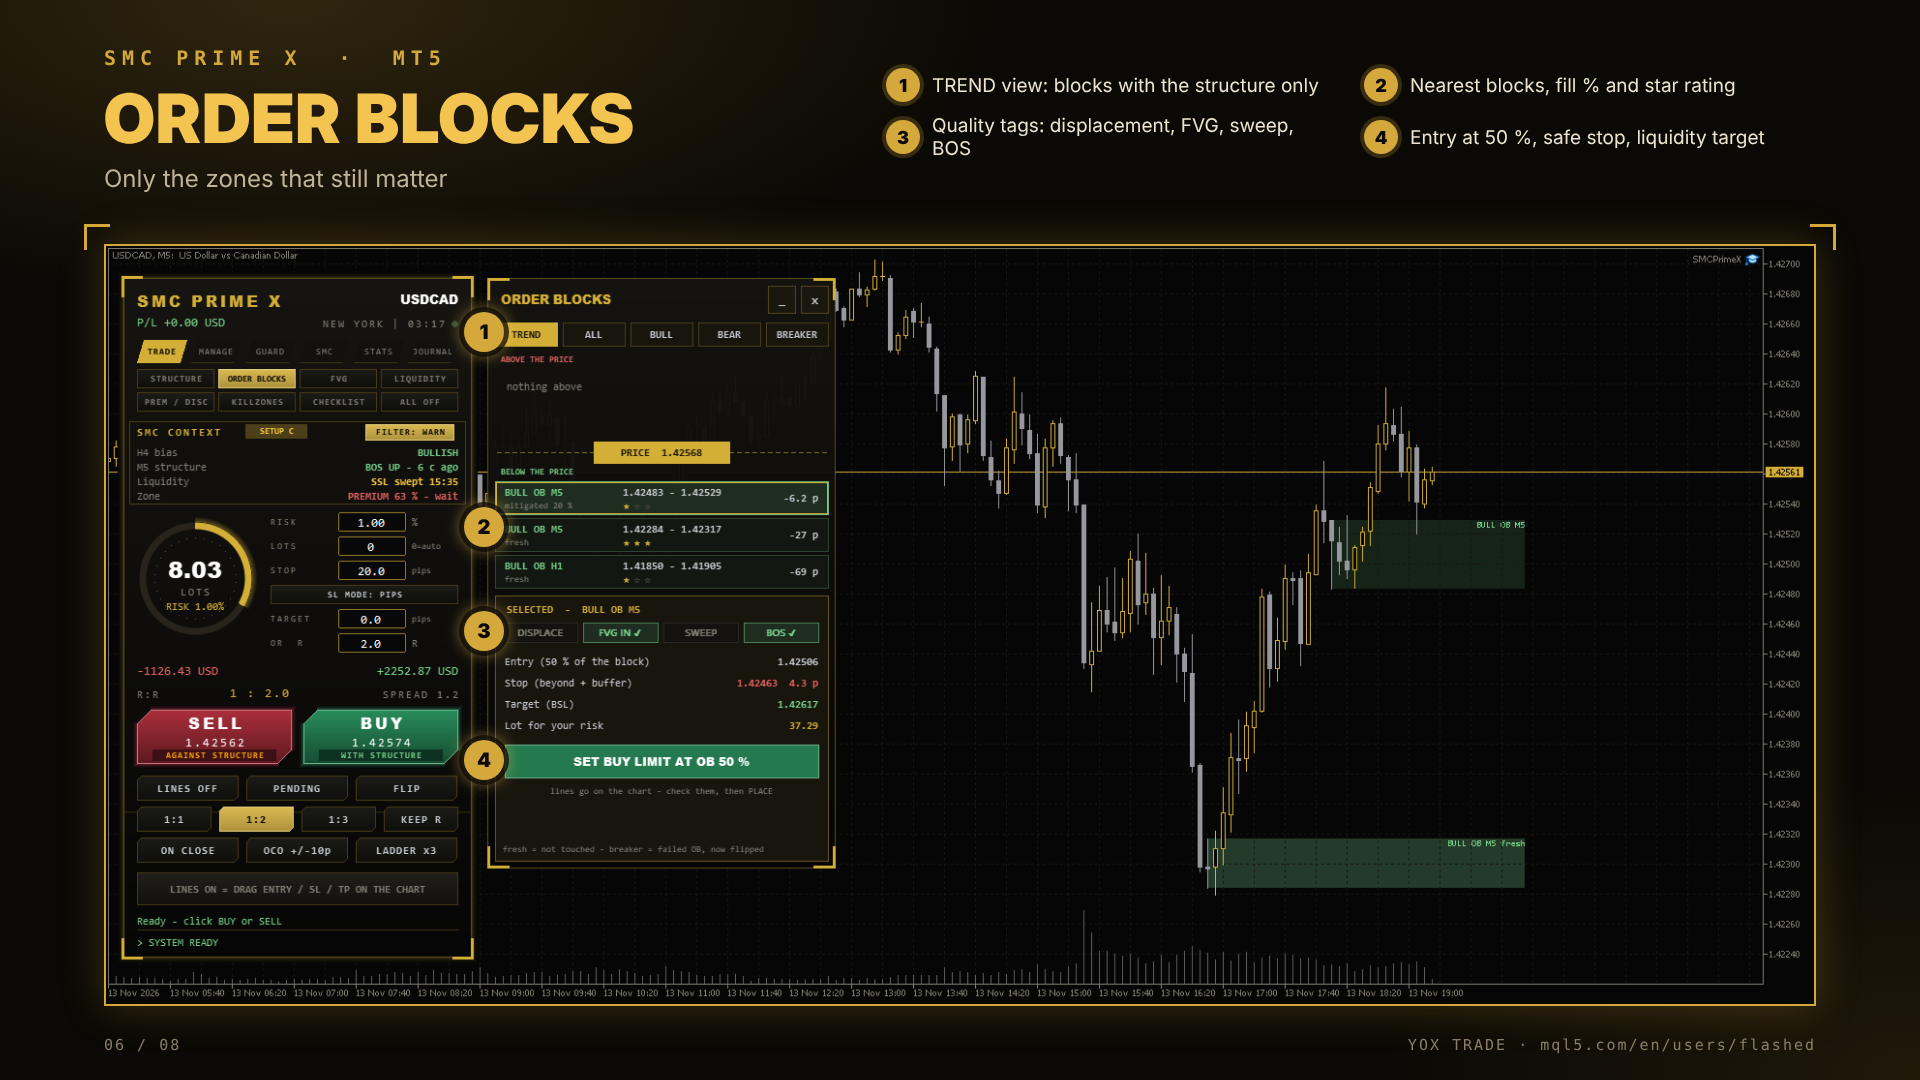
4.2 Order blocks
- Lists the 2 nearest blocks above and below the price, with distance, state (fresh / mitigated %) and a 1–3 star rating.
- TREND (default) shows only blocks in the direction of the H4 bias. ALL, BULL, BEAR and BREAKER show the rest.
- Stars: ★ basic block · ★★ it swept liquidity first · ★★★ it also caused a CHoCH (or is a breaker) with the H4 trend.
- Selected block: quality tags (DISPLACE, FVG IN, SWEEP, BOS / CHoCH), entry at 50 % of the block, stop beyond it with a safe minimum distance, target at the next liquidity (or your R), and the lot for your risk.
- SET BUY / SELL LIMIT AT OB 50 % puts the lines on the chart; check them, then press PLACE.
- Used-up blocks (50 % filled or tested twice) disappear; overlapping blocks are merged; blocks too big for the chart are hidden ( SmcMaxZoneATR ).
4.3 Fair value gaps
- Bullish and bearish gaps with % filled; IFVG = a gap price closed through, which often flips its role.
- Entry at the CE (50 % of the gap). Overlapping gaps are merged into one zone.
- Minimum gap size is set with SmcFvgMinATR .
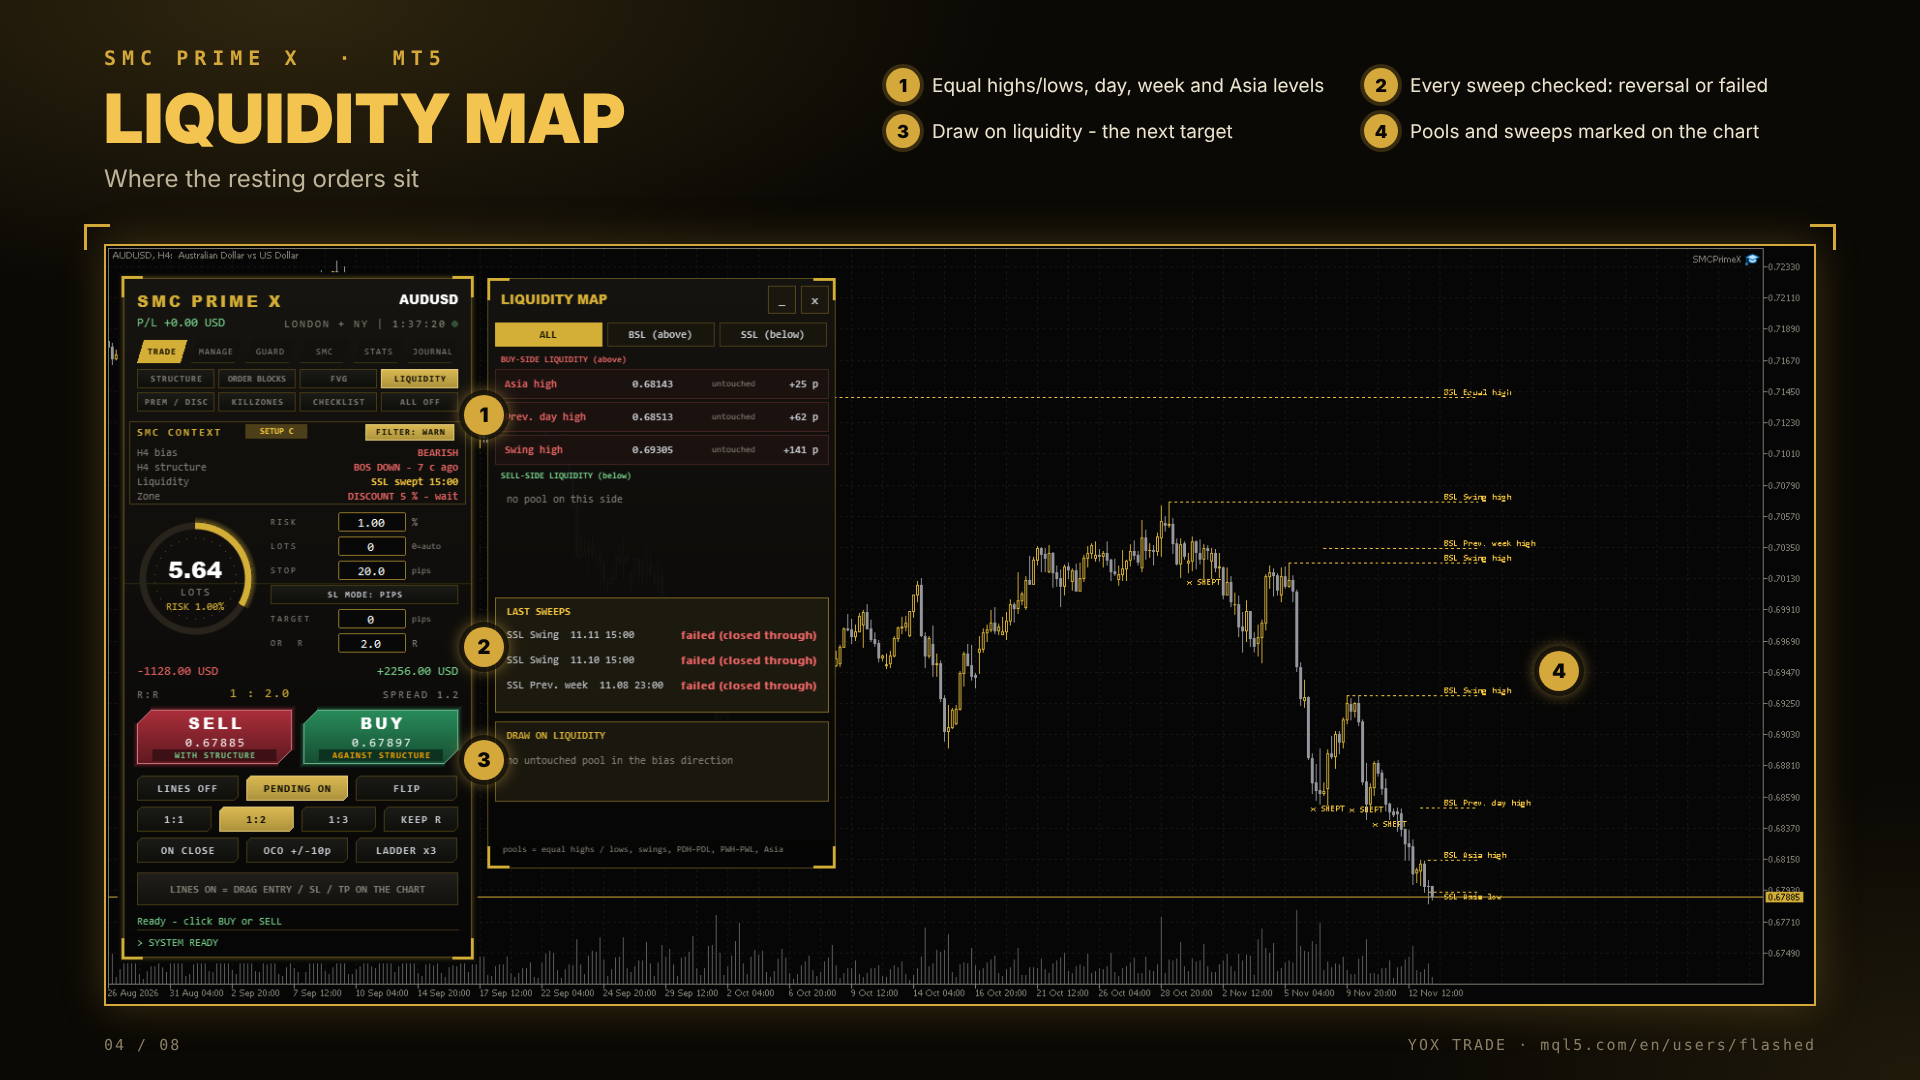
4.4 Liquidity map
- Buy-side (above) and sell-side (below) pools: equal highs / lows, swing points, previous day, previous week and the Asia range, each untouched or swept.
- Last sweeps: reversal ✓ if the opposite structure broke within 30 candles, failed (closed through) if price kept going.
- Draw on liquidity: the next untouched pool in the direction of the bias – the likely target.
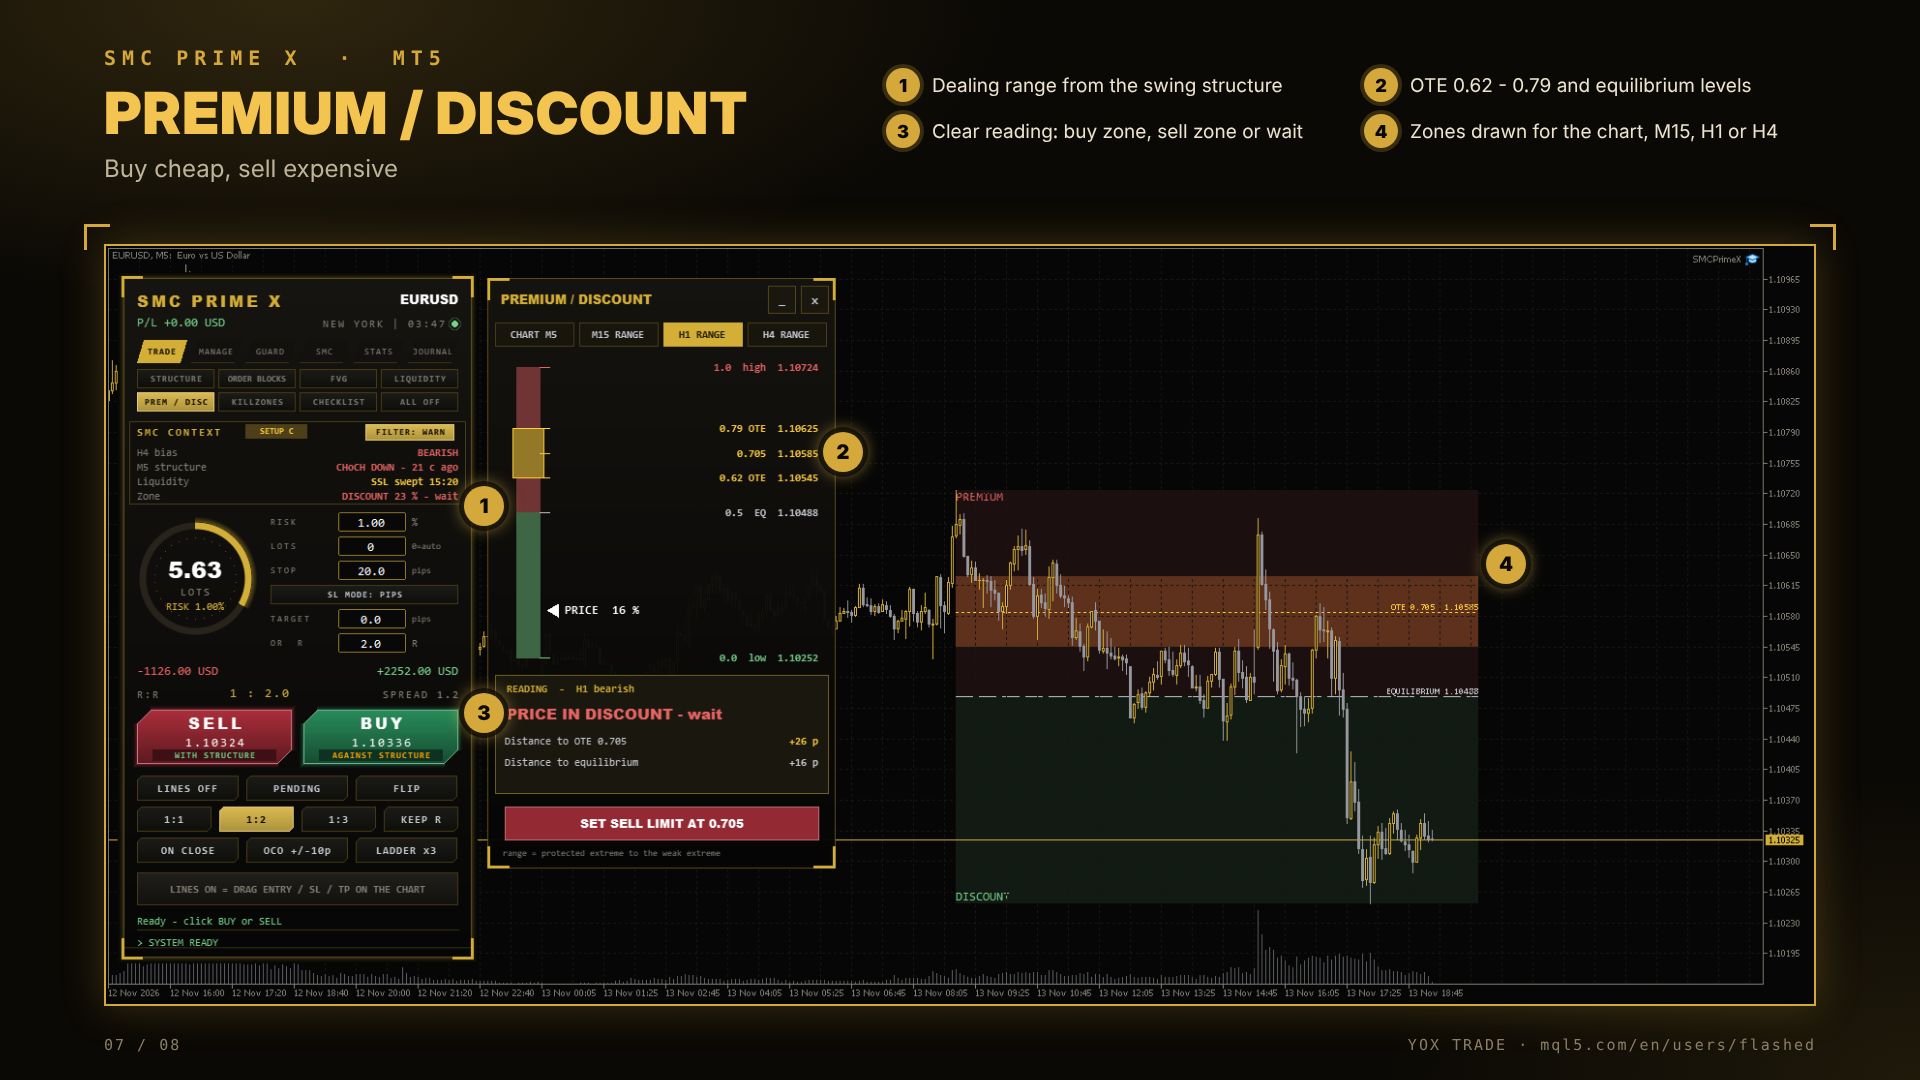
4.5 Premium / discount
- Range from the protected extreme to the weak extreme. Choose CHART, M15, H1 or H4 range.
- Levels: equilibrium (0.5) and the OTE zone 0.62 – 0.705 – 0.79.
- Reading: buy in discount in an uptrend, sell in premium in a downtrend, otherwise wait. ABOVE / BELOW THE RANGE means a new high or low is being made.
- SET BUY / SELL LIMIT AT 0.705 places the lines at the middle of the OTE zone.
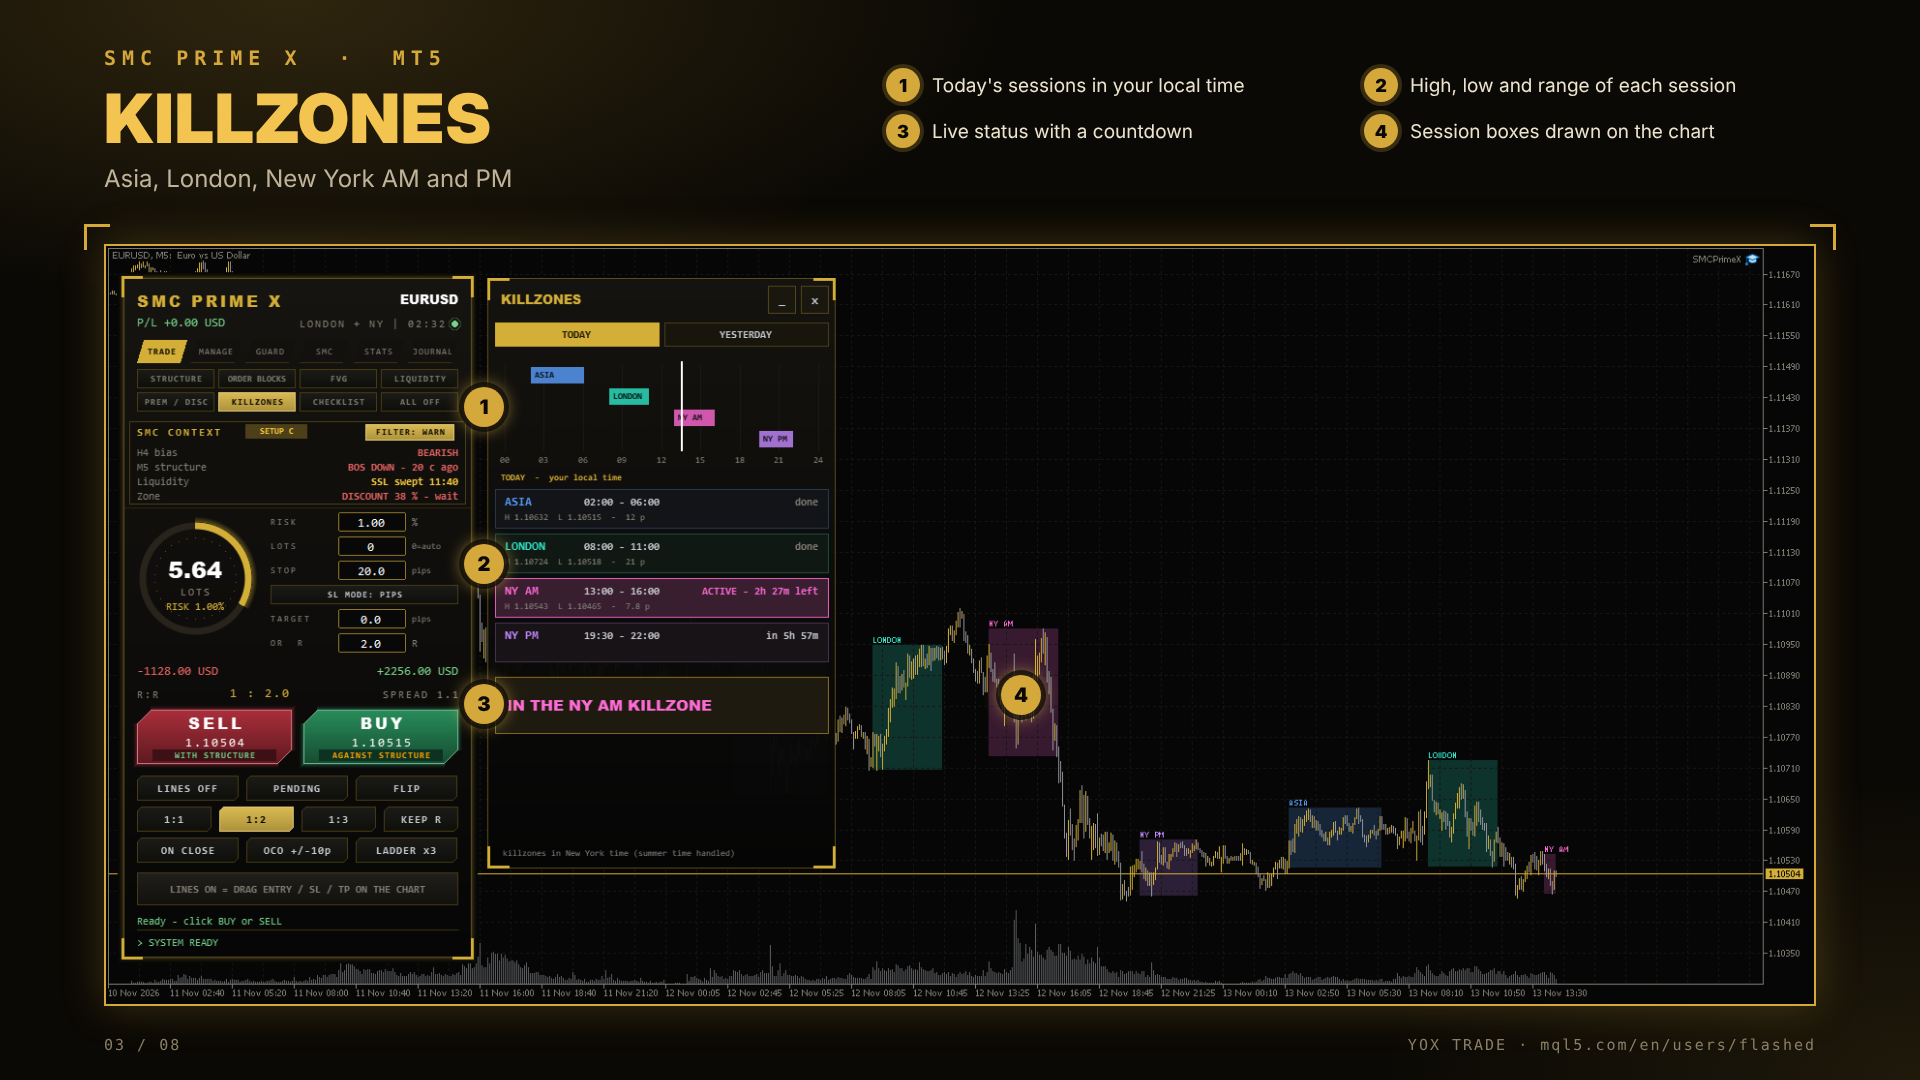
4.6 Killzones
- Asia, London, New York AM and New York PM in your local time (summer time handled).
- High, low and range of each session; status done, ACTIVE – time left or in 1h 30m.
- TODAY / YESTERDAY; session boxes are drawn on the chart.
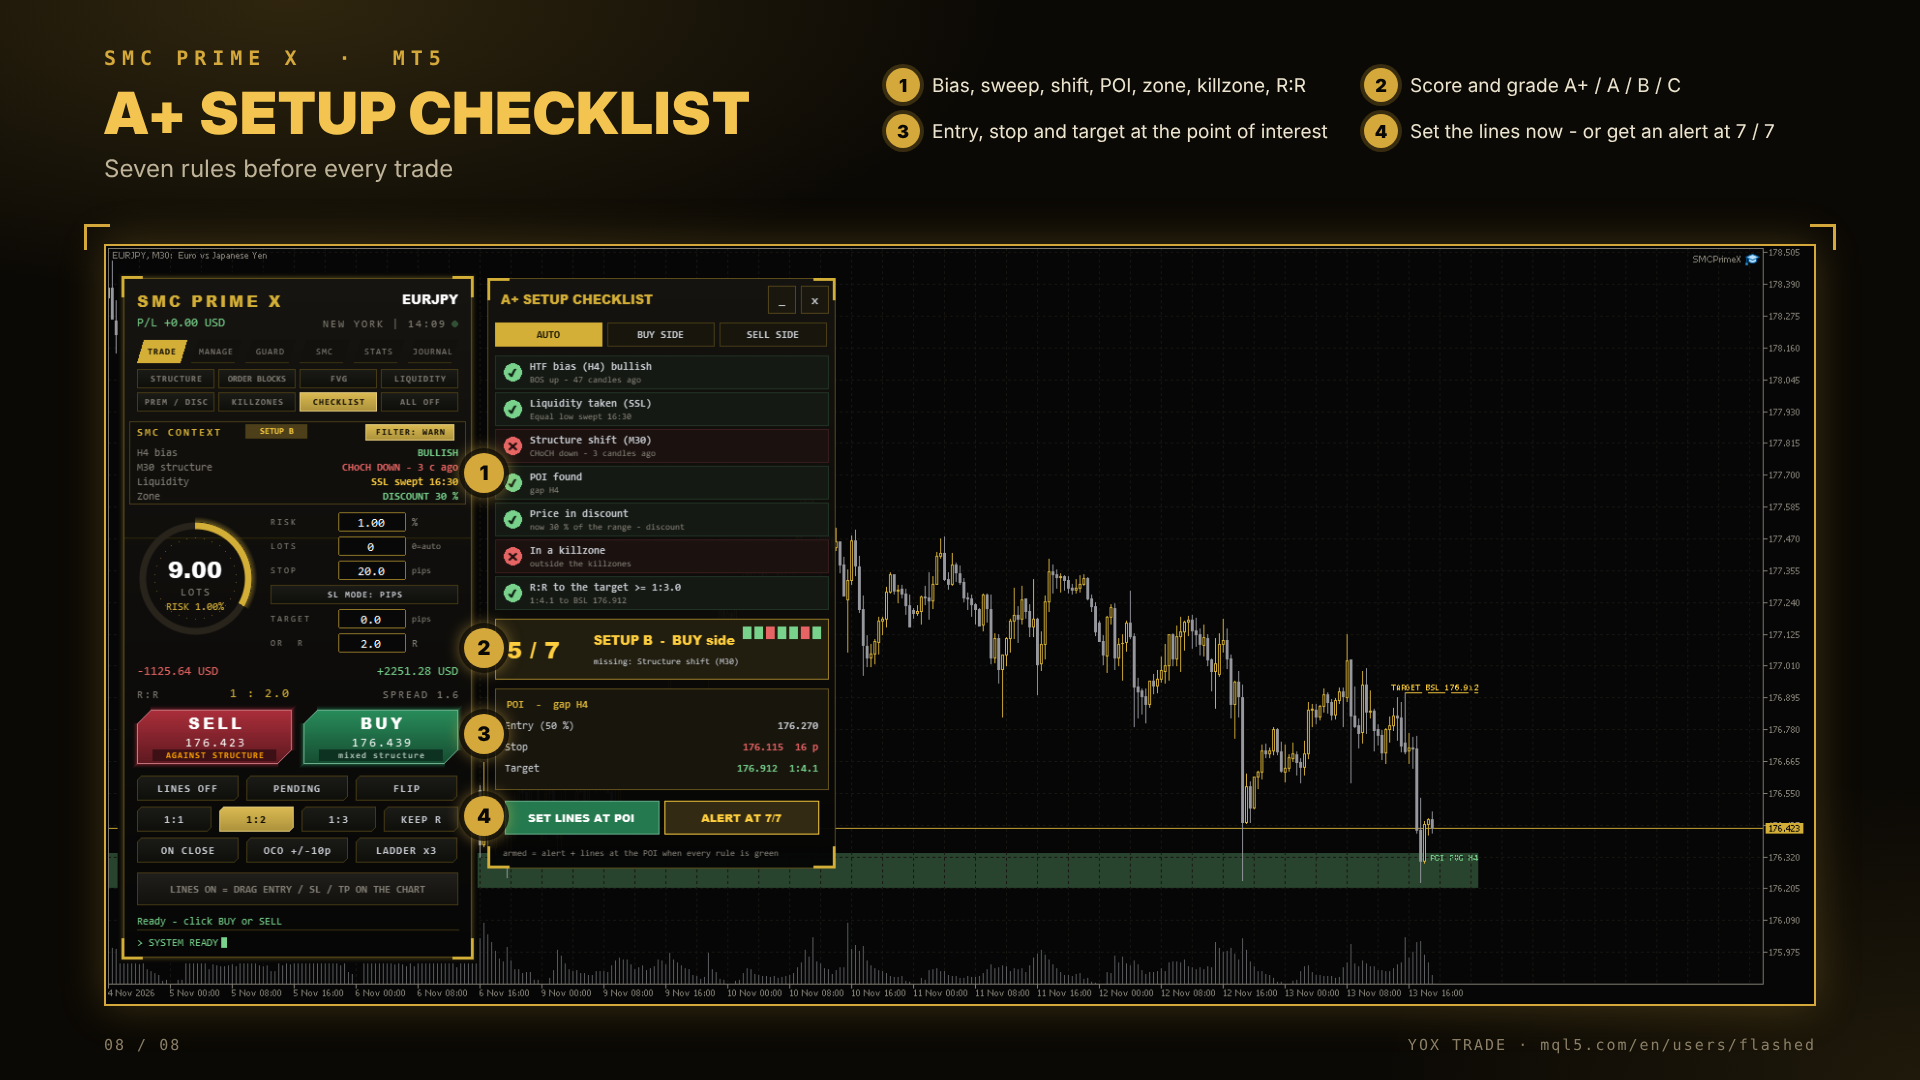
4.7 A+ Setup checklist
Seven rules, checked live for the BUY or SELL side (AUTO picks the side of the bias):
- HTF bias (H4) in the trade direction.
- Liquidity taken on the opposite side.
- A fresh structure shift (max. 30 candles old).
- A point of interest (order block or FVG) found.
- Price in discount (buy) or premium (sell).
- Inside a killzone.
- R:R to the liquidity target at least SmcMinRR (default 1:3).
Score and grade: 7 = A+, 6 = A, 5 = B, 4 = C, below 4 = no setup. The POI box shows entry, stop and target. SET LINES AT POI prepares the trade; ALERT AT 7/7 alerts you and sets the lines when every rule turns green.
5. Other tabs, alerts and protection
MANAGE. Open trades of this symbol with their profit in R. Automatic breakeven, up to three partial closes and trailing stop (pips, ATR, swing, candles or EMA) run in the background with the settings from section 6. BASKET mode manages all trades on the symbol as one position (target, stop, trailing give-back).
GUARD. Your safety limits and their live state: daily and weekly loss, equity drawdown, losing streak, trades per day, open trades, spread, trading hours, news pause and risk per currency. When a limit is hit the panel shows SYSTEM LOCKED with the reason, and new orders are refused until it clears.
SMC. Structure of all five timeframes in one list, the nearest point of interest with SET LINES buttons, and the alerts switch.
STATS. Win rate, profit factor, average win and loss, best and worst trade, expectancy and loss streak over the last StatsDays days.
JOURNAL. Closed trades with entry, exit, result and notes; export to CSV ( SMCPrimeX_Journal.csv ).
Alerts
SMC Prime X alerts only on events worth your attention:
- CHoCH on the chart timeframe – a possible change of trend.
- Key liquidity sweeps – equal highs / lows, previous day, previous week, Asia range.
- First touch of a fresh order block in the trend direction, e.g. price reached a fresh bullish order block M5 on USDCAD (with the trend – look for a BUY). Each block alerts once; at most one such alert every 5 minutes.
- Checklist 7/7, when armed with ALERT AT 7/7.
Alerts can be pop-up, sound and push (phone), see section 6.
Structure filter
- OFF – structure is shown, nothing is blocked.
- WARN (default) – a trade against the H4 structure needs a second click.
- BLOCK – trades against the H4 structure are refused.
6. Input settings
The most important inputs, grouped as in the EA's Inputs tab. Defaults in brackets.
SMC
| Input | What it does |
|---|---|
| SmcTF1–SmcTF4 (M5, M15, H1, H4) | The four structure timeframes |
| SmcBiasTF (H4) | Timeframe for the higher-timeframe bias |
| SmcSwingLen (5) | Candles on each side that confirm a swing |
| SmcBars (600) | Candles read per timeframe |
| SmcFvgMinATR (0.3) | Minimum fair value gap size, × ATR |
| SmcEqualTolATR (0.10) | Tolerance for equal highs / lows, × ATR |
| SmcMinRR (3.0) | Minimum R:R for checklist rule 7 |
| SmcMaxZoneATR (6.0) | Hide order blocks taller than this × chart ATR (0 = off) |
| SmcAlerts (true) | SMC alerts on at start |
| RaceFilter (WARN) | Structure filter: OFF / WARN / BLOCK |
| ArenaPanel (true) · StartTool · ArenaPanelW (360) · ArenaPanelRight (10) | Tools panel on / off, first tool, width and gap |
Orders
| Input | What it does |
|---|---|
| RiskMode (% of balance) · DefaultRisk (1.0) | Risk per trade as % or a fixed amount |
| DefaultSLPips (20) · DefaultTP_R (2.0) | Starting stop and target |
| SL_UseATR (false) · SL_ATRMult (1.5) | Start in ATR stop mode |
| PendingExpiryHours (0) | Pending orders expire after N hours (0 = never) |
| OCODistancePips (10) · LadderOrders (3) · LadderSpreadPct (50) | OCO distance and ladder settings |
| MagicNumber · TradeComment · SlippagePoints | Order identification and slippage |
Management
| Input | What it does |
|---|---|
| ManageScope | Manage only EA trades, or also your manual trades on this symbol |
| UseBreakeven · BE_AtR (1.0) · BE_LockPips (1.0) | Move SL to breakeven at +1R, lock 1 pip |
| UsePartial1–3 · P1_AtR · P1_Percent … | Up to three partial closes at set R levels |
| UseTrailing · TrailMode (ATR) · TrailStartR (1.0) | Trailing stop type and start |
| Basket… | Basket target, stop and give-back in % of balance |
| TimeExitHours · DailyCloseTime · FridayCloseTime | Time-based exits |
Guard
| Input | What it does |
|---|---|
| MaxDailyLossPct (3.0) · MaxWeeklyLossPct · MaxEquityDDPct | Loss limits that lock the EA |
| DailyTargetPct | Stop new trades after a daily gain |
| MaxLossStreak · StreakPauseMinutes · CooldownMinutes | Pauses after losses or any closed trade |
| MaxOpenTrades (5) · MaxTradesPerDay (10) · MaxLotSize · MaxRiskPerTradePct | Size and count limits |
| MaxSpreadPips (3.0) | Lock while the spread is above this |
| PipSizeOverride (0 = auto) | Pip size; auto = forex 0.0001 / 0.01 JPY, gold 0.10, silver 0.01 |
| TradeFromHour · TradeToHour | Allowed trading hours, local time |
| UseCalendarNews (true) · NewsTimes · NewsPauseMinutes (15) | Pause around high-impact news |
| MaxRiskPerCurrencyPct (3.0) · MaxTradesPerCurrency | Exposure limit per currency across all symbols |
Panel, journal and alerts
| Input | What it does |
|---|---|
| PanelX · PanelY | Panel position |
| Theme (Black Gold) · PaintChart | Panel theme and matching chart colours |
| ShowTradeZones | Shade SL / TP zones of open trades |
| EnableHotkeys | Press twice: B buy, S sell, X close all, H half close, E breakeven |
| PopupAlerts · SoundAlerts · PushAlerts | How alerts reach you |
| JournalAllSymbols · ScreenshotOnClose · StatsDays (30) | Journal and statistics |
7. A typical workflow, tips and FAQ
Workflow example (M5 / M15 trader)
- Direction. Open STRUCTURE and click H4. Bearish H4 = look for sells only (TREND view and the SELL button say WITH STRUCTURE).
- Where. Open PREM / DISC with the M15 or H1 range. In a downtrend wait for price to come up into premium, ideally the OTE zone.
- What. Open ORDER BLOCKS (TREND view) or FVG and pick the zone inside premium, preferably ★★ or ★★★.
- Target. Check LIQUIDITY: the draw on liquidity is your target.
- Confirm. Open CHECKLIST. Press SET LINES AT POI now, or ALERT AT 7/7 to be told when everything lines up.
- Execute. Check the lines and lot on the chart, then PLACE. Breakeven, partials and trailing take over from there.
Tips
- Use a higher timeframe for direction and a lower one for entries; the M15 range on PREM / DISC suits M1 / M5 scalping.
- Thin zones on M1 / M5 give large lot sizes. The EA keeps a safe minimum stop, but always check the lot before you place.
- A gold stop of 20 pips is only 2.00 USD. Gold traders usually use 30–100 pips.
- On M1 the checklist changes often; for steadier grades use M5 or M15.
FAQ
The panel says SYSTEM LOCKED. A guard limit is active; the reason is shown next to it (e.g. spread, daily loss, news). It clears by itself, or change the limit in the inputs.
Nothing changes on the chart when I click a timeframe in STRUCTURE. The chart always shows its own swings; the clicked timeframe adds only its key levels (strong / weak / last break). Far levels may be off-screen; zoom out.
The spread or lot looks wrong on gold or silver. Check PipSizeOverride ; leave it at 0 for automatic pip size, or enter your broker's pip size.
Do the drawings repaint? No. All SMC levels use closed candles only.