|

For EA version 6.425 · drop into MQL5\Services\ — no compiling needed
* This service does nothing on its own. It requires ApeX Trading Console running on a chart.
ApeX TELEGRAM bar
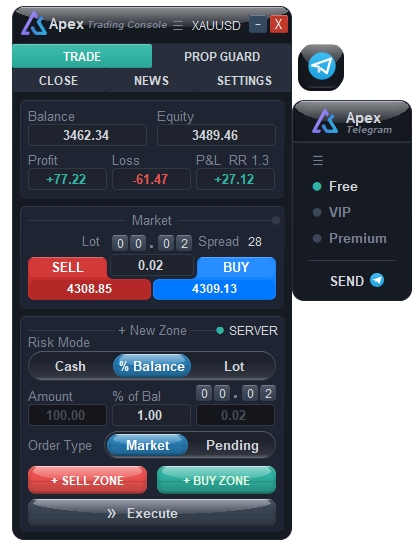
A console for broadcasting your own setups: tick the channels, press SEND once, and every ticked channel receives the same message and the same chart picture.
Switched on with Signal Bar in the Settings tab. It appears once at least one chat is set to Channel in the Telegram window.
Nothing is ever sent by itself, and account alerts and commands never reach these channels.
1. The bar
- 1.1 Channel chips — One per Channel chat. Click to tick or untick, several at a time in any combination; the dot turns green when a channel is included.
- 1.2 SEND — Sends the current selection. The whole row is clickable, not only the word.
- 1.3 ☰ — Opens the Signal channel setup described in section 2.
- 1.4 Moving it — Drag the bar by its header. The place is remembered, including after a timeframe change or a restart.
2. Signal channel setup

- 2.1 Combine — Slide the switch to dock the bar onto the main panel. Docked, it follows the panel while you drag it, takes the panel's transparency, and sits under the ApeX indicator bar if one is docked too. Slide it back and the bar is free again, returning to the place you last dragged it to.
- 2.2 Bar shape — Vertical or horizontal. Combine keeps it vertical, so the horizontal option is dimmed while Combine is on.
- 2.3 Zone — Which boxes are collected when you press SEND: Draft (the one you are still drawing), Pending, Market. Only boxes on the chart's own symbol are collected, and the choice covers both the message and the picture.
- 2.4 Partial — Writes the TP and SL levels already configured on the box into the text. This is the plan you set, not a follow-up alert when price reaches them.
- 2.5 Details — ON sends the text message; OFF sends the picture alone.
- 2.6 Chart — ON attaches a picture of the chart; OFF sends text alone. Turning both off is refused, as there would be nothing to send.
- 2.7 Remark — A fixed line added to the end of every message, for a disclaimer or a note to your members. Empty means no extra line.
- 2.8 Confirm popup before sending — Keeps a confirmation dialog between the press and the send, listing how many boxes go to how many channels. Telegram has no undo, so leaving this on is the safe choice.


3. What one press does
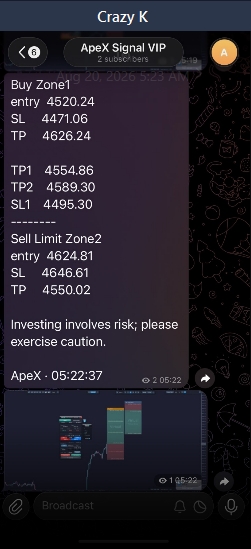
- 3.1 One message, one picture — Every qualifying box goes into a single message, ordered by zone number, with a single chart picture — not one message per box.
- 3.2 The picture — Taken from your chart as it looks now, with every box except the ones being sent hidden for the shot and restored straight after. The chart's timeframe is never changed.
- 3.3 The notification card — Confirms the send and lists the channels it went to. It is kept in Notify History, and can be silenced or given a sound under Signal Sent in Notify & Sound.
- 3.4 Order of arrival — The text arrives first and the picture a moment later, because the screenshot is taken in the background so the chart is never frozen.
4. Good to know
- 4.1 Members cannot answer the console — Commands are accepted only from the IDs in Allowed IDs, and a post inside a channel carries no sender at all, so it is refused whoever wrote it.
- 4.2 The bot must be an administrator — of the channel it posts into, and that channel must be added as a Channel chat in the Telegram window.
- 4.3 Nothing is scheduled — The bar sends only what you press, so closing the terminal stops nothing; there was never anything pending.
- 4.4 Wait a moment between presses — A second press within a couple of seconds is ignored, so one slow click cannot post the same signal twice.
━━━━━━━━━━━━━━━━━━━━━━━━━━━━━━
Popup "Telegram"
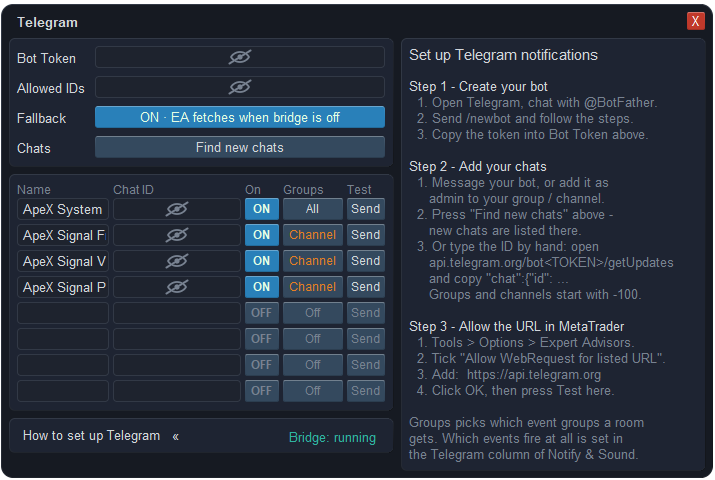
Sets up the bot, the chats it writes to, and what each chat is allowed to do.
Opened from the Telegram button beside the tabs, or from Setup next to Notify & Sound in the Settings tab.
Two separate jobs live here. System chats receive your alerts and can hold the control buttons; Channel chats receive only the signals you broadcast from the ApeX TELEGRAM bar. A chat is one or the other, never both.
1. Bot Token & Allowed IDs
- 1.1 Bot Token — The token @BotFather gives you. The field stays closed until you click it, and while it is closed no input box exists at all — a screenshot of this window can never contain the token.
- 1.2 Allowed IDs — Telegram user IDs allowed to send commands, separated by commas. Anything from anyone else is ignored. Left empty, the EA accepts no commands at all.
- 1.3 Test — Sends a test message, so the token, the chat and the WebRequest permission are confirmed in one press.
2. The chats table — up to 8 rows
- 2.1 Name — Your own label for the row. It is also the name shown on the ApeX TELEGRAM bar.
- 2.2 Chat ID — The destination. Groups and channels start with -100. Closed by the same cover as the token, because a chat ID is enough to post into your channel for anyone who also has the bot.
- 2.3 On — Switches the row off without deleting it.
- 2.4 Groups — Opens the card in section 3, where the role, the filters and the permissions of that chat are set.
- 2.5 Find new chats — Message your bot, or add it as an administrator to a group or channel, then press this. New chats the bot has seen are listed, and the ones you tick are written into free rows. Nothing found means the bot is not an administrator yet.
- 2.6 By hand — A chat ID can also be typed into an empty row: open api.telegram.org/bot<TOKEN>/getUpdates and copy the "chat":{"id": value.
3. The room card
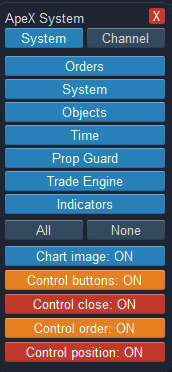
- 3.1 System / Channel — The role of this chat, one or the other. System receives alerts and may be given the control buttons. Channel receives only what you send from the ApeX TELEGRAM bar; alerts and commands stay off there, so a customer channel is never reached by your account events.
- 3.2 Group filters — Seven buttons, one per event group (Orders, System, Objects, Time, Prop Guard, Trade Engine, Indicators), deciding which groups this chat receives. All and None set them in one press.
- 3.3 Chart image — ON attaches a chart picture to the alerts this chat receives; OFF sends text only.
- 3.4 Control buttons — Puts the action buttons into this chat. Only one chat can hold them — switching it on here switches it off everywhere else.
- 3.5 Control close / Control order / Control position — Three separate permissions, enabled one at a time under the control chat. A button that is not permitted is never offered, and the reply names the switch that is missing.
4. Commands from your phone
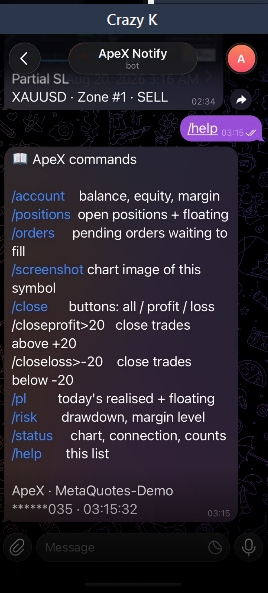
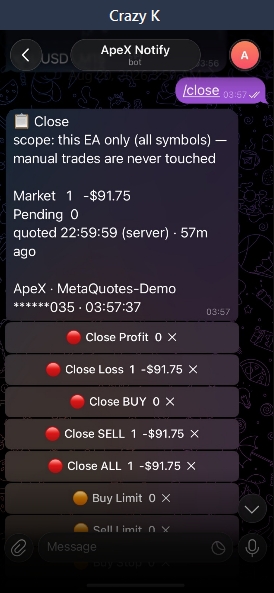
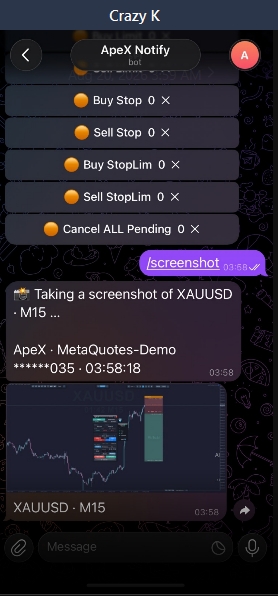
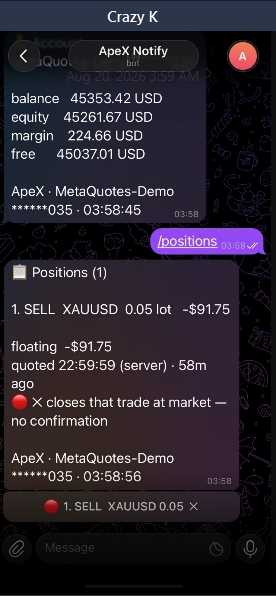
- 4.1 The commands — /help /account /positions /pl /status /risk /orders /screenshot /close /closeprofit /closeloss
- 4.2 Where the answer goes — Always to the private chat of whoever asked, never into a channel, because the reply carries the account line.
- 4.3 Who is heard — Only the IDs in Allowed IDs. A message posted inside a channel carries no sender, so it is refused whoever wrote it.
- 4.4 Buttons — Anything that touches money is offered as a button with a confirmation step. Buttons expire after a while and work once.
5. Setting it up the first time
- 5.1 Create the bot — In Telegram, chat with @BotFather, send /newbot, follow the steps, then paste the token into Bot Token.
- 5.2 Find your user ID — Allowed IDs wants the number of the Telegram account that will send commands, not a username. Send any command to your bot once and look at the Experts tab of MetaTrader: the line rejected command from 123456789 (not in Allowed IDs) is your own ID — paste that number into the field and send the command again. Asking @userinfobot in Telegram gives you the same number. Several people are separated by commas.
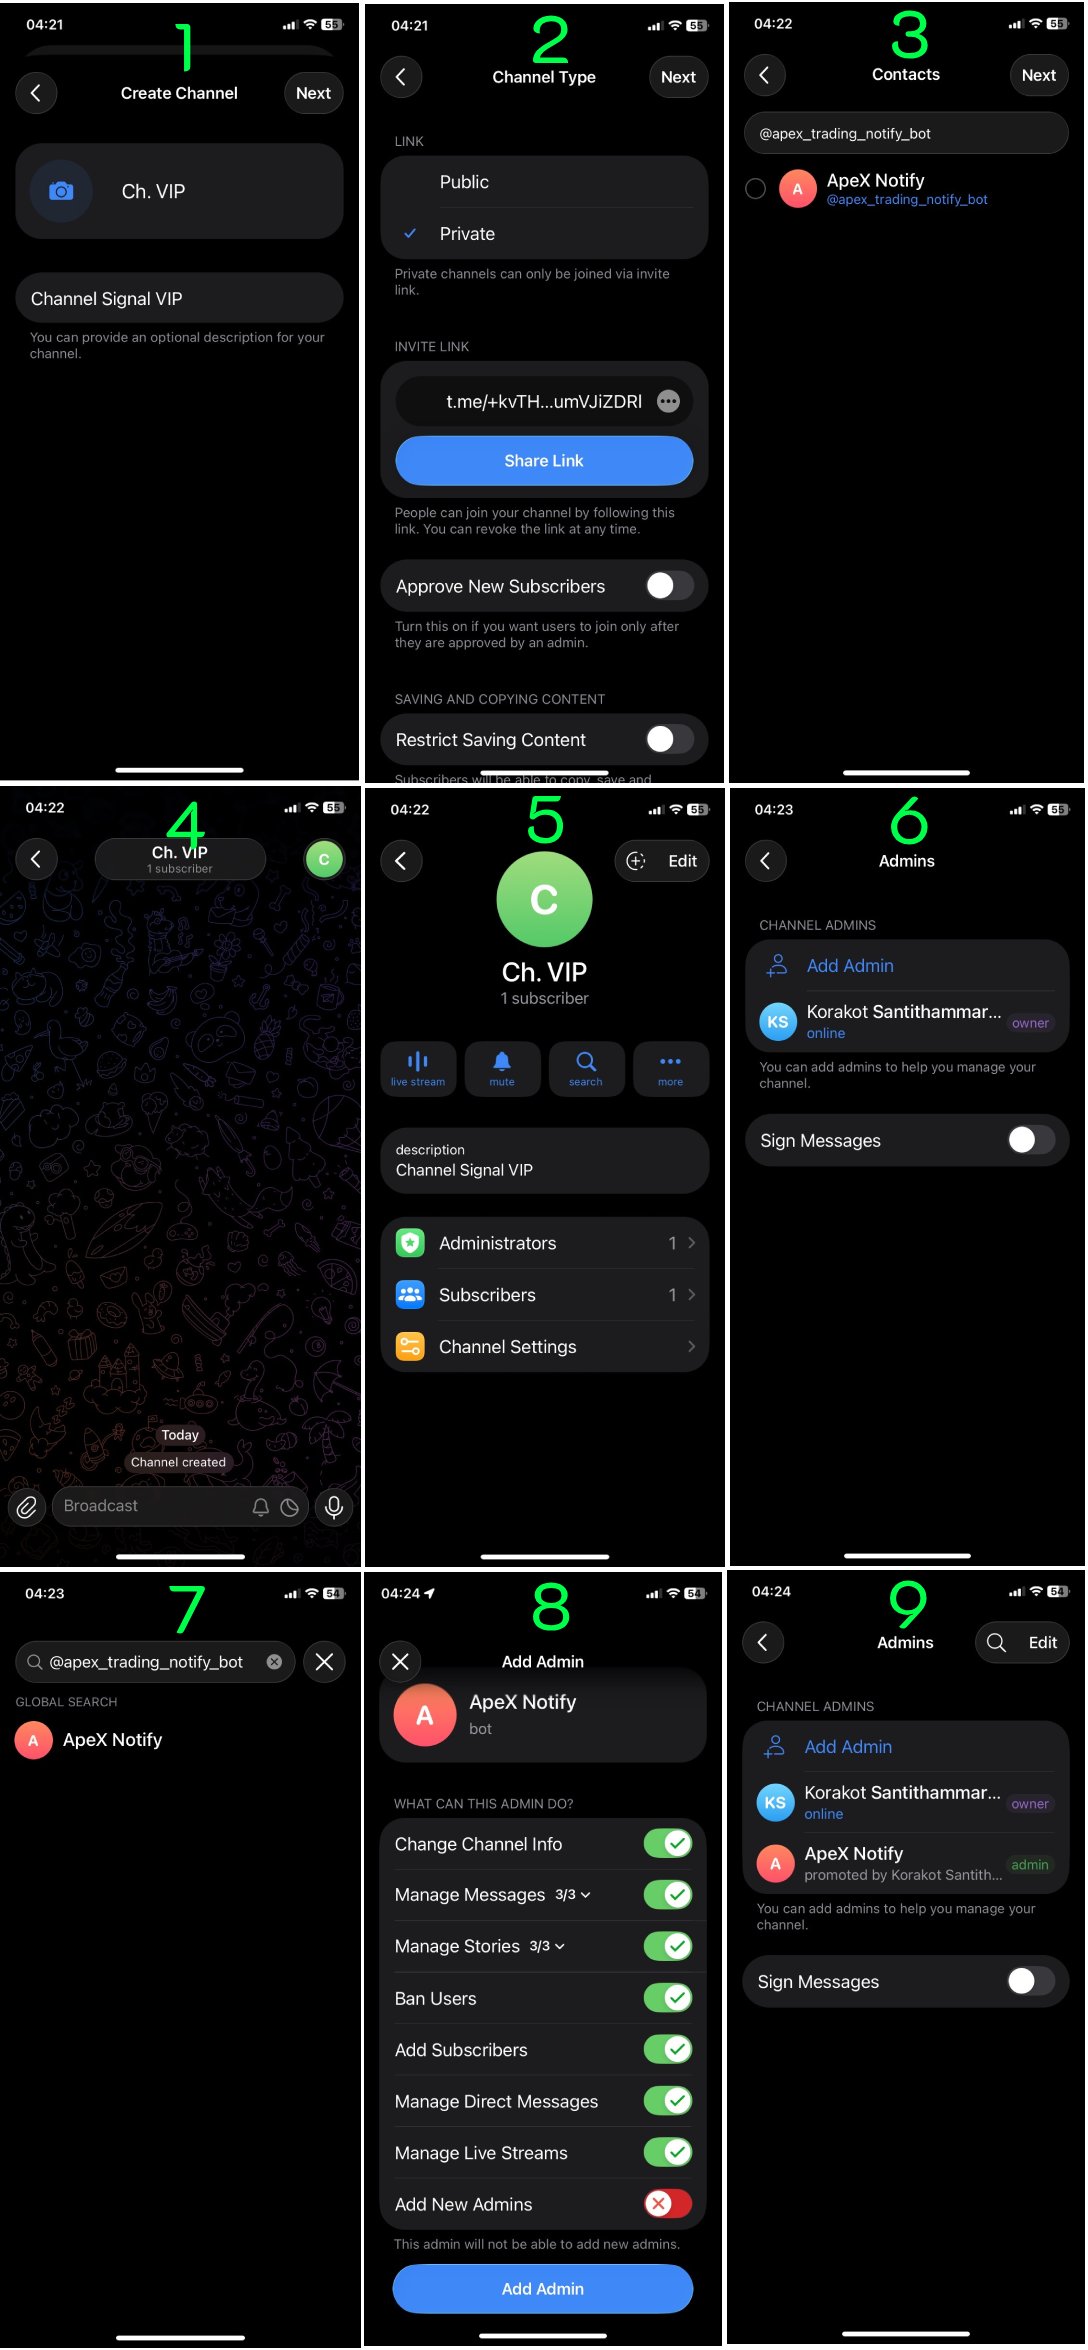
- 5.3 Create a channel — In Telegram choose New Channel, name it, and make it public or private as you prefer. Open the channel, go to Administrators > Add Admin, search for your bot by its name and add it with the right to post messages. A bot that is only a member, not an administrator, cannot post and cannot be found. Do this once per channel you plan to broadcast to.
- 5.4 Add your chats — Message your bot, or add it as an administrator to your group or channel, then press Find new chats.
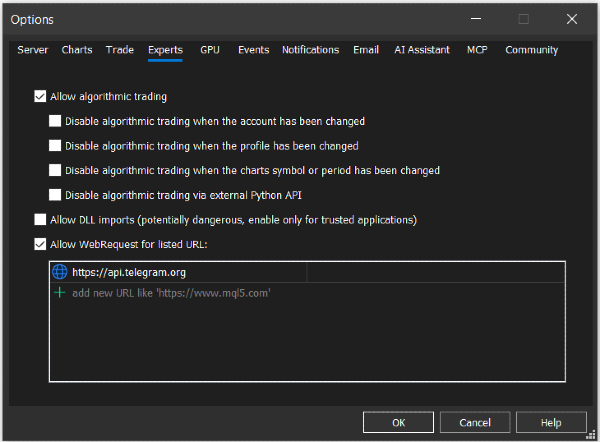
- 5.5 Allow the address in MetaTrader — Tools > Options > Expert Advisors, tick Allow WebRequest for listed URL, add https://api.telegram.org, press OK, then press Test here. Nothing leaves the terminal until this is done.
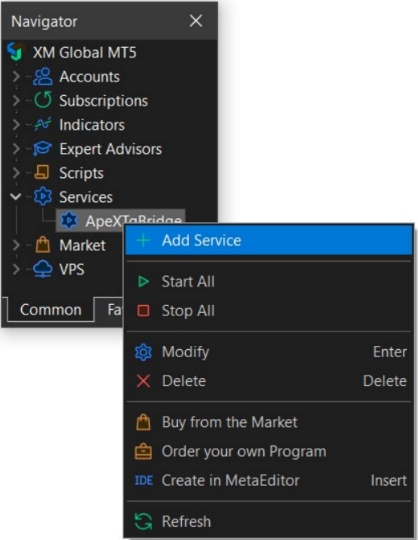
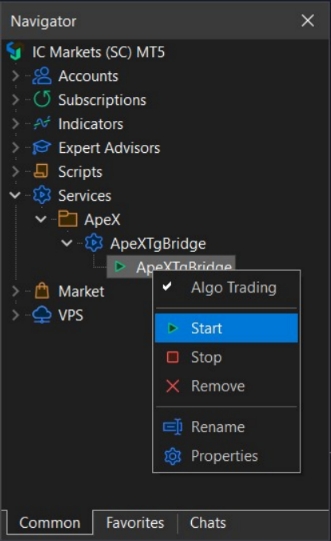
- 5.6 Install the Bridge service (optional, recommended) — Download ApeXTgBridge.ex5 from the top of this page. Open File > Open Data Folder, put the file into MQL5\Services\, then restart MetaTrader. In Navigator > Services, right-click ApeXTgBridge > Add service..., give it any name, and press Start. Make sure Algo Trading is ticked in that same menu. A service never starts by itself the first time — you must start it once by hand.
- 5.7 Check that it is running — open Toolbox and look for [TgBridge] started in the log. From now on it starts with the terminal. The Bridge has no settings of its own: it reads the same configuration the EA writes, so everything stays in one place.
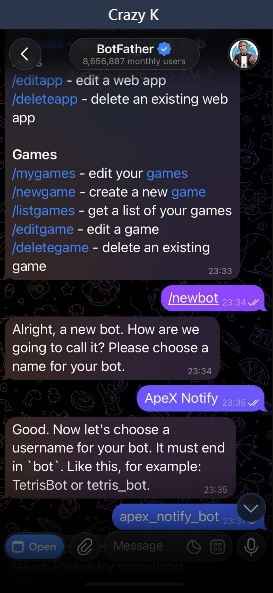
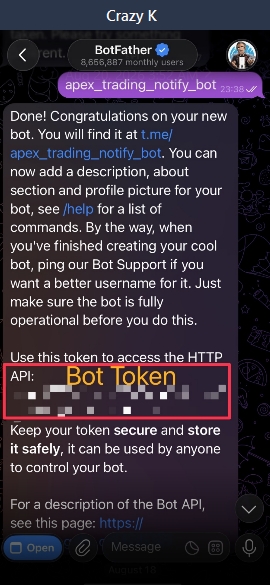
Create the bot
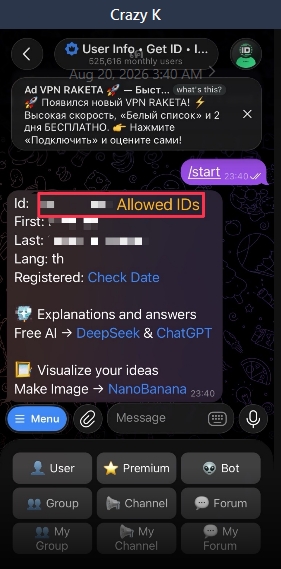
Find your user ID
6. Good to know
- 6.1 Two switches, not one — Whether an event reaches Telegram at all is decided in the Telegram column of Notify & Sound; Groups here decides which chat receives it.
- 6.2 MetaTrader must be running — Messages and commands are handled by the EA, so the terminal has to be open with the chart attached.
- 6.3 A bot cannot start a chat — It answers only where it has been added, which is why a chat must message the bot, or the bot must be made an administrator, before it can be found.
|