
How to Use Smart Money Concepts Correctly — Practical Trading Guide

📘 How to Use Smart Money Concepts Correctly — A Practical Trading Guide
This guide explains how to trade with SMC logic using the Smart Market Concepts Indicator — not just what the settings do, but how to read structure, build bias, find entries, and avoid common mistakes.
Available for MetaTrader 4 and MetaTrader 5:
⬇️ Smart Market Concepts (MT5)
⬇️ Smart Market Concepts (MT4)
For every input parameter, see the companion manual: Complete SMC Guide (Concepts + Settings)
📖 Contents
1) The SMC mindset · 2) Top-down workflow · 3) Reading structure · 4) Premium, discount & OTE · 5) Order blocks · 6) Fair value gaps · 7) Liquidity · 8) Sessions & timing · 9) Entry models · 10) Trade checklist · 11) Common mistakes · 12) Recommended setup
🧠 1) The SMC mindset
Smart Money Concepts (SMC) is a price-action framework for reading institutional order flow through structure, liquidity, and imbalances. The indicator automates the markup — you provide the decision logic.
Three rules:
- Structure first — Direction comes from swing structure (HH/HL or LH/LL), not one candle.
- Location second — The same order block in premium vs discount is not the same trade.
- Confirmation last — BOS, CHoCH, touches, and session timing confirm; they do not replace bias.
👉 Never trade a label. Trade the story: bias → location → liquidity → confirmation.
🔭 2) Top-down workflow (HTF → LTF)
Markets are fractal: the same SMC logic works on every timeframe. Use a top-down process:

Figure 1 — Top-down workflow: establish bias on HTF, mark POIs, execute on LTF.
| Step | Timeframe | Question | Indicator tools |
|---|---|---|---|
| 1 | Daily / 4H | Bullish, bearish, or range? | Swing structure, HH/HL/LH/LL, strong/weak |
| 2 | 1H / 30M | Premium or discount? | Premium/discount zones, Fib/OTE |
| 3 | 1H / 15M | Where can price react? | Swing OB, HTF FVG, PDH/PDL, EQH/EQL |
| 4 | 5M / 15M | When to enter? | Internal CHoCH/BOS, internal OB, LTF FVG |
Practical sequence:
- Define swing bias from the last swing BOS.
- Mark premium / discount / OTE on the current swing range.
- Mark POIs — OB, FVG, equal levels, prior day/week highs and lows.
- Wait for price to reach a POI aligned with bias.
- Drop to LTF for internal CHoCH or BOS in your direction.
- Enter at OB/FVG/OTE; stop beyond invalidation; target next liquidity pool.
💡 One chart, one job. HTF = bias and POIs. LTF = timing and execution.
🔄 3) Reading structure correctly
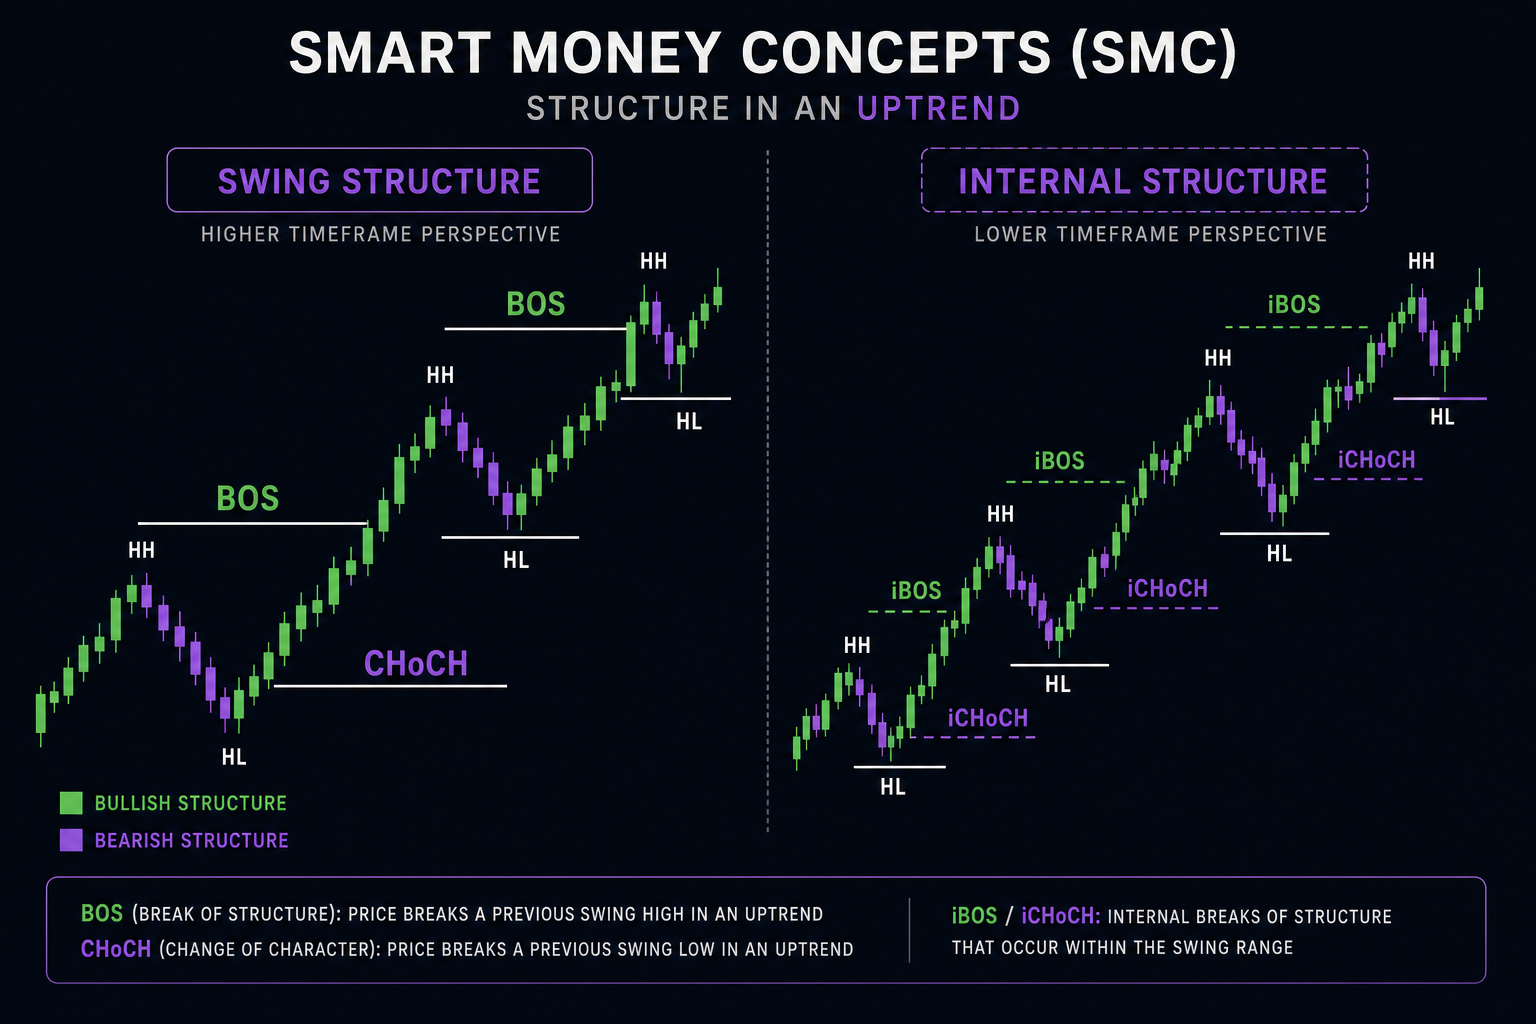
Figure 2 — Swing structure (solid) defines bias; internal structure (dashed) helps time entries.
Swing vs internal
| Swing structure | Internal structure | |
|---|---|---|
| Role | Bias (direction) | Timing (entries) |
| Lines | Solid, larger labels | Dashed, smaller labels |
| Use | Trend, HH/HL/LH/LL | Scalp entries inside swing bias |
- Swing BOS → major trend continuation.
- Swing CHoCH → possible reversal; reduce risk or wait for new bias.
- Internal BOS → short-term continuation (often with trend).
- Internal CHoCH → entry trigger after liquidity is taken.
Strong / weak highs and lows
In an uptrend: lows are strong, highs are weak (liquidity above).
In a downtrend: highs are strong, lows are weak (liquidity below).
Use Display Mode in Bars and display:
- Historical — study past structure and backtest ideas.
- Present — live trading with less clutter.
💰 4) Premium, discount & OTE

Figure 3 — Trade longs in discount and shorts in premium; OTE (0.618–0.786) refines entries.
From the current swing range:
- Premium (top ~5%) — relatively expensive; favor shorts in bearish bias.
- Equilibrium (~50%) — fair value; need extra confluence.
- Discount (bottom ~5%) — relatively cheap; favor longs in bullish bias.
Core rule:
- Bullish bias → longs in discount, ideally in OTE (0.618–0.786).
- Bearish bias → shorts in premium, ideally in OTE.
Enable Premium & Discount and Fibonacci / OTE together. The best POIs are where OB or FVG overlaps OTE inside the correct zone.
📦 5) Order blocks — how to use them

Figure 4 — Wait for price to retrace into OB/FVG; enter on reaction, not on the break alone.
An order block is the last opposite candle before an impulsive structural break.
- Swing OB → HTF points of interest.
- Internal OB → LTF entry zones after confirmation.
- OB filter (ATR / CMR) → removes noise-sized blocks.
- Mitigation (Close / High-Low) → defines when a block is consumed.
Valid OB workflow:
- OB forms after confirmed BOS.
- Price retraces into the block.
- You see reaction — rejection wick, internal CHoCH, engulfing on LTF.
- Block fails if price mitigates through without reaction.
Confluence stack (stronger setups): Swing OB + correct zone + internal OB inside + FVG overlap + OTE + session kill zone.
🟩 6) Fair value gaps (FVG)
An FVG is a three-candle imbalance — price moved too fast and left an inefficient zone.
- FVG Timeframe — use HTF for quality, chart TF for precision.
- Auto threshold — filters insignificant gaps.
- Extend FVG — track future interaction.
Rules:
- FVG from displacement beats FVG from slow chop.
- FVG with structure (after BOS) beats random gaps.
- FVG in the correct premium/discount zone beats FVG against location.
- First touch often gives the best reaction.
After liquidity sweep + internal CHoCH, the FVG created by that leg is a classic entry zone. Use FVG touch alerts so you do not miss retests.
💧 7) Liquidity — EQH/EQL & MTF levels

Figure 5 — Classic sequence: liquidity build → sweep → CHoCH → expansion to next pool.
Liquidity pools sit above highs and below lows (stops, breakout orders).
Equal highs / equal lows (EQH / EQL)
Equal levels = stacked liquidity. Price often:
- Sweeps EQH/EQL,
- Prints CHoCH,
- Targets liquidity on the opposite side.
Multi-timeframe highs & lows
PDH/PDL — intraday reactions.
PWH/PWL — weekly context.
PMH/PML — macro reference.
Enable only the levels you trade. Too many lines = analysis paralysis.
Liquidity sequence:
Build liquidity → Sweep → CHoCH → Return to OB/FVG → Target next pool
🕒 8) Sessions, kill zones & silver bullets
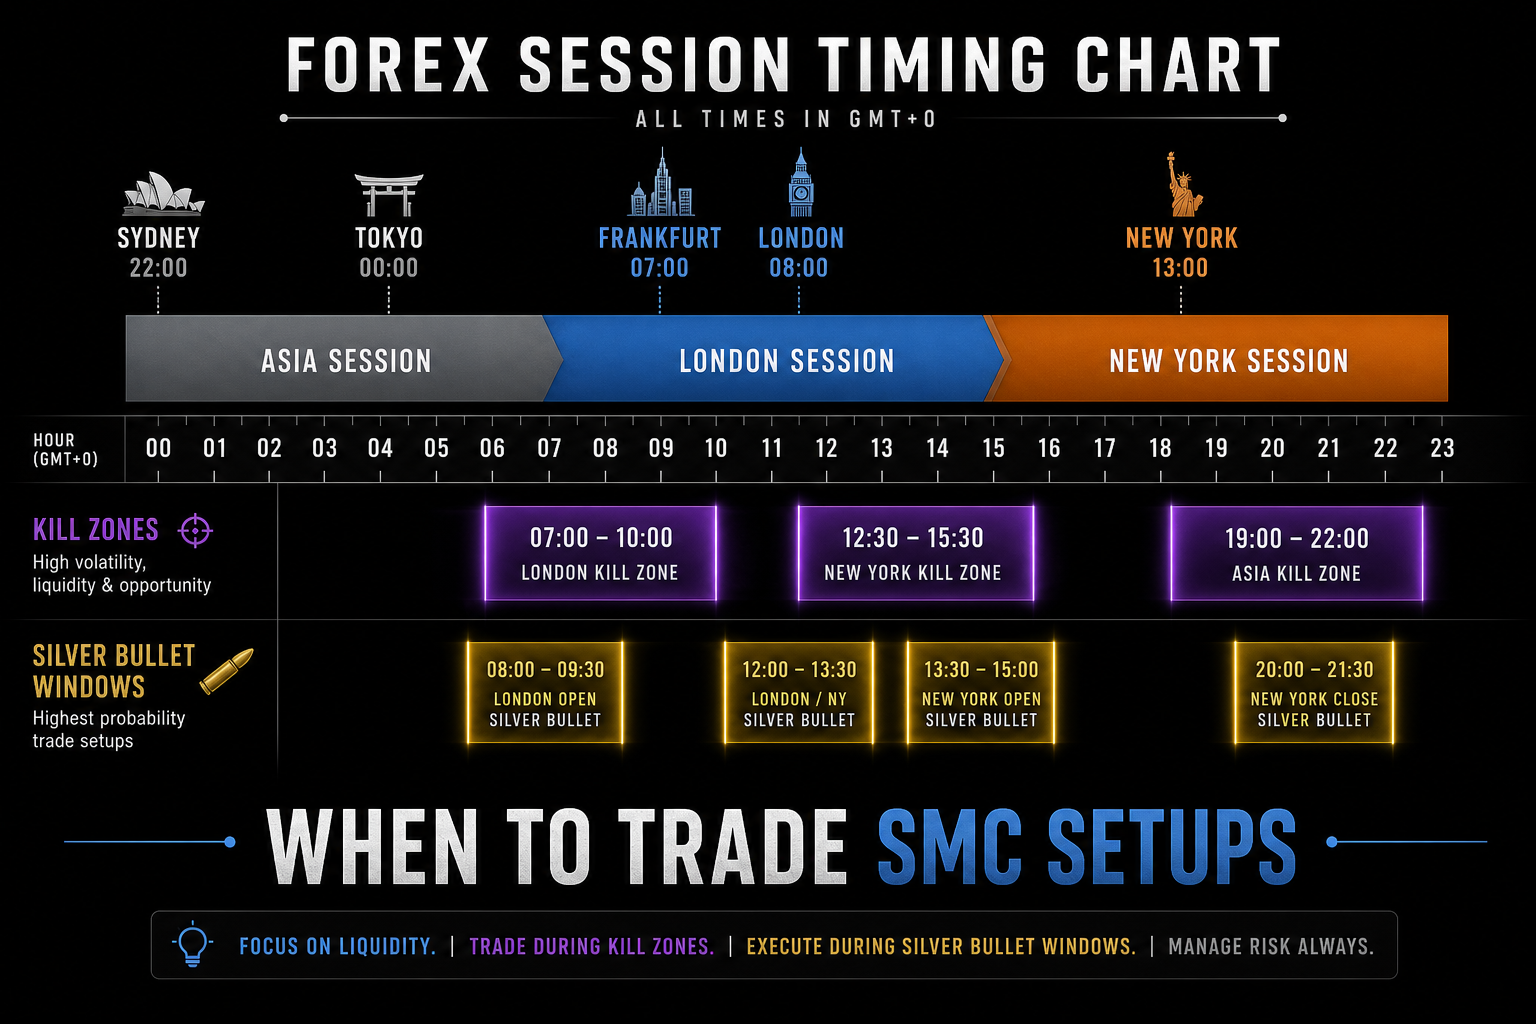
Figure 6 — Align entries with active sessions and kill zones; not every hour is equal.
SMC is time-sensitive. The indicator supports major sessions, kill zones, and silver bullets with a global time offset for broker time.
| Window | Typical behavior |
|---|---|
| Asia | Consolidation, range, liquidity build |
| London | Volatility expansion, structure breaks |
| New York | Continuation or reversal, high participation |
| Kill zones | Short windows — sweeps and impulsive moves |
| Silver bullets | Narrow ICT-style entry windows |
Setup tips:
- Set Session Time Offset Hours to match your broker.
- Start with London + New York.
- Use SessionsAtBottom for timing overview or SessionsAtPrice to see overlap with OB/FVG.
- Toggle Sessions from the control panel during active hours.
💡 If bias is bullish in discount but Asia is flat, wait for London/NY kill zone before triggering on LTF.
🎯 9) Entry models (step by step)
Model A — Trend continuation (most common)
Bullish example:
- 4H — Swing bullish BOS; HH/HL intact.
- 1H — Price in discount; mark swing OB or HTF bullish FVG.
- Wait — Pullback into POI.
- 15M — Sweep of EQL or local low; internal bullish CHoCH.
- Entry — Internal OB or FVG from CHoCH leg; stop below sweep.
- Target — Weak high, EQH, or PDH.
Bearish: mirror in premium with bearish CHoCH; target weak low or PDL.
Model B — Reversal after liquidity sweep
- Price runs EQH or PDH into extension.
- Swing CHoCH (or strong internal CHoCH + failure to make new HH).
- Entry on retest of OB/FVG from reversal leg.
- Target equilibrium or opposite range side.
Model C — MTF level reaction
- HTF bias bullish.
- Pullback to PWL or PDL (discount + key level).
- Reaction + internal BOS/CHoCH.
- Entry at OB/FVG; target PWH or swing high.
✅ 10) Pre-trade checklist
Before every trade:
- ☐ Swing bias clear (last swing BOS direction)
- ☐ Trade with bias (or deliberate reversal with sweep + CHoCH)
- ☐ Entry in correct premium/discount zone
- ☐ POI marked (OB, FVG, OTE, or MTF level)
- ☐ Liquidity story clear (swept vs targeted)
- ☐ LTF confirmation (internal CHoCH or BOS)
- ☐ Stop beyond structural invalidation
- ☐ Target at next liquidity pool
- ☐ R:R ≥ 1:2 (ideally 1:3)
- ☐ Session supports the move (optional filter)
If three or more are unchecked → no trade.
⚠️ 11) Common mistakes
| Mistake | Fix |
|---|---|
| Trading every BOS/CHoCH | Swing = bias; internal = entry only |
| Ignoring premium/discount | Long in discount / short in premium |
| Chasing displacement | Wait for retrace to OB/FVG/OTE |
| Too many features ON | Start minimal; add tools gradually |
| No HTF context | Mark PDH/PWH on HTF; LTF for entry |
| OB before BOS | OB valid after structural break |
| Trading Asia like London | Use sessions and kill zones |
| No invalidation | Stop beyond sweep or swing point |
⚙️ 12) Recommended indicator setup
Beginner (clean chart)
- Historical or Present
- Swing structure + swing points + strong/weak
- Premium/discount + Fib/OTE
- Internal structure + internal OB (last 3–5)
- EQH/EQL + previous day H/L
- Sessions: London + NY, SessionsAtBottom
- Control panel ON
Intermediate
- Add swing OB, FVG (auto threshold ON), previous week H/L
- Kill zones + one silver bullet
- Alerts: swing CHoCH, OB touch, EQH/EQL, PDH/PDL touch
Advanced
- HTF FVG timeframe above chart TF
- Previous month H/L
- Full session suite with custom times
- Custom alerts matched to your playbook only
Quick reference
| Tool | Answers |
|---|---|
| Swing BOS/CHoCH | Where is the market going? |
| Internal BOS/CHoCH | When should I act? |
| Premium/Discount + OTE | Is price expensive or cheap? |
| Order blocks | Where did direction shift? |
| FVG | Where is price inefficient? |
| EQH/EQL + MTF H/L | Where is liquidity? |
| Sessions | When is participation highest? |
📌 Final word
The Smart Market Concepts Indicator saves drawing time so you can focus on context. The edge is not more lines — it is aligning structure, location, liquidity, and timing before you risk capital.
Master the sequence: Bias → Location → Liquidity → Confirmation → Entry.
⬇️ Smart Market Concepts (MT5)
⬇️ Smart Market Concepts (MT4)
Questions and feedback are welcome — they help improve both the tool and future guides.


")
")
