
I wanted trading to be simple. Fast. Predictable.
One click to enter a trade. Risk is calculated. Partials and breakeven are set. Everything is visible and adjustable on the chart. That idea became HINN Magic Entry.
HINN Magic Entry is a powerful, fast, and intuitive trade execution & management EA. You place orders and open positions by selecting levels directly on the chart — with automatic risk calculation and flexible, price-driven scenarios.
It’s a tool for controlling positions and orders and building execution scenarios around price movement. This is not a bot. It does not trade by itself. It will: calculate the correct lot size for your chosen risk, account for spread and commission, set partial take profits at predefined levels, track price, move your stop to breakeven, and more. No restrictions on account type, number of accounts, deposit size, or account currency. Built to work with any broker. 100% prop-firm friendly.
Philosophy: 1 Click!
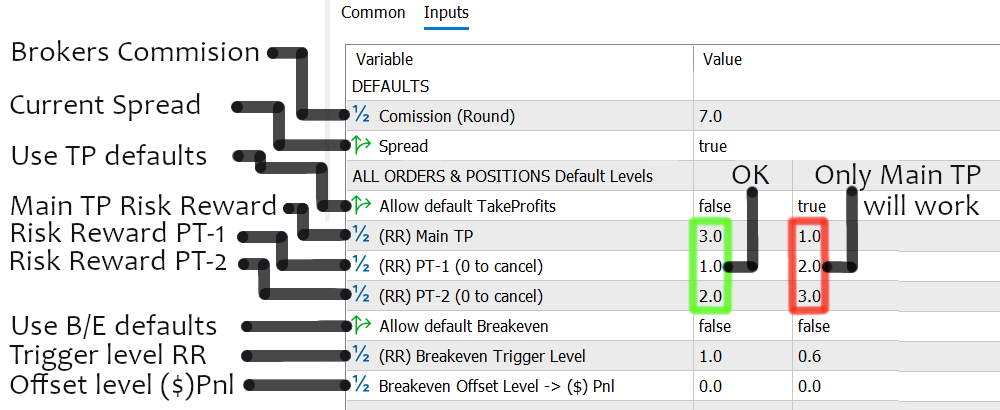
Of course, you can use predefined levels or place everything manually — your call.For all orders and positions created with HINN Magic Entry, you can define “default” levels. This is optional and can be disabled anytime. Default levels are based on your base Risk-Reward: the distance from stop-loss to entry is used as the coefficient for placing targets. Adjust the inputs to get the exact structure you want. Important: the main take-profit must be the farthest level. If the main TP is closer than intermediate targets, partial targets won’t trigger.
Everything you need — right on the chart. Nothing extra.
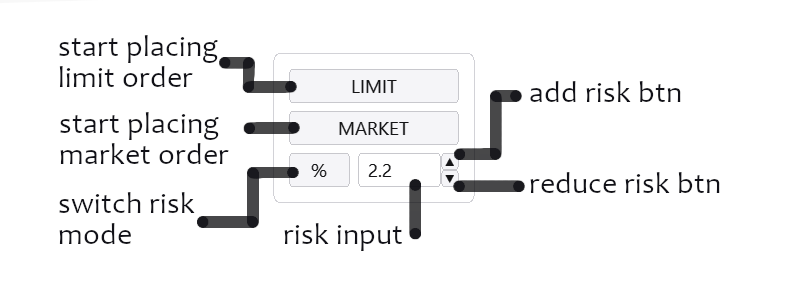
In practice, “everything you need” is just two panels: one for fast market entry / order placement with pre-defined risk, and one for quick actions on positions and orders for the current chart symbol.
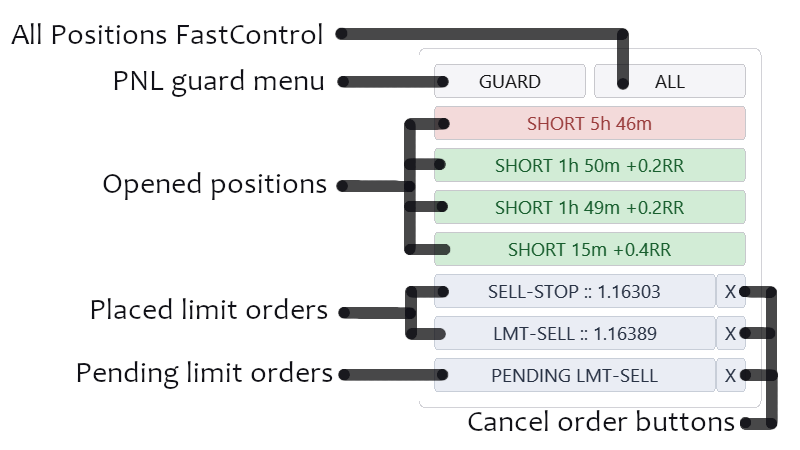
Orders show order type and entry level for live orders. Or the order is labeled as PENDING — meaning it’s not actually in the market yet, and will be sent only when price reaches the selected PENDING level.
Click a position/order to open the extended details panel for that specific item.
Functionality for any account type — and risk management is handled by one button, giving you access to 4 risk control modes
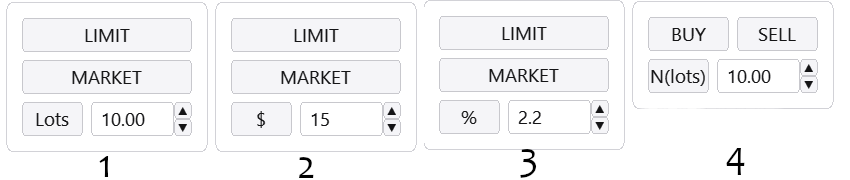
- 1: Fixed lot per trade (e.g., 10 lots)
- 2: Risk in account currency — lot size is calculated so that hitting SL costs exactly the amount you set (e.g., $15)
- 3: Risk as % of deposit — lot size is calculated so that hitting SL costs the chosen % (e.g., 2.2%)
- 4: Netting mode — no opposite hedges; an opposite trade closes the current exposure by lots
Netting accounts are supported out of the box. Mode 4 is netting emulation on hedging accounts. It also allows trading without placing a stop-loss immediately (unlike the other modes).
1 click to close all my positions — or just a part of them
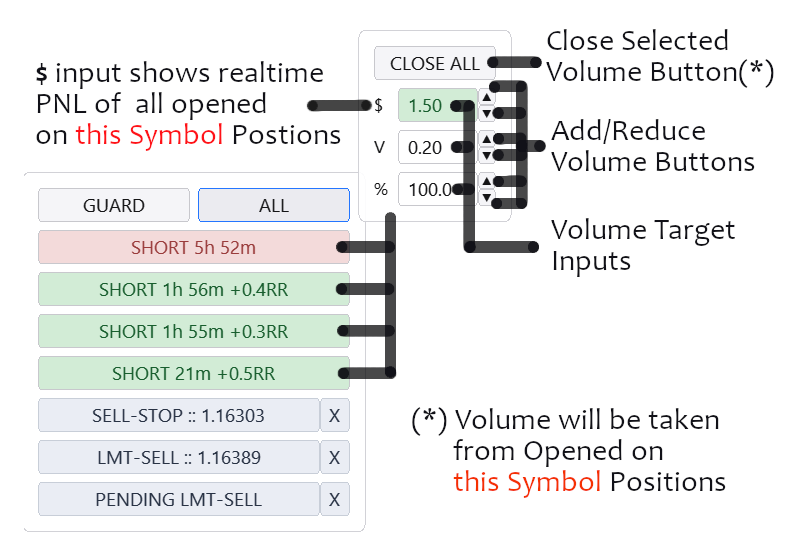
CLOSE ALL menu opens when you click the ALL button. It has 3 inputs for 3 volume selection modes: in account currency, in lots, or in % of total volume. Each input supports direct typing and +/- buttons. Like all Magic Entry inputs: once focused, you can use keyboard Up/Down arrows for fast changes.
In the top input ($) you see total PNL, in the middle you see total volume exposure for the symbol, and in the bottom you see the average % selected from total exposure.
You can choose a target profit amount and close it with one click. Or choose lots. Or choose the percentage of exposure.
So CLOSE ALL lets you select what exactly you want to close from all open positions on the current symbol, and execute it instantly. Definitely faster than managing each position manually.
PNL-GUARD for drawdown control
Switch modes using Ticker / Account and Daily / Current. Example: Account + Daily — when total PNL for the current trading day (closed + open) drops below your threshold, all positions for the account are closed. Ticker + Current — only open positions for the current symbol are tracked, and only they will be closed if the limit is hit.
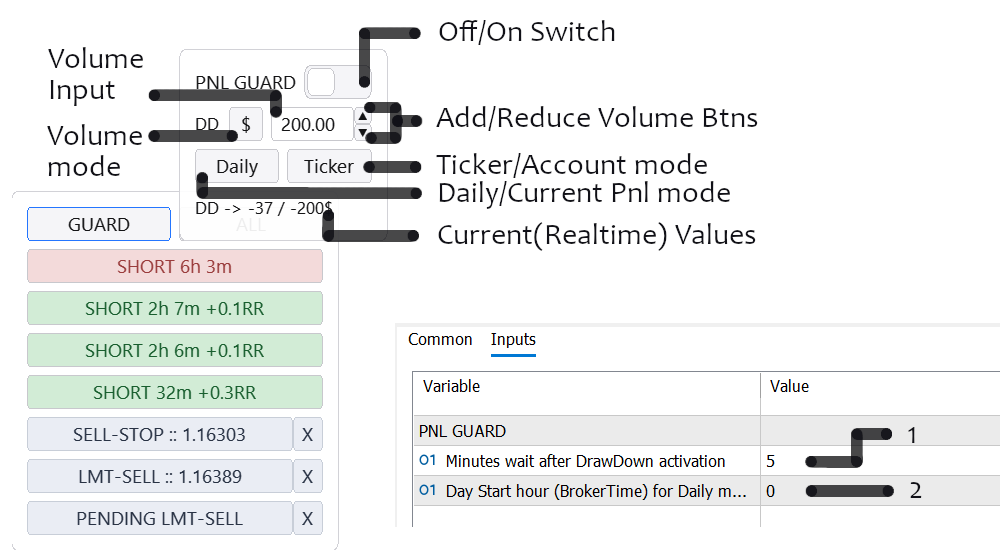
After PNL-GUARD closes positions, the entire UI on this chart is locked for the number of minutes defined in the EA inputs (1). In the EA inputs (2) you also set “Day Start Hour” — this defines the start of the trading day so PNL-GUARD knows what time window to use in Account + Daily mode. Broker server time is used, so Day Start = 0 means 00:00 server time.
Multi-position control basics are covered — now let’s move to per-order / per-position configuration.
Order & Position Details

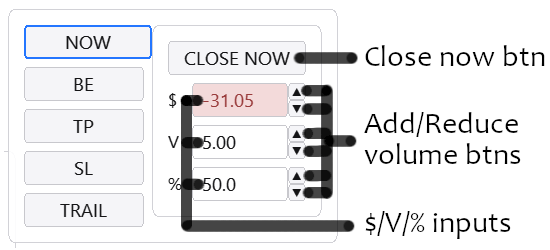
0 - Close Now menu. Instantly close part of the position. Available only for open positions.
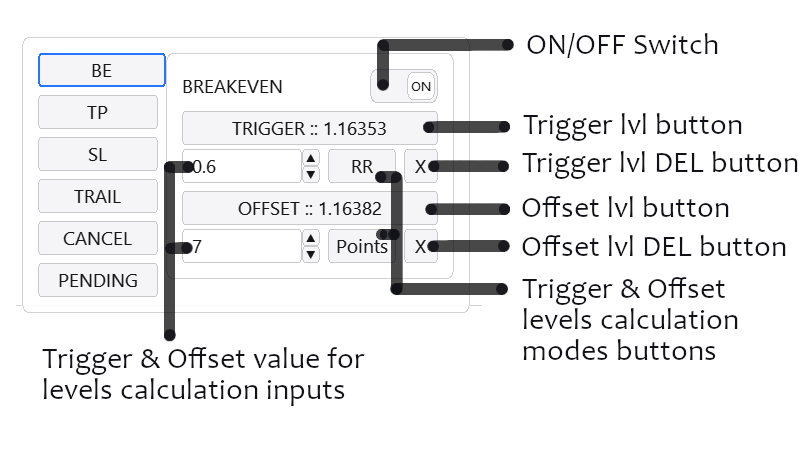
1 - Breakeven menu. Configure a trigger level and the offset level. This is more than “BE” — you can move SL to any level you want.
2 - Take Profit menu. Configure main TP and intermediate targets, and distribute volume.
3 - Stop Loss menu. Configure main SL and intermediate stops, and distribute volume.
4 - Trailing menu. Configure trailing options for stops and takes.
5 - Cancel menu. Set a level that cancels the order once reached (invalidation). Not available for positions.
6 - Pending menu. Set the Pending level. Until price reaches it, the limit becomes virtual and is removed from the market. Not available for positions.
Important: each position and each order is its own independent entity and has its own button (e.g., “SHORT 45m +0.2RR”). Adding partials to one position does not affect any other position. Each position/order keeps its own settings and can run different logic simultaneously via the detail menus above.
Close Now menu
The NOW menu mirrors the ALL menu logic, except it applies only to the selected position. You choose volume to close by: account currency, lots, or % of the position volume. Each input supports keyboard and +/- buttons. CLOSE NOW executes the selected partial close at market.
Breakeven menu
Breakeven menu gives you more than a classic “move SL to entry”. It lets you move SL to any level after price reaches a trigger. You can reuse it as many times as you want.The idea is simple: set two levels — TRIGGER (the level price must reach to activate the move) and OFFSET (the level where SL will be placed once trigger is hit).
Levels can be selected directly on the chart via TRIGGER/OFFSET buttons, or set via inputs not in price, but in RR, Points, or Profit. This gives maximum flexibility and supports presets/automation.
Intermediate Partial Takes
No unnecessary empty fields. Add new levels by clicking +P (+Parts). Set target volume in any format: target profit, % of total size, or direct lots. Select levels by clicking on the chart. Real-time visualization and PNL calculation including partials.
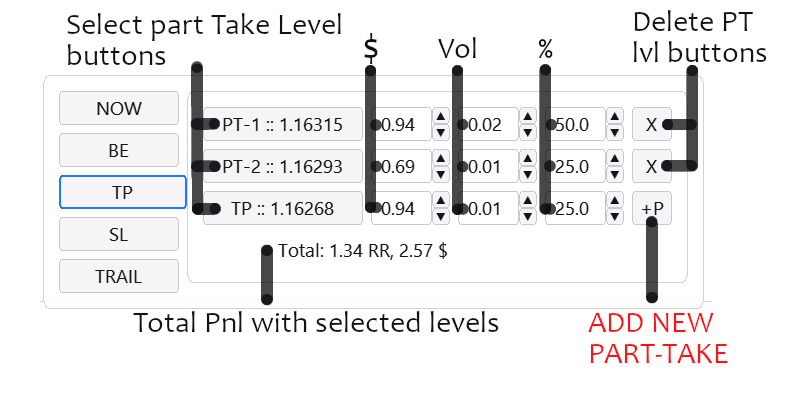
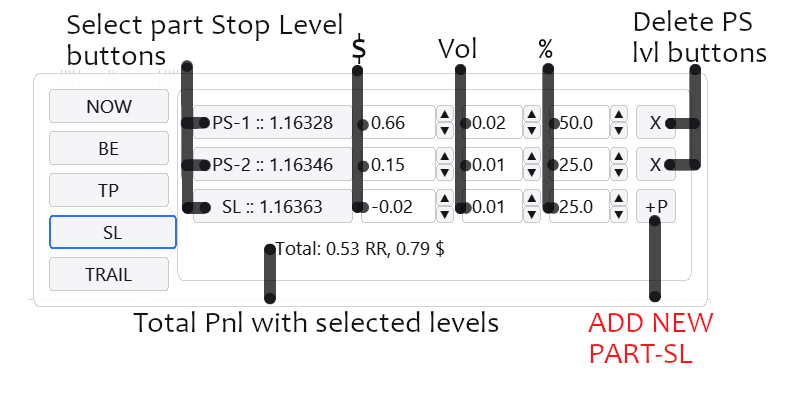
The only difference between Stop-Loss and Take-Profit menus (and their intermediate levels) is on which side of current price the partial execution occurs. You can partially reduce size even on the SL side if your plan requires it — and you can also lock profit in the standard TP direction.
Both menus have no hard limit on the number of partial levels — only position size and broker minimum lot restrictions. Both menus manage their own maximum available volume independently. Whichever price scenario triggers first gets priority.
Trailing Stops & Takes
Per-position trailing settings allow you to define: START — the level that activates trailing, and GAP — the distance the target level (SL or TP) must keep from price.Stop and take trailing are configured independently. Only main levels are trailed — main TP / main SL.
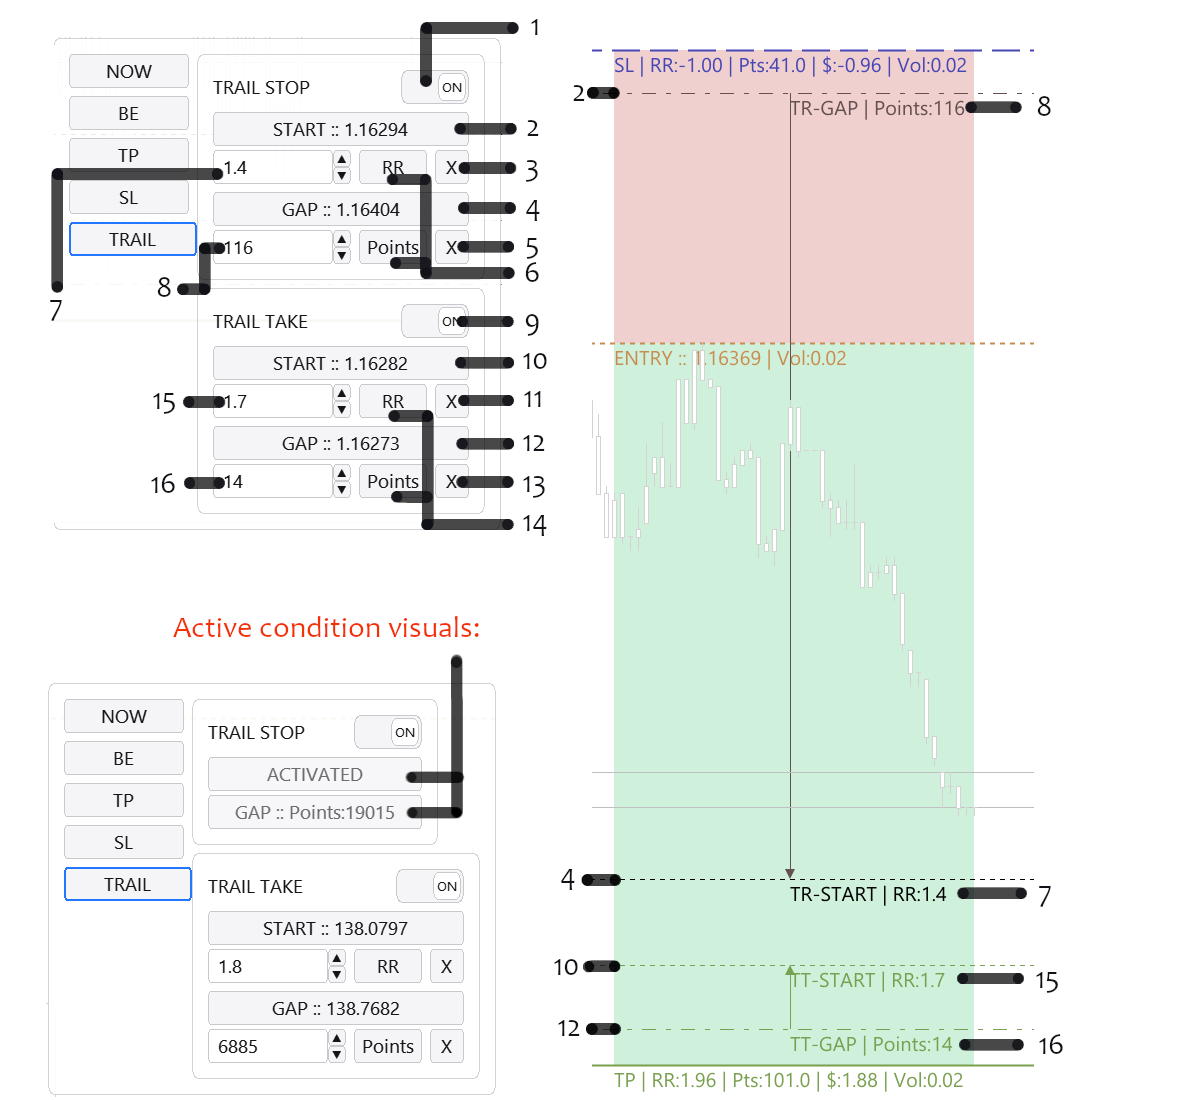
1 - Toggle trailing stop ON/OFF.
2 - Select the level that must be reached before trailing stop activates.
3 - Reset trailing stop START level.
4 - Select the GAP level — the distance to keep between price and stop-loss when price moves away from SL.
5 - Reset GAP level (4).
6 - Select calculation mode for inputs 7-8 (RR mode / Point mode).
7 - Trailing stop START input.
8 - Trailing stop GAP input.
9 - Toggle trailing take ON/OFF.
10 - Select the level that must be reached before trailing take activates.
11 - Reset trailing take START level.
12 - Select the GAP level — the distance to keep between price and take-profit when price moves toward TP.
13 - Reset GAP level (12).
14 - Select calculation mode for inputs 15-16 (RR mode / Point mode).
15 - Trailing take START input.
16 - Trailing take GAP input.
Inputs support 2 calculation modes: Risk-Reward mode (distance is based on base RR and stop size) or Point mode (distance is measured in points).
It may look like a lot of options, but in practice everything is set in two clicks, thanks to smart linking: GAP “sticks” to START. Move START — both levels shift automatically while GAP stays constant.
Pending Orders & Invalidation Levels
The idea is to cover two key use cases:
1) Place a limit order only after price reaches a specific level — PENDING
2) Cancel/delete a limit order if price reaches a zone where the setup is invalid — CANCEL
Each level has its own simple menu with: a toggle and buttons to pick the level directly on the chart. Setup is literally one click per level.

Two CANCEL invalidation levels allow different scenarios, and together with the PENDING level they cover the full spectrum of “wait / confirm / execute / invalidate”.
Breakeven moves, trailing, partial exits, limit cancellation, and pending-level tracking are processed locally on your PC inside your MetaTrader 5 terminal instance. That means your PC and terminal must be running (no sleep/hibernation) and connected to the internet for these features to work.
Keyboard Control, UI Layout, UI Elements Count
Using position/layout settings and element visibility toggles, you can configure exactly how the interface looks. Except risk type / orders / positions buttons — you can hide anything else and keep the UI ultra-minimal.
1 - ESC cancels any active action; works as Cancel and Back at the same time
2 - Toggle to enable/disable keyboard hotkeys
3 - TAB switches focus between positions and orders
4 - Q places a LIMIT order: 1st click = SL, 2nd = entry, 3rd = TP (if defaults are not set)
5 - W places a MARKET entry: 1st click = SL, entry triggers instantly; 2nd = TP (if defaults are not set)
6 - A buys N lots in netting emulation mode N(lots)
7 - D sells N lots in netting emulation mode N(lots)
8 - T selects main Take-Profit level
9 - S selects main Stop-Loss level
For display modes and UI element positioning:
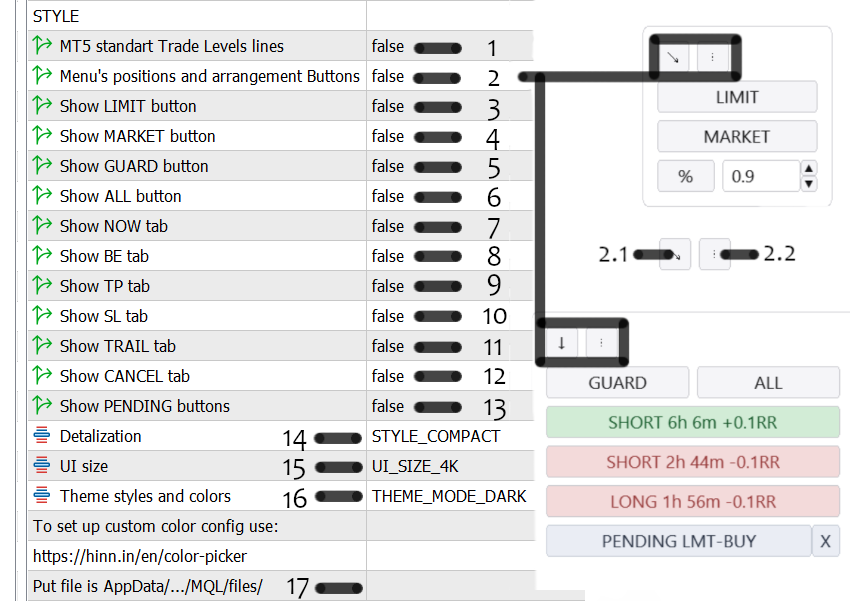
1 - Show/hide standard MetaTrader SL/TP levels
2 - Show/hide buttons for menu position/orientation
2.1 - Arrow button: toggle positions
2.2 - Orientation toggle
3 - Show/hide LIMIT button
4 - Show/hide MARKET button
5 - Show/hide GUARD button
6 - Show/hide ALL button
7 - Show/hide NOW button
8 - Show/hide BE button
9 - Show/hide TP button
10 - Show/hide SL button
11 - Show/hide TRAIL button
12 - Show/hide CANCEL button
13 - Show/hide PENDING button
14 - Toggle compact / full UI mode
15 - Theme mode switch
16 - UI size switch
17 - Input for custom theme file name
Using these toggles you can build any layout in a few clicks.
Dark, Light, and Custom Themes
Theme switch (15) toggles between built-in dark and light palettes: 
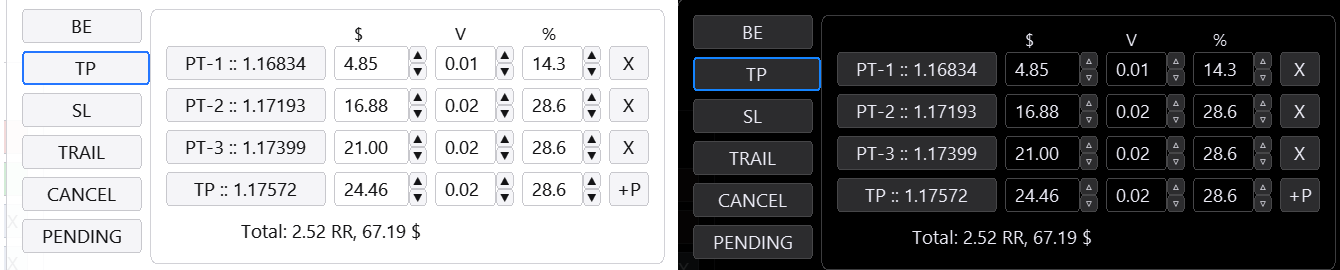
Choose one of the two presets or build your own theme.
Use https://hinn.in/en/magic-entry/color-picker to quickly configure colors and shades visually and generate a theme file (e.g., myTheme.mqh).
Place the file into your MetaTrader 5 terminal folder:
C:\Users\USERNAME\AppData\Roaming\MetaQuotes\Terminal\...\MQL5\Files\
Set Theme switch (15) to THEME_MODE_CUSTOM.
In input (16) enter the file name: myTheme


")

")