

What Trading Styles can you use with the "Supply and Demand EA ProBot"?
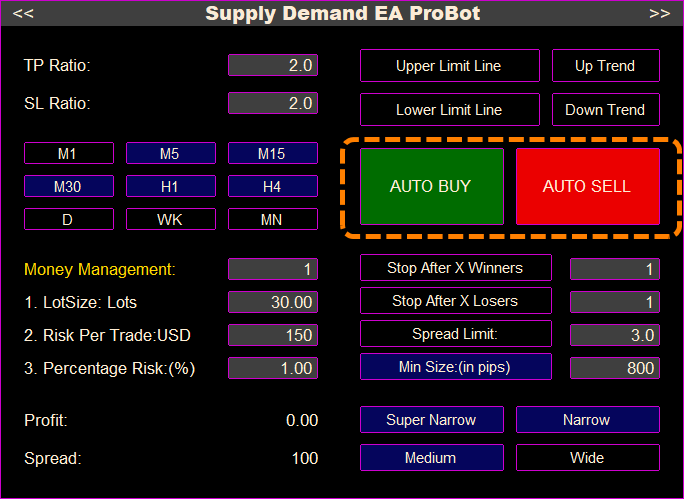
· Manual Trading: You can manually place Marker/Limit trades by clicking on the zone labels next to Supply and Demand Zones. For this style of trading you need to enable Manual Trading from input parameters, disable Automated Direction and de-active BUY and SELL buttons on the trading panel. Also you can use Direction Panel indicator to have an real-time idea of the bias of any timeframe of the pair you want to trade.
· Semi-Automated Trading: On this type of trading the EA can automatically place trades when price touches a zone. It places the trade according to your selected preferences on the Trading Panel. In order to place trades when price touches a Demand Zone the BUY button need to be activated and in order to place trades when price touches a Supply Zone the SELL button needs to be activated. This allows you to customize the trade direction (BUY or SELL), as well as other essential settings like risk management, lot size, stop loss, and take profit directly from the Trading Panel. For this style of trading you need to disable Automated Direction. If you want EA to place only Buy orders you need to active BUY and de-active SELL button on the trading panel. If you want EA to place only Sell orders you need to de-active BUY and active SELL button. Directional Panel can help you identify the right bias of the market by giving you real-time information about the bias on every timeframe of the selected pair and help you select a BUY or SELL direction on the trading panel.
· Fully Automated Trading: The EA decides automatically whether to place a buy trade when price touches a demand zone or a sell trade when price touches a supply zone. Also you can do more filtering by the Automated Direction Settings . If at least one of the Timeframe Above Settings is true then Automated Direction is enabled. Those parameters allows you to set the strength level of the market bias required for the EA to execute a trade automatically. You can choose between four settings: 1st Timeframe Above , 2nd Timeframe Above , 3rd Timeframe Above , and 4th Timeframe Above . These levels help filter out trades based on market momentum or strength of the trend. For this style of trading you need to activate AUTO BUY and AUTO SELL buttons on the trading panel.
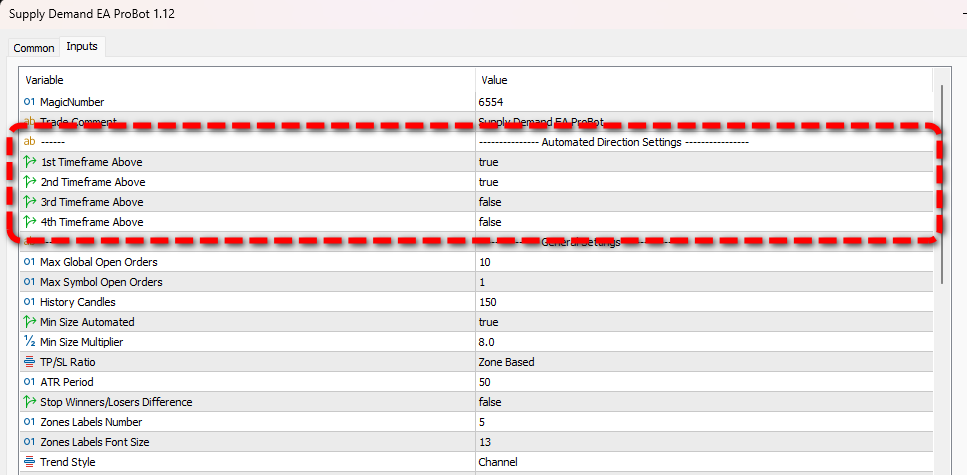
Automated Direction Settings
You can choose from four different Timeframe Directions, which represent the Market Direction of higher timeframes. You can view the direction of each timeframe using the Directional Panel indicator. However, it is not necessary to attach the Directional Panel to the chart for the Automated Direction feature to work—it functions independently of the indicator being attached.
You can enable multiple filters simultaneously. For example, you can activate the 1st, 2nd, and 4th filters, and all of them must align for a trade to be executed.
For Mild strength you can enable only 1st Timeframe Above
For Medium strength you can enable 1st Timeframe Above and 2nd Timeframe Above
For Strong strength you can enable 1st Timeframe Above, 2nd Timeframe Above and 3rd Timeframe Above
For Super Strong strength you can enable 1st Timeframe Above, 2nd Timeframe Above, 3rd Timeframe Above and 4th Timeframe Above
If at least one of the Timeframe Above Settings is true then Automated Direction is enabled. If none of the Timeframe Above settings are enabled, the Automated Direction feature is disabled.
- Dual Trading Option: To allow the EA to place both buy and sell trades automatically, make sure both the AUTO BUY and AUTO SELL buttons on the trading panel are enabled.
- Single Direction Option: If you want the EA to only place buy orders, activate AUTO BUY only; similarly, activate AUTO SELL only for sell orders. This setting allows for greater control over trade direction in specific market conditions.
1st Timeframe Above
- Demand Zone:
When the price touches a demand zone, this filter checks the direction of the 1st higher timeframe (above the demand zone's timeframe). If the direction is BUY, the EA places a buy order. If it is SELL, no trade is placed. - Supply Zone:
When the price touches a supply zone, this filter checks the direction of the 1st higher timeframe (above the supply zone's timeframe). If the direction is SELL, the EA places a sell order. If it is BUY, no trade is placed.
Example:
If the price touches a 30-minute demand zone, and the 1st Timeframe Above filter is true, the EA will only place a buy trade if the 1-hour timeframe's direction is BUY. Similarly, if the price touches a 30-minute supply zone, the EA will only place a sell trade if the 1-hour timeframe's direction is SELL.
If this filter is false, the EA will not consider the 1st timeframe direction.
2nd Timeframe Above
- Demand Zone:
When the price touches a demand zone, this filter checks the direction of the 2nd higher timeframe (above the demand zone's timeframe). If the direction is BUY, the EA places a buy order. If it is SELL, no trade is placed. - Supply Zone:
When the price touches a supply zone, this filter checks the direction of the 2nd higher timeframe (above the supply zone's timeframe). If the direction is SELL, the EA places a sell order. If it is BUY, no trade is placed.
Example:
If the price touches a 30-minute demand zone, and the 2nd Timeframe Above filter is true, the EA will only place a buy trade if the 4-hour timeframe's direction is BUY. Similarly, if the price touches a 30-minute supply zone, the EA will only place a sell trade if the 4-hour timeframe's direction is SELL.
If this filter is false, the EA will not consider the 2nd timeframe direction.
3rd Timeframe Above
- Demand Zone:
When the price touches a demand zone, this filter checks the direction of the 3rd higher timeframe (above the demand zone's timeframe). If the direction is BUY, the EA places a buy order. If it is SELL, no trade is placed. - Supply Zone:
When the price touches a supply zone, this filter checks the direction of the 3rd higher timeframe (above the supply zone's timeframe). If the direction is SELL, the EA places a sell order. If it is BUY, no trade is placed.
Example:
If the price touches a 30-minute demand zone, and the 3rd Timeframe Above filter is true, the EA will only place a buy trade if the Daily timeframe's direction is BUY. Similarly, if the price touches a 30-minute supply zone, the EA will only place a sell trade if the Daily timeframe's direction is SELL.
If this filter is false, the EA will not consider the 3rd timeframe direction.
4th Timeframe Above
- Demand Zone:
When the price touches a demand zone, this filter checks the direction of the 4th higher timeframe (above the demand zone's timeframe). If the direction is BUY, the EA places a buy order. If it is SELL, no trade is placed. - Supply Zone:
When the price touches a supply zone, this filter checks the direction of the 4th higher timeframe (above the supply zone's timeframe). If the direction is SELL, the EA places a sell order. If it is BUY, no trade is placed.
Example:
If the price touches a 30-minute demand zone, and the 4th Timeframe Above filter is true, the EA will only place a buy trade if the Weekly timeframe's direction is BUY. Similarly, if the price touches a 30-minute supply zone, the EA will only place a sell trade if the Weekly timeframe's direction is SELL.
If this filter is false, the EA will not consider the 4th timeframe direction.
Can you use Upper and Lower Limit Lines with Automated Direction Enabled?
Yes, you can set upper and lower limit lines to work with the Automated Direction feature. When you set limit lines, the EA will only place trades inside this specific area. This keeps trades within a defined trading zone, giving more control over where trades start and stop.
Can you use Uptrend and Downtrend Channels with Automated Direction Enabled?
Yes, you can also use uptrend and downtrend channels with Automated Direction. Here’s how each one works:
-
Uptrend Channel: If you create an uptrend channel and turn on both Auto Buy and Auto Sell, the EA will:
- Place Buy orders only within the uptrend channel.
- Place Sell orders both inside and outside the uptrend channel.
-
Downtrend Channel: If you create a downtrend channel, the EA will:
- Place Sell orders only within the downtrend channel.
- Place Buy orders both inside and outside the downtrend channel.
Both Uptrend Channel and Downtrend channel cannot be created at the same time. The main idea of using an uptrend or downtrend channel is to make a price range where the EA will only Buy or only Sell based on the trend. So, if you decide to set an uptrend or downtrend channel, it’s best to turn on only Auto Buy or Auto Sell (not both) to keep trading with the trend.
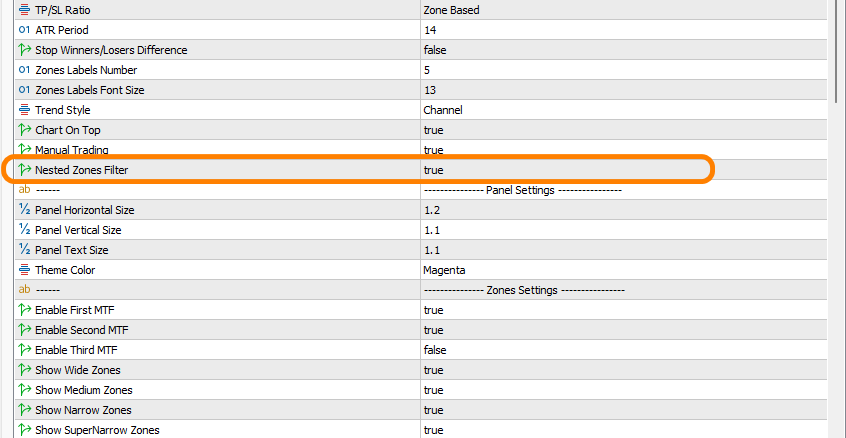
Can you use the Nested Filter with Automated Direction Enabled?
You can use the Nested Filter along with Automated Direction, but it’s usually better to use the Nested Filter as a separate strategy. If you want to use the Nested Zones strategy and turn on the Nested Filter, i suggest turning off the Automated Direction feature. Instead, you can select both Buy and Sell directions from the trading panel, so the EA can trade properly in nested price zones.
Tip: You are strongly encouraged to test any settings or strategies on a demo account first to understand how they work before committing real funds.
You can check the "Supply Demand EA ProBot" on the following links:
MT4 Version: https://www.mql5.com/en/market/product/116645
MT5 Version: https://www.mql5.com/en/market/product/117023


")

![[XAUUSD]: Weekly Liquidity Activation Points (timings), June 22-26, 2026](https://c.mql5.com/6/1013/splash-preview-771790.png "[XAUUSD]: Weekly Liquidity Activation Points (timings), June 22-26, 2026")