

How to Install Free Trial
- Open the MT4/MT5 platform Select ‘File’ from the main menu
- Click on ‘Open Data Folder’ to bring up a new folder panel
- Select the ‘MQL4/5’ folder, followed by the ‘Experts’ folder
- Drag and drop (or Copy) your EA file(s) into this folder
- Restart MetaTrader for your changes to take affect
Copy Signals from any channel you are a member (including private and restricted) straight to your MT4/MT5.
This tool has been designed with the user in mind while offering many features you need to manage and monitor the trades.
Getting started
Setup takes about five minutes. You install two pieces of software on the same Windows PC (or VPS): the MetaTrader EA and the Telegram Receiver app. The EA must be running before the Receiver can do anything useful.
Quick start checklist
- Install Telegram To MT5 or Telegram To MT4 in MetaTrader
- Attach the EA to a chart, enable Algo Trading, and turn on Enable Telegram To MT5 (or MT4)
- Install and launch DaneTrades Telegram Receiver
- Wait for the “Connect MetaTrader EA” screen to disappear (automatic, up to ~30 seconds)
- Log in to Telegram in the Receiver (phone + verification code)
- If you have Two Factor Authentication on your account it will say you need a password. The password box will display 'Enter Password'
- Select your signal channels and press Start copying
Important: Run the Receiver and MetaTrader on the same machine.
What You Need
| You need | Notes |
|---|---|
| Windows PC or VPS | Windows 10 or newer. MetaTrader and the Receiver must run on the same machine. |
| MetaTrader 4 or 5 | Logged into your trading account (demo or live). |
| Telegram account | Your own phone number. You must already follow or join any channels you want to copy. |
| DaneTrades Telegram Receiver | The desktop app from your download (for example DaneTrades-Telegram-Receiver-3.0.0.exe). |
| Telegram To MT4 or MT5 | The copier you attach to a chart in MetaTrader (from your DaneTrades install files). |
How it works
When someone posts a signal in Telegram, the Receiver app picks it up and passes it to MetaTrader. The copier on your chart reads the message and opens or changes trades based on the rules you set (lot size, stop loss, take profit, and so on).
The Receiver only sends signals while it can see that your MetaTrader copier is running. If you remove the copier from the chart or turn off automated trading, copying stops for safety.
Set up MetaTrader (MT4 or MT5)
Install the copier
- In MetaTrader, open File, then Open Data Folder. Copy the Telegram To MT5 (or MT4) files into the Experts folder shown in your install instructions.
- In the Navigator list on the left, right-click Expert Advisors and choose Refresh. You should see Telegram To MT5 or Telegram To MT4.
- Open Tools, Options, Expert Advisors. Turn on Allow algorithmic trading. Click OK.
- On the toolbar, make sure the Algo Trading button is on (green).
Old Telegram bot method
If you see an option to connect with a bot token and chat ID, leave it off if using the telegram receiver app.
Install the Telegram Receiver app
- Run the installer or exe file from your DaneTrades download.
- If Windows asks whether you trust the app, choose to run it if you downloaded it from DaneTrades.
- The first time you open the app, you may see a screen that asks you to connect MetaTrader. That is normal. Follow the next section.
Only open one Telegram Receiver app at a time.
Link MetaTrader to the app
The app needs your chart copier to be running before you can use the rest of the program.
- Open MetaTrader and sign in to your account.
- Drag Telegram To MT5 (or MT4) from the Navigator onto any chart. The symbol on that chart does not matter for the link.
- In the copier settings, turn Enable Telegram To MT5 (or MT4) on. Make sure Algo Trading is on. You should see a happy face on the chart corner, not a red X.
- Wait up to 30 seconds. The “Connect MetaTrader” screen in the Receiver app should close by itself.
On the Copying tab you should see something like “EA connected” with your account number. If you remove the copier from the chart or turn off Algo Trading, the app will stop copying until you fix it.
Log in to Telegram
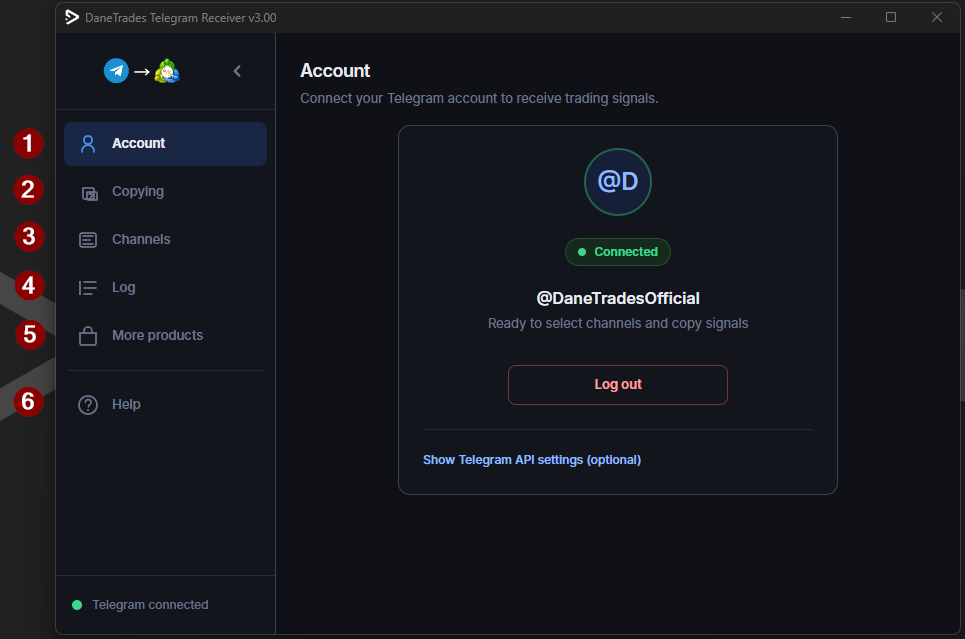
Click Account in the left menu.
- Type your phone number with country code (example: +447700900123). Press Send.
- Enter the code you get in the Telegram app. Press Verify.
- If Telegram asks for your password, enter it and press Submit.
- Keep Stay logged in on if you want the app to remember you next time.
When you are in, you will see Connected on the Account page and “Telegram connected” at the bottom of the menu.
Pick which channels to copy
Click Channels in the left menu.
- Press the refresh button to load your Telegram channels, groups, and chats.
- Search or sort the list to find your signal providers. Click a name to select it (tick mark).
- Select every place you want signals from. The app shows how many you picked.
Filter on the chart (optional)
The MetaTrader copier can also limit which channel names it trades. If you turn that on in the chart settings, only channels you allow there and in the Receiver app will copy.
Start copying signals
- On the Channels page, press Start copying. The button turns green while it is running.
- Open the Copying tab to watch each channel: last message time and a short preview.
- New Telegram posts should show up in MetaTrader as trades or updates, depending on your chart settings.
A green bar at the bottom of the app tells you how many channels are active. Messages about closing trades, moving stop loss, or taking profit are handled when the copier recognises them.
Smart signal processing
On the Copying tab, each channel has a switch called Smart signal processing.
On (recommended for most channels): The app tidies up messy Telegram text before MetaTrader sees it. It looks for things like buy/sell, symbol, entry, stop loss, take profit, and close or modify instructions. It also skips obvious spam or promo posts.
Off: The full Telegram message is sent as written. Use this if your provider uses a very fixed format and you want the chart copier to read it exactly.
Your risk and trade rules on the chart still apply either way.
Tip: Try everything on a demo account first. Turn on Show Log Window on the chart to see what the copier did with each message.
What each part of the app does
| Menu item | Use it for |
|---|---|
| Account | Sign in or out of Telegram. Stay logged in. |
| Copying | See live status for each channel. Turn smart processing on or off per channel. |
| Channels | Find and select Telegram channels. Start or stop copying. |
| Log | Read what the app has been doing. Filter and export if you need a record. |
| More products | Other DaneTrades tools. |
| Help | Opens extra help in your web browser. |
Common problems
Stuck on “Connect MetaTrader”- The copier is on a chart and shows the active (happy) icon
- Enable Telegram To MT5 (or MT4) is turned on in settings
- Algo Trading is on in MetaTrader
- Wait 30 seconds and try removing the copier from the chart and adding it again
- Only one copier on one chart is enough; you do not need it on every chart
- You pressed Start copying and selected at least one channel
- Chart channel filter (if you use it) includes that channel name
- Buy/sell and symbol settings on the chart match your signals
- Your broker uses the symbol names you expect (check symbol mapping)
- Look at the chart log window and the app Log tab for error messages
This usually means MetaTrader is closed, the copier was removed from the chart, or Algo Trading was turned off. Fix that, then press Start copying again.
Setup Tab
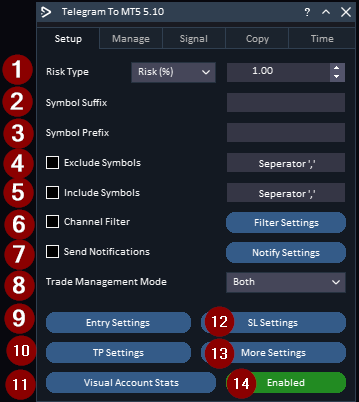
| # | What it is | What it does |
|---|---|---|
1 | Risk type | Chooses how trade size is calculated (for example risk as a percent of your account). The box next to it is the risk amount (here 1.00 with Risk (%) selected). |
2 | Symbol suffix | Text your broker adds after a symbol name (for example .pro or m ). Leave blank if your broker does not use one. |
3 | Symbol prefix | Text your broker adds before a symbol name. Leave blank if your broker does not use one. |
4 | Exclude symbols | Tick to turn on, then list symbols you never want to trade. Separate multiple symbols with a comma. |
5 | Include symbols | Tick to turn on, then list only the symbols you allow. Separate multiple symbols with a comma. |
6 | Channel filter | Tick to limit which Telegram channel names the copier listens to. Use Filter Settings to choose or refresh the list. |
7 | Send notifications | Tick to turn alerts on. Use Notify Settings to choose how you are notified. |
8 | Trade management mode | Dropdown for how trade updates are handled (shown as Both in your screenshot). |
9 | Entry settings | Opens the window for how entries are taken (market price, zones, slippage, and related options). |
10 | TP settings | Opens take profit settings (targets, splitting risk across TPs, overrides). |
11 | Visual account stats | Opens a visual summary of account performance and stats. |
12 | SL settings | Opens stop loss settings (how SL is read from signals, overrides, random SL, and related options). |
13 | More settings | Opens extra setup options that do not fit on this main screen. |
14 | Status (Enabled / Disabled) | Main on/off control for the copier on this chart. Green Enabled means it is active and ready to work with the Receiver app. |
Entry Settings
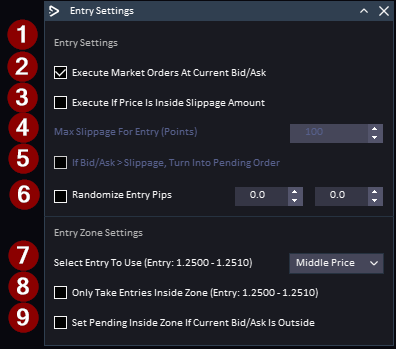
| # | What it is | What it does |
|---|---|---|
1 | Entry settings (section title) | The top block of options for how the copier opens trades when a signal arrives. |
2 | Execute market orders at current bid/ask | When ticked, market trades are placed at the live price on your broker right away. In your screenshot this is on. |
3 | Execute if price is inside slippage amount | When ticked, a market trade only runs if price is still close enough to the signal entry. In your screenshot this is off, so the slippage box below stays greyed out. |
4 | Max slippage for entry (points) | How far price may move from the signal before the copier refuses a market entry (or uses the pending option below). Only applies when #3 is on. Shows 100 here but is inactive while #3 is off. |
5 | If bid/ask is outside slippage, turn into pending order | When ticked with #3 on, instead of skipping the trade, the copier places a pending order. Greyed out while #3 is off. |
6 | Randomize entry pips | When ticked, adds a small random shift to the entry price between the min and max pip values. Both boxes show 0.0 and the option is off in your screenshot. |
7 | Entry zone settings / select entry to use | For signals that give a price range (for example 1.2500 to 1.2510), this chooses which price to use: first, middle, or last in the range. Your screenshot shows Middle price. |
8 | Only take entries inside zone | When ticked, the copier only enters if live price is inside the signal’s entry range. If price is outside the zone, it will not take the trade (unless #9 applies). |
9 | Set pending inside zone if current bid/ask is outside | When ticked, if live price is outside the entry zone, the copier places a pending order inside the zone instead of entering at market. |
SL Settings
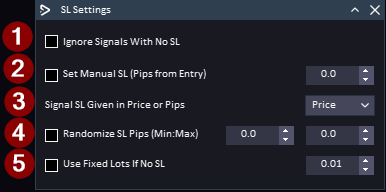
| # | What it is | What it does |
|---|---|---|
1 | Ignore signals with no SL | When ticked, the copier skips any signal that does not include a stop loss. In your screenshot this is off, so signals without an SL can still be traded (unless other rules block them). |
2 | Set manual SL (pips from entry) | When ticked, the copier ignores the signal’s stop loss and uses your own distance in pips from the entry instead. The number box sets that distance (here 0.0). With the box off, the signal’s SL is used when one is given. |
3 | Signal SL given in price or pips | Tells the copier how to read the stop loss in the Telegram message. Price means a level such as 1.0850. Pips means a distance in pips from entry. Your screenshot shows Price. |
4 | Randomize SL pips (min : max) | When ticked, adds a random extra shift to the stop loss between the two pip values. Both show 0.0 and the option is off in your screenshot. |
5 | Use fixed lots if no SL | When ticked, if a signal has no stop loss, the copier still opens the trade using a fixed lot size (here 0.01) instead of sizing by risk. With it off, missing SL behaviour depends on your other settings (for example #1 if you turn that on). |


 & AMD Framework")
")