

How to Install Demo
- Open the MT4/MT5 platform Select ‘File’ from the main menu
- Click on ‘Open Data Folder’ to bring up a new folder panel
- Select the ‘MQL4/5’ folder, followed by the ‘Experts’ folder
- Drag and drop (or Copy) your EA file(s) into this folder
- Restart MetaTrader for your changes to take affect
Setup and User Guide for Discord To MT4 and Discord To MT5
1. Download Discord To MT4/5 v1.30 and extract the files
2. Run DaneTrades_Discord_To_MT4_5_v1.30.exe
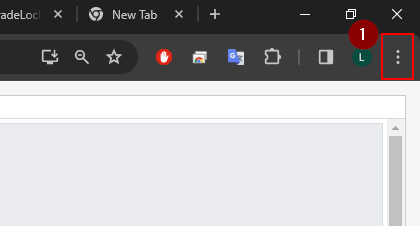
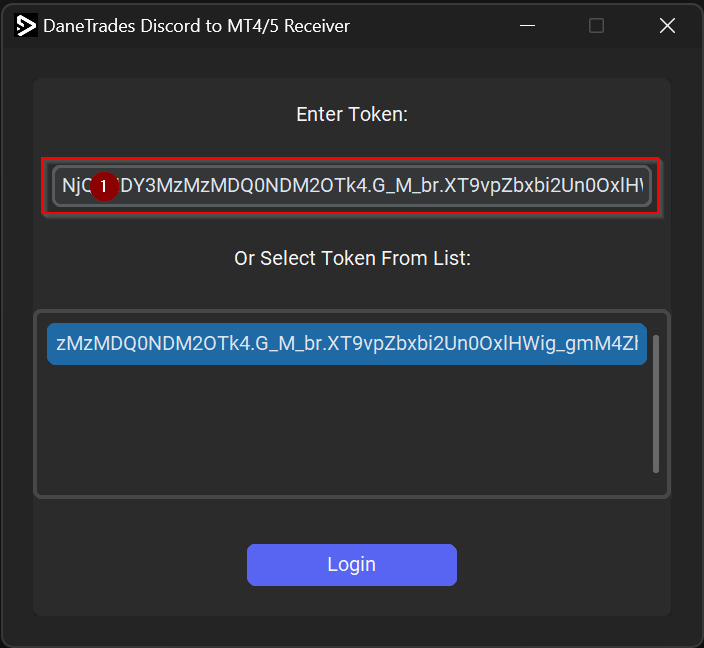
3. To get your Discord Token log in on the Discord website via Google Chrome Browser
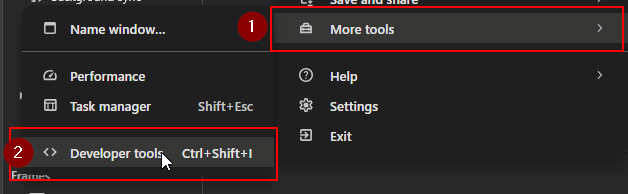
4. Click the three dots in the top right corner of the browser window, choose More tools, then Developer tools.
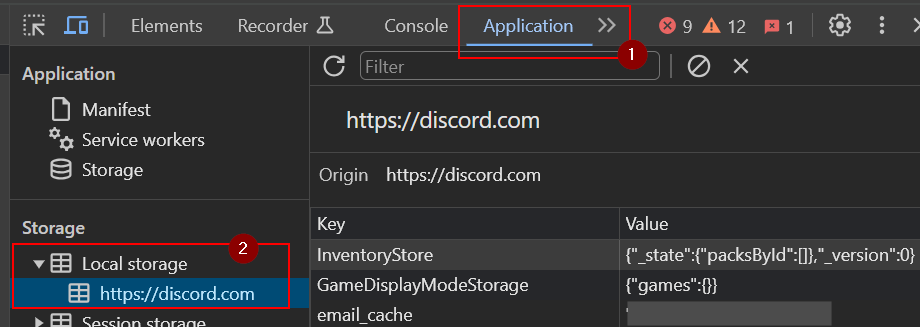
5. Go to the Application tab, click the down arrow next to Local storage in the Storage section, find and click on the Discord URL.
6. Click Toggle device toolbar and In the Filter field, type token.
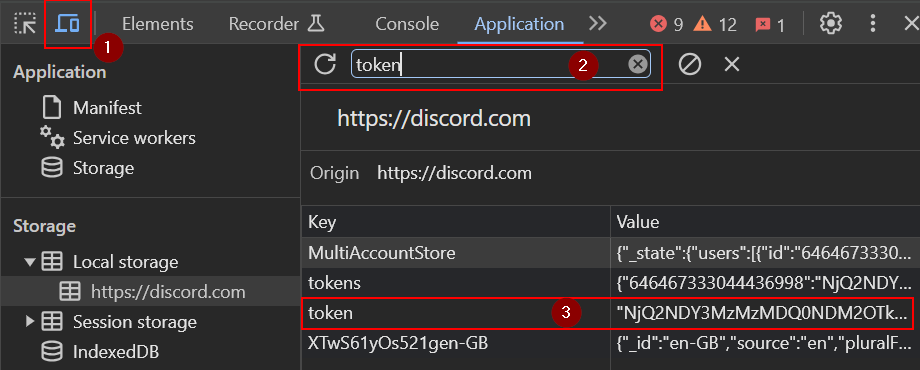
7. Copy and Paste this token into the Discord To MT4/5 Application and select Login. (The token will be saved for future use)
8. Expand and select the server/channel you wish to copy from and select copy channel
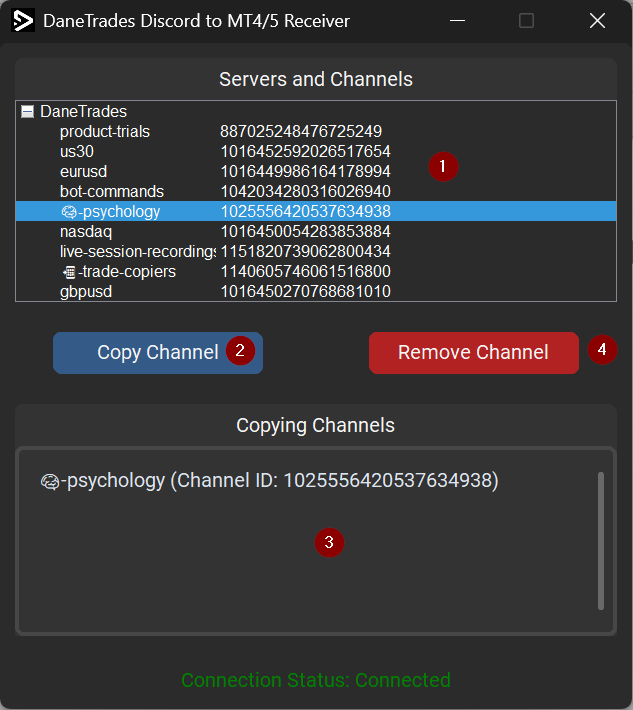
9. Any Channel IDs in the Copying Channel list will have their signals copied. Remove Channel ID from the Active Channel list to stop copying signals from the Channel
Please keep the program running and copying at all times while using the EA
Enable Discord To MT4/MT5 Receiver EA
How to Enable EA
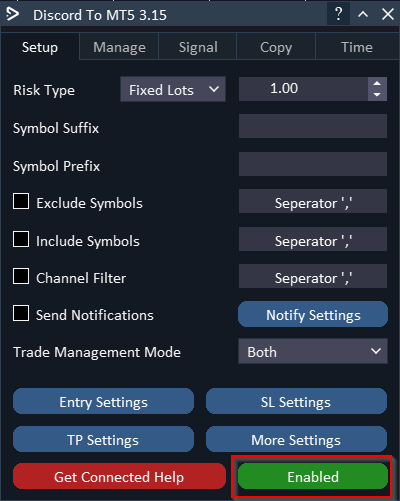
- You must first enable the Copier by pressing the ‘Enable’ on the bottom right of the panel
Setup Tab
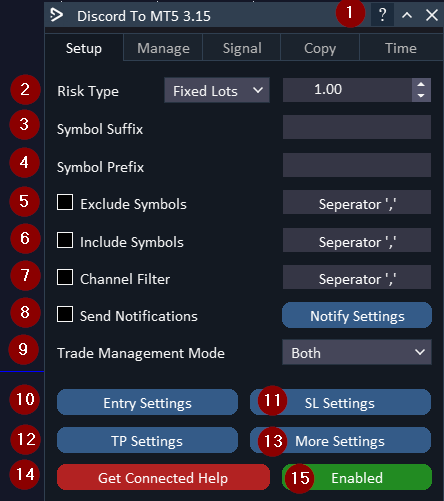
- Enables/Disables tool tips
- Risk per trade in % of balance
- Symbol suffix for example '.i' to make GBPUSD.i
- Symbol Prefix for example 'x' to make xGBPUSD
- Exclude symbols separated by , (XAUUSD, SPX500)
- Include symbols separated by , (XAUUSD, SPX500)
- Channel Filter via Channel Name (separated by ','). The channels in here will be the ONLY channels copied. This only needs to be used when running on multiple accounts and you want to filter specific channels on certain accounts.
- Send notifications. Tick to enable
- Trade Management Mode. Both = Signals can be managed from the Signal Provider or from the 'Manage Tab'. 'From Signal = trade managed by signal from Discord. Manual = Trades can be managed by 'Manage Tab' or manually. Will ignore modifications sent from signal
- Entry settings - Opens the Entry settings window
- SL settings - Opens the SL settings window
- TP settings - Opens the TP setting window
- More Settings - Opens More Settings Window
- Help to get connected to Discord
- Enables the EA to start copying
Notify Settings

- Click on Notify Settings to Open Notification Settings Window
- Set the type of Notification you would like to receive; Alerts, Push, Email
- Notify Settings for various actions
Entry Settings

- Execute orders at market instead of using the entry in the signal
- If Price > Slippage, Turn Into Pending Order - If price is outside the slippage amount it will be turned into a pending order.
- Max slippage for the Entry Price - If the Entry price for MARKET orders in the signal is too far away from the price on your broker it will either be ignored or turned into a pending order (If 2. is selected)
- If Bid/Ask > Slippage, Turn Into Pending Order – If the difference between the Signal Entry and your Broker price exceeds the specified slippage, convert to a pending order.
- Randomize Entry Pips – Randomize the entry point within a specified range of pips. Specify the minimum and maximum pips for randomization. Helps in making your trades unique.
6. Select Entry To Use - Some signals have an Entry Range or Zone, Select with Entry price to use:
- BUY EURUSD @ 1.1120 - 1.1130
- First Price = 1.1120
- Middle Price = 1.1125
- Second Price = 1.1130
7.Only Take Entries inside Zone - Only take the signal if the MARKET Entry price is between the Entry Zone
8. Pending Inside Zone – If the current broker Bid/Ask is outside the signal entry zone a Pending Order inside the zone. The Pending will be placed at the ‘Select Entry To Use’ Price.
SL Settings
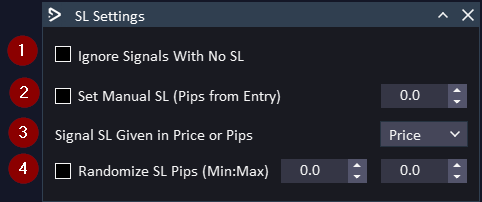
- Ignore Signals With No SL - All signals that do not have a SL will NOT be copied
- Set Manual SL (Pips from Entry) - Ignore the SL in the signal and set your own SL. A value of 20 would set SL at 20 pips away from the entry price
- Signal SL Given in Price or Pips – Specify whether the signal’s SL is given in Price or Pips. • Price – Select if SL is an absolute price level • Pips – Select if SL is a distance in Pips from entry
- Randomize SL Pips (Min:Max) – Randomize the SL distance in pips within a specified range. Specify the minimum and maximum pips for randomization. Helps in making your trades unique.
TP Settings
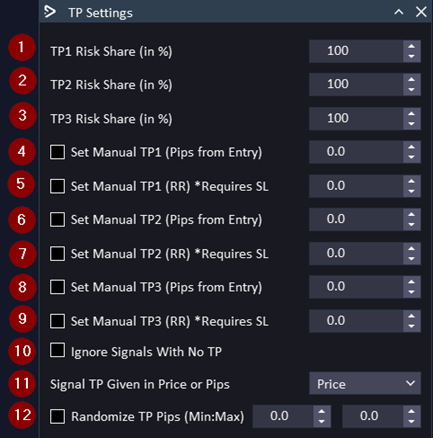
- TP1 Risk Share (%) - How much of the Risk will be allocated to TP1. For example you risk 1% overall. TP1 is set to 50%. TP1 lot size will be half of the risk amount 1%. So will be 0.5%
- TP2 Risk Share (%) - How much of the Risk will be allocated to TP2. For example you risk 5 lots. TP2 is set to 20%. TP2 lot size will be 25% of the 5 risk lots. So will be 1 lot for TP2
- TP3 Risk Share (%) - How much of the Risk will be allocated to TP3. For example you risk 1% overall. TP3 is set to 25%. TP3 lot size will be 25% of the risk amount 1%. So will be 0.25%
- Set Manual TP1 (Pips from Entry) - Ignore the TP1 in the signal and set your own TP1. A value of 20 would set TP1 at 20 pips away from the entry price
- Set Manual TP1 (RR) * Requires SL - Ignore the TP1 in the signal and set your own TP1. A value of 2 would set TP1 at 2 RR away from the entry price. If SL is 0 this setting will NOT work
- Set Manual TP2 (Pips from Entry) - Ignore the TP2 in the signal and set your own TP2. A value of 30 would set TP2 at 30 pips away from the entry price
- Set Manual TP2 (RR) * Requires SL - Ignore the TP2 in the signal and set your own TP2. A value of 3 would set TP2 at 3 RR away from the entry price. If SL is 0 this setting will NOT work
- Set Manual TP3 (Pips from Entry) - Ignore the TP3 in the signal and set your own TP3. A value of 40 would set TP3 at 40 pips away from the entry price
- Set Manual TP3 (RR) * Requires SL - Ignore the TP3 in the signal and set your own TP3. A value of 3.5 would set TP3 at 3.5 RR away from the entry price. If SL is 0 this setting will NOT work
- Ignore Signals With No TP - All signals that do not have a TP will NOT be copied
- Signal TP Given in Price or Pips - Specify whether the signal’s TP is given in Price or Pips. • Price – Select if TP is an absolute price level • Pips – Select if TP is a distance in Pips from entry
- Randomize TP Pips (Min:Max) – Randomize the TP distance in pips within a specified range. Specify the minimum and maximum pips for randomization. Helps in making your trades unique.
More Settings
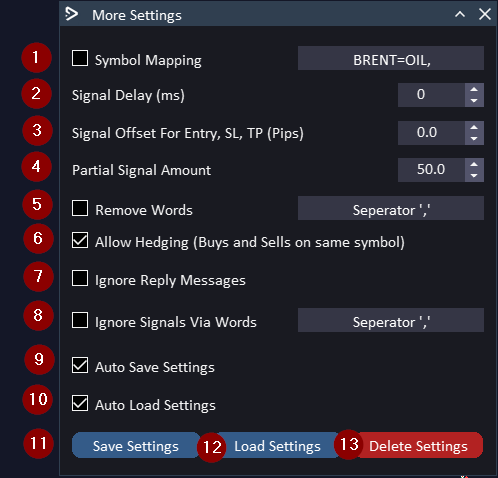
- Symbol Mapping - If symbol names are not the same in the signal as your broker then you need to map it. The format is 'Symbol From Signal' = 'Symbol in broker'. Then use ',' (Comma) as a separator. For example BRENT = OIL,SP500 = US500. GOLD is already mapped to XAUUSD by default so this does not need to be added
- Signal Delay (ms) - Delay Taking signals by increasing this timer
- Signal Offset for Entry, SL, TP (Pips) - When receiving a signal you can add a few pips to the values to make them unique. Good for prop firms.
- Partial Signal Amount - If a signal sends command to take a partial. The partial amount will be the value in this field
- Remove words - Any words or phrases in this list will be removed from the signal. For example in this field you have 'Trade is in profit'. Original message = XAUUSD Trade is in profit Go Breakeven. Modified Signal = XAUUSD Go Breakeven
- Allow Hedging (Buys and Sells on same symbol) – Enable to allow hedging on the same symbol (buy and sell simultaneously). This options depends on your brokers support for hedging.
- Ignore Reply Messages – Ignore reply messages in signal channels. Prevents unintended actions triggered by replies to signals.
- Ignore Signals Via Words – Signals that contain any of the words/phrases in the filter will be ignored.
- Auto Save Settings – Any changes made in the GUI will be saved automatically when the EA is closed
- Auto Load Settings - Load previous saved settings on EA Start
- Save Settings – Manually save the settings
- Load Settings – Manually load the settings
- Delete Settings – Delete the settings config
(NOT REQUIRED - OLD METHOD) COPY FROM SOMEONE ELSES DISCORD
If you are copying signals from someone else’s Discord they will need to give you their Bot Token. Alternatively, if you are an admin of their Discord you will also be able to follow the instructions below to create a Bot Token for the Discord. You can get the Channel ID by right clicking on the channel the signals are in and click Copy Channel ID. Copy these both into the Discord to MT5/MT4 to get connected.
If they do not have a bot token with the correct permissions. You can send them the guide below for them to set it up.
(NOT REQUIRED - OLD METHOD) COPY FROM OWN DISCORD
Create and Setup a Discord Bot
- Log into your Discord account and click on ‘Advanced’ in the sidebar. Then activate ‘Developer Mode’. Then click on ‘Discord API’.
- Activate ‘Developer Mode’ in your Discord account and then click on ‘Discord API’
- In the Developer Portal, click on ‘Applications’ in the sidebar on the left. Log in to your account again and then click on ‘New Application’.
- Click on ‘Applications’ and then ‘New Application’.
- Give your bot a name and then click on ‘Create’.
- Click on ‘Bot’ in the left sidebar, then click on reset token. Take note of the token, as this will be needed for the EA later.
- Scroll down and enable Message Content Intent
- Click ‘OAuth2’ in the left sidebar and URL Generator. Under Scope, Tick ‘Bot’. Scroll down and tick Send Messages and Read Message History under bot permissions.
- At the bottom copy the generated URL and paste it into the browser. Authenticate it to your discord room. The bot is now added to your discord.
- Right Click on the Channel you want to copy signals from and select “copy Channel ID”.
- Right click on the Channel you wish to take signals from and go to Settings > Permissions > Add Members or Role and add the bot to the channel.
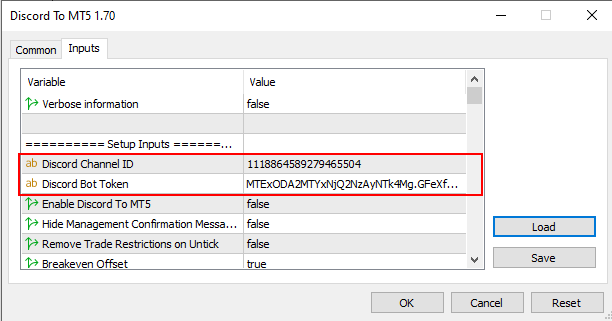
- Enter the Channel ID and Bot Token from step 4 into the EA as shown in screenshot. You can use the interface or paste it into the inputs.


")
