

✔️ Telegram Publisher Agent MT4©: https://www.mql5.com/en/market/product/18985
✔️ Telegram Publisher Agent MT5©: https://www.mql5.com/en/market/product/23946
Warning: Please attach Telegram Publisher Agent MT4/5 only on one chart.
Telegram Publisher Agent is an add-on that allows traders to send signals to their Telegram channels and groups in real-time. With customizable messages, chart screenshots, and other features, the tool helps traders share their trading insights and strategies with their followers. The tool also features a beautiful design with light and dark theme switch, providing users with an aesthetic and functional trading experience.
How it works:
Telegram Publisher Agent works by integrating with the MetaTrader trading platform and sending signals to the user's Telegram channels and groups. Users need to install the tool and set up their Telegram account to send the signals. Once the tool is installed, users can customize the messages they send based on their preferences. The tool also provides optional inputs such as chart screenshots, chart templates, and custom images, making it easy to share additional information with followers. With Telegram Publisher Agent, traders can share their trading insights and strategies with their followers, making it an essential tool for any trader looking to build a following.
Setup:
- In your Telegram Channel or Group click on Administrators then click on add admin search for @MetaTrader_Publisher_Agent_bot and add it as member and admin.
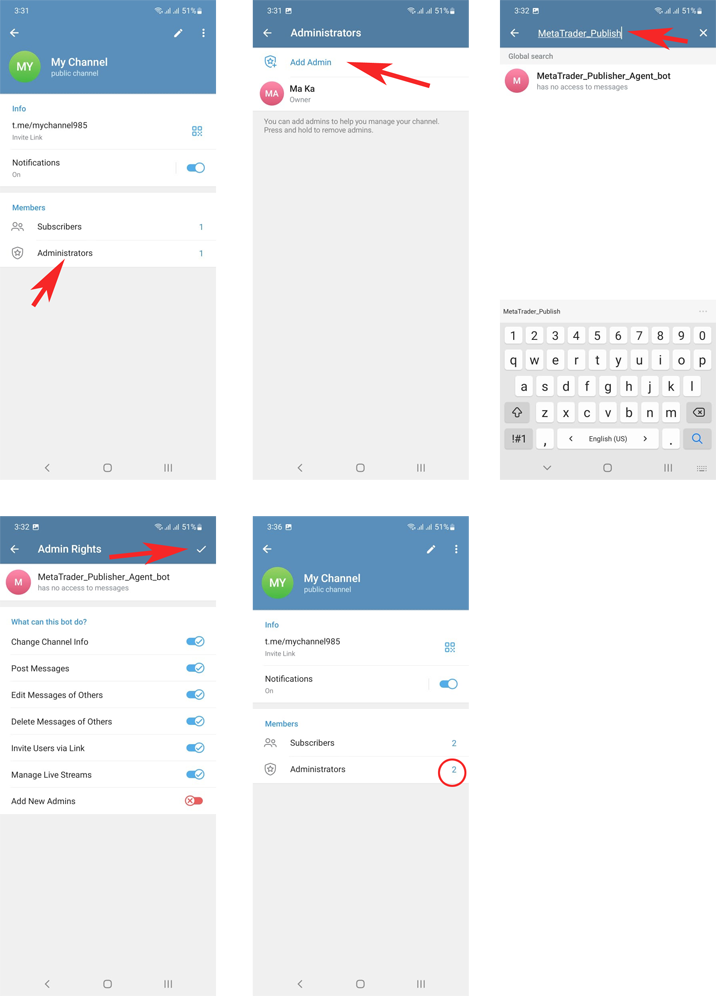
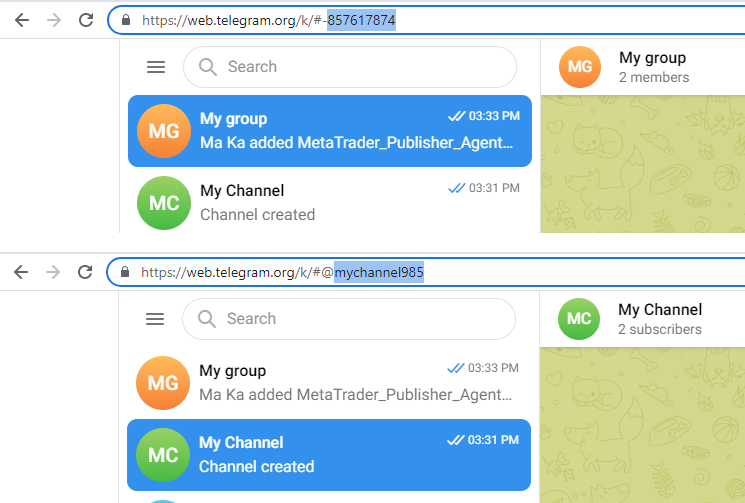
2. Go to https://web.telegram.org to get your private group or channel id, the id will be shown after the #symbol in the link, You just need to enter the letters or numbers (Ignore " - " or " @ " character) for Example:
3. You must add the URL “https://api.telegram.org” to Tools > Options > Expert Advisors > Allow Web Request for listed URL in order to load news data from the source.

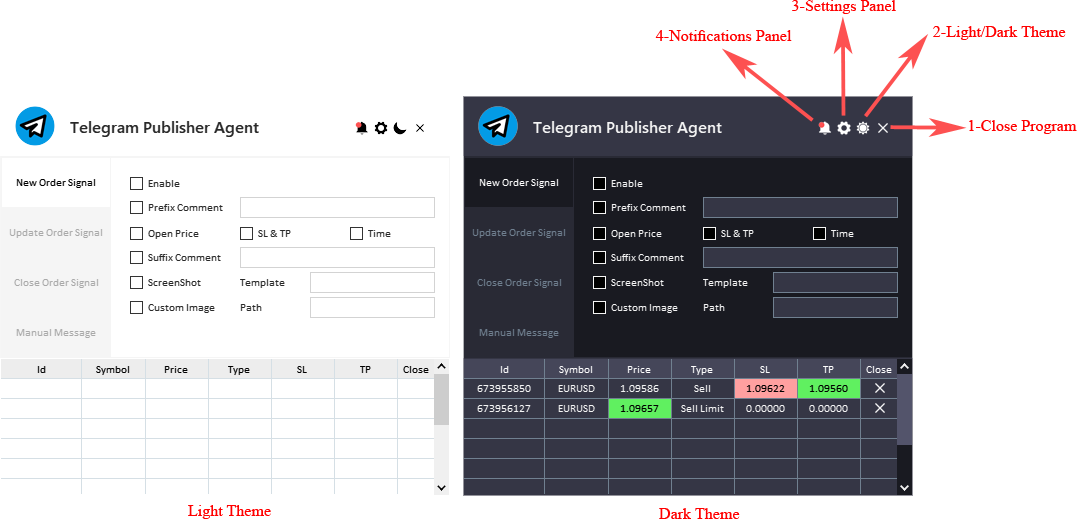
Main Panel Explanation:
-
Close EA Button: This button is used to stop the Expert Advisor (EA) and remove it from the chart.
-
Light/Dark Button: This button is used to switch between a light and dark theme for the panel. This button can be helpful if you find one of the themes too bright or too dark and want to switch to the other one.
-
Settings Panel Button: This button is used to open the settings panel for the EA. The settings panel allows you to configure various settings for the EA.
-
Notifications Panel Button: This button is used to open the notifications panel for the EA. The notifications panel displays important notifications.
-
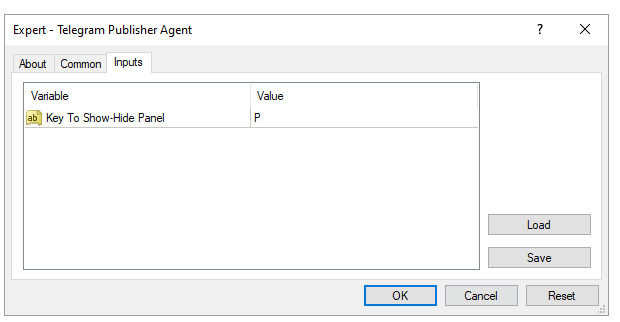
Show/Hide Panel Key: a shortcut to show and hide panel by using your keyboard.
Inputs Tabs:
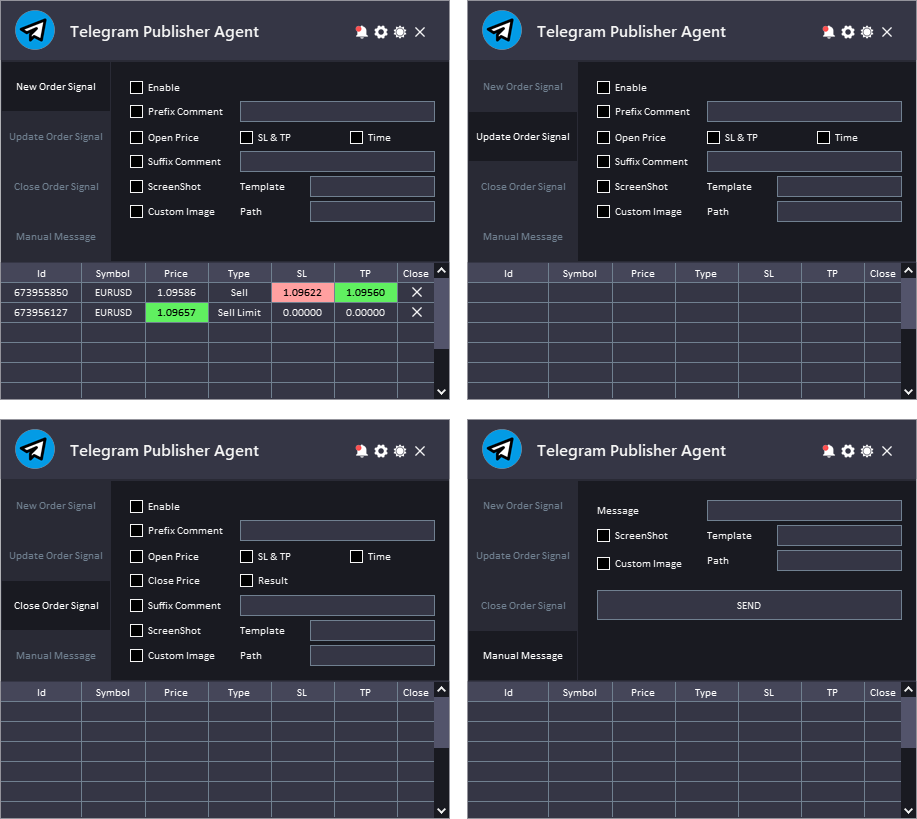
The interface panel is designed to enable users to efficiently manage their inputs through the use of organized tabs. By grouping these inputs together in easily accessible tabs, users can effortlessly access and utilize the desired features, streamlining their trading experience.
These tabs are dedicated to specific functions, including New Order Signal, Update Order Signal, Close Order Signal, and Manual Message.
The New Order, Update Order, and Close Order tabs have similar input options that users can customize to send notifications for their orders:
- Enable: This input allows users to enable or disable send notifications for their orders. If set to "true", the tool will send a message to the user's Telegram chat every time an order action is performed.
- Prefix Comment: This input allows users to add a prefix to the message sent by the tool when an order action is performed. For example, the user can add their own identifier or label to the message.
- Open Price: This input allows users to include the opening price of the order in the message sent by the tool.
- SL & TP: This input allows users to include the Stop Loss and Take Profit levels of the order in the message sent by the tool.
- Time: This input allows users to include the time of the order action in the message sent by the tool.
- Suffix Comment: This input allows users to add a suffix to the message sent by the tool when an order action is performed. For example, the user can add additional information or comments to the message.
- Screenshot: This input allows users to include a screenshot of the chart at the time the order was placed, updated, or closed in the message sent by the tool.
- Template: This input allows users to apply a template on the screenshot chart.
- Custom Image: This input allows users to include a custom image in the message sent by the tool.
- Path: This input allows users to specify the file path for the custom image to be included in the message sent by the tool.
Chart Template must be entered in this format: ADX without the file extension.
Custom Image Path must be entered in this format: Logo.bmp (including the file extinction).
The file of the custom image should be available in the terminal folder: MQL4/5> Files> Logo.bmp.
- Close Price: This input allows users to include the closing price of the order in the message sent by the tool when the order is closed.
- Result: This input allows users to include the profit or loss in pips from the closed order in the message sent by the tool.
The Manual Message Tab of the Telegram Publisher Agent is a versatile feature that enables users to send customized messages to their Telegram channels and groups. It allows the user to include a chart screenshot, specify the chart template, and send a custom image along with the message they want to send.
Settings Panel Explanation:

This panel consists of multiple tabs, Including:
Channels and Groups: there are textboxes provided for channels and groups. The user can add multiple channels or groups by separating their respective IDs with a semicolon (;) character. This means that the tool can send signals to multiple channels or groups simultaneously, which can be useful for traders who want to broadcast their signals to a larger audience.
Messages: In this tab, users can specify custom headers for different order actions. This allows users to personalize the messages they send, making them more distinctive and easy to recognize. By customizing the headers for these different order actions, users can make it easier for their audience to understand the content of the message. Moreover, the customized headers can help to create a consistent branding across all of the messages sent through the Telegram Publisher Agent. For example, in the Messages tab, the user can customize headers for different order actions, such as:
- New Order
- Order SL Modified
- Order TP Modified
- Order SL&TP Modified
- Order Closed
- Order Partially Closed
- Pending Order Deleted
- Pending Order Price Modified
- Pending Order Activated
Daily Message: allows users to send daily messages to their audience at a specific time, which can help to keep their audience engaged and informed. In the Daily Message tab, users can find a checkbox to enable or disable the daily message feature. When the checkbox is enabled, users can enter the message they want to send in the textbox provided. Users can customize the message according to their needs, and it can be anything from market updates to personal messages. Furthermore, users can specify the time when they want the message to be sent. This can be done using the time picker provided in the Daily Message tab. Users can select the time when they want the message to be sent, and the tool will automatically send the message at the specified time.
Orders: allows users to specify which orders they want the tool to manage based on their magic number. In the Orders tab, users can find a textbox where they can enter the magic number of the order they want to manage. If the magic number is set to 0, it means that the tool will manage only manual orders. If the magic number is set to -1, it means that the tool will manage all orders. Users can also enter any other number in the magic number field, which means that the tool will manage only the orders with the specified magic number. This can be useful for users who want to manage specific orders and ignore others.
Notifications Panel Explanation:
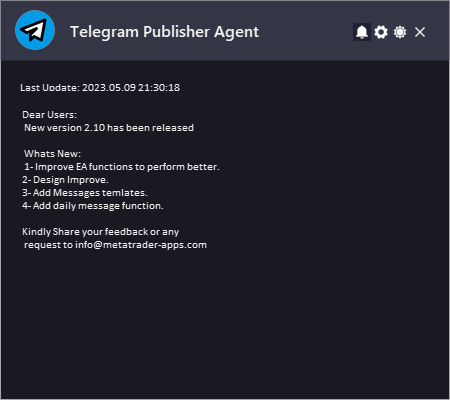
The Date refers to the date and time when the notification was generated.
The Notification refers to the message that is displayed. This can include information about the EA or the updates or message from the developer.
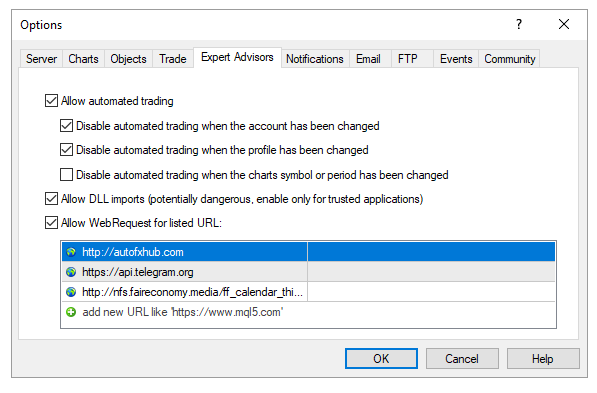
To allow EA getting the notifications, you need to add our website link to the list of allowed URLs in the platform's settings.
Here are the steps to add a link to the allowed URLs list in MetaTrader (Check The Image Below):
- Open the MetaTrader platform and go to "Tools" in the top menu, then select "Options".
- In the "Options" window, click on the "Expert Advisors" tab.
- Check the "Allow WebRequests for listed URL" option and click on the "Add" button.
- In the "New URL" field, enter the URL that you want to allow web requests for (http://autofxhub.com).
- Click "OK" to save the URL to the list of allowed URLs.
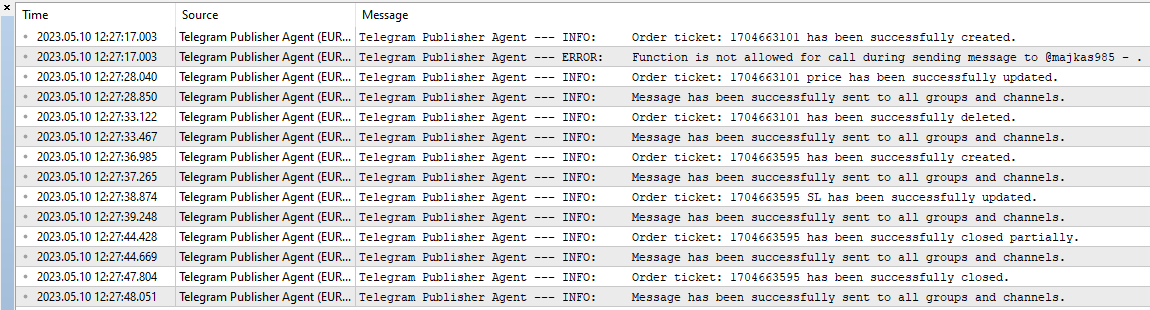
EA Log:
The "Experts" contains the entire information about the attached expert, including closing of positions, modifying of orders, the expert's own messages, etc.
Information is represented in the form of a table with the following fields:
- Time – date and time of an event connected with the Expert Advisor;
- Message – information about the EA operation.
Here are an example of the Messages from Signal Lot Manager EA:
✔️ Telegram Publisher Agent MT4©: https://www.mql5.com/en/market/product/18985
✔️ Telegram Publisher Agent MT5©: https://www.mql5.com/en/market/product/23946


 Trading Guide")
