

✔️ One Click Analysis MT4©: https://www.mql5.com/en/market/product/14135
✔️ One Click Analysis MT5©: https://www.mql5.com/en/market/product/15003
One Click Analysis Tool is a keyboard shortcut-based object creation and copying tool for MetaTrader. It makes it easy to use analysis tools in MetaTrader with just a click. With our tool, you can quickly draw support and resistance levels, Fibonacci levels, shapes, channels, trend lines, and all other objects on your chart. Simply click the button, move the mouse, and One Click Analysis Tool will do the rest for you. This can save you time and make your chart analysis more efficient, allowing you to focus on making informed trading decisions based on your analysis.
In addition to object creation, One Click Analysis Tool also includes an object copier (chart sync) that allows you to easily copy objects from one chart to another. This can be especially helpful if you have multiple charts open and need to duplicate objects across them.
One Click Analysis Tool allows you to use one chart for all symbols in MetaTrader. This means that you can view different charts on the same window, without the need to switch between multiple charts. One Click Analysis Tool automatically hides objects from other symbols when you switch to a different symbol and shows them again when you come back to the first symbol. This can help you save time and improve your trading efficiency, by allowing you to easily compare and analyze different charts on the same window.
Main Panel Explanation:

-
Close EA Button: This button is used to stop the Expert Advisor (EA) and remove it from the chart.
-
Light/Dark Button: This button is used to switch between a light and dark theme for the panel. This button can be helpful if you find one of the themes too bright or too dark and want to switch to the other one.
-
Settings Panel Button: This button is used to open the settings panel for the EA. The settings panel allows you to configure various settings for the EA.
-
Notifications Panel Button: This button is used to open the notifications panel for the EA. The notifications panel displays important notifications.
-
Show/Hide Panel Key: a shortcut to show and hide panel by using your keyboard.
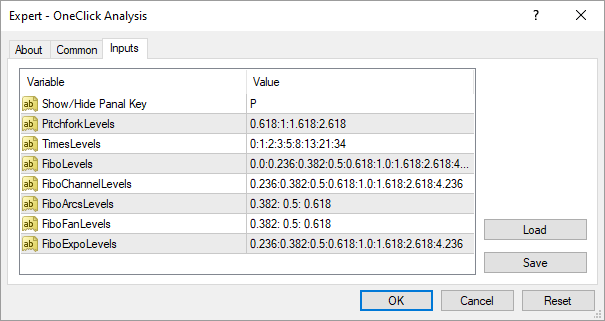
- Objects Levels Inputs: These inputs are the default levels used by the tool for different types of technical analysis tools (Each input should be separated by a colon (":") character).
How it works:
This tool works by allowing you to quickly and easily draw technical analysis objects on your MetaTrader chart. To access the tool, simply press the "P" hotkey to show or hide the panel.
Once the panel is open, You can customize the style, color, and width of the object to fit your preferences. For objects like Fibonacci and Fibonacci Channel, you can also add your own levels by separating each level with a colon (":").
Additionally, you have the option to show or hide the object's description. This can be useful for keeping your chart clean and uncluttered.Move your pointer to where you want to draw the object, and then click the corresponding hotkey for the type of object you want to draw. The tool will then automatically draw the object on your chart.
Objects Tabs:
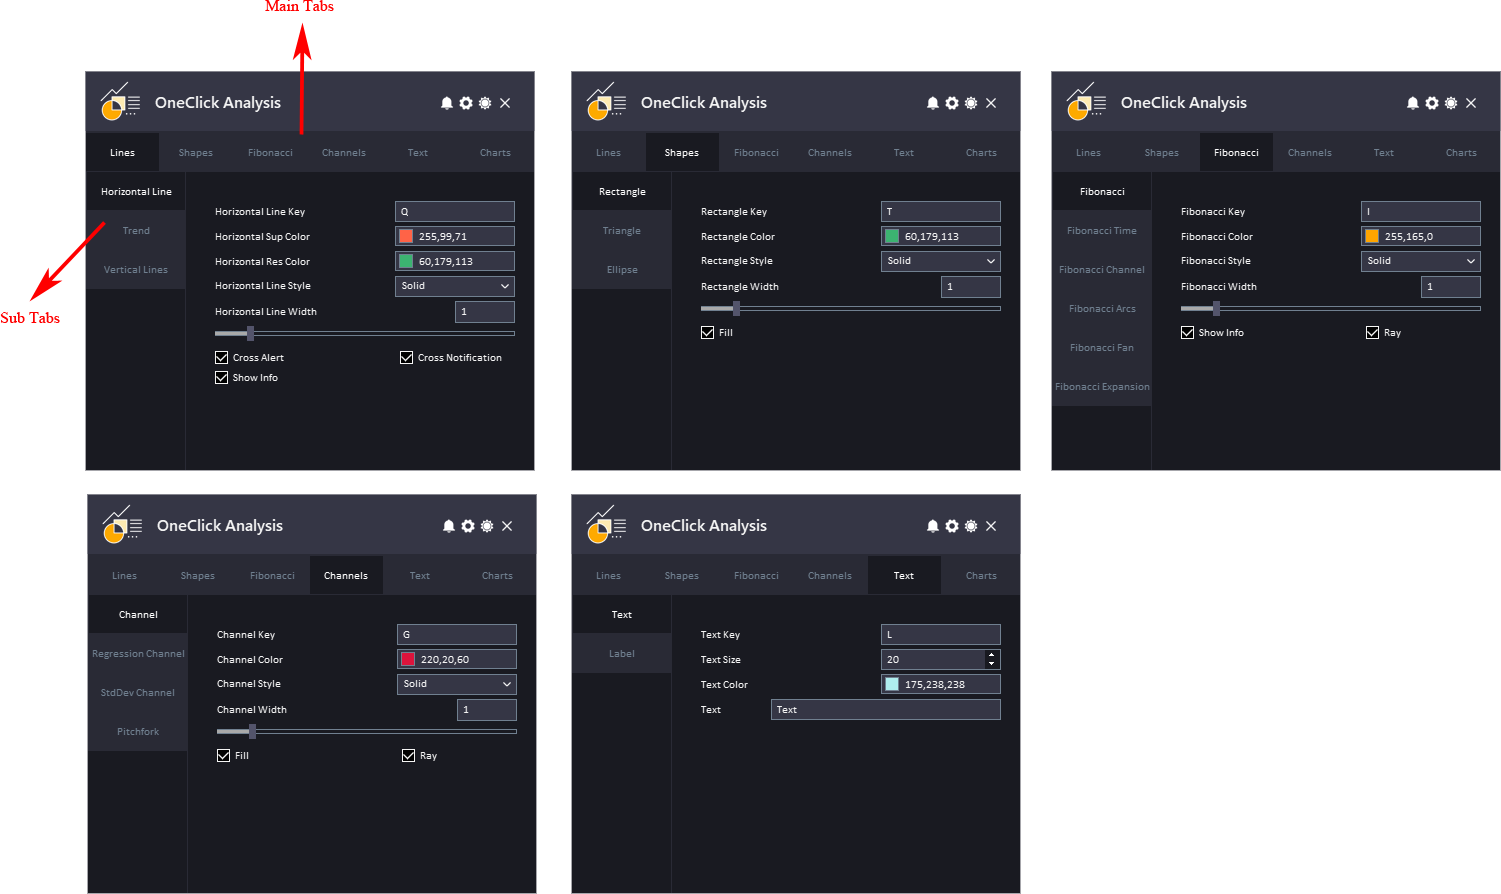
The interface panel is designed to allow you to create several types of technical analysis objects on your MetaTrader chart. The objects are organized into different tabs, making it easy to access and use them.
- The "Lines" tab includes various types of lines, such as support and resistance horizontal lines, vertical lines, trend lines, and arrowed lines. These can be useful for identifying key levels of support and resistance, as well as trend directions.
- The "Shapes" tab includes shapes like rectangles, triangles, and ellipses. These can be useful for marking specific areas of interest on your chart.
- The "Fibonacci" tab includes different types of Fibonacci tools, such as retracements, time zones, channels, arcs, fans, and expansions. These tools are commonly used in technical analysis to identify potential levels of support and resistance.
- The "Channels" tab includes channels like regression channels, standard deviation channels, and Andrews Pitchfork. These tools can be used to identify potential trend channels or areas of support and resistance.
- Lastly, the "Text" tab includes text and labels. These can be useful for adding notes or comments to your chart to help you keep track of your analysis.
The main inputs or settings that can be applied to each object created using the tool:
- Shortcut key: Each object can be assigned a specific key on your keyboard to quickly and easily draw it on your chart.
- Color: The color of the object can be selected, and for some objects like horizontal lines, the color can be chosen separately for support and resistance lines. For objects that have levels, the color of the levels can also be chosen.
- Style: You can choose the style of the line used to draw the object, such as dotted or solid. And for objects that have levels, the style of the levels can also be chosen.
- Width: You can adjust the width of the line used to draw the object, and for objects that have levels, the width of the levels can also be chosen.
- Show info: This option allows the display of additional information like price gap from current price or level value.
- Ray: This option allows the creation of an extended line that acts like a trend line.
- Fill: For objects that support the fill feature, like shape objects, you can enable this option to fill the shape with a color.
- Cross alert and cross notification: This option sends an alert or notification when the object's line is crossed.
Charts Tab:
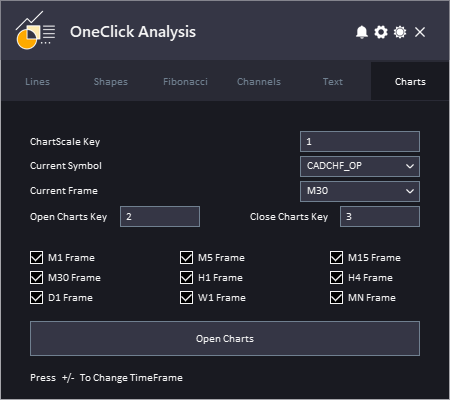
The chart tab in the interface panel contains several features that can be applied to the chart. These features include:
- Chart Scale key: This allows the user to change the scale of the chart quickly using a keyboard shortcut.
- Current symbol: This feature enables the user to change the symbol or instrument being displayed on the chart. For instance, the user can switch from displaying EUR/USD to displaying GBP/USD.
- Current time frame: This feature allows the user to change the time frame of the chart, such as switching from a 1-hour time frame to a 4-hour time frame.
- Open and close chart shortcut key: With this feature, the user can select different time frames, and when they press the open chart shortcut key, the tool will open all the charts for the current symbol with the selected time frames. Similarly, the close shortcut key will close all the charts for the current symbol.
- +/- shortcut key: This feature allows the user to change to a higher or lower time frame by using the plus or minus key on the keyboard. For example, if the user is viewing a 1-hour time frame, they can quickly switch to a 30-minute time frame by using this shortcut key.
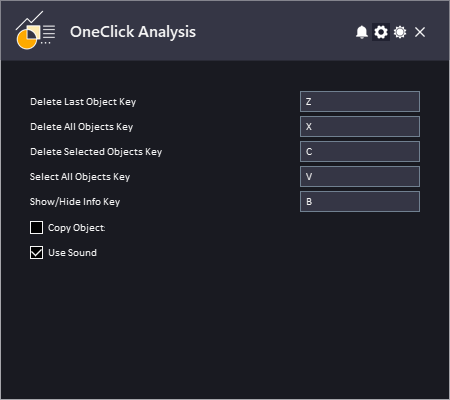
Settings Panel Explanation:
-
Delete last object key: This is a keyboard shortcut that allows you to delete the last object that you created on the chart.
-
Delete all objects key: This is a keyboard shortcut that allows you to delete all the objects that you have created on the chart.
-
Delete selected objects key: This is a keyboard shortcut that allows you to delete a selected object on the chart.
-
Select/deselect all objects key: This is a keyboard shortcut that allows you to select or deselect all objects on the chart.
-
Show/hide info key: This is a keyboard shortcut that allows you to show or hide the information of the objects on the chart, such as the price levels and values.
-
Copy object: This is a checkbox that, when checked, allows you to easily copy objects from one chart to another.
-
Use sound: This input refers to a feature that plays a sound effect every time an action is performed.
Notifications Panel Explanation:
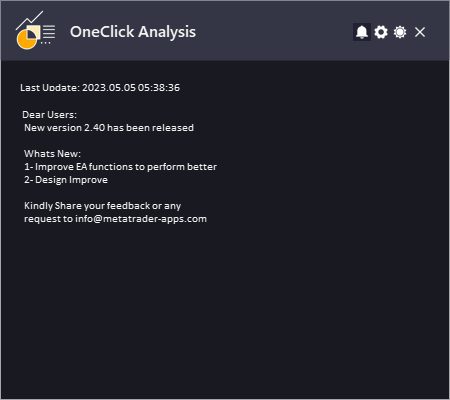
The Date refers to the date and time when the notification was generated.
The Notification refers to the message that is displayed. This can include information about the EA or the updates or message from the developer.
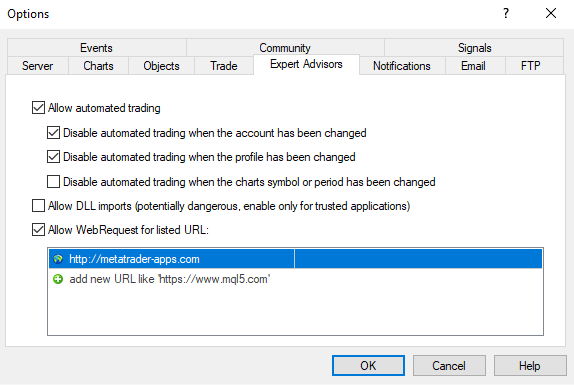
To allow EA getting the notifications, you need to add our website link to the list of allowed URLs in the platform's settings.
Here are the steps to add a link to the allowed URLs list in MetaTrader (Check The Image Below):
- Open the MetaTrader platform and go to "Tools" in the top menu, then select "Options".
- In the "Options" window, click on the "Expert Advisors" tab.
- Check the "Allow WebRequests for listed URL" option and click on the "Add" button.
- In the "New URL" field, enter the URL that you want to allow web requests for (http://metatrader-apps.com).
- Click "OK" to save the URL to the list of allowed URLs.
✔️ One Click Analysis MT4©: https://www.mql5.com/en/market/product/14135
✔️ One Click Analysis MT5©: https://www.mql5.com/en/market/product/15003


![[Two Different Approaches to Market Timing]: The Spiral Calendar and the VISTmany Research Project](https://c.mql5.com/6/1012/splash-preview-771691.png "[Two Different Approaches to Market Timing]: The Spiral Calendar and the VISTmany Research Project")
