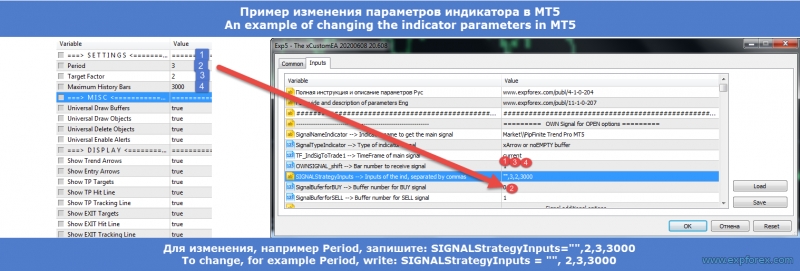
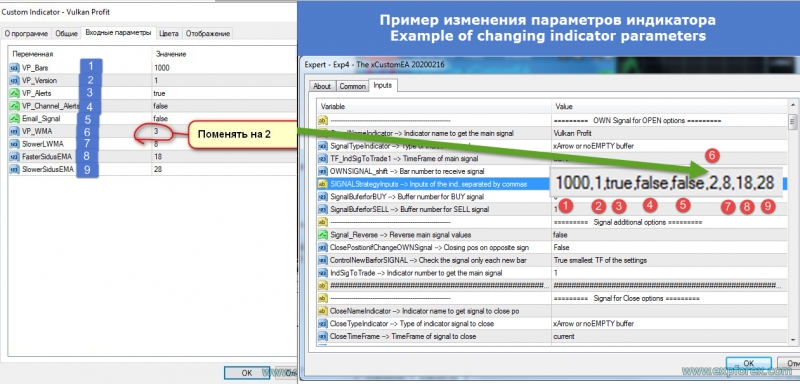
Exp - The xCustomEA Advisor on the PipFinite Trend PRO indicator

| 🧩 How to Trade with PipFinite Trend PRO Using The xCustomEA A practical example of building an automated trading strategy from the PipFinite Trend PRO custom indicator using Exp – The xCustomEA. This article shows how to connect indicator buffers, configure BUY / SELL signals, closing logic, trend filtering and Take Profit levels without programming a new Expert Advisor from scratch. |
[Русский] - [English] - [Español] - [Português] - [Deutsch] - [Français] - [한국어] - [日本語] - [中文] - [Türkçe] - [Italiano]
| 💎 The xCustomEA MT4 | 💎 The xCustomEA MT5 |
| ⬇ Download The xCustomEA DEMO + PDF | 📘 Full xCustomEA Instruction |
| ▶ Watch Video | ⚙ Settings and Inputs |
| 🏠 Main | 🎓 Documentation | ⚙ Settings |
| ❓ FAQ | ⭐ Reviews | 💬 Comments |
🔗 Related xCustomEA Articles and SettingsUse these related English articles together with this PipFinite Trend PRO example. The main xCustomEA article explains the Expert Advisor concept, while the Settings article explains external inputs and configuration groups in more detail. |
The xCustomEA main article:
The xCustomEA settings and inputs:
[English Settings Article] - www.expforex.com/xcustomea/#Settings
🎬 Watch How The xCustomEA Works with Custom IndicatorsThe video explains how The xCustomEA can read custom indicator signals and turn them into automated trading logic. |
🧩 The xCustomEA for MT4 and MT5 One universal Expert Advisor for building automated strategies from custom indicator signals. |


🚀 What is This Article About?
This article is a practical example of how to configure Exp – The xCustomEA to trade using the popular custom indicator PipFinite Trend PRO.
The main goal is not to advertise only one indicator. The goal is to show a real workflow: install a custom indicator, find its signal buffers, connect these buffers to The xCustomEA, configure opening signals, closing signals, trend filters and Take Profit levels, and then test the result in MetaTrader.
PipFinite Trend PRO is a convenient example because it provides clearly documented buffers for BUY signals, SELL signals, trend filtering and Take Profit targets. This makes it a good educational case for understanding how The xCustomEA works with custom indicators.
📌 Practical Indicator ExampleWe use PipFinite Trend PRO as a real custom indicator example. | 🧩 xCustomEA as Trading EngineThe xCustomEA reads buffers and turns indicator signals into trades. |
🔢 Buffer-Based SetupBUY, SELL, filter and Take Profit buffers are configured manually. | 🧪 MT4 / MT5 TestingThe same idea can be tested in both MetaTrader 4 and MetaTrader 5. |
⭐ Why PipFinite Trend PRO Is a Good Example
- It is a popular Market indicator available for MetaTrader 4 and MetaTrader 5.
- It provides signal buffers that can be read by an Expert Advisor.
- It has separate BUY and SELL signal buffers.
- It includes trend filter buffers that can be used to confirm direction.
- It provides Take Profit buffers that can be used for target logic.
- It is useful for showing xArrow configuration in The xCustomEA.
- It demonstrates the full workflow: entry, exit, filter, SL/TP and testing.
| ⚠ Important: This is an example of working with PipFinite Trend PRO. The xCustomEA can be used with many other custom indicators, but every indicator must be checked separately: buffer numbers, repainting behavior, Strategy Tester compatibility and signal logic. |
🛠 Step 1 — Install PipFinite Trend PRO
Before The xCustomEA can trade by the indicator, the indicator must be installed in the MetaTrader terminal. If the indicator is purchased or downloaded from the MQL5 Market, it will appear in the Indicators / Market folder.
For this example, install the PipFinite Trend PRO version for the terminal you use: MT4 or MT5.
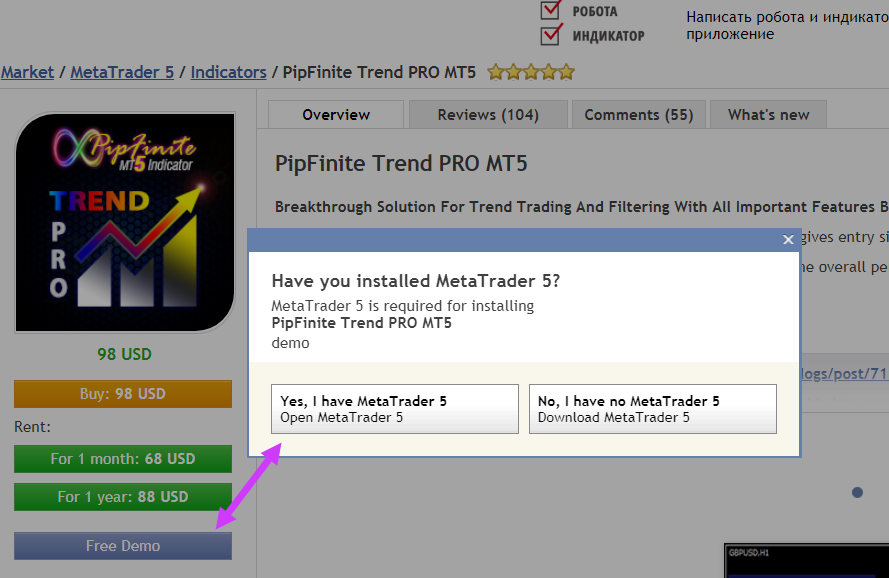
Download the Indicator from MQL5 Market |
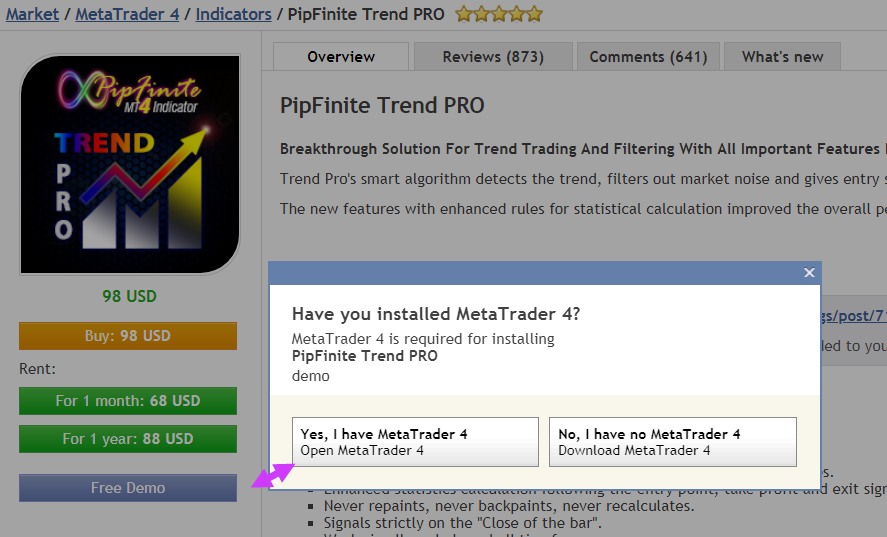
Confirm Installation in MetaTrader |
Indicator in Market Folder After installation, the indicator should be visible in the Market folder of your terminal. |

🔍 Step 2 — Find the Signal Buffers
To automate a custom indicator, you must know which buffers contain the trading signals. The xCustomEA reads indicator values through these buffers.
In the PipFinite Trend PRO example, the important buffers are:
| Buffer | Meaning | How The xCustomEA Can Use It |
| 8 | BUY signal | Open BUY position |
| 9 | SELL signal | Open SELL position |
| 10 | BUY trend / UpTrend filter | Allow BUY trades or filter signals |
| 11 | SELL trend / DnTrend filter | Allow SELL trades or filter signals |
| 12 | Near Take Profit | Use as closer TP level |
| 13 | Far Take Profit | Use as farther TP level |
Buffer Numbers in Data Window The Data Window helps verify which buffers contain signals and indicator values. |

🏹 Step 3 — Configure Opening Signals with xArrow
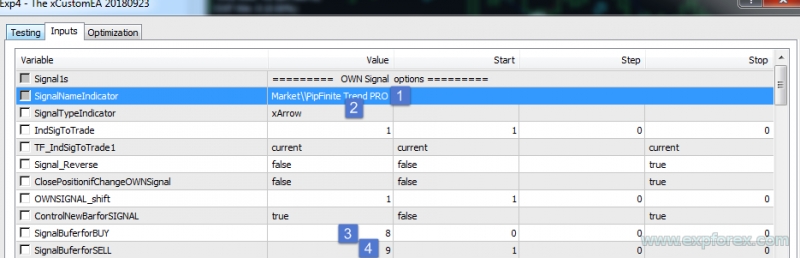
The simplest way to connect PipFinite Trend PRO is to use the xArrow mode. This mode is suitable when the indicator draws BUY and SELL arrows using separate buffers.
For opening positions, we use:
- SignalBuferforBUY = 8
- SignalBuferforSELL = 9
| Parameter | Example for PipFinite Trend PRO |
| SignalNameIndicator | Market \ PipFinite Trend PRO MT5 |
| SignalTypeIndicator | xArrow |
| TF_IndSigToTrade1 | Current timeframe |
| OWNSIGNAL_shift | 1 |
| SignalBuferforBUY | 8 |
| SignalBuferforSELL | 9 |
xArrow Opening Signal Setup Once the buffer numbers are known, the opening signal setup becomes very simple. |
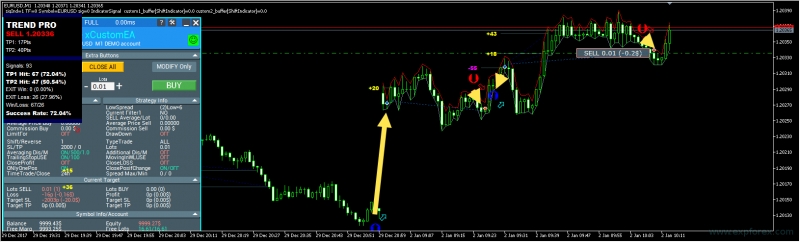
The EA Opens Trades by PipFinite Signals The xCustomEA reads buffers 8 and 9 and opens positions according to PipFinite Trend PRO signals. |
🚪 Step 4 — Configure Closing by Opposite Signals
Opening is only part of the system. A strategy also needs exit logic. In this example, positions can be closed by the opposite signal from the same indicator.
For closing positions, we reverse the signal buffers:
- CloseBuferforBUY = 9 — close BUY when SELL signal appears
- CloseBuferforSELL = 8 — close SELL when BUY signal appears
| Close Parameter | Example for PipFinite Trend PRO |
| CloseNameIndicator | Market \ PipFinite Trend PRO MT5 |
| CloseTypeIndicator | xArrow |
| CloseBuferforBUY | 9 |
| CloseBuferforSELL | 8 |
Closing Signal Setup The opposite signal buffers can close active positions. |

🧭 Step 5 — Add Trend Filtering
Signals alone are not always enough. Many strategies need a trend filter to avoid entries against the current direction.
PipFinite Trend PRO provides trend filter buffers:
- FilterBuferforBUY = 10
- FilterBuferforSELL = 11
| Filter Parameter | Example for PipFinite Trend PRO |
| FilterNameIndicator | Market \ PipFinite Trend PRO MT5 |
| FilterTypeIndicator | xArrow / buffer filter mode |
| FilterBuferforBUY | 10 |
| FilterBuferforSELL | 11 |
Trend Filter Setup Filters can be used to confirm the market direction before opening trades. |
PipFinite Trend Filter Example |


🎯 Step 6 — Use Take Profit from PipFinite Trend PRO
Some indicators provide not only entry signals but also target levels. PipFinite Trend PRO provides Take Profit buffers that can be used by The xCustomEA.
In this example:
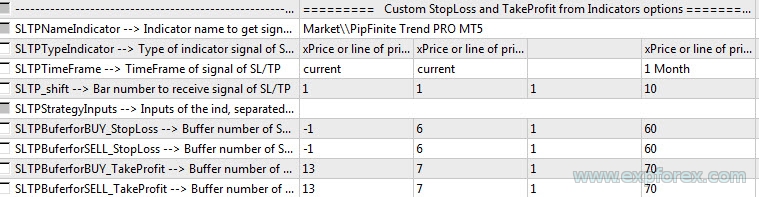
- Buffer 12 can be used as a nearer Take Profit target.
- Buffer 13 can be used as a farther Take Profit target.
In the example below, buffer 13 is used as the Take Profit level for both BUY and SELL trades.
| SL / TP Parameter | Example Value |
| SLTPNameIndicator | Market \ PipFinite Trend PRO MT5 |
| SLTPBuferforBUY_TakeProfit | 13 |
| SLTPBuferforSELL_TakeProfit | 13 |
| Alternative TP buffer | 12 for a nearer target |
| Stop Loss buffer | Not used in this example; Stop Loss can be configured in xCustomEA settings. |
SL / TP from Indicator Buffers |
Take Profit Buffer Example |
Result of Closing by Indicator Take Profit |


🧪 Step 7 — Test the Strategy in MT4 and MT5
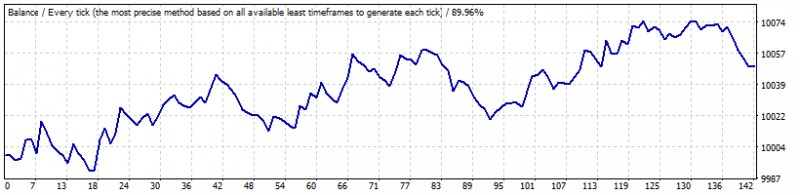
After configuring opening signals, closing signals, filters and Take Profit from the indicator, the strategy must be tested.
The main purpose of testing is to confirm that:
- The xCustomEA reads PipFinite Trend PRO buffers correctly.
- BUY and SELL entries appear at the expected moments.
- Closing by opposite signal works as intended.
- The trend filter does not block correct trades unexpectedly.
- Take Profit levels from the indicator are applied correctly.
- The strategy behaves similarly in MT4 and MT5 when the same logic is used.
MT4 Test Example |
MT5 Test Example |
⚙ Main xCustomEA Settings Used in This Example
This example uses several important groups of The xCustomEA settings. The full list is available in the Settings section.
| Setting Group | Purpose in PipFinite Trend PRO Example |
| SignalNameIndicator | Sets the PipFinite Trend PRO indicator name and path. |
| SignalTypeIndicator | Selects xArrow mode for reading BUY and SELL arrows. |
| SignalBuferforBUY / SignalBuferforSELL | Uses buffers 8 and 9 for opening signals. |
| CloseNameIndicator | Uses PipFinite Trend PRO again for closing signals. |
| CloseBuferforBUY / CloseBuferforSELL | Uses opposite buffers 9 and 8 for closing trades. |
| FilterNameIndicator | Uses PipFinite Trend PRO as trend filter source. |
| FilterBuferforBUY / FilterBuferforSELL | Uses buffers 10 and 11 for filtering. |
| SLTPNameIndicator | Uses PipFinite Trend PRO for Take Profit levels. |
| SLTPBuferforBUY_TakeProfit / SLTPBuferforSELL_TakeProfit | Uses buffer 13 for Take Profit in this example. |
| Shift settings | Use closed candle logic when you want more stable signals. |
| Money management settings | Control lot size, Stop Loss, Take Profit, risk and trading rules. |
| 📘 Want the full parameter list? Open the complete xCustomEA Settings documentation before connecting your own indicator. |
✅ What This Example Teaches
- How to install a custom indicator from the MQL5 Market.
- How to find indicator buffers in the Data Window.
- How to connect BUY and SELL buffers to The xCustomEA.
- How to close positions by opposite indicator signals.
- How to use trend filter buffers.
- How to use indicator Take Profit buffers.
- How to test the same strategy idea in MT4 and MT5.
- How one practical example can be adapted for other custom indicators.
⚠ Important Notes Before Using This on a Real Account
|
🌐 Broker, Terminal and Testing Recommendations
The xCustomEA reads indicator buffers and opens real trades according to your settings. This means that both technical setup and trading conditions matter.
✅ Recommended
| ⚠ Check Carefully
|
🛠 How to Repeat This Setup
| Step | Action |
| 1 | Install The xCustomEA for MT4 or MT5. |
| 2 | Install PipFinite Trend PRO for the same terminal. |
| 3 | Check the indicator in the Strategy Tester or on the chart. |
| 4 | Open Data Window and confirm BUY, SELL, filter and TP buffers. |
| 5 | Set SignalNameIndicator and SignalTypeIndicator in The xCustomEA. |
| 6 | Set SignalBuferforBUY = 8 and SignalBuferforSELL = 9. |
| 7 | Set closing buffers: CloseBuferforBUY = 9 and CloseBuferforSELL = 8. |
| 8 | Add filter buffers 10 and 11 if you want trend filtering. |
| 9 | Add Take Profit buffer 12 or 13 if you want TP from the indicator. |
| 10 | Run Strategy Tester and check every trade before using the setup on demo. |
🎬 Additional Testing Video: The xCustomEA in Strategy TesterThis additional video shows the current testing workflow and helps understand how The xCustomEA can be checked inside MetaTrader before live trading. Watch this video after completing the setup steps above. It is especially useful before testing your own custom indicator configuration. |
| ▶ Watch Strategy Tester Video | ⚙ Open xCustomEA Settings |
🔗 Useful Links🔹 How to Buy and Install a Market Advisor 🔹 Download The xCustomEA DEMO + PDF 🔹 Read Full xCustomEA Documentation |
🆚 Manual Indicator Trading vs xCustomEA Automation
Manual indicator trading requires constant monitoring. You must watch the chart, wait for arrows, check filters, decide when to close and manage risk manually. The xCustomEA helps automate this workflow when the indicator buffers can be read correctly.
| Manual PipFinite Trading | PipFinite + The xCustomEA |
| Trader watches arrows manually | EA reads BUY and SELL buffers automatically |
| Closing decisions are manual | Opposite signal buffers can close positions |
| Trend filter must be checked visually | Filter buffers can be used automatically |
| Take Profit levels must be handled manually | Indicator TP buffers can be used if available |
| Hard to test many variants manually | Strategy can be tested in MetaTrader Strategy Tester |
⚠ Risk Warning
| Trading Forex and CFDs involves risk. This article shows how to configure The xCustomEA using PipFinite Trend PRO as an example. It is not a guarantee of profit. A custom indicator can give false signals, repaint, work differently in real-time trading or perform poorly under some market conditions. Always test the strategy before live trading. |
🏁 Final Thoughts
PipFinite Trend PRO is a good practical example for learning how The xCustomEA works with custom indicators, because it provides clearly defined signal, filter and Take Profit buffers.
The xCustomEA is the automation engine in this workflow. It reads the indicator buffers, applies your configured rules and turns a visual indicator strategy into a testable Expert Advisor strategy.
If you understand how to find buffers and configure signals in this example, you can use the same approach with many other custom indicators that provide readable values for Expert Advisors.
🚀 Try The xCustomEA with Your IndicatorWatch the video, download the demo, study the PipFinite Trend PRO example, connect your own indicator and test whether your indicator logic can become an automated trading strategy. |
| ▶ Watch Video | ⬇ Download DEMO + PDF |
| 📘 Read Documentation | ⚙ Settings Article |
| 💎 Buy The xCustomEA MT5 | 💎 Buy The xCustomEA MT4 |
SEO Tags
The xCustomEA, Exp The xCustomEA, xCustomEA PipFinite Trend PRO, PipFinite Trend PRO Expert Advisor, PipFinite Trend PRO automation, MetaTrader custom indicator EA, iCustom Expert Advisor, custom indicator trading robot, MT4 custom indicator EA, MT5 custom indicator EA, indicator buffer trading, xArrow, signal buffers, PipFinite buffers, PipFinite BUY buffer, PipFinite SELL buffer, custom strategy builder, automated trading by indicator, Forex automation, Expert Advisor without programming, indicator based Expert Advisor, MQL5 Market indicator EA, Expforex xCustomEA


![[EURUSD]: Weekly Liquidity Activation Points (LAP), October 12-16, 2026](https://c.mql5.com/6/1035/splash-preview-777305.png "[EURUSD]: Weekly Liquidity Activation Points (LAP), October 12-16, 2026")
![[Nasdaq]: Weekly Liquidity Activation Points (LAP), October 12-16, 2026](https://c.mql5.com/6/1035/splash-preview-777311.png "[Nasdaq]: Weekly Liquidity Activation Points (LAP), October 12-16, 2026")
![[BRENT]: Weekly Liquidity Activation Points (LAP), October 12-16, 2026](https://c.mql5.com/6/1035/splash-preview-777303.png "[BRENT]: Weekly Liquidity Activation Points (LAP), October 12-16, 2026")