

A series of experts Lucky Star WPR, Lucky Star RSI, Lucky Star MA, Lucky Star SO, Lucky Star MACD, Lucky Star MA and SO, Lucky Star MA and MACD, Lucky Star SO and MACD created by the numerous requests of novice traders, to be able to participate in various forex contests and increase the likelihood of winning real money management or bonuses to real accounts (read more on this in my blog). EA can be configured under the many rules of various contests of various brokers, if the trading of robots is of course allowed.
To optimize and set up a series of experts:Lucky Star WPR, Lucky Star RSI, Lucky Star MA, Lucky Star SO, Lucky Star MACD, Lucky Star MA and SO, Lucky Star MA and MACD, Lucky Star SO and MACD first of all, you need to check the availability of the broker's currency pair quotes history (they often do not post trades history to facilitate terminal loading, and the adviser cannot start testing without the history).
Go to the tab Service -> Settings, then select the tab "Charts" and in the columns "Max. bars of history ”and“ max. bars in the window "choose a value of 250000 as shown in the figure (by default it costs 65000 bars).

Now we proceed to the optimization of the adviser for the selection of input parameters.
Open the strategy tester, choose the adviser Lucky Star WPR or Lucky Star RSI or Lucky Star MA or Lucky Star SO or Lucky Star MACD or Lucky Star MA and SO or Lucky Star MA and MACD or Lucky Star SO and MACD as shown in the figure,
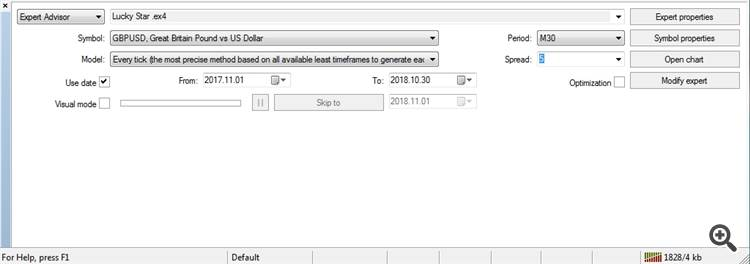
then we set the symbol (currency pair), the testing model and the testing period (usually at least two to three months). In order for quotes for the desired pair to be available in the terminal, to conduct a test on them, open the Service -> QuotesArchive tab or press F2.
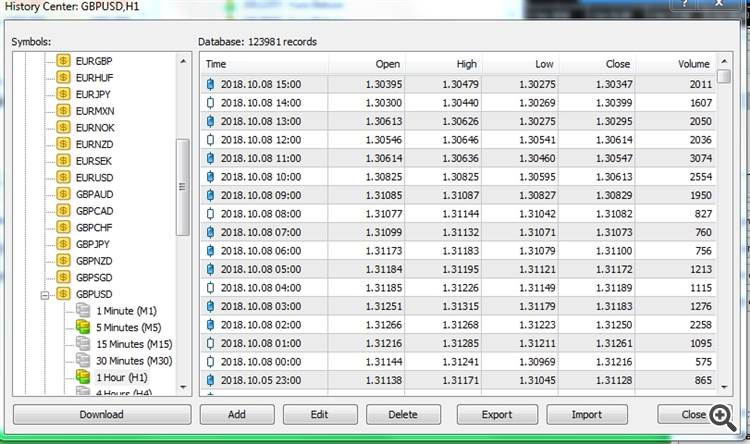
Next, select the pair and period M1 we need and press the “load” button. After a while the quotes will load. Reboot the terminal (turn it off and on again). Repeat this procedure several times until the gray battery pictured before the period turns yellow-green. And so we do on all timeframes.
To reduce the time for optimization, to select approximate input parameters (especially effective for selecting indicator timeframes), select a testing model based on opening prices (a quick method on established bars, only for advisors with explicit control of opening bars). After a quick optimization and finding the input parameters we need (selected at a low drawdown), be sure to optimize the advisor on the model for all ticks (the most accurate method based on all the available smaller timeframes).
When optimizing for all ticks, the volume of generated ticks can be quite large, so the terminal can consume quite a lot of resources and a lot of time, which is why you first need to find the most profitable timeframes of indicators, at opening prices. In order for more accurate testing they do not include the work of the optimizer.
For the final optimization of the adviser, always choose the method of all ticks. This is the slowest, but also the most reliable method.
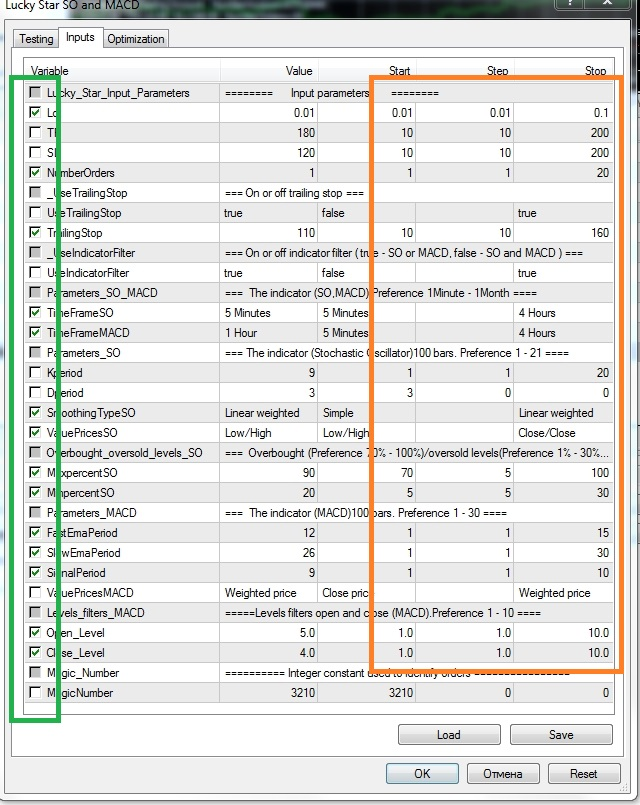
To speed up testing in the “Input Parameters” tabs, select the most relevant parameters, such as indicator parameters, take profit, stop loss, number of orders, etc. (check the boxes as shown in fig. for example) and do not forget to set the starting parameters, step and stop (the larger the step, the faster the tests will be, but the accuracy of the parameters will be rougher).
In the “Testing” tabs you can enter the deposit used for the test and the deposit currency, as well as the parameter to be optimized.
Spread - you can set any value or use the current spread for the pair.
Put a tick in the window "Optimization" and click "Start". After some time, after testing the advisor, the tester will display options for the input parameters that you can select in the "Optimization Results" window at your discretion. Always choose parameters with a low drawdown and a reasonable profit, to do this, left-click twice in the column "Drawdown" in the "Optimization Results" window.
Configuring EA directly for work
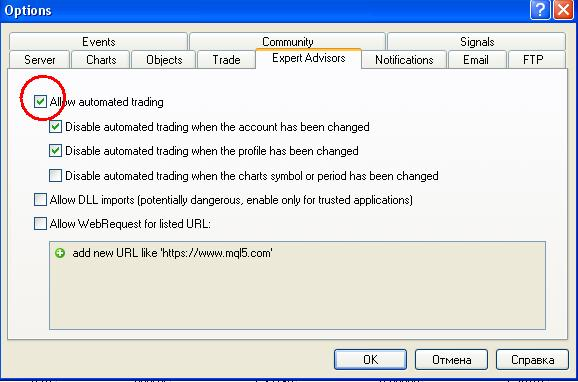
We go to the terminal service and select Settings, the result is a window like this, in the section “advisors” we tick off the inscription “Allow advisor to trade” and agree with the selected actions by clicking on the “OK” button.
Now, attach the expert to the chart (currency pair window) by dragging it, with the right mouse button clamped, from the navigator window to the currency pair window.
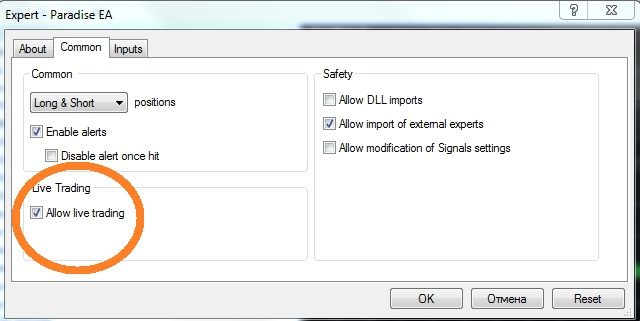
Do not forget to also set a tick against against "allow advisor to trade" in the general section by pressing the key (F7) beforehand.
Repeat this operation for all currency pairs for which you plan to install experts.
After all these preparatory operations in the terminal, using the “Auto-trade” button, we turn on the work of all experts at the same time. If everything is set up correctly and EA is turned on, then its work will begin immediately. And if the signals of the indicators included in the expert's body give the go-ahead for opening an order, the expert will immediately place a warrant or orders, displaying the main parameters in the upper left corner of the currency pair window.
I wish you a successful and profitable trade!


")
")
")