
CRUD Operations in Firebase using MQL

Introduction
If you've ever tried to build a mobile or web app, you know that managing the backend can be one of the more complex and time-consuming parts of development. That's where Firebase, Google’s popular backend-as-a-service (BaaS) platform, really shines. It removes much of the heavy lifting involved in backend tasks, letting developers focus more on building features and less on managing infrastructure.
Firebase offers a wide array of tools to support app development—authentication, cloud functions, analytics, hosting, crash reporting, and more—but one of its most powerful and widely used features is its database solutions. Firebase provides two main NoSQL databases: Firebase Realtime Database and Cloud Firestore. While they serve similar purposes, they each have unique strengths, and choosing between them depends largely on your specific project needs.
Firebase Realtime Database
The Firebase Realtime Database has been around since the early days of Firebase and is especially well-suited for apps where low latency and instant data syncing across clients are crucial. This makes it ideal for applications like chat apps, multiplayer games, live dashboards, or any other app where users need to see updates in real-time without needing to refresh the screen.
The Realtime Database uses a simple, flat JSON tree to store data. Its simplicity means it’s easy to get started with and can deliver blazing-fast updates, even over slower connections. However, because of its flat structure, things can get a bit unwieldy as your data grows more complex. Nested data, deep relationships, and filtered queries can require more careful planning compared to a traditional database.
Cloud Firestore
Cloud Firestore, often simply called Firestore, is the newer of Firebase’s two database offerings. It was built with scalability, structure, and advanced querying in mind. Firestore supports a more hierarchical, document-based data model. It organizes data into collections and documents, giving developers a more structured and scalable way to manage complex data relationships.
Firestore also comes with powerful features like:
- Advanced querying – filter by multiple fields, order results, paginate queries
- Offline persistence – automatically sync data once the device reconnects
- Server-side timestamping and atomic operations
- More granular security rules
- Better integration with other Google Cloud services
In general, if your app is relatively small and prioritizes speed and simplicity, Realtime Database may be a better fit. If you’re building something more ambitious that needs complex data modeling and large-scale support, Firestore is probably the way to go.
Setting Up a Firebase Project and Database (Step-by-Step)
Now that you have a better idea of what Firebase databases are and how they differ, let’s walk through setting one up from scratch. We’ll cover how to create a Firebase project, choose your database, and configure basic settings like security rules and data structure.
Step 1: Create a Firebase Project
To start using Firebase, you’ll need a Google account. Head over to the Firebase Console and click the “Add Project” button. You’ll be asked to provide a project name (this can be anything), and you’ll have the option to enable Google Analytics for your project. You can skip this for now, or enable it if you want to track user behavior down the line.
Once you click “Create Project,” Firebase will handle the provisioning behind the scenes. After a few seconds, your project will be ready.
Step 2: Add Your App to Firebase
Before you can use Firebase’s features, you need to register your app—whether it’s a web app, Android, or iOS. Click on the appropriate platform icon (for example, the web symbol </>) and follow the steps to register your app. For a web app, you’ll be provided with a configuration snippet (your Firebase project credentials) that you’ll need to copy into your code.
Here’s what the config snippet might look like:
const firebaseConfig = {
  apiKey: "YOUR_API_KEY",
  authDomain: "your-app.firebaseapp.com",
  projectId: "your-app",
  storageBucket: "your-app.appspot.com",
  messagingSenderId: "SENDER_ID",
  appId: "APP_ID"
};
Use this configuration to initialize Firebase in your app.
Step 3: Enable Your Preferred Database
Once your project and app are set up, it’s time to pick a database. In the Firebase Console, find the “Build” section in the left-hand navigation and select either Realtime Database or Cloud Firestore, depending on which one you want to use.
Click “Create Database” and choose the location for your data. For most apps, the default location should be fine, but you might want to select a region closer to your user base for better performance.
Step 4: Configure Security Rules
Firebase databases are incredibly flexible—but with that flexibility comes responsibility. By default, Firebase restricts access to your database for safety reasons. You’ll be prompted to select a security rules mode during setup. For development or testing, you can temporarily use the “test mode,” which makes your database publicly readable and writable. Just be sure not to use this in production!
Here’s what test mode looks like:
{
  "rules": {
    ".read": "true",
    ".write": "true"
  }
}
For production environments, you’ll want to write more specific rules that control who can read or write which parts of the data. Firebase security rules can be based on user authentication, document fields, request parameters, and more.

Database URL and API Key: To authenticate requests, you’ll need your Firebase project’s API key and database URL. These are found in your project settings under “Web API Key” and “Realtime Database URL” (or Firestore’s REST endpoint).
Understanding REST Endpoints: Firebase databases are accessible via REST APIs. For example:
Realtime Database: https://PROJECT_ID.firebaseio.com/path/to/data.json
Firestore: https://firestore.googleapis.com/v1/projects/PROJECT_ID/databases/(default)/documents/path/to/document
To demonstrate how reading and writing operations work, we’ll start by creating a new collection—a logical container for organizing documents—and manually populate it with sample user entries. This setup will serve as the foundation for practicing data retrieval in later steps, giving you a clear, end-to-end understanding of Firestore’s workflow.
Create Your First Collection
Click on the Start Collection button. A modal window will appear asking you to name your collection. Let’s name it users since we’re going to simulate a small user database.
After naming the collection, you’ll be prompted to create the first document inside it. Firestore automatically generates a random document ID if you don’t want to set it manually, but for the sake of clarity, go ahead and create one yourself—let’s use something simple like users .
Add Fields to Your Document
Once you’ve given your document an ID, it’s time to populate it with some fields. Think of these like the columns in a traditional database, but with much more flexibility.
You might start with something like:
name → "Jane Doe"
Since our aim is to automatically add the data with mql5 code, the part above is not so significant. Now, let us connect to the databasee.
Connecting to the database
The REST Endpoint for our "my-users-mql5" database would be:
https://firestore.googleapis.com/v1/projects/my-users-mql5/databases/(default)/documents/users/
If you paste that URL into a browser now, you’ll likely see:

With your users collection now set up, you’re in a perfect position to start learning how to read data from Firestore using code. In the next steps, we’ll go over how to add data, fetch documents, listen for real-time updates, and use queries to filter and sort your data.
Creating Data
The HTTP POST method is designed to submit data to a specified resource—in other words, to send data to a server. When you make a POST request, you’re typically including data in the body of the request, which the server then processes to create a new resource (e.g., a new user account, a new blog post, or a new entry in your database).
This differs from a GET request, which is used only to retrieve data and should never alter anything on the server. POST, by contrast, is all about sending and changing—it creates something new.
In each case, the client sends structured data (usually in JSON format) to the backend or directly to a serverless function that then stores that data somewhere—often in a database like Firestore.
void add_data()
  {
   string url = "https://firestore.googleapis.com/v1/projects/my-users-mql5/databases/(default)/documents/users";
   string jsonData = "{\"fields\":{\"Name\":{\"stringValue\":\"Jane Doe\"}}}";
   uchar postData[], result[];
   StringToCharArray(jsonData, postData, 0, StringLen(jsonData), CP_UTF8);
   string header;
   int res = WebRequest("POST", url, "Content-Type: application/json\r\n", 5000, postData, result, header);
   if(res == 200)
     {
      Print("Success: ", CharArrayToString(result));
     }
   else
     {
      Print("Error ", res, ": ", CharArrayToString(result));
     }
  }

Using the code above, we have now added a new entry called "Jane Doe" under a unique ID generated by Firebase ensuring no key conflicts even with concurrent data additions. We can add as many data entries as needed, including nested fields like email , age , or timestamp , by structuring them as key-value pairs within the database reference. The next step is to retrieve that data.
Reading Data
Now that our database is alive and kicking, it’s time to actually start interacting with it in a meaningful way. We’ve already created and populated a collection with some sample documents, and we’ve learned how to send data to Firestore using the POST method. That’s a great start—but reading data is just as important as writing it. In fact, for many applications, retrieving and displaying data is the heart of the user experience.
Whether you're loading a list of users, displaying a newsfeed, or rendering a product catalog, you're going to need a way to fetch information from the database. And that’s where the GET method comes into play.
The GET method is one of the core HTTP request methods. Unlike POST, which is used to send data and create new resources, GET is used to retrieve information from a server. It’s essentially a read-only operation—when you send a GET request, you’re asking the server to return some data, but you’re not modifying anything on the server side.
Here’s a quick analogy: if a POST request is like submitting a form to create a new account, a GET request is like logging in and viewing your profile info. You’re not changing anything, just retrieving data that already exists.
void authorize()
  {

// 1. Construct Firestore URL
   string url = "https://firestore.googleapis.com/v1/projects/my-users-mql5/databases/(default)/documents/users/";
// 2. Prepare headers
   string headers;
   headers += "Content-Type: application/json\r\n";
// 3. Send request
   char data[], result[];
   int timeout = 5000;
   int status = WebRequest("GET", url, headers, timeout, data, result, headers);
// 4. Handle response
   if(status == 200)
     {
      // Print("Firestore Data Received:");
      int filehandle = FileOpen("firebase-temp.txt", FILE_WRITE | FILE_BIN);
      if(filehandle != INVALID_HANDLE)
        {
         //--- Saving the contents of the result[] array to a file
         FileWriteArray(filehandle, result, 0, ArraySize(result));
         //--- Closing the file
         FileFlush(filehandle);
         FileClose(filehandle);
        }
      else
         Print("Error in FileOpen. Error code =", GetLastError());
     }
   else
     {
      Print("Error Code: ", status);
      Print("Response: ", CharArrayToString(result));
     }
  }
And just with a few lines of code, we have a file which contains all the information from the database "firebase-temp.txt"
Permissions: Make sure your Firestore security rules allow read access where needed. For public testing, you might use open rules ( allow read: if true; ), but for production, tighten it up!
Updating Data
As you've probably noticed by now, every time you add a new document to your Firestore database—whether manually through the console or programmatically using the Firebase SDK—it gets assigned a unique document ID. This ID might look like a random string of letters and numbers, such as kJ73sd98ASQv, and at first glance, it may not seem all that important.
Firestore is structured around collections and documents. A collection holds multiple documents, and each document contains data in the form of key-value pairs. When you add a document to a collection, you can either let Firestore automatically generate an ID, or you can specify one manually.
For example, when you add a user to the users collection, you might end up with a path like:
users/kJ73sd98ASQv
This means the document for that user lives inside the users collection and is uniquely identified by the kJ73sd98ASQv ID. If you want to retrieve, update, or delete that specific document later, you need to reference that full path—including the document ID.
But make no mistake: that document ID is essential. In fact, it’s the unique identifier that allows Firestore (and by extension, your application) to efficiently locate, modify, or remove that specific piece of data. Think of it like a fingerprint—no two documents share the same ID, and that ID is what enables direct, precise interaction with each individual document.
So when it comes to updating or deleting data in Firestore, knowing and using the document ID is absolutely critical.
From the "Jane Doe" example, our End point for the added field is:
https://firestore.googleapis.com/v1/projects/my-users-mql5/databases/(default)/documents/users/NoQ8m2vYLnGkykNhUjFESo our document ID is: NoQ8m2vYLnGkykNhUjFETo update this data, we can use the "PATCH" method:
void update_entry(string doc_id)
  {
   string url = "https://firestore.googleapis.com/v1/projects/my-users-mql5/databases/(default)/documents/users/" + doc_id; //end point url
   string jsonData = "{\"fields\":{\"exampleField\":{\"stringValue\":\"Princess Doe\"}}}"; //specifiy data to be added
   uchar postData[], result[];
   StringToCharArray(jsonData, postData, 0, StringLen(jsonData), CP_UTF8); //convert plain string to char array to be sent to the db
   string header;
   int res = WebRequest("PATCH", url, "Content-Type: application/json\r\n", 5000, postData, result, header);
   if(res == 200)
     {
      Print("Success: ", CharArrayToString(result)); //if successful, print
     }
   else
     {
      Print("Error ", res, ": ", CharArrayToString(result)); //return error
     }
  }
Using this code, we will update the name from "Jane Doe" to "Princess Doe".

Deleting The Entries
The final manipulation in this series would be deleting the entry. To delete an entry like "Jane Doe" from the Firebase Realtime Database, you can use the DELETE method on the specific database reference pointing to the entry’s unique ID. For example, calling DELETE on the child node containing Jane’s auto-generated key will permanently erase that entry from the database. This can be combined with a promise chain or callback to handle success/error states, ensuring proper feedback in your application. Additionally, Firebase Security Rules should be configured to restrict deletion permissions, preventing unauthorized users from removing data unintentionally or maliciously.
void delete_entry(string documentId)
  {
   string url = "https://firestore.googleapis.com/v1/projects/my-users-mql5" +
                "/databases/(default)/documents/users/" + documentId; //end point url with specified document ID
   uchar result[];
   uchar postData[]; // Empty payload for DELETE
   string headers = "Content-Type: application/json\r\n";
   string responseHeaders; // To store response headers (unused here)
// Correct WebRequest overload:
   int res = WebRequest(
                "DELETE",       // HTTP method
                url,            // Full URL with document ID
                headers,        // Request headers
                5000,           // Timeout (5 seconds)
                postData,       // Empty payload (uchar array, not NULL)
                result,         // Response data
                responseHeaders // Response headers (ignored)
             );
   if(res == 200)
     {
      Print("Document deleted"); //sucess
     }
   else
     {
      Print("Error ", res, ": ", CharArrayToString(result));
     }
  }
By specifying the document ID, the entry would be deleted.
Using Firebase in algorithmic trading
Now that we have learnt the application of simple CRUD functions in MQL, we can use a practical example of how to apply this knowledge in algorithmic trading. For this example, we will be sending trading information from the terminal to firebase and then reading the signal on a dashboard
Sending Trading Information to firebase
We can use basic MQL5 code to get information from closed positions and this data will be sent to the database for processing.
datetime last_closed_time;
//+------------------------------------------------------------------+
//| Expert initialization function                                   |
//+------------------------------------------------------------------+
int OnInit()
  {
   last_closed_time = TimeCurrent();
//---
   return(INIT_SUCCEEDED);
  }
//+------------------------------------------------------------------+
//| Expert deinitialization function                                 |
//+------------------------------------------------------------------+
void OnDeinit(const int reason)
  {
//---
  }
//+------------------------------------------------------------------+
//|                                                                  |
//+------------------------------------------------------------------+
void add_data(ulong ticket, string symbol, double lot, double profit)
  {
   string url = "https://firestore.googleapis.com/v1/projects/my-users-mql5/databases/(default)/documents/users";
// Build JSON dynamically using function parameters
   string trade_id = "Trade_" + IntegerToString((int)ticket);
   string jsonData =
      "{"
      "\"fields\":{"
      "\"" + trade_id + "\":{"
      "\"mapValue\":{"
      "\"fields\":{"
      "\"symbol\":{\"stringValue\":\"" + symbol + "\"},"
      "\"lot\":{\"doubleValue\":" + DoubleToString(lot, 2) + "},"
      "\"profit\":{\"doubleValue\":" + DoubleToString(profit, 2) + "}"
      "}"
      "}"
      "}"
      "}"
      "}";
   uchar postData[], result[];
   StringToCharArray(jsonData, postData, 0, StringLen(jsonData), CP_UTF8);
   string header;
   int res = WebRequest("POST", url, "Content-Type: application/json\r\n", 5000, postData, result, header);
   if(res == 200)
     {
      Print("Success: ", CharArrayToString(result));
     }
   else
     {
      Print("Error ", res, ": ", CharArrayToString(result));
     }
  }
//+------------------------------------------------------------------+
//|                                                                  |
//+------------------------------------------------------------------+
void OnTrade()
  {
   HistorySelect(0, TimeCurrent());
   for(int i = 0; i < HistoryDealsTotal(); i++)
     {
      if(deal.SelectByIndex(i))
        {
         if(deal.Time() >= last_closed_time && last_closed_time != 0)
           {
            if(deal.Entry() == DEAL_ENTRY_OUT)
              {
               add_data(deal.Ticket(), deal.Symbol(), deal.Volume(), deal.Profit());
              }
           }
        }
     }
   last_closed_time = TimeCurrent();
  }
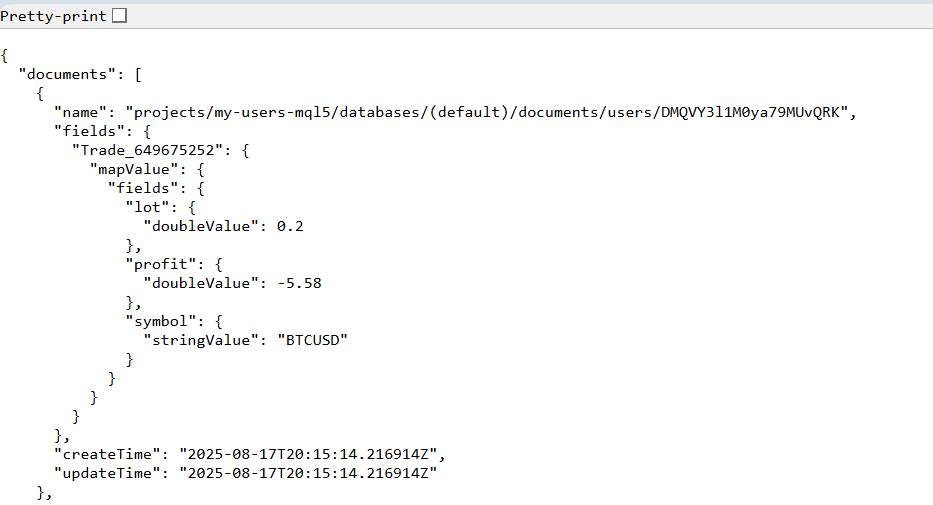
Synchronizing a portfolio from MQL5 to Firestore
Every piece of data that is sent can be stored, downloaded, and even read line by line before being displayed on a dashboard. This creates a clear and organized way of reviewing trading history, rather than scrolling through endless logs or relying on screenshots. By structuring the data in this way, traders are able to visualize their performance more effectively and identify patterns that might otherwise go unnoticed.
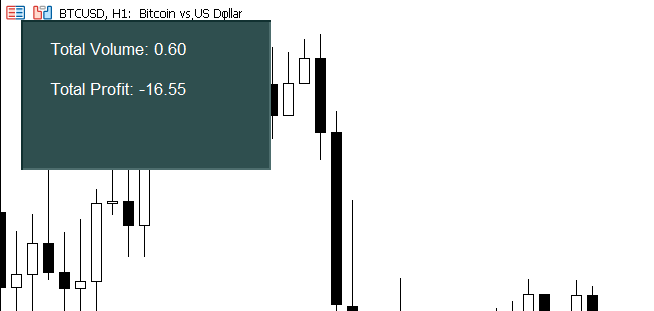
int OnInit()
  {
//---
   draw_dashboard();
   get_data();
   return(INIT_SUCCEEDED);
  }
//+------------------------------------------------------------------+
//| Expert deinitialization function                                 |
//+------------------------------------------------------------------+
void OnDeinit(const int reason)
  {
//---
  }
//+------------------------------------------------------------------+
//| Expert tick function                                             |
//+------------------------------------------------------------------+
void OnTick()
  {
//---
  }
//+------------------------------------------------------------------+
//|                                                                  |
//+------------------------------------------------------------------+
void draw_dashboard()
  {
   ObjectCreate(0, "dash-board", OBJ_RECTANGLE_LABEL, 0, 0, 0);
   ObjectSetInteger(0, "dash-board", OBJPROP_XDISTANCE, 20);
   ObjectSetInteger(0, "dash-board", OBJPROP_YDISTANCE, 20);
   ObjectSetInteger(0, "dash-board", OBJPROP_XSIZE, 250);
   ObjectSetInteger(0, "dash-board", OBJPROP_YSIZE, 150);
   ObjectSetInteger(0, "dash-board", OBJPROP_BGCOLOR, clrDarkSlateGray);
   ObjectCreate(0, "dash-tv", OBJ_LABEL, 0, 0, 0);
   ObjectSetInteger(0, "dash-tv", OBJPROP_XDISTANCE, 50);
   ObjectSetInteger(0, "dash-tv", OBJPROP_YDISTANCE, 40);
   ObjectSetString(0, "dash-tv", OBJPROP_TEXT, "Total Volume: " +  DoubleToString(trading_volume_from_file(), 2));
   ObjectSetInteger(0, "dash-tv", OBJPROP_COLOR, clrWhite);
   ObjectCreate(0, "dash-profit", OBJ_LABEL, 0, 0, 0);
   ObjectSetInteger(0, "dash-profit", OBJPROP_XDISTANCE, 50);
   ObjectSetInteger(0, "dash-profit", OBJPROP_YDISTANCE, 80);
   ObjectSetString(0, "dash-profit", OBJPROP_TEXT, "Total Profit: " + DoubleToString(pnl_from_file(), 2));
   ObjectSetInteger(0, "dash-profit", OBJPROP_COLOR, clrWhite);
  }
//+------------------------------------------------------------------+
//+------------------------------------------------------------------+
//| Get total trading volume                                         |
//+------------------------------------------------------------------+
double trading_volume_from_file(string filename = "firebase-temp-trade.txt")
  {
   double tv = 0;
   int filehandle = FileOpen(filename, FILE_READ | FILE_TXT | FILE_ANSI);
   if(filehandle == INVALID_HANDLE)
     {
      Print("Error opening file: ", GetLastError());
      return 0;
     }
   string line;
   while(!FileIsEnding(filehandle))
     {
      line = FileReadString(filehandle);
      // Look for lot values
      if(StringFind(line, "lot") != -1)
        {
         string raw0 = FileReadString(filehandle);
         int stat_int = StringFind(raw0, "d", 0);
         string raw = StringSubstr(raw0, stat_int + 14, -1);
         double profit = StringToDouble(raw);
         //---
         tv += NormalizeDouble(profit, 2);
        }
     }
   FileClose(filehandle);
   return tv;
  }

//+------------------------------------------------------------------+
//| Get total PnL                                                    |
//+------------------------------------------------------------------+
double pnl_from_file(string filename = "firebase-temp-trade.txt")
  {
   double p_l = 0;
   int filehandle = FileOpen(filename, FILE_READ | FILE_TXT | FILE_ANSI);
   if(filehandle == INVALID_HANDLE)
     {
      Print("Error opening file: ", GetLastError());
      return 0;
     }
   int line_no = 0;
   while(!FileIsEnding(filehandle))
     {
      string line = FileReadString(filehandle);
      line_no++;
      // Look for profit values
      if(StringFind(line, "profit") != -1)
        {
         string raw0 = FileReadString(filehandle);
         int stat_int = StringFind(raw0, "d", 0);
         string raw = StringSubstr(raw0, stat_int + 14, -1);
         double profit = StringToDouble(raw);
         //---
         p_l += profit;
        }
     }
   FileClose(filehandle);
   return p_l;
  }

//+------------------------------------------------------------------+
void get_data()
  {
// 1. Construct Firestore URL
   string url = "https://firestore.googleapis.com/v1/projects/my-users-mql5/databases/(default)/documents/users";
// 2. Prepare headers
   string headers;
   headers += "Content-Type: application/json\r\n";
// 3. Send request
   char data[], result[];
   int timeout = 5000;
   int status = WebRequest("GET", url, headers, timeout, data, result, headers);
// 4. Handle response
   if(status == 200)
     {
      // Print("Firestore Data Received:");
      int filehandle = FileOpen("firebase-temp-trade.txt", FILE_WRITE | FILE_BIN);
      if(filehandle != INVALID_HANDLE)
        {
         //--- Saving the contents of the result[] array to a file
         FileWriteArray(filehandle, result, 0, ArraySize(result));
         //--- Closing the file
         FileFlush(filehandle);
         FileClose(filehandle);
        }
      else
         Print("Error in FileOpen. Error code =", GetLastError());
     }
   else
     {
      Print("Error Code: ", status);
      Print("Response: ", CharArrayToString(result));
     }
  }
//+------------------------------------------------------------------+
Output looks like this:
Conclusion
Databases are the backbone of modern applications, and mastering them is a non-negotiable skill for developers. By learning to interact with Firebase, whether through Realtime Database’s instant sync or Firestore’s powerful queries, you’ve unlocked a critical toolkit for building dynamic, data-driven apps.
| File Name | Description |
|---|---|
| firebase-users.mq5 | File containing code for performing CRUD functions with firestore. |
| Download_Infor.mq5 | File containing the code for downloading information from firestore and displaying on the chart. |
| Sending_Trading_Info.mq5 | File containing the code for sending trading information to firestore. |
Warning: All rights to these materials are reserved by MetaQuotes Ltd. Copying or reprinting of these materials in whole or in part is prohibited.
This article was written by a user of the site and reflects their personal views. MetaQuotes Ltd is not responsible for the accuracy of the information presented, nor for any consequences resulting from the use of the solutions, strategies or recommendations described.


- Free trading apps
- Over 8,000 signals for copying
- Economic news for exploring financial markets
You agree to website policy and terms of use