
Trading strategy based on the improved Doji candlestick pattern recognition indicator
Introduction
The article "Improved candlestick pattern recognition illustrated by the example of Doji" dealt with the concept of metabars. In short, a metabar is a conditional combination of several consecutive bars into a large one. This is similar to a bar of a higher timeframe, but not exactly, since the size of the metabar is not fixed (it "floats" in a given range) and there is no binding to a specific start and end time of the bar. Therefore, the use of metabars allows traders to detect various patterns of candlestick analysis much more often.
In the previous article I described the creation of the Doji candlestick indicator on metabars and demonstrated its work.
Now we will try to create a trading strategy using such an indicator. In theory, since metabars allow us to detect candlestick patterns more often, then the strategy will be able to make more deals than on conventional bars. This is a great opportunity to make more profit.
Trading strategy concept: Are candles enough?
We will take the Doji indicator using metabars from the above article. Unfortunately, it will not be possible to simply open and close trades according to the readings of this indicator. The reason is neither the indicator, nor metabars. The Doji candlestick pattern is generally not designed to be used as an independent trading signal
since it is a potential trend reversal signal. This means that before the Doji candle there should also be a trend of the corresponding direction. If there is no trend, then there is no point in making a deal based on the Doji candle.
Bringing a trend and metabars together
Solving this task is not as difficult as it might seem at first glance. In fact, it is pretty easy. The Doji candlestick is a metabar, but the trend does not have to be on metabars, it can be built on regular bars as well. For candlesticks, the ratios of the maximum and minimum price deviations within a bar are important, and (as we found out in the previous article) they strongly depend on the width of the metabar (that is, the number of ordinary bars included in it) and its time shifts. However, the trend line does not show any extreme ratios, it simply passes through the average price values in a group of bars. In order to calculate the average values, the size of the parts the group is divided into is not particularly important.
In general, we will build a trend on regular bars.
The only thing we need to know is the end time of the trend, that is, the number of the bar from which the Doji candle detected by the indicator already begins because the width of this candle can change in a wide range (specified in the indicator settings). The bars that make up the candlestick metabar should not be considered part of the trend. The Doji candlestick is its potential turning point, meaning it is no longer an old trend, but it is not yet a new one either. Or it is both an old and a new trend depending on how you look at it. In general, it can also be considered a flat, as its close price is close to the open price.
Therefore, we will not include the metabar with the Doji candlestick in the group of bars the trend is built on to avoid errors in the statistical characteristics of the trend.
The easiest way to find out when a Doji candle starts when calculating a trend is to calculate the trend in the same indicator that plots this candle. In other words, we will modify the indicator from the previous article so that it includes a filter showing only the Doji candles having a corresponding trend before them. Also, the indicator with such a setting becomes directly suitable for trading: it will be possible to perform deals using its signals without any additional analysis.
Currently, the indicator features inputs whose names start with "Candle_". These are the various candle parameters. Now we will need to add various trend inputs to the indicator code. At the very least, these should be the following two parameters.
- Minimum trend width (in number of bars):
input int Trend_WidthMin = 10;
- Maximum trend width (in number of bars):
input int Trend_WidthMax = 50;
When a Doji candle is detected, the indicator will analyze a group of bars in front of it in the amount of the range specified by these two parameters. It will also evaluate if the bars have a suitable trend.
Other trend inputs to be set will be mentioned later. In the meantime, let's pay attention to a small, but technically important nuance.
Since now the indicator needs to analyze a larger number of previous bars in order to draw any signal on the chart (because the width of the metabar the candlestick is built on has also been extended to the width of the trend), we need to make a small correction in the indicator code. There was a line in the OnInit function that calculated how many bars at the very beginning of the price history should be skipped. In other words, the indicator cannot be calculated and drawn on these bars (due to insufficient historical data):
SkipBars = Candle_WidthMax;Now this string should look as follows:
SkipBars = Candle_WidthMax + Trend_WidthMax;
Appropriate trend calculation method
We can detect a trend using various algorithms. Some of them are easier, some are more complex. For using Doji candles, I think it is important to not just detect a trend, but also define some of its characteristics. Let's show this on the chart:
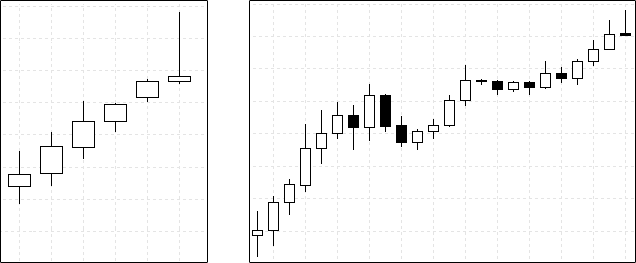
Examples of trends before the Doji candle
The figure above shows two examples of trends. On the left, we see a Doji candle that has a height comparable to and even a little exceeding any price movements within the previous trend. It can be assumed that there really was some significant event inside this Doji candle resulting in a clash of serious opposing forces. One of the forces pushed the price up with unprecedented power (for the entire period of the trend development), but another force did not allow the price to stay at the top and returned the price to the initial level of opening the candle. In other words, on this candle, we can see the very moment when a force that could resist the growth of the trend came into play. Thus, we can assume that the trend has exhausted itself and is ready to turn around.
On the right, we see that the height of the Doji candle is not something special compared to the movements that took place inside the trend. This means that the force that reversed the price inside this candlestick can hardly be sufficient to reverse the entire trend. Opening a trade on such a Doji candle can be an unjustified risk. It would be nice to give our trading strategy the opportunity to somehow distinguish between these two situations.
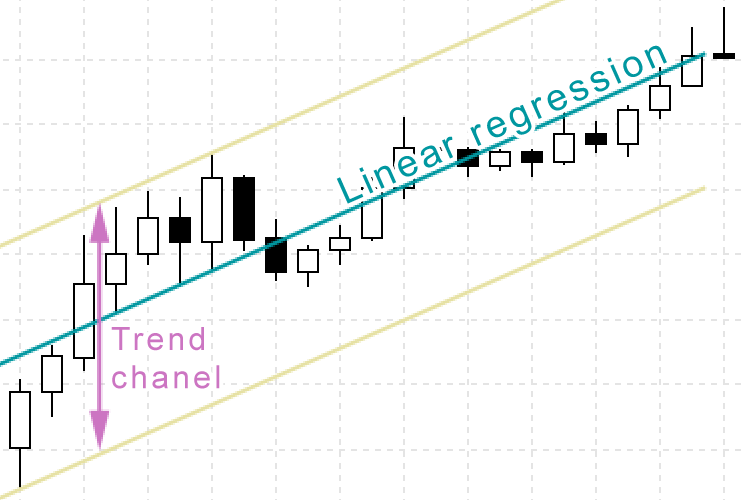
This can be done by using the linear regression method to determine the trend. In this case, we will not just detect a trend, but also define the equation of the line passing through the middle of the trend channel:
y = A + B * x
Equation composition:
x — coordinates of the chart points along the horizontal axis (in our case, these are the bar numbers).
y — coordinates along the vertical (price) axis. These are the coordinates calculated by this linear regression equation in order to build a point on the price chart for each bar and draw a straight line through these points. This is a trend line.
B — ratio characterizing the slope of a trend line. The higher this ratio, the steeper and more powerful the trend. If the ratio is positive, the line will increase from left to right, which corresponds to an uptrend. A negative ratio value corresponds to a downtrend.
A is just an auxiliary coefficient for positioning the trend line at the desired chart height. It does not carry any meaning in terms of trading.
The algorithm for calculating linear regression is widely known. It is part of the mathematical statistics apparatus foundations and is used in many application areas in addition to trading. As a result of the algorithm operation, the above coefficients A and B are calculated.
In the indicator code, it briefly looks something like this (the full indicator code is attached below). Within the cycle, various intermediate sums are accumulated for all bars included in the measured trend:
      double BarPrice = (open[CurBar] + close[CurBar] + high[CurBar] + low[CurBar])/4;

      X = TrendBarNum;
      Y = BarPrice;
      N = TrendBarNum;
      S1 += X;
      S2 += Y;
      S3 += X * Y;
      S4 += X * X;
When all sums for trend bars are collected, then the ratios of the regression equation are displayed:
         B = (N * S3 - S1 * S2) / (N * S4 - S1 * S1);
         A = (S2 - B * S1) / N;
When we calculated the linear regression equation, then by analyzing the ratio B, we can find out if there is a trend in this group of bars and whether it is consistent with the direction of the candle:
         if ((CandleDir < 0)&&(B < 0)) continue;
         if ((CandleDir > 0)&&(B > 0)) continue;
It would also be useful to assess whether the trend is strong enough, that is, how steeply it is sloping. Too little trend slope can be just noise, a flat error. Also, small price movements generate too little income to cover trading fees. Therefore, let's add a parameter to the indicator code that sets the minimum allowable trend slope. It is measured in points per minute:
input double Trend_PowerMin = 0.01;
In the code, this parameter is converted to the same unit as the ratio B from the regression equation, and they are compared:
if (MathAbs(B) < (Trend_PowerMin*_Point*PeriodSeconds()/60)) continue;
Now let's move on to the most important thing that made us use linear regression to determine a trend.
Since the regression line passes through the center of the trend channel, we can now calculate the width of this channel itself. The width of the trend channel is the largest spread of bar prices relative to the regression line. More precisely, it is the sum of the largest upward and downward deviations:
To calculate the channel width, you need to go through all the bars of the trend, calculate the regression value for each bar (the same “y” from the previously obtained linear regression equation), calculate the difference between this value and the prices of the bar, and accumulate the largest values of these differences:
         for (X=1; X<=TrendBarNum; X++)
         {
            int TmpCurBar=CandleStartBar+X;
            Y = A + B*X;
            DH=high[TmpCurBar]-Y;
            DL=low [TmpCurBar]-Y;
            if ((DH > maxDH)||(X==1)) maxDH=DH;
            if ((DL < minDL)||(X==1)) minDL=DL;
         }
We can compare this very width of the channel with the height of the Doji candle in order to conclude whether the movements in this candle are strong enough to reverse this trend. To do this, add one more trend input parameter to the indicator, which sets the maximum allowable ratio of the channel width to the height of the found Doji candlestick:
input double Trend_ChanelPowerMax = 1;
In the indicator code, it is taken into account as follows:
if ((maxDH-minDL) > Trend_ChanelPowerMax*CandleHeight) break;
The full indicator code is attached below.
Final indicator algorithm for the strategy
Now that we have the code that detects the presence of a trend, let's connect it as a filter. So that only those Doji candles can be displayed on the indicator chart, in front of which there is a trend that is suitable in all respects - direction, length and width.
Let's put all the code related to the calculation and assessment of the acceptability of the trend characteristics into a separate function within the indicator code:
bool DetectTrend(
                 int CandleStartBar,
                 int CandleDir,
                 double CandleHeight,
                 const double& open[],
                 const double& high[],
                 const double& low[],
                 const double& close[]
                )
It returns the logic value indicating whether there is a suitable trend or not. We will call this function every time a Doji candle is found:
               if (DojiExists)
               {
                  if (DetectTrend(CurBar, CandleDir, CandleHeight, open, high, low, close))
                     break; // there is a candle and a trend, there is no need to expand the metabar further
                  else
                     DojiExists=false;
               }
The full indicator code is attached below. We will check its work together with the EA a little later.
EA algorithm
So, we have a modified indicator that looks for Doji candles on metabars, and the same indicator determines the presence of a trend before the candle. The indicator now draws a line on the chart only when there is both a Doji candle and a trend in the same direction as the tip of the candle at the same time. In other cases, the indicator does not draw anything.
Thus, the readings of such an indicator are already a ready-made signal for a trading EA. A deal is performed when a line appears on the indicator. It remains to decide when to close deals.
Since the signal of the indicator in our case is a prediction of a possible trend reversal, with an indication of its direction, the existing deal should be closed when the indicator shows a signal opposite to the one the deal was opened on. This is the best signal for closing a deal, since ideally its appearance means that, having entered the market at the very beginning of the trend (according to the previous signal), the trading advisor will exit at the very end of the trend, that is, it will extract the maximum possible profit from this market situation.
By the way, this signal does not just close the deal. A new deal is opened in the opposite direction right away since we use indicator signals for entry as well.
However, the price in the market does not always follow ideal trajectories for a trader. The beginning and end of trends are not always clearly marked. It can also take a long time between the end of one trend and the start of the next. This will be a period of flat or short price movements up and down. Our indicator will not react in any way to such situations. This means that we will not receive a close signal from it for a long time. Although the initial trend will already be exhausted and there is no longer any point in being in the market for the strategy.
The easiest way to add additional closing conditions to any trading strategy is to set take profit and stop loss levels for all opening trades. Their value can be set in the EA settings.
Also, you will need to add all the indicator parameters to the EA settings: Doji candle size ranges, trend size ranges, etc. The EA will launch the indicator (invisible) by itself passing the settings to it.
The full code of the trading EA is in the appendix to the article. It makes no sense to describe the code in the article, since the EA is pretty simple and typical. The entire market analysis is performed by the indicator, while the EA only opens and closes deals based on ready-made signals.
Checking the resulting EA
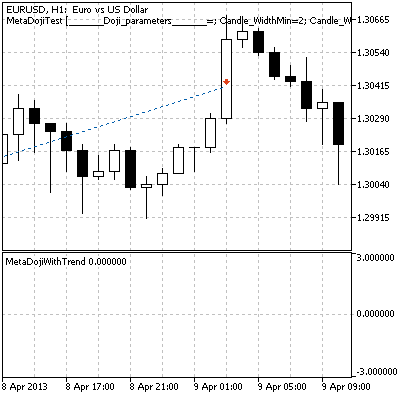
Before conducting large-scale tests on history, let's check if everything works correctly. Let's run the EA in the MetaTrader 5 strategy tester for a short period of history and examine its trades displayed on the chart.
It can be seen that the adviser's behavior corresponds to the intended algorithm. Here is the case when the trade was opened using the correct indicator signal:
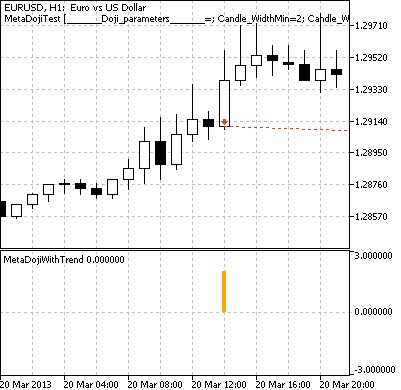
The indicator signals an upward Doji candlestick on the metabar of the previous two bars
and an uptrend before the candle. The EA has opened a trade
Later, this trade closed on the opposite signal and a new trade was opened in the opposite direction:
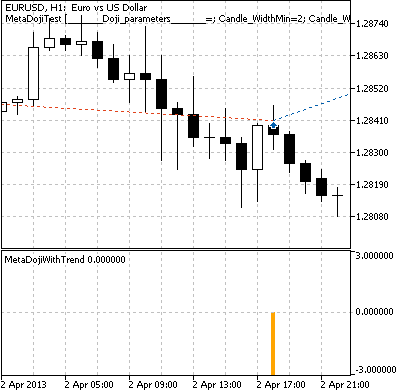
The indicator detected a downward Doji candle on the metabar of the previous three bars
and a downtrend before the candle. The EA closed the deal and opened the opposite one.
The case when there was no counter signal from the indicator for a long time and the trade was closed by take profit:
There are no signals on the indicator. The trade opened by the EA was closed upon reaching the take profit level.
Preparation for backtesting a trading strategy
The resulting trading EA has very flexible settings. We can set it up to trade Doji candles based on metabars or conventional (single) bars. The trend parameters before the candle can also be adjusted down to zero values (which will, in fact, mean that the presence of a trend is not taken into account). All this dramatically affects the behavior of the EA. You can even conditionally consider these settings as different trading strategies. Optimization will show which of these options are the most effective.
In various trading resources, it is recommended to use Doji patterns on timeframes not lower than an hour, otherwise the price noise will give a lot of false signals.
Let's use EURUSD H4 for testing. For high-quality statistics, with minimal influence of randomness and the effect of adjustment, we will take a long segment of 10 years. The Strategy Tester in MetaTrader 5 allows us to split the selected segment into two halves: the first half will be used to train the Expert Advisor, and the second half will be used for automatic testing after training (forward test).
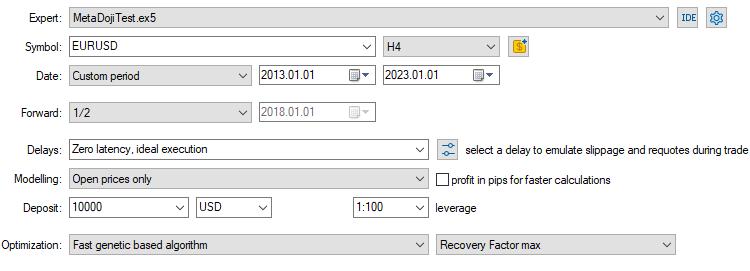
We will conduct two testing sessions (and training) to determine which is more effective: metabars or classic candles. We will compare by the recovery factor - the ratio of the received profit to the drawdown. The larger this parameter, the more profitable the strategy.
The EA has a lot of optimized parameters, so to speed up the optimization, we will carry it out not by exhaustive search, but by a genetic algorithm.
Settings for one-bar (conventional) Doji candles
Timeframe H4. Candle width is strictly 1 bar. The remaining settings have a wide optimization range:
| EA parameter | Start | Step | Stop |
|---|---|---|---|
| Candle_WidthMin | 1 | ||
| Candle_WidthMax | 1 | ||
| Candle_HeightPowerMin | 0.2 | 0.2 | 2 |
| Candle_BodyPowerMax | 0.1 | 0.1 | 0.4 |
| Candle_ShadowPowerMax | 0.1 | 0.1 | 0.4 |
| Trend_WidthMin | 1 | 3 | 10 |
| Trend_WidthMax | 1 | 4 | 40 |
| Trend_PowerMin | 0 | 0.2 | 2 |
| Trend_ChanelPowerMax | 0.5 | 0.2 | 2 |
| Lots | 0.1 | ||
| TakeProfit | 300 | 300 | 3000 |
| StopLoss | 300 | 300 | 3000 |
This means over 63 million combinations of parameters. However, genetic optimization will reduce the enumeration thousands of times and allow us to fit within a few minutes.
Settings for metabar Doji candles
Metabars can have a variable width in an unlimited range, that is, one Expert Advisor could immediately trade on a huge number of candles of different widths. But for the accuracy of the experiment, we will not set the range much wider than in testing one-bar candles. The standard available timeframes closest to H4 are H3 and H6. We will capture only the gap between these values with metabars. The nearest smaller timeframe that allows you to do this is M30. By running the EA on it, we will be able to trade on all metabars that have a width equivalent to any of the following: H3.5, H4, H4.5, H5, H5.5. Only one of these timeframes (H4) is available for trading on classic Doji candles. We would not be able to trade on others if not for metabars. The candles on the metabars are like a rabbit that a conjurer takes out of an empty hat. However, unlike the pre-existing rabbit, metabars catch real additional price movements (we saw this in the previous article). And we are about to find out whether these movements can be turned into real additional profit.
All other EA settings are exactly the same as in the test of the one-bar variant. We just need to scale them: since the M30 timeframe is 8 times smaller than H4, all the EA inputs measured in bars should be multiplied by 8.
The parameters that differ from the one-bar test are in bold.
Timeframe M30 (H4 and its surroundings are simulated at the expense of metabars).
| EA parameter | Start | Step | Stop |
|---|---|---|---|
| Candle_WidthMin | 7 | ||
| Candle_WidthMax | 11 | ||
| Candle_HeightPowerMin | 0.2 | 0.2 | 2 |
| Candle_BodyPowerMax | 0.1 | 0.1 | 0.4 |
| Candle_ShadowPowerMax | 0.1 | 0.1 | 0.4 |
| Trend_WidthMin | 8 | 24 | 80 |
| Trend_WidthMax | 8 | 32 | 320 |
| Trend_PowerMin | 0 | 0.2 | 2 |
| Trend_ChanelPowerMax | 0.5 | 0.2 | 2 |
| Lots | 0.1 | ||
| TakeProfit | 300 | 300 | 3000 |
| StopLoss | 300 | 300 | 3000 |
Results of testing a trading strategy on history
While optimizing the EA for 5 years of history, the strategy tester went through about 5 thousand settings and built a graph showing what result the EA achieved on each of the options. We can put the following graphs side by side from a one-bar EA and from a Metabar EA aligning them according to the vertical scale (recovery factor):
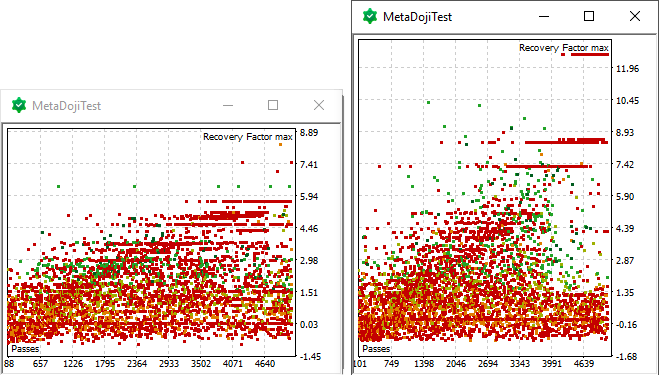
All optimization results of one-bar (left) and meta-bar (right) EAs
These charts show that metabars generally led to better results.
But this is only a preliminary and very rough conclusion. Let's export the optimization results to an external program (like Excel) for a more detailed analysis. If we calculate how many trades were made by the EA with different settings, then the spread will be as follows:
| Candle type | Number of trades (per one EA pass along the tutorial history) | ||
|---|---|---|---|
| Low | Average | High | |
| One-bar | 0 | 54 | 1472 |
| Metabar | 0 | 82 | 3796 |
Based on such a sample, we can only reliably judge that metabars really allow us to perform more transactions.
However, it is too early to assess profitability since the sample contains a huge number of setting options, in which the EA made very few trades - just a few or even one... Therefore, no matter how efficient the EA seems, we cannot trust this result, because it could be accidental in nature.
In order to draw statistically reliable conclusions, we need to leave in the sample only the options that led to the EA performing a lot of trades. Let's apply the following minimum reasonable filter to the sample:
- number of trades >= 120 (this means 2 trades per month for 5 years)
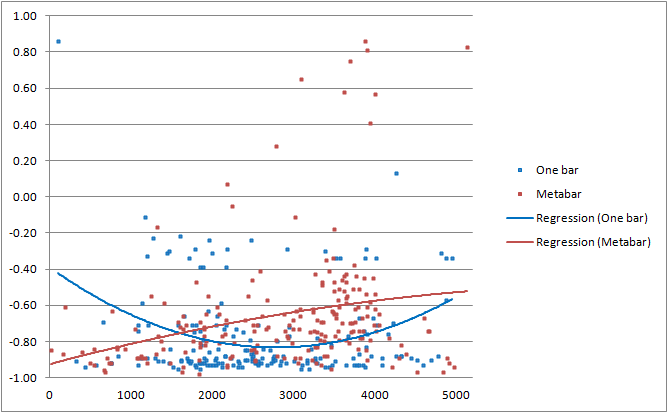
After that, only about 600 remained for a one-bar EA and about 900 for a meta-bar one (since it makes more trades on average) out of about 5000 setting options. Let's build a single graph based on them to compare the training stages of a one-bar EA and a meta-bar one:
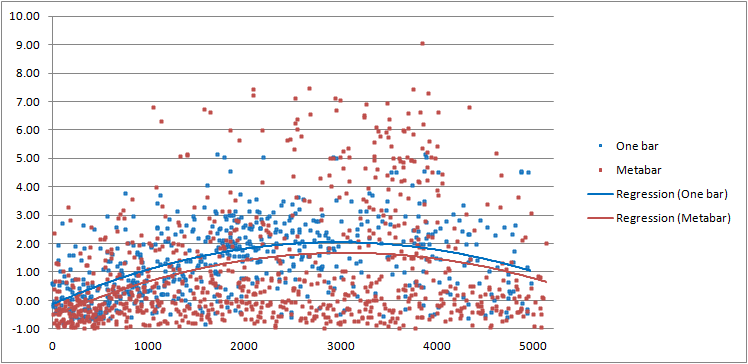
Minimum reliable optimization results
The graph shows that the one-bar EA on average (as can be seen from the regression lines) had a slightly better result over the entire training period. But the meta-bar EA had a wider spread of results, both in the direction of greater losses and in the direction of greater profitability. This can be explained precisely by the fact that more trades were made on the metabars, and this worked as a kind of amplifier: unprofitable EA multiplied the loss (because they made more unprofitable trades), profitable ones multiplied the profit.
Therefore, it was the metabar EA that achieved the most profitable results. The graph shows that only that EA was able to achieve a recovery factor above 6 more than once.
Now let's see how the EAs with the best settings will behave in the next 5 years of history on the forward test. The last graph showed that, on average (the regression line), the training outcomes reached the value of 2. So let's take everything above this average as good values. An additional filter is applicable to the sample displayed in the chart above:
- recovery factor >= 2 (on a 5-year history, with a drawdown of 50%, this would correspond to 20% per annum).
The sample size has now been reduced to about 200 values for both the single-bar and meta-bar EAs. For all settings from this sample, we will find the results achieved on the forward test and build a graph based on them:
Forward test of the best settings obtained during optimization
The forward test graph shows that the metabar EA managed to maintain its leadership as it dominates among the best results. Moreover, now its average result is also slightly better than that of a one-bar EA.
How many trades were made by all EAs from this chart? Let's calculate:
| Candle type | Number of trades (per one EA pass along the forward history) | ||
|---|---|---|---|
| Low | Average | High | |
| One-bar | 121 | 231 | 543 |
| Metabar | 122 | 352 | 1173 |
It can be seen that the EAs were as active on the forward test as they were at the training stage — the minimum number of trades approximately coincided with the filter value we applied earlier. Most trades were made by metabar EAs.
As you might remember, this was the objective of this article - to determine whether metabars allow you to make more trades (and not just find more candles) and whether this increases income. Now we can answer "yes" to both questions.
As a side research, we can evaluate the effectiveness of the trading strategy on Doji candles in general. The forward test graph has already made its assessment - the results of all strategies on it are much worse than they were at the training stage. So for real effective trading, we will need to create a more advanced trading system and/or select the optimal settings, timeframes, currency pairs and history ranges more carefully. As a bonus, let me show here some of the most unique EA settings that showed good results on the forward test graph above:
| Timeframe | H4 | M30 | ||
| Inputs | ||||
|---|---|---|---|---|
| Candle_WidthMin | 1 | 7 | ||
| Candle_WidthMax | 1 | 11 | ||
| Candle_HeightPowerMin | 0.4 | 2 | 1.8 | 1.6 |
| Candle_BodyPowerMax | 0.2 | 0.1 | 0.2 | 0.2 |
| Candle_ShadowPowerMax | 0.1 | 0.4 | 0.4 | 0.3 |
| Trend_WidthMin | 1 | 80 | 80 | 80 |
| Trend_WidthMax | 13 | 296 | 296 | 168 |
| Trend_PowerMin | 1.6 | 0 | 0 | 0 |
| Trend_ChanelPowerMax | 1.5 | 1.9 | 1.7 | 1.9 |
| Lots | 0.1 | |||
| TakeProfit | 900 | 300 | 300 | 300 |
| StopLoss | 300 | 3000 | 1200 | 3000 |
Conclusion
It was experimentally possible to show that the use of candles on metabars instead of conventional (one-bar) candles allows the trading strategy to perform much more deals.
Metabars should be used carefully. After all, a losing strategy, making more trades, will become even more unprofitable, while a profitable strategy can become more profitable.
Translated from Russian by MetaQuotes Ltd.
Original article: https://www.mql5.com/ru/articles/12355
Warning: All rights to these materials are reserved by MetaQuotes Ltd. Copying or reprinting of these materials in whole or in part is prohibited.
This article was written by a user of the site and reflects their personal views. MetaQuotes Ltd is not responsible for the accuracy of the information presented, nor for any consequences resulting from the use of the solutions, strategies or recommendations described.
- Free trading apps
- Over 8,000 signals for copying
- Economic news for exploring financial markets
You agree to website policy and terms of use
Some underdeveloped theories in the use of indicators.... It's all sad.
The grass used to be greener, yeah.....
Write something of your own, in the spirit of the day.
Study and integrate them. What a problem.
Thanks for the great article.
I noticed that when I zoomed in on the chart, the last signals suddenly disappeared.
It was missing:
Now it works.