EX5 라이브러리로 프로젝트 홍보하기
개요
경험이 많은 독자라면 라이브러리 내 함수 및 클래스 구현 은닉의 목적은 설명하지 않아도 알 겁니다. 아직 새로운 아이디어를 찾는 중이시라면 구현 세부 사항 은닉이 어떻게 쓰이는지 알고 싶으실 테고요.
MetaQuotes에서 EX5 라이브러리 클래스의 직접 상속을 가능하게 하기 위해 열심히 개발 중이긴 하지만 우리가 한번 먼저 구현해 보도록 하겠습니다.
목차
1. 함수 불러오기 및 내보내기
2. 클래스 구현 은닉 내보내기
3. .ex5 파일 변수 초기화
4. 내보내기 클래스 상속
5. EX5 라이브러리
1. 함수 불러오기 및 내보내기
클래스 내보내기의 기초가 되는 메소드입니다. 여러분이 만든 함수가 다른 프로그램에서도 작동할 수 있으려면 다음의 세 가지 요건을 충족해야 합니다.
- .ex5 파일로 컴파일하기 위해 .mqh가 아닌 .mq5 확장자를 갖는 파일로 작성될 것
- #property 라이브러리 전처리기 지시문을 포함하는 파일일 것
- 함수 헤더 뒤에 키워드 'export'가 포함될 것
Example 1. Let us create a function to be used in other programs

//--- library.mq5
#property library
int libfunc (int a, int b) export
{
  int c=a+b;
  Print("a+b="+string(с));
  return(с);
}
컴파일이 완료되면 library.ex5이 생성되며 이를 통해 libfunc 함수를 다른 프로그램에서 사용할 수 있게 됩니다.
함수 내보내기 과정은 매우 간단한데요. #import 전처리기 지시문을 이용하면 됩니다.
Example 2. We will use the export function libfunc() in our script

//--- uses.mq5
#import "library.ex5"
  int libfunc(int a, int b);
#import

void OnStart()
{
  libfunc(1, 2);
}
다만 컴파일러가 MQL5\Libraries 폴더에서 .ex5 파일을 검색한다는 점에 유의하세요. library.ex5 파일이 다른 폴더에 위치하는 경우 해당 경로를 지정해 줍니다.
예
#import "..\Include\MyLib\library.ex5" // the file is located in the MQL5\Include\MyLib folder
#import "..\Experts\library.ex5" // the file is located in the MQL5\Experts\ folder
.mq5 확장자를 갖는 파일 외에 .mqh 파일로도 함수 내보내기가 가능합니다.
그래픽을 이용해 실제 적용 방법을 설명하겠습니다.
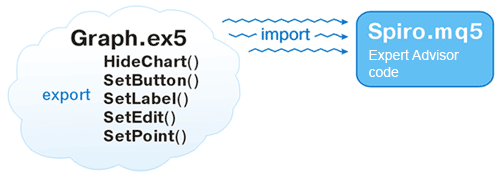
우선 내보내기할 함수 라이브러리를 생성해 보겠습니다. 해당 함수들은 버튼이나 라벨 등과 같은 그래픽 객체를 나타내며 차트에서 객체를 삭제하고 차트의 색상 변수를 재설정할 수 있습니다.
도식으로 나타내면 다음과 같습니다.

본문 하단에 있는 완성 파일 Graph.mq5를 참조하세요. 이번에는 드로잉 함수인 edit만 살펴보겠습니다.
//+------------------------------------------------------------------+
//| SetEdit                                                          |
//+------------------------------------------------------------------+
void SetEdit(long achart,string name,int wnd,string text,color txtclr,color bgclr,color brdclr,
             int x,int y,int dx,int dy,int corn=0,int fontsize=8,string font="Tahoma",bool ro=false) export
  {
   ObjectCreate(achart,name,OBJ_EDIT,wnd,0,0);
   ObjectSetInteger(achart,name,OBJPROP_CORNER,corn);
   ObjectSetString(achart,name,OBJPROP_TEXT,text);
   ObjectSetInteger(achart,name,OBJPROP_COLOR,txtclr);
   ObjectSetInteger(achart,name,OBJPROP_BGCOLOR,bgclr);
   ObjectSetInteger(achart,name,OBJPROP_BORDER_COLOR,brdclr);
   ObjectSetInteger(achart,name,OBJPROP_FONTSIZE,fontsize);
   ObjectSetString(achart,name,OBJPROP_FONT,font);
   ObjectSetInteger(achart,name,OBJPROP_XDISTANCE,x);
   ObjectSetInteger(achart,name,OBJPROP_YDISTANCE,y);
   ObjectSetInteger(achart,name,OBJPROP_XSIZE,dx);
   ObjectSetInteger(achart,name,OBJPROP_YSIZE,dy);
   ObjectSetInteger(achart,name,OBJPROP_SELECTABLE,false);
   ObjectSetInteger(achart,name,OBJPROP_READONLY,ro);
   ObjectSetInteger(achart,name,OBJPROP_BORDER_TYPE,0);
   ObjectSetString(achart,name,OBJPROP_TOOLTIP,"");
  }
함수 불러오기 및 사용은 Spiro.mq5 파일에 구현됩니다.
Example 3. Using imported functions

//--- Spiro.mq5 – the target file of the Expert Advisor

//--- importing some graphics functions
#import "Graph.ex5"
  void SetLabel(long achart, string name, int wnd, string text, color clr,
               int x, int y, int corn=0, int fontsize=8, string font="Tahoma");
  void SetEdit(long achart, string name, int wnd, string text, color txtclr, color bgclr, color brdclr,
                 int x, int y, int dx, int dy, int corn=0, int fontsize=8, string font="Tahoma", bool ro=false);
  void SetButton(long achart, string name, int wnd, string text, color txtclr, color bgclr,
                int x, int y, int dx, int dy, int corn=0, int fontsize=8, string font="Tahoma", bool state=false);
  void HideChart(long achart, color BackClr);
#import

//--- prefix for chart objects
string sID;
//+------------------------------------------------------------------+
//| Expert initialization function                                   |
//+------------------------------------------------------------------+

void OnInit()
{
  HideChart(0, clrWhite);
  sID="spiro.";
  DrawParam();
}
//+------------------------------------------------------------------+
//| DrawParam                                                        |
//+------------------------------------------------------------------+
void DrawParam()
{
  color bgclr=clrWhite, clr=clrBlack;
//--- bigger radius
  SetLabel(0, sID+"stR.", 0, "R", clr, 10, 10+3);
  SetEdit(0, sID+"R.", 0, "100", clr, bgclr, clr, 40, 10, 50, 20);
//--- smaller radius
  SetLabel(0, sID+"str.", 0, "r", clr, 10, 35+3);
  SetEdit(0, sID+"r.", 0, "30", clr, bgclr, clr, 40, 35, 50, 20);
//--- distance to the center
  SetLabel(0, sID+"stD.", 0, "D", clr, 10, 60+3);
  SetEdit(0, sID+"D.", 0, "40", clr, bgclr, clr, 40, 60, 50, 20);
//--- drawing accuracy
  SetLabel(0, sID+"stA.", 0, "Alfa", clr, 10, 85+3);
  SetEdit(0, sID+"A.", 0, "0.04", clr, bgclr, clr, 40, 85, 50, 20);
//--- drawing accuracy
  SetLabel(0, sID+"stN.", 0, "Rotor", clr, 10, 110+3);
  SetEdit(0, sID+"N.", 0, "10", clr, bgclr, clr, 40, 110, 50, 20);
//--- draw button
  SetButton(0, sID+"draw.", 0, "DRAW", bgclr, clr, 39, 135, 51, 20);
}
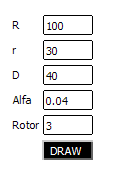
엑스퍼트 어드바이저를 실행하면 차트에 객체가 나타납니다.

함수 내보내기 및 불러오기는 매우 간단하지만 유의해야 할 점이 있으니 도움말의 내보내기와 불러오기를 꼭 읽어 보세요.
2. 클래스 구현 은닉 내보내기
MQL5 클래스의 직접 내보내기는 아직 불가능하므로 약간은 복잡한 방법을 이용해야 합니다. 다형성과 가상 함수를 기반으로 하죠. 사실 ex5 모듈에서 반환되는 것은 클래스 자체가 아니라 클래스에서 생성된 객체입니다. 이를 구현 은닉 객체라고 부르겠습니다.
우리가 이용할 방법의 포인트는 클래스를 두 개로 나누어 함수 및 변수 호출에 대한 퍼블릭 액세스는 가능케 하되 구현 관련 사항은 숨겨진 .ex5 파일에 넣는 것입니다.
간단하게 설명해 볼까요? 구현 관련 세부 사항은 숨긴 채로 다른 개발자들과 공유하고 싶은 클래스 CSpiro가 있습니다. 해당 클래스는 변수, 생성자, 소멸자 및 관련 함수를 포함합니다.
다음 방법을 따라 클래스를 내보냅니다.
- CSpiro 하위 클래스를 복제합니다. 복제된 클래스를 ISpiro라고 부르겠습니다(첫 글자 'C'를 '인터페이스'의 'I'로 대체).
- 모든 변수 및 가함수는 기존의 CSpiro 클래스에 그대로 둡니다.
- 함수 구현 세부 사항이 ISpiro 클래스를 이룹니다.
- 여기에 내보내기 함수를 추가하면 ISpiro 클래스 인스턴스가 생성됩니다.
- 주의! 모든 필요 함수는 virtual이라는 프리픽스를 갖습니다.
결과적으로 두 개의 파일이 생성됩니다.
Example 4. Hiding of the class implementation in the ex5 module

//--- Spiro.mqh – public file, the so called header file

//+------------------------------------------------------------------+
//| Class CSpiro                                                     |
//| Spirograph draw class                                       |
//+------------------------------------------------------------------+
class CSpiro
  {
public:
   //--- prefix of the chart objects
   string            m_sID;
   //--- offset of the chart center
   int               m_x0,m_y0;
   //--- color of the line
   color             m_clr;
   //--- chart parameters
   double            m_R,m_r,m_D,m_dAlfa,m_nRotate;

public:
   //--- constructor
                     CSpiro() { };
   //--- destructor
                    ~CSpiro() { };
   virtual void Init(int ax0,int ay0,color aclr,string asID) { };
   virtual void SetData(double aR,double ar,double aD,double adAlpha,double anRotate) { };

public:
   virtual void DrawSpiro() { };
   virtual void SetPoint(int x,int y) { };
  };
모든 함수 클래스가 키워드 virtual을 통해 선언됨을 잊지 마세요.
//--- ISpiro.mq5 – hidden implementation file

#include "Spiro.mqh"

//--- importing some functions
#import "..\Experts\Spiro\Graph.ex5"
void SetPoint(long achart,string name,int awnd,int ax,int ay,color aclr);
void ObjectsDeleteAll2(long achart=0,int wnd=-1,int type=-1,string pref="",string excl="");
#import

CSpiro *iSpiro() export { return(new ISpiro); }
//+------------------------------------------------------------------+
//| Сlass ISpiro                                                     |
//| Spirograph draw class                                       |
//+------------------------------------------------------------------+
class ISpiro : public CSpiro
  {
public:
                     ISpiro() { m_x0=0; m_y0=0; };
                    ~ISpiro() { ObjectsDeleteAll(0,0,-1); };
   virtual void      Init(int ax0,int ay0,color aclr,string asID);
   virtual void      SetData(double aR,double ar,double aD,double adAlpha,double anRotate);

public:
   virtual void      DrawSpiro();
   virtual void      SetPoint(int x,int y);
  };
//+------------------------------------------------------------------+
//| Init                                                             |
//+------------------------------------------------------------------+
void ISpiro::Init(int ax0,int ay0,color aclr,string asID)
  {
   m_x0=ax0;
   m_y0=ay0;
   m_clr=aclr;
   m_sID=asID;
   m_R=0;
   m_r=0;
   m_D=0;
  }
//+------------------------------------------------------------------+
//| SetData                                                          |
//+------------------------------------------------------------------+
void ISpiro::SetData(double aR,double ar,double aD,double adAlpha,double anRotate)
  {
   m_R=aR; m_r=ar; m_D=aD; m_dAlfa=adAlpha; m_nRotate=anRotate;
  }
//+------------------------------------------------------------------+
//| DrawSpiro                                                        |
//+------------------------------------------------------------------+
void ISpiro::DrawSpiro()
  {
   if(m_r<=0) { Print("Error! r==0"); return; }
   if(m_D<=0) { Print("Error! D==0"); return; }
   if(m_dAlfa==0) { Print("Error! Alpha==0"); return; }
   ObjectsDeleteAll2(0,0,-1,m_sID+"pnt.");
   int n=0; double a=0;
   while(a<m_nRotate*2*3.1415926)
     {
      double x=(m_R-m_r)*MathCos(a)+m_D*MathCos((m_R-m_r)/m_r*a);
      double y=(m_R-m_r)*MathSin(a)-m_D*MathSin((m_R-m_r)/m_r*a);
      SetPoint(int(m_x0+x),int(m_y0+y));
      a+=m_dAlfa;
     }
   ChartRedraw(0);
  }
//+------------------------------------------------------------------+
//| SetPoint                                                         |
//+------------------------------------------------------------------+
void ISpiro::SetPoint(int x,int y)
  {
   Graph::SetPoint(0,m_sID+"pnt."+string(x)+"."+string(y),0,x,y,m_clr);
  }
//+------------------------------------------------------------------+
이제 은닉 클래스가 .mq5 파일에 구현되었으며 전처리기 명령어 #property 라이브러리를 포함합니다. 위에서 제시된 요건을 모두 충족하죠.
SetPoint 함수의 범위 확인 연산자에 주목하세요. Graph 라이브러리와 CSpiro 클래스 모두에 선언됩니다. 범위 확인 연산자 :: 를 이용해 컴파일러가 필요한 함수를 호출할 수 있도록 만듭니다.
Graph::SetPoint(0, m_sID+"pnt."+string(x)+"."+string(y), 0, x, y, m_clr);
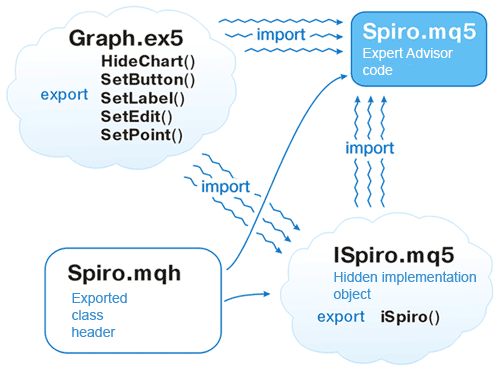
이제 헤더 파일을 포함시킨 후 엑스퍼트 어드바이저로 구현된 클래스를 불러옵니다.
도식으로 나타내면 다음과 같습니다.

Example 5. Using export objects

//--- Spiro.mq5 - the target file of the Expert Advisor

//--- importing some functions
#import "Graph.ex5"
  void SetLabel(long achart, string name, int wnd, string text, color clr,
               int x, int y, int corn=0, int fontsize=8, string font="Tahoma");
  void SetEdit(long achart, string name, int wnd, string text, color txtclr, color bgclr, color brdclr,
              int x, int y, int dx, int dy, int corn=0, int fontsize=8, string font="Tahoma", bool ro=false);
  void SetButton(long achart, string name, int wnd, string text, color txtclr, color bgclr,
                int x, int y, int dx, int dy, int corn=0, int fontsize=8, string font="Tahoma", bool state=false);
  void HideChart(long achart, color BackClr);
#import

//--- including the chart class
#include <Spiro.mqh>

//--- importing the object
#import "ISpiro.ex5"
  CSpiro *iSpiro();
#import

//--- object instance
CSpiro *spiro;
//--- prefix for chart objects
string sID;
//+------------------------------------------------------------------+
//| Expert initialization function                                   |
//+------------------------------------------------------------------+
void OnInit()
{
  HideChart(0, clrWhite);
  sID="spiro.";
  DrawParam();
//--- object instance created
  spiro=iSpiro();
//--- initializing the drawing
  spiro.Init(250, 200, clrBlack, sID);
//--- setting the calculation parameters
  spiro.SetData(100, 30, 40, 0.04, 10);
//--- drawing
  spiro.DrawSpiro();
}
//+------------------------------------------------------------------+
//| Expert deinitialization function                                 |
//+------------------------------------------------------------------+
void OnDeinit(const int reason)
{
  delete spiro; // deleting the object
}
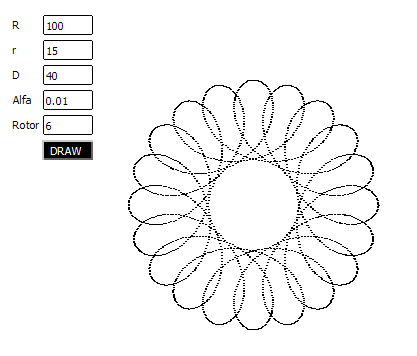
이제 차트에서 객체 매개 변수를 변경하고 객체로 된 차트를 그릴 수 있게 되었습니다.

3. .ex5 파일 변수 초기화
ISuperClass는 globals.mqh 파일에 포함된 변수들을 사용하는 경우가 많습니다. 이와 유사한 방법을 사용해 해당 변수들을 다른 파일에서도 이용할 수 있는데요.
예
Example 6. Public include file

//--- globals.mqh

#include <Trade\Trade.mqh>
//--- instance of the trade function object
extern CTrade *_trade;
_trade 객체의 유일한 인스턴스는 여러분의 프로그램에 초기화되어 있지만 은닉 클래스인 ISuperClass에서도 사용이 되는 거죠.
이를 위해 ISuperClass 클래스에서 .ex5 파일로 객체 포인터가 전달됩니다.
아래와 같이 .ex5 파일로부터 객체를 전달 받는 것이 가장 쉽죠.
Example 7. Initialization of variables upon creation of the object

//--- ISuperClass.mq5 –hidden implementation file

#property library
CSuperClass *iSuperClass(CTrade *atrade) export
{
//--- saving the pointer
   _trade=atrade;
//--- returning the object of the hidden implementation of ISuperClass of the open CSuperClass class
  return(new ISuperClass);
}
//... the remaining code
모듈에 객체가 수신되면 필요한 모든 변수가 초기화됩니다.
전역 변수의 종류가 서로 다를 수도 있습니다. 따라서 iSuperClass 함수 헤더를 매번 바꾸고 싶지 않다면 모든 전역 변수와 필요 함수를 포함하는 특수 클래스
를 생성하기를 권장합니다.
Example 8. Public include file

//--- globals.mqh
#include <Trade\Trade.mqh>

//--- trade "object"
extern CTrade *_trade;
//--- name of the Expert Advisor of the system
extern string _eaname;

//+------------------------------------------------------------------+
//| class __extern                                                   |
//+------------------------------------------------------------------+
class __extern // all extern parameters for passing between the ex5 modules are accumulated here
{
public:
//--- the list of all public global variables to be passed
//--- trade "object"
  CTrade *trade;
//--- name of the Expert Advisor of the system
  string eaname;

public:
  __extern() { };
  ~__extern() { };

//--- it is called when passing the parameters into the .ex5 file
  void Get() { trade=_trade; eaname=_eaname; };  // getting the variables

 //--- it is called in the .ex5 file
  void Set() { _trade=trade; _eaname=eaname; };  // setting the variables

};
//--- getting the variables and pointer for passing the object into the .ex5 file
__extern *_GetExt() { _ext.Get(); return(GetPointer(_ext)); }

//--- the only instance for operation
extern __extern _ext;
ISuperClass.mq5 파일은 다음과 같이 구현됩니다.
Example 9.

//--- ISuperClass.mq5 –hidden implementation file

#property library
CSuperClass *iSuperClass(__extern *aext) export
{
//--- taking in all the parameters
  aext.Set();
//--- returning the object
  return(new ISuperClass);
}
//--- ... the remaining code
이제 좀 더 간단하게 함수를 호출할 수 있게 되었죠. 확장성 서식도 이용할 수 있게 되었고요.
Example 10. Using export objects in the presence of public global variables

//--- including global variables (usually located in SuperClass.mqh)
#include "globals.mqh"

//--- including the public header class
#include "SuperClass.mqh"
//--- getting the hidden implementation object
#import "ISuperClass.ex5"
  CSuperClass *iSuperClass();
#import

//+------------------------------------------------------------------+
//| Script program start function                                    |
//+------------------------------------------------------------------+
void OnStart()
{
//--- creating the hidden implementation object providing for the passing of all parameters
  CSuperClass *sc=iSuperClass(_GetExt());
  //--- ... the remaining code
}
4. 내보내기 클래스 상속
지금쯤이면 직접 상속은 불가능하다고 생각하고 계시겠죠. 은닉 구현 객체 내보내기를 하면 객체 자체가 구조 최하단에 위치하게 되니까요.
이때 추가로 중간 클래스를 만들면 일종의 상속 '에뮬레이션'이 생성됩니다. 여기서 다시 한번 다형성과 가상 함수를 이용하게 되는데요.
Example 11. Emulation of inheritance of hidden classes

//--- including the public header class
#include "SuperClass.mqh"

//--- getting the hidden implementation object
#import "ISuperClass.ex5"
  CSuperClass *iSuperClass();
#import

class _CSuperClass
{
public:
//--- instance of the hidden implementation object
  CSuperClass *_base;
public:
//--- constructor
  _CSuperClass() {  _base=iSuperClass(_GetExt()); };
//--- destructor
  ~_CSuperClass() { delete _base; };
//--- further followed by all functions of the base CSuperClass class
//--- working function called from the hidden implementation object
  virtual int func(int a, int b) { _base.func(a,b); };
};
문제는 CSuperClass 클래스 변수에 대한 엑세스가 가능하느냐 입니다.. 자손 클래스에서 선언되지 않았을 뿐더러 _base 변수에 위치하니까요. 보통 헤더 클래스인 SuperClass.mqh가 있으면 사용이 제한되지 않기는 합니다.
물론 함수로 여러분만의 노하우를 공유하고 싶으신 거라면 따로 ISuperClass 래퍼를 만들어 둘 필요는 없습니다. 해당 함수를 사용하는 사람들이 직접 래퍼 클래스를 생성하면 상속도 쉬우니까요.
- 클래스 종속 함수 내보내기
- .mqh 헤더 파일 및 .ex5 구현 파일
- .ex5 파일 변수 초기화
5. EX5 라이브러리
2011년 11월 MetaQuotes는 파일 저장소를 대중에 공개했습니다. 공지에서 더 많은 관련 정보를 찾을 수 있습니다.
해당 저장소에는 여러분이 만든 프로젝트를 저장할 수 있으며, 다른 개발자들에게 액세스 권한을 부여할 수도 있습니다. 쉽게 여러분의 파일을 업데이트하고 또 기존 파일을 사용 중인 개발자들이 빠르게 새 파일에 접근할 수 있게 된 것이죠.
또한, MetaQuotes 웹사이트의 마켓을 이용하면 여러분의 함수 라이브러리를 유료 또는 무료로 배포할 수 있습니다.
결론
여러분은 이제 EX5 라이브러리를 생성할 수 있습니다. 함수 및 클래스 객체 내보내기도 할 줄 알고 실제 적용도 할 수 있게 되었죠. 다른 개발자들과 좀 더 가까워진 것이기도 합니다. 이제 함께 프로젝트 작업을 할 수도 있고, 마켓에 프로젝트를 홍보하거나 EX5 라이브러리 함수에 대한 액세스를 허락해 줄 수도 있죠.
MetaQuotes 소프트웨어 사를 통해 러시아어가 번역됨.
원본 기고글: https://www.mql5.com/ru/articles/362
경고: 이 자료들에 대한 모든 권한은 MetaQuotes(MetaQuotes Ltd.)에 있습니다. 이 자료들의 전부 또는 일부에 대한 복제 및 재출력은 금지됩니다.
이 글은 사이트 사용자가 작성했으며 개인의 견해를 반영합니다. Metaquotes Ltd는 제시된 정보의 정확성 또는 설명 된 솔루션, 전략 또는 권장 사항의 사용으로 인한 결과에 대해 책임을 지지 않습니다.
 AutoElliottWaveMaker-MetaTrader 5 엘리엇 파동 반자동 분석 도구
 MQL5 코드 보호하기: 보안 암호, 키 생성기, 시간 제한, 원격 라이선스 및 고급 EA 라이선스 키 암호 테크닉
 마켓에 제품 출시하기
 트레이드미네이터 3: 라이즈 오브 더 트레이딩 머신
...
클래스 내보내기 또는 이와 유사한 기능을 구현할 계획이 있나요?
예, 하지만 지금은 아닙니다.
클래스를 내보낼 수 있습니다.
MT4에서 작동하나요?
적어도 클래스를 내보낼 수 있는 가능성은 있습니다.
MT4에서도 작동하나요?
7년 후에도 여전히 "지금은 안 된다"입니다.
MT4는 잊어버렸어요, 과거 일이니까요.