MTF Trend Matrix Panel With Heatmap
- Indicateurs
- Version: 4.25
- Activations: 10

Trend Matrix Panel is a multi-timeframe technical indicator for MetaTrader 5 that compresses an entire trading session's structural picture into a single panel. Rather than flipping between charts to read M1, M15, H1, and D1 separately, the panel shows the trend state of three configurable moving averages across twelve timeframes simultaneously, with a heatmap that draws your eye to the genuinely strong signals and away from noise.
The core idea is simple: every cell in the matrix tells you how many bars a moving average has been trending in its current direction on a given timeframe. Five bars of bullish slope on M15 is meaningful; eighty bars of bullish slope on D1 is structural. The heatmap fades weak counts toward the background and saturates strong counts to full color, so a glance at the panel tells you which timeframes are doing real work and which are just chopping.
The indicator surfaces information through four complementary channels — the matrix tells you what's structural across timeframes, the volume tags on the chart tell you what's significant in the moment, the MA lines and their right-edge labels tell you which trend is which, and the heatmap fade keeps the noise quiet. None of the channels overlap, and the panel is designed so a single glance gives you the read.
The matrix:
The matrix is a grid of timeframes (rows) by MA columns. The first column is split into TF and Volume cells — the timeframe label paired with that timeframe's volume ratio versus its rolling average. The next three columns are the configured moving averages, each cell showing the count of consecutive bars the MA has been trending in its current direction.
Cells are colored bull (default green) or bear (default red) based on slope, then heatmap-faded by their count. A count of 1 means the trend just flipped this bar; the cell shows as a faint tint. A count of 10 or more means the trend is well-established; the cell shows at full saturation. The transition is smooth, not stepped, so you read the matrix as a heatmap rather than a binary on/off grid.
The two-row column header — bias gradient and split votes:
Each MA column has a header that occupies two rows. The top row shows the MA name (e.g. "EMA-20") on a background that tints continuously based on the column's directional bias: dark grey when there's no clear lean, gradually shifting to bull or bear color as alignment builds, reaching full saturation when every qualifying timeframe agrees. The text auto-flips between black and white based on background brightness to stay readable across the full color range.
The bottom row is split into three sub-cells — bull · bear · total — showing the live qualifying votes. The bull number renders in the column's bull color, the bear number in its bear color, the total in the default font color. Crucially, this row's background stays at a fixed neutral grey regardless of bias state, which keeps the numbers always legible and forms a static visual anchor between the dynamic top header and the matrix below. When consensus pulses, the contrast between the moving top row and the still bottom row makes it stand out like a neon sign rather than blending into a continuous gradient.
This separation also fixes a class of misreads. Earlier versions showed a single 9/12 ratio, which was easy to misinterpret as "9 of 12 in directional consensus" when it actually meant "9 of 12 had enough bar history to vote." The new bull/bear/total split makes vote alignment unambiguous: 5/2/12 cannot be mistaken for consensus, and 11/0/12 is clearly a strong directional signal.
Moving average lines and their chip labels:
The three configured moving averages are drawn directly on the chart in their column colors, each at a configurable line width. At the right edge of the chart pane, a small dark chip with a colored border identifies each line by name (e.g. "EMA-20"). The chip text is rendered in the line's color so the text itself matches the line — your eye picks up correspondence at a glance. The chip's vertical position tracks each MA's current value, so labels glide with the moving averages as the market moves; the X coordinate stays anchored to the chart pane in screen-space, so labels remain visible regardless of how far you pan or zoom.
Per-bar volume tags:
On the chart itself, bars whose tick volume meets a configurable ratio threshold get a small tag below their wick showing that bar's ratio (e.g. "1.4x"). Tags are placed only on the most recent N bars (default 60), forming a rolling window that walks forward as new bars print — the oldest tag drops off, new qualifying bars get tagged. This deliberately avoids cluttering the chart with tags on every bar; only the bars where volume actually mattered get marked.
The tags are particularly useful for spotting climactic volume sequences. A run of escalating tags (1.2x, 1.5x, 2.0x) into a swing high tells you distribution; a steady stream of moderate tags (1.1x, 1.2x, 1.1x, 1.3x) along a trending move tells you healthy participation. These are signatures you cannot read from the candles alone.
Tags update only on bar transitions — historical data doesn't change intra-bar, so updating every tick would be wasted work. This keeps performance light even on lower timeframes.
The footer: volume snapshots, spread, and timer:
Below the matrix, two compact rows display live market state. The top footer row shows three volume snapshots side by side: the current bar's tick count and ratio, the previous bar's, and the bar before that. Each is colored independently based on its own ratio against the rolling average — so you can see at a glance whether volume is building, fading, or stable across three consecutive bars.
The bottom footer row splits into spread on the left (with a configured threshold visible inline and three-tier color coding — green well below, amber approaching, red over) and the next-bar countdown on the right (also three-tier — green most of the bar, amber in the final 20%, red in the final 10%).
How to read the panel at a glance:
There's a natural reading order once you've used the panel for a while:
• Scan the column headers first: are they tinted? Which way? Strongly?
• Read the split row beneath each header to confirm the directional split — strong consensus shows imbalanced numbers (e.g. 11/0/12).
• Scan the column you care about top-to-bottom: are the cells consistent in color and saturation, or mixed?
• Glance at the TF/Vol column on the left: which timeframes are showing high volume right now (Lavender to Lime tints)?
• Check the volume footer: is current volume building or fading versus the previous two bars?
• Check the chart for recent volume tags: where did high-volume bars cluster?
• Confirm spread is acceptable before trading.
The panel is designed to deliver this read in under two to five seconds. If you find yourself studying it for longer than that, the market itself is probably ambiguous and waiting is usually the right move.
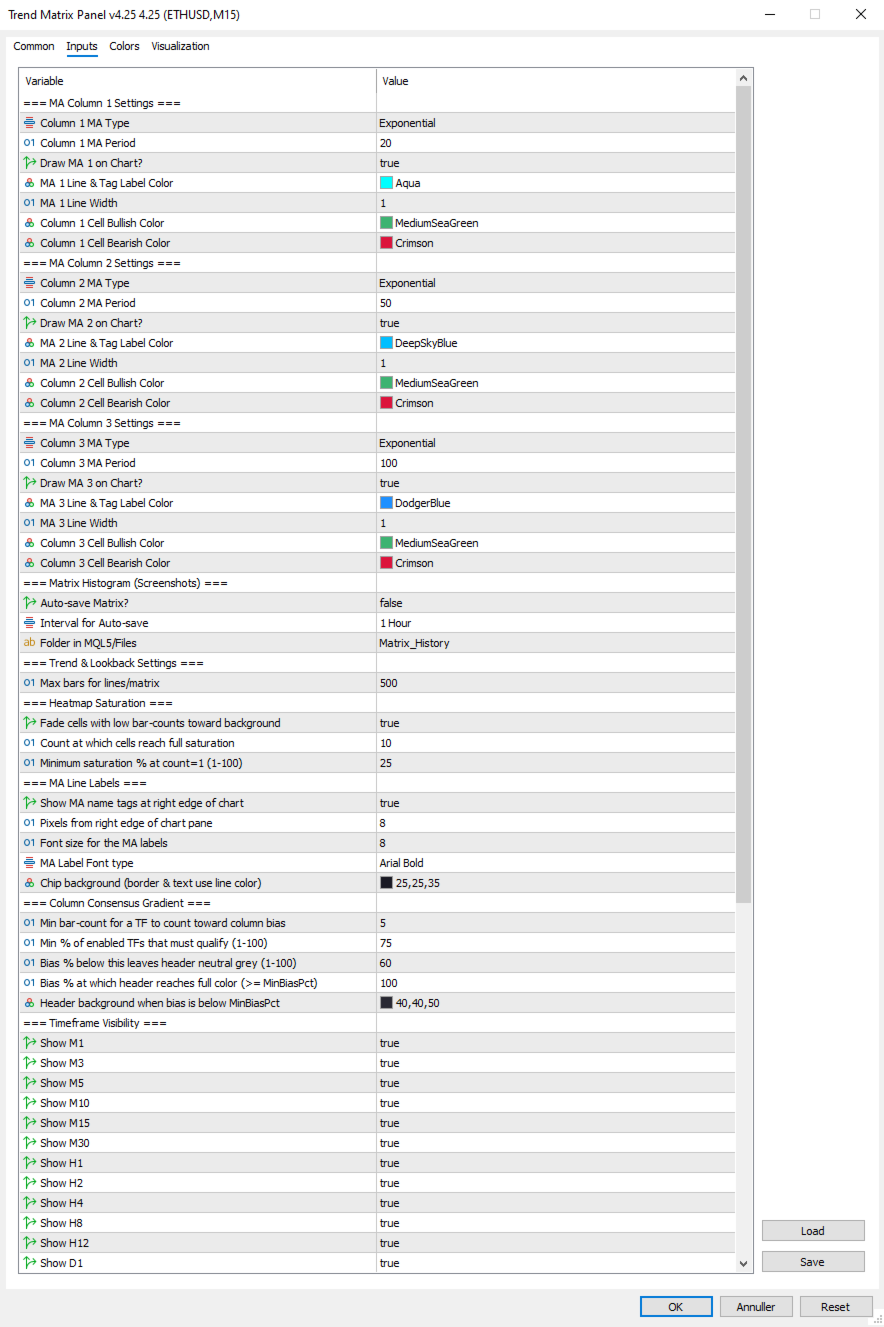
The settings:
=== MA Column 1 Settings ===
- Column 1 MA Type: Select MA type for Column 1 (SMA/EMA/SMMA/LWMA).
- Column 1 MA Period: Select the period (lookback bars) for the Column 1 MA calculation.
- Draw MA 1 on Chart?: Set true to draw MA 1 on the chart, false to hide the line and its right-edge label.
- MA 1 Line & Tag Label Color: Select the color for the MA 1 line on the chart and its right-edge chip label.
- MA 1 Line Width: Select the width in pixels for the MA 1 line.
- Column 1 Cell Bullish Color: Select the color for matrix cells in Column 1 when the MA is sloping up.
- Column 1 Cell Bearish Color: Select the color for matrix cells in Column 1 when the MA is sloping down.
=== MA Column 2 Settings ===
- Column 2 MA Type: Select MA type for Column 2 (SMA/EMA/SMMA/LWMA).
- Column 2 MA Period: Select the period (lookback bars) for the Column 2 MA calculation.
- Draw MA 2 on Chart?: Set true to draw MA 2 on the chart, false to hide the line and its right-edge label.
- MA 2 Line & Tag Label Color: Select the color for the MA 2 line on the chart and its right-edge chip label.
- MA 2 Line Width: Select the width in pixels for the MA 2 line.
- Column 2 Cell Bullish Color: Select the color for matrix cells in Column 2 when the MA is sloping up.
- Column 2 Cell Bearish Color: Select the color for matrix cells in Column 2 when the MA is sloping down.
=== MA Column 3 Settings ===
- Column 3 MA Type: Select MA type for Column 3 (SMA/EMA/SMMA/LWMA).
- Column 3 MA Period: Select the period (lookback bars) for the Column 3 MA calculation.
- Draw MA 3 on Chart?: Set true to draw MA 3 on the chart, false to hide the line and its right-edge label.
- MA 3 Line & Tag Label Color: Select the color for the MA 3 line on the chart and its right-edge chip label.
- MA 3 Line Width: Select the width in pixels for the MA 3 line.
- Column 3 Cell Bullish Color: Select the color for matrix cells in Column 3 when the MA is sloping up.
- Column 3 Cell Bearish Color: Select the color for matrix cells in Column 3 when the MA is sloping down.
=== Matrix Histogram (Screenshots) ===
- Auto-save Matrix?: Set true to automatically capture chart screenshots at regular intervals.
- Interval for Auto-save: Select the timeframe interval between automatic screenshots (e.g. PERIOD_H1 = one per hour).
- Folder in MQL5/Files: Subfolder name under MQL5/Files where screenshots are saved (created automatically if absent).
=== Trend & Lookback Settings ===
- Max bars for lines/matrix: Maximum bar history used for line drawing and trend-count detection (cap, not minimum).
=== Heatmap Saturation ===
- Fade cells with low bar-counts toward background: Master toggle for the heatmap effect; false reverts to flat full-saturation cells.
- Count at which cells reach full saturation: Bar count at which a cell shows at full color; lower = matrix lights up faster.
- Minimum saturation % at count=1 (1-100): Saturation percentage for freshly-flipped trends; lower = weaker cells fade more toward invisible.
=== MA Line Labels ===
- Show MA name tags at right edge of chart: Master toggle for the colored chip labels next to each MA line.
- Pixels from right edge of chart pane: Horizontal padding between the chip's right edge and the chart pane's right edge.
- Font size for the MA labels: Font size for the chip text.
- InpMALabelFont: Font face dropdown for the chip labels (Arial / Arial Bold / Tahoma Bold / Verdana Bold / Segoe UI Bold / Consolas).
- Chip background (border & text use line color): Background color for the chip pill; border and text always match the MA line color.
=== Column Consensus Gradient ===
- Min bar-count for a TF to count toward column bias: Timeframes below this count abstain from the directional vote.
- Min % of enabled TFs that must qualify (1-100): Minimum quorum of enabled TFs that must have enough history before any bias is registered.
- Bias % below this leaves header neutral grey (1-100): Directional bias percentage below which the column header stays neutral.
- Bias % at which header reaches full color (>= MinBiasPct): Directional bias percentage at which the header reaches full saturation.
- Header background when bias is below MinBiasPct: Background color for the column header in neutral state and for the split-vote row.
=== Timeframe Visibility ===
- Show M1: Set true to include the M1 row in the matrix.
- Show M3: Set true to include the M3 row in the matrix.
- Show M5: Set true to include the M5 row in the matrix.
- Show M10: Set true to include the M10 row in the matrix.
- Show M15: Set true to include the M15 row in the matrix.
- Show M30: Set true to include the M30 row in the matrix.
- Show H1: Set true to include the H1 row in the matrix.
- Show H2: Set true to include the H2 row in the matrix.
- Show H4: Set true to include the H4 row in the matrix.
- Show H8: Set true to include the H8 row in the matrix.
- Show H12: Set true to include the H12 row in the matrix.
- Show D1: Set true to include the D1 row in the matrix.
=== Panel Aesthetics ===
- Panel Background Color: Background color for the panel; also serves as the heatmap fade target.
- Panel Text Color: Default text color for non-tinted panel areas (cell counts, TF labels, total-vote number, footer).
- Matrix Font Size: Base font size for the matrix cells.
- Panel Anchor Point: Which corner of the chart the panel anchors to (top-left / top-right / bottom-left / bottom-right).
- X-Axis Offset: Horizontal pixel offset of the panel from its anchor corner.
- Y-Axis Offset: Vertical pixel offset of the panel from its anchor corner.
=== Volume Settings ===
- Volume Average Lookback (bars): Number of prior bars used to compute the rolling volume average for ratio calculations.
- Low-volume Threshold (ratio vs avg): Ratio at or below which volume is classified as Low (e.g. 0.7 = 70% of average).
- High-volume Threshold (ratio vs avg): Ratio at or above which volume is classified as High (e.g. 1.5 = 150% of average).
- Color: Above Average Threshold: Text color used for volume readings above the High threshold.
- Color: Below Average Threshold: Text color used for volume readings below the Low threshold.
- Color: Average Threshold : Text color used for volume readings between the Low and High thresholds.
=== Per-Bar Volume Tags ===
- Show ratio tags below high-volume bars: Master toggle for the per-bar volume tags on the chart.
- How many recent bars to consider for tagging: Size of the rolling window of recent bars eligible for tagging.
- Min ratio to tag (>=); 1.1 = anything 110% of average: Minimum volume ratio for a bar to receive a tag.
- Tag text color: Color used for the volume tag text below qualifying bars.
- Tag font size: Font size for the volume tag text.
- Tag Font type: Font face dropdown for the volume tags (same options as MA label font).
=== Spread Settings ===
- Max Spread Treshold: Spread threshold in raw points; spread above this turns the spread display red.
- % of threshold at which spread tints amber (1-100): Percentage of the spread threshold at which the display tints amber instead of green (1-100).atrix Cell when in Bearish Trend.
Tips & Operational Notes
First attach behavior
On a fresh attach, the indicator needs a moment for the MA sub-indicator handles to warm up across all twelve timeframes. The matrix may briefly show "SYNC" cells, the MA lines may take a tick or two to draw, and volume tags will populate after the first bar transition. Higher timeframes (especially D1) may take longer if the broker is still loading history. The panel will fully populate within seconds on a live market and within a second or two on closed markets — the OnTimer retry path handles both cases automatically.
Closed market behavior
The panel works correctly on weekends and holidays. The matrix and MA lines update from the most recently completed data; the volume footer shows the last live bars; spread reads as broker-reported (often zero on closed markets). The next-bar timer continues to count down assuming the next bar will arrive on schedule. Volume tags remain in place from the last live session.
Re-attach optimization
Removing and re-adding the indicator is safe and clean — all panel objects, MA chips, and volume tags are removed in OnDeinit, and they all rebuild fresh on OnInit. Use this if you change settings that affect layout (timeframe visibility, anchor corner, etc.) and want to see the updated panel immediately.
Multiple instances
The indicator uses a single shared object name prefix ("TMTX_"), which means running two instances on the same chart is not supported — they would collide. Running one instance per chart is fully supported.
Recommended timeframe choices
The default 12 timeframes are intentionally broad. Common refinements:
• Scalping: hide H8, H12, D1 (rarely relevant for sub-15-minute trades). Keep M1 through H4.
• Intraday/swing: hide M1, M3 (mostly noise for trades held longer than a few minutes). Focus on M5 through D1.
• Position trading: hide M1, M3, M5, M10, M15. Focus on M30 through D1, where structural moves play out.
Tuning the heatmap
The default settings (FullCount=10, MinSaturation=25) balance detail with focus on a typical liquid market. Adjust based on personal taste:
• If the matrix feels too washed out: lower FullCount to 6–8 (cells reach full color sooner) or raise MinSaturation to 35–40 (weak cells more visible).
• If the matrix feels too loud: raise FullCount to 15–20 (full color requires longer trends) or lower MinSaturation to 10–15 (weak cells almost vanish).
• Heatmap off entirely: set InpHeatmapEnabled = false. Useful for verifying raw signal direction before tuning.
Tuning the consensus gradient
Two knobs control how aggressively the column header announces directional bias:
• MinBiasPct higher (e.g. 75): headers stay neutral longer, only tinting on stronger leans. Calmer panel, fewer false alarms.
• MaxSatAt lower (e.g. 80): headers reach full color at 80% bias instead of 100%. More dramatic, fires earlier.
• Tightening the band (e.g. MinBias=80, MaxSat=100): creates a sharper transition — headers stay grey until clearly aligned, then quickly saturate. "On/off" feel within a continuous system.
Tuning the volume tags
The default threshold of 1.1x is permissive enough that you'll see most participating bars get marked. Tune based on chart density and your trading style:
• Threshold 1.0: tags every average-or-above bar — useful for studying full sessions, but busy.
• Threshold 1.3 or 1.5: only tags bars with notable volume — great for spotting climactic moves and absorption.
• Window 30 bars: tighter focus on the immediate session — old tags drop off faster.
• Window 200 bars: longer history for after-the-fact session review. Watch the object count if you push much beyond 200.
Spread threshold per instrument
The default 20-point threshold is appropriate for major forex pairs on tight-spread brokers. For other instruments, tune accordingly: 10–15 for very tight pairs, 30–50 for indices and metals, 50+ for exotics. The amber warning tier at 80% of threshold gives you advance notice when spread is widening — useful around news events when costs spike before liquidity dries up entirely.
Knowing when to ignore the panel
The matrix is a structural read; it cannot tell you about news, session changes, or imminent reversals. Three situations where the panel's signal should be ignored or weighted down:
• Around scheduled high-impact news (NFP, FOMC, CPI). The matrix's recent counts reflect pre-news structure that the news will likely break.
• During session transitions (Asian → London, London → New York). Volume regime changes can flip multi-TF alignment within a few bars.
• On illiquid instruments or off-session hours. A perfect-looking matrix on a thin market means very little — wait for real participation.
The volume footer is the panel's primary tool for catching these situations. Three consecutive low-ratio bars in the footer should temper any structural signal the matrix is showing. The volume tags on the chart give you a longer view of the same — a stretch of recent bars with no tags at all suggests low-conviction action you should treat with caution.