

Signalator Local Trade Copier MT5 - Complete Setup Guide
Signalator Local Trade Copier MT5 is a local MetaTrader 5 trade copier for copying trades between your own MT5 terminals on the same computer or VPS.
MT5 product page - https://www.mql5.com/en/market/product/184163
At least one terminal works as the Master. It publishes trade events. One or more terminals work as Receivers. They copy allowed trades according to your receiver settings, symbol mapping, lot sizing, filters and broker rules.
The copier works locally and does not use an external cloud copier relay. For live copying, both MT5 terminals must be running, connected and allowed to trade where needed.
Important: always test your copier setup on demo accounts first. Confirm symbol mapping, lot sizing, filters and close behavior before using live accounts.
1. Basic Workflow
The copier works through a local bridge channel between MT5 terminals on the same computer or VPS.
The basic workflow is:
- Master terminal publishes trade events into a selected local bridge.
- Receiver terminal reads trade events from the same bridge.
- Receiver checks source account, filters, symbol mapping, lot sizing and broker permissions.
- If everything is allowed, the Receiver opens, modifies or closes its linked copy.
- The panel and Log tab show copied, skipped, warning and error events.
The simplest setup is one Master and one Receiver.
More advanced setups can use different layouts:
- One Master to several Receivers - one source account copied to multiple receiver accounts.
- Several Masters to separate Receiver groups - each Master uses its own BridgeName, for example main, gold or prop1.
- Several Masters on the same bridge - possible only when the Receiver is intentionally configured to accept the required Master accounts.
For live use, the safest structure is to keep unrelated Masters on separate BridgeName values and use AllowedMasterAccounts on each Receiver.
Example:
- BridgeName = gold for a gold strategy Master and its Receivers.
- BridgeName = indices for an indices strategy Master and its Receivers.
- BridgeName = prop1 for a specific prop account setup.
Do not place several unrelated Masters on the same BridgeName unless this is intentional. If multiple Masters publish into the same bridge, the Receiver must be filtered correctly so it accepts only the source accounts you want it to copy.
2. Before You Start
Before configuring the copier, check the following:
- Both MT5 terminals are installed and connected.
- The EA is installed in each MT5 terminal that will participate in copying.
- Algo Trading is enabled in MT5.
- The Master and Receiver use the same BridgeName.
- The Receiver account has trading permission enabled.
- The Receiver has the required trading symbols available from its broker.
- Use demo accounts for the first test.
The EA does not need to be attached to the same chart symbol that you copy. It can be attached to any chart, while the copier manages trade events through its bridge and symbol mapping.
3. Installation
Install the copier in each MT5 terminal that will be used as Master or Receiver.
- Open MT5.
- Open File > Open Data Folder.
- Place the EA file into the MQL5 / Experts folder.
- Restart MT5 or refresh the Navigator.
- Attach the EA to a chart.
- Open the Inputs tab and configure the role.
If you change important Inputs such as Role or BridgeName, reload the EA after changing them.
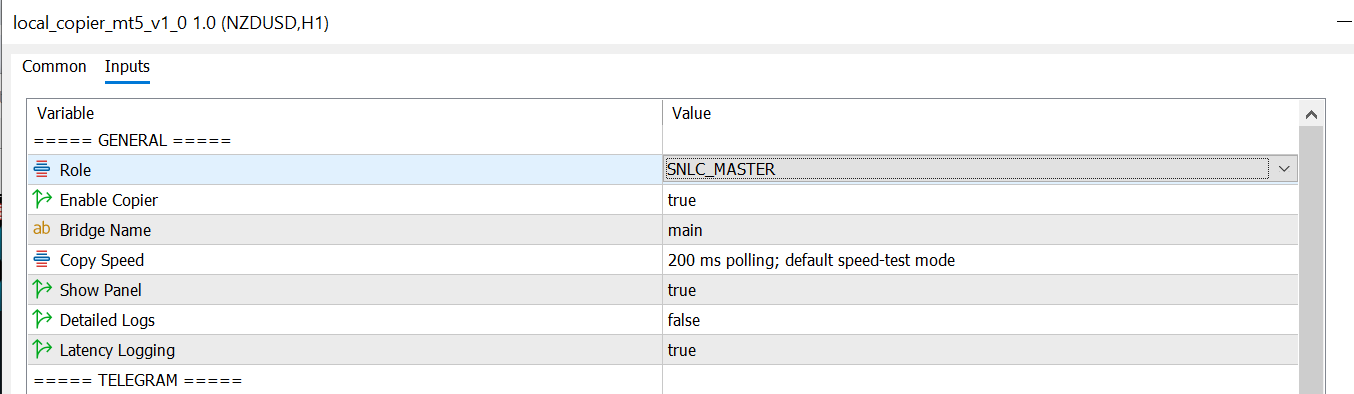
4. Master Setup
The Master terminal is the source account. It publishes trade events for Receivers to copy.
In the Master terminal Inputs, set:
- Role = Master
- CopierEnabled = true
- BridgeName = your bridge name, for example main
The Master can publish different types of activity, depending on your settings:
- new market trades
- trade close events
- pending order events
- SL/TP changes
- manual trades
- EA trades
- Trade Panel trades
- BUY only, SELL only or both directions
For the first test, keep the setup simple: allow both BUY and SELL, use a small lot size and test on demo.
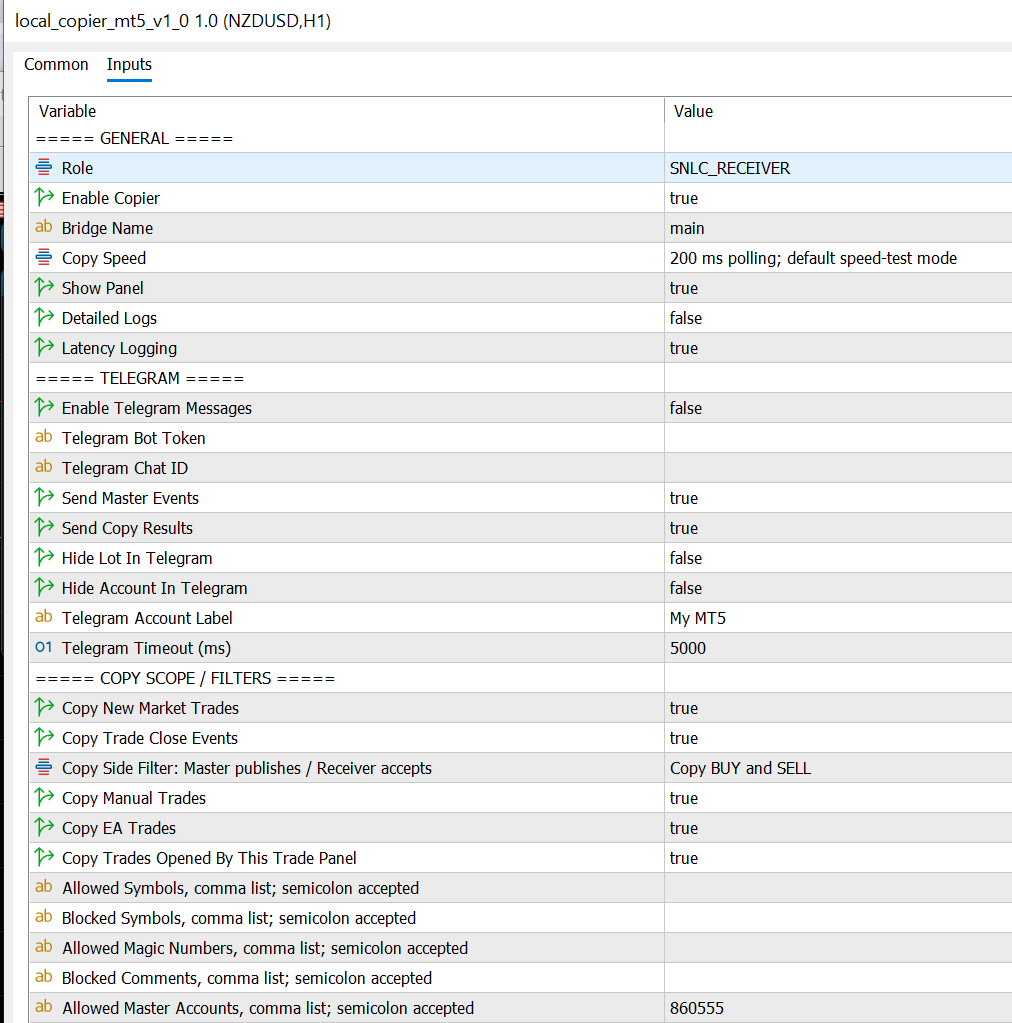
5. Receiver Setup
The Receiver terminal copies allowed trades from the bridge.
In the Receiver terminal Inputs, set:
- Role = Receiver
- CopierEnabled = true
- BridgeName = the same bridge name used by the Master
- AllowedMasterAccounts = the Master login, preferably login@server
AllowedMasterAccounts is strongly recommended for live use. It tells the Receiver which Master account is allowed to control copying.
Example:
860555@Broker-Server or 860555
If the master filter is empty, the Receiver may accept compatible events from the same bridge. This can be useful during testing, but it is not recommended for production use.
6. BridgeName Explained
BridgeName is the local copier channel. The Master and Receiver must use the same BridgeName to communicate.
Examples:
- main - default copier group
- gold - separate copier group for gold strategy
- prop1 - separate copier group for a specific account setup
Do not use the same BridgeName for unrelated Masters unless the Receiver is intentionally configured to accept them.
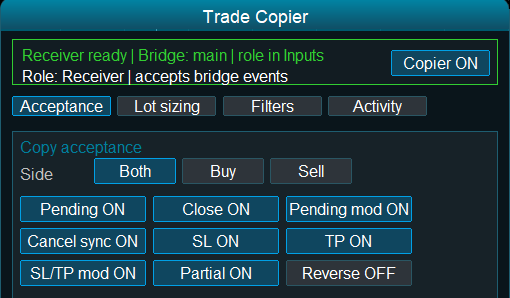
7. Copy Acceptance Settings
The Receiver can choose which event types it accepts from the bridge.
The Copier tab contains runtime controls such as:
- Side - accept both directions, BUY only or SELL only
- Pending - allow pending orders
- Close - allow close synchronization
- Pending mod - allow pending order modifications
- Cancel sync - allow pending order cancellation sync
- SL - copy stop loss
- TP - copy take profit
- SL/TP mod - copy later SL/TP changes
- Partial - copy partial closes
- Reverse - copy in the opposite direction
Runtime buttons change the active session. For permanent defaults, set the values in Inputs.
8. Reverse Copying Warning
Reverse copying is dangerous if enabled by mistake.
When Reverse is ON:
- Master BUY opens Receiver SELL
- Master SELL opens Receiver BUY
This is not normal mirror copying. Use Reverse only when the Receiver is intentionally meant to trade the opposite direction.
Copied SL/TP can also become invalid after direction reversal. A stop level that was valid for a Master BUY may be invalid for a reversed Receiver SELL. If you use Reverse mode, check SL/TP behavior carefully or disable SL/TP copying for that test.
For normal copy behavior, keep Reverse OFF.
9. Symbol Mapping
Different brokers may use different names for the same instrument. For example:
- EURUSD
- EURUSDm
- EURUSD.pro
- XAUUSD
- GOLD
The copier can map symbols automatically when the symbols are clearly equivalent. You can also use manual mapping when needed.
Use the Map tab to review mapping status, pending approval and accepted mappings.
For most Forex symbols, automatic mapping is usually enough. For metals, indices, futures and broker-specific instruments, always check the contract details before accepting a match.
If automatic mapping selects the wrong receiver symbol, use manual mapping.
Manual map format:
Source=Receiver;Source2=Receiver2
Example:
XBRUSD=Brent

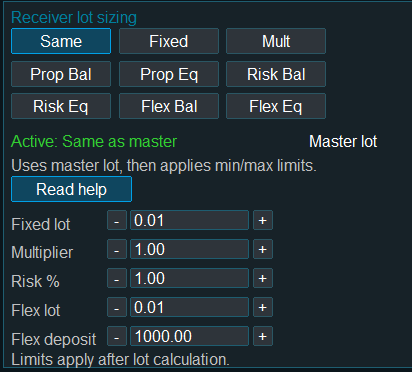
10. Lot Sizing
The Receiver decides the final copied lot size. This is important because different accounts can have different balance, leverage, symbol limits and risk settings.
Available lot sizing modes include:
- Same - copy the master lot directly, subject to receiver broker limits
- Fixed - always use a fixed receiver lot
- Multiplier - multiply the master lot by a receiver-side coefficient
- Balance proportional - scale lot by receiver balance compared with master value
- Equity proportional - scale lot by receiver equity compared with master value
- Risk % - calculate lot using risk settings when valid SL and symbol specifications are available
- Flex - scale lot using receiver-side lot and deposit-size settings
You can also set minimum and maximum receiver lots. Depending on the selected action, out-of-range lots can be clamped to the allowed range or blocked.
For the first test, use a simple lot mode such as Same, Fixed or Multiplier.
11. Filters and Safety Settings
Receiver filters help control which events are accepted.
Common filters include:
- AllowedMasterAccounts - accept only selected Master accounts
- AllowedSymbols - accept only selected symbols
- BlockedSymbols - block selected symbols
- AllowedMagicNumbers - accept only selected magic numbers
- BlockedComments - block trades matching selected comments
- CopySideFilter - accept BUY only, SELL only or both
The copier also includes protections such as:
- same-account copying protection
- copied-trade loop protection
- symbol trade-mode checks
- lot size validation
- broker retcode reporting
For live use, the most important safety setting is AllowedMasterAccounts.
12. Startup and Reconnect Behavior
For normal safety, old trade history should not create surprise new receiver trades.
By default, CopyCurrentTradesOnStart is OFF. This means the Receiver does not automatically copy all existing Master positions when it starts.
Recommended startup order:
- Start the Master terminal first.
- Make sure the Master is online and publishing current status.
- Start the Receiver terminal.
- Check the Summary and Log tabs.
If the Receiver starts before the Master, it may wait until fresh Master status is available. After reconnect, the Receiver checks current Master status before cleaning old copied trades.
This behavior is designed to avoid old offline data causing unexpected receiver actions.
13. Telegram Alerts
The copier can send Telegram alerts for Master events, copy results, skipped actions, errors and warnings.
Telegram bot creation is covered in a separate guide:
Telegram bot creation and setup guide
After creating the bot and Chat ID, configure:
- TelegramEnabled
- TelegramBotToken
- TelegramChatId
- TelegramSendMasterEvents
- TelegramSendCopyResults
In MT5, add this URL to allowed WebRequest URLs:
You can also use privacy options to hide lot size or account details in Telegram messages.
14. Copier Log
The Log tab is the first place to check when something does not copy as expected.
The log can show:
- copied trades
- skipped events
- warnings
- errors
- broker rejection reasons
- validation results
- system messages
If a trade is not copied, check the Log tab before changing settings. The reason is usually visible there: wrong bridge, blocked master, symbol issue, lot issue, market closed, invalid stops or trading permission disabled.
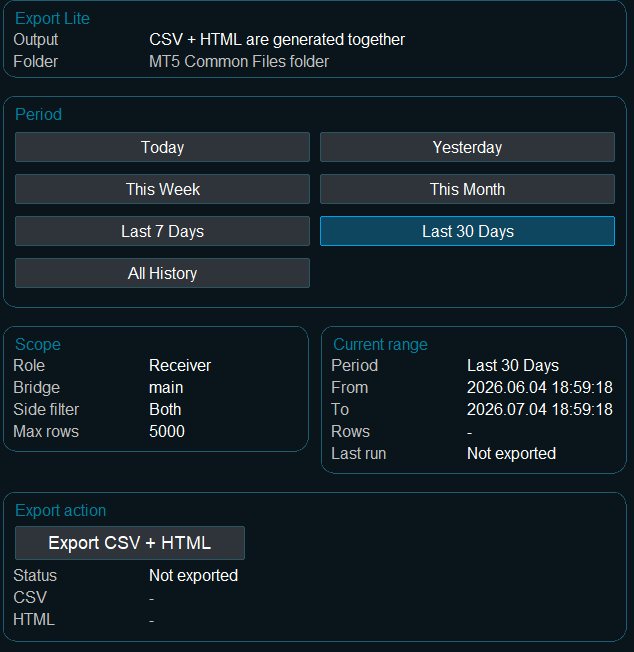
15. Export Module
The Export tab can generate CSV and HTML reports from copier activity.
You can export selected periods such as:
- Today
- Yesterday
- This Week
- This Month
- Last 7 Days
- Last 30 Days
- All History
Export can be useful for review, reporting, account comparison and checking copied trade history.
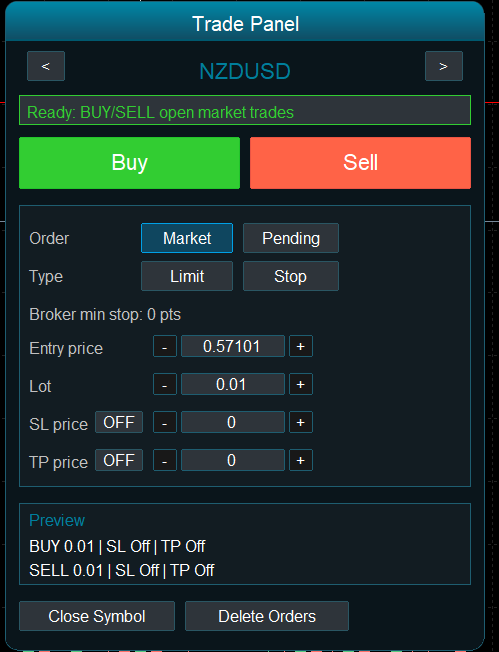
16. Trade Panel
The Trade Panel allows opening and managing trades directly from the copier interface.
The Trade Panel uses only instruments that are available for trading in Market Watch. If a symbol is disabled or close-only, the panel should not allow new open trades for that symbol.
Before using the Trade Panel, check:
- selected symbol
- lot size
- SL and TP settings
- pending order mode if enabled
- broker minimum stop distance
Trade Panel trades can also be controlled by the copier settings if you allow or block Trade Panel source trades.
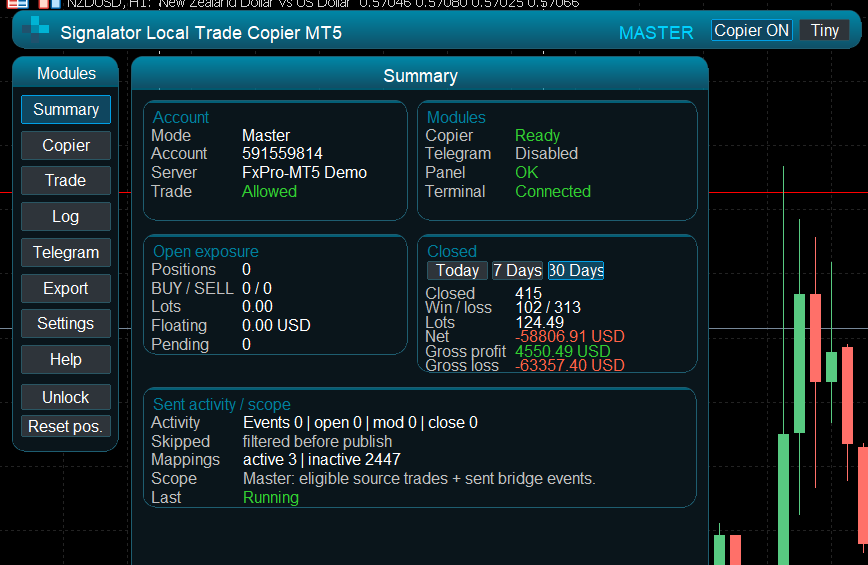
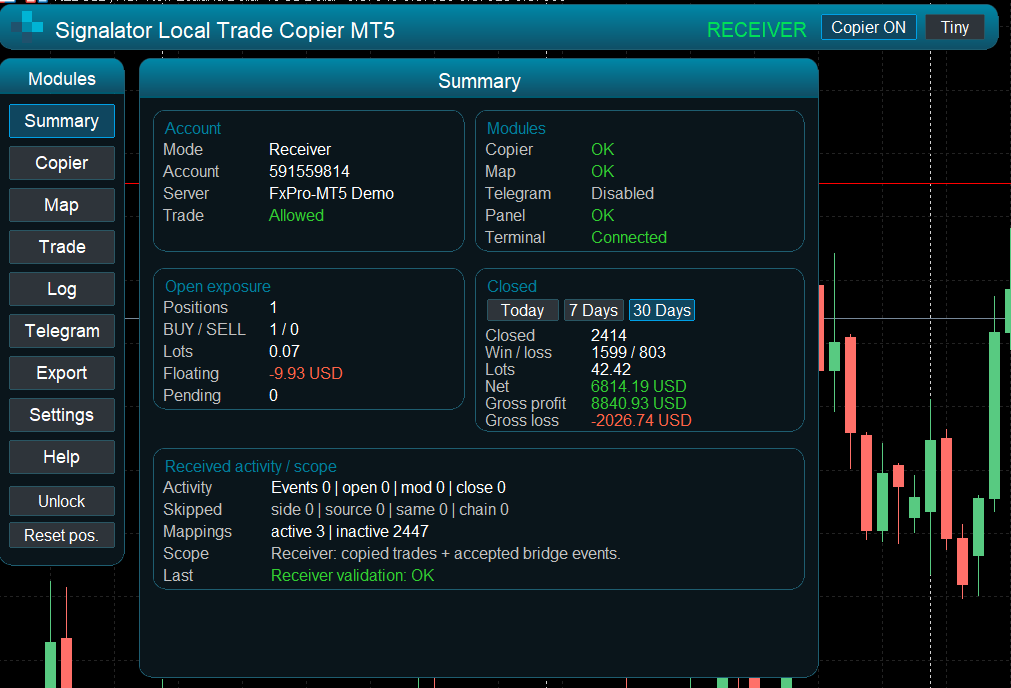
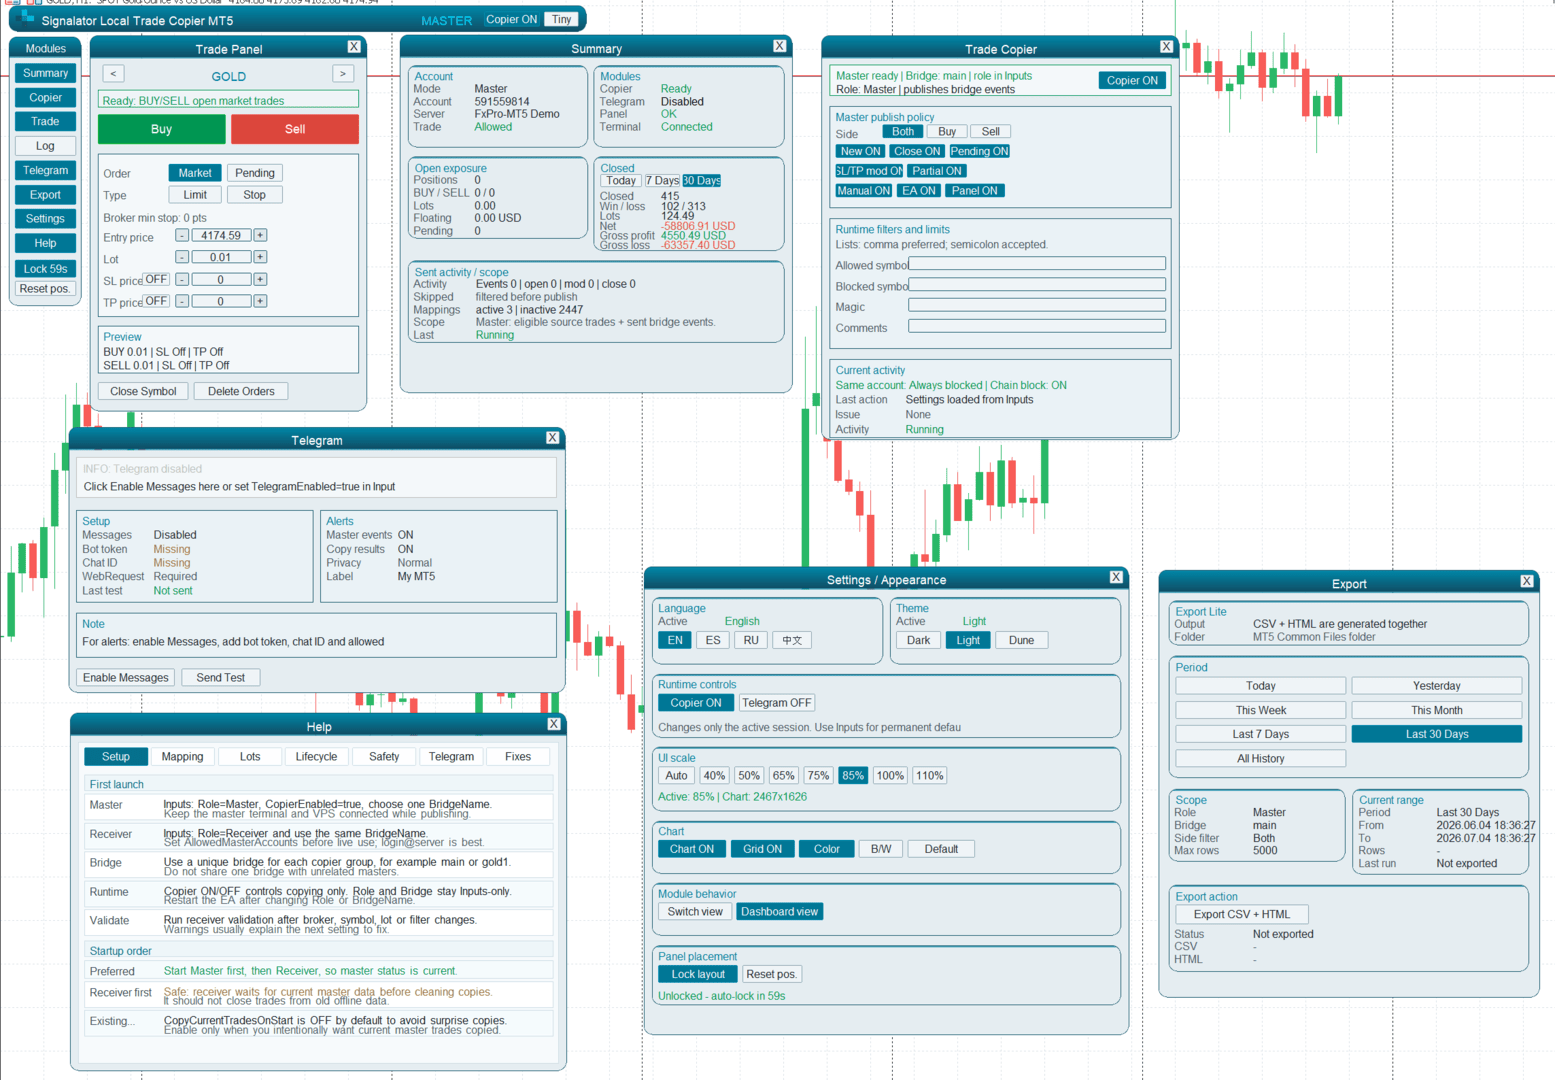
17. Interface Overview
The chart panel contains several modules:
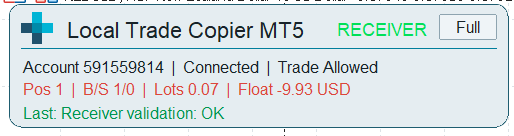
- Summary - account, module status, open exposure and latest activity
- Copier - copy acceptance, lot sizing, filters and activity controls
- Map - symbol mapping status and approvals
- Trade - optional trade panel
- Log - copied, skipped, warning, error and system events
- Telegram - Telegram status and test controls
- Export - CSV and HTML export
- Settings - language, theme, UI scale and layout controls
- Help - built-in help notes
The interface supports Dark, Light and Dune themes, multiple UI scale levels and several languages.
Some runtime controls affect only the current session. For permanent defaults, change the EA Inputs.
18. Display, Themes, Languages and Tiny Mode
The copier interface can be adjusted for different chart sizes, monitor resolutions and working styles.
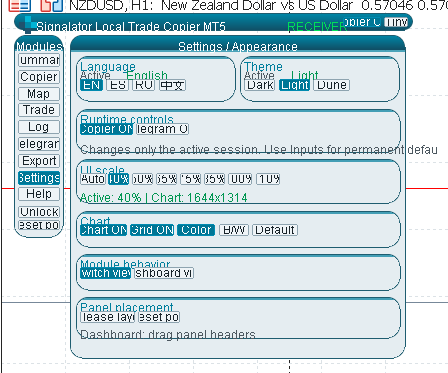
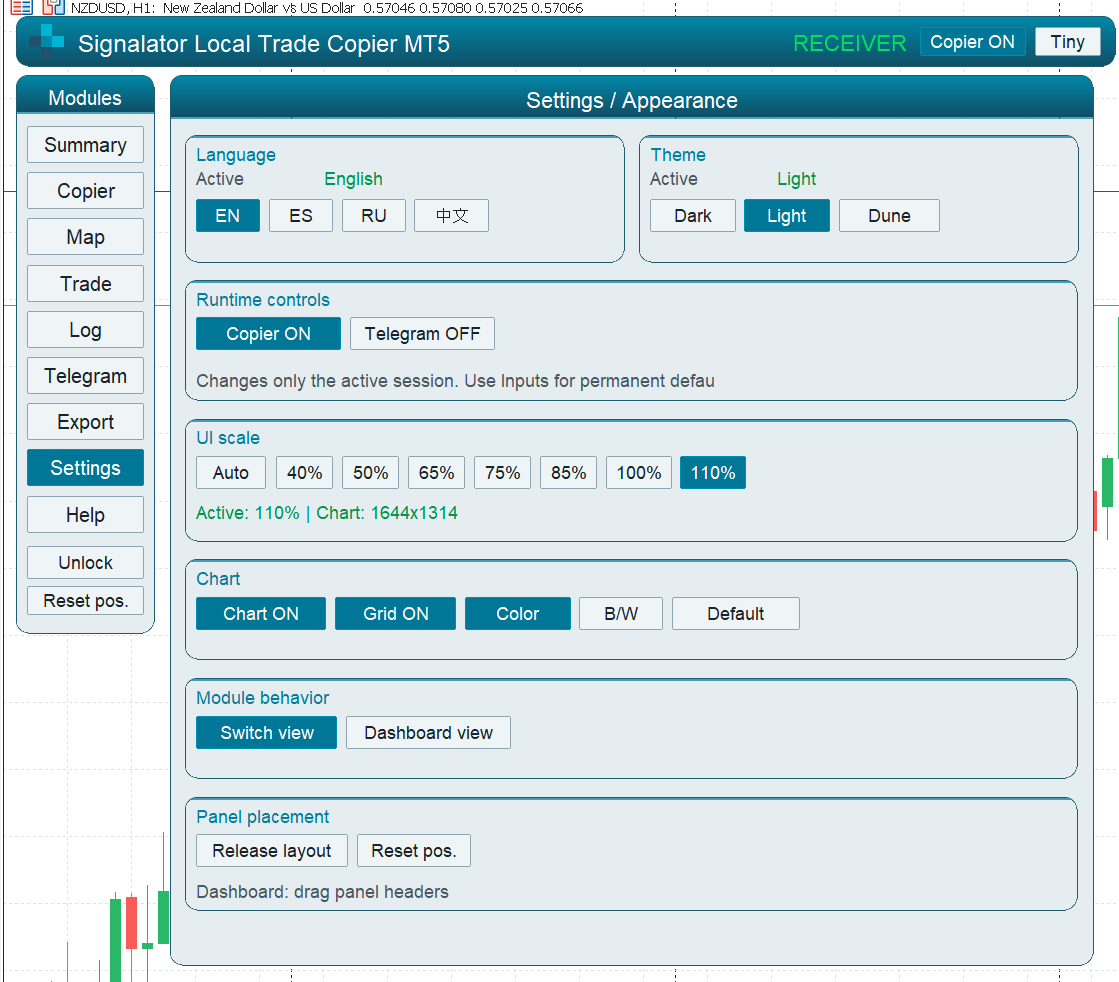
The Settings tab contains the main display options:
- Language
- Theme
- UI Scale
- Tiny mode
- Dashboard and layout controls
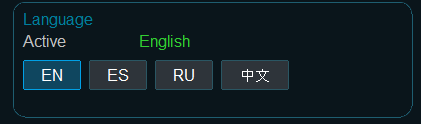
Language
The interface can be switched between the available built-in languages from the Settings tab.
- Use the Language control to select the required interface language.
- Most panel labels update directly after changing the language.
- If any text does not refresh immediately, reload the EA or reopen the chart.
Theme
The copier includes several visual themes for different chart backgrounds and screen preferences.
- Dark - recommended for dark MT5 charts.
- Light - recommended for light chart backgrounds.
- Dune - softer warm theme for long screen use.
Theme changes affect only the panel appearance. They do not change copying logic, bridge settings, lot sizing, filters or trading permissions.

UI Scale
UI Scale changes the size of the panel, buttons, text and spacing.
Available scale values may include Auto and fixed percentage values such as 40%, 50%, 65%, 75%, 85%, 100% and 110%, depending on the build.
- Auto lets the copier choose a suitable scale based on the current chart size.
- Use smaller scale values on small VPS screens or narrow chart windows.
- Use larger scale values when readability is more important than compact layout.
Tiny Mode
Tiny mode is a compact display mode for limited screen space.
Use Tiny mode when you want to keep the copier running on a small chart while still seeing key status information.
- Useful for VPS screens with low resolution.
- Useful when several MT5 terminals are visible at the same time.
- Useful when the copier should stay attached without covering the chart.
- Useful for monitoring status after the main setup is complete.
Tiny mode does not change copier behavior. It only changes how the panel is displayed.
If a setting is not visible in Tiny mode, switch back to the full dashboard or Settings view, change the setting, then return to Tiny mode.
Recommended Display Setup
- For first configuration, use the full dashboard at 85% or 100% scale.
- After setup is complete, use Auto scale or Tiny mode for compact monitoring.
- For screenshots, support requests or troubleshooting, use the full dashboard so all important controls are visible.
Dashboard Mode
Dashboard mode is a flexible workspace view where copier panels can be opened as separate movable blocks.
Instead of working only inside one fixed tab area, Dashboard mode lets you arrange important modules side by side on the chart.
- Drag panels to place them where you want on the chart.
- Place several panels side by side for easier monitoring.
- Keep Summary, Copier, Map, Log or Telegram information visible at the same time.
- Use it when you want to monitor the copier without constantly switching tabs.
For example, you can keep the Summary panel on the left, the Copier controls in the center and the Log panel on the right.
Dashboard layout is useful when several copier functions must be visible at once, especially during testing, troubleshooting or multi-terminal monitoring.
Moving dashboard panels does not change copier logic. It only changes how the interface is arranged on the chart.
Dashboard View Button
The Dashboard View button switches the interface into the movable dashboard workspace.
- Use it when you want to see several copier modules at the same time.
- Use it to arrange panels side by side.
- Use it for monitoring, setup checks and troubleshooting.
The Dashboard View button does not reset the copier, does not delete mappings and does not change bridge, lot sizing or trading settings.
Switch Mode
Switch Mode changes how the copier interface is displayed.
- Use the normal tab view when you want a clean single-panel interface.
- Use Dashboard mode when you want movable panels placed side by side.
- Use Tiny mode when you want the smallest monitoring view.
If a setting or module is not visible in the current display mode, switch back to the normal tab view or Dashboard mode.
Switch Mode changes only the interface layout. It does not enable or disable copying by itself.
19. Recommended First Test
Use demo accounts and a very small lot size.
- Start the Master terminal.
- Start the Receiver terminal.
- Confirm both use the same BridgeName.
- Confirm the Receiver allows the Master account.
- Open a small BUY trade on the Master.
- Check that the Receiver copies a BUY trade.
- Modify SL/TP on the Master.
- Check whether the Receiver follows the change.
- Close the Master trade.
- Confirm the Receiver closes its linked copy.
- Check the Log tab for copied and skipped events.
After this, test pending orders, partial close, Telegram and export only if you plan to use those features.
20. Common Problems
No trade is copied
- Check that both terminals use the same BridgeName.
- Check that Copier is ON.
- Check that the Receiver role is set correctly.
- Check AllowedMasterAccounts.
- Check the Log tab.
Receiver opens the opposite direction
- Check whether Reverse is ON.
- Reverse ON means Master BUY becomes Receiver SELL.
- For normal copying, turn Reverse OFF.
Order rejected
- Check broker retcode in the Log tab.
- Check symbol trading permission.
- Check lot size limits.
- Check market open/closed status.
- Check SL/TP minimum stop distance.
SL/TP rejected
- SL or TP may be too close to market price.
- The receiver broker may have different stop-level rules.
- If Reverse is ON, copied SL/TP may be invalid after direction flip.
Symbol not mapped
- Open the Map tab.
- Check pending approvals.
- Add manual mapping if needed.
- Confirm the receiver symbol is available and tradable.
Telegram not sending
- Check TelegramEnabled.
- Check Bot Token and Chat ID.
- Add https://api.telegram.org to MT5 allowed WebRequest URLs.
- Use the Telegram test button.
Receiver started before Master
- Start Master first when possible.
- Wait until fresh Master status is available.
- Check Summary and Log for current status.
21. Practical Notes
- Use one BridgeName per copier group.
- Use AllowedMasterAccounts for live setups.
- Test symbol mapping before live copying.
- Use small lots during setup.
- Keep Reverse OFF unless you intentionally need opposite-direction copying.
- Check the Log tab when anything is skipped or rejected.
- Use demo first, then move to live only after confirming the full workflow.
Signalator Local Trade Copier MT5 is designed to give clear control over local MT5 copying: what is copied, which Master is accepted, how symbols are mapped, how lots are sized and how copy results are monitored.
22. Part of the Signalator Ecosystem
Signalator Local Trade Copier MT5 is part of the wider Signalator ecosystem for MetaTrader tools, trade automation support and trader infrastructure.
The ecosystem is designed around practical trading operations such as:
- local multi-terminal trade execution and copying
- instant trade notifications
- account and trade summary utilities
- Telegram reporting and monitoring workflows
- licensing and user access management
- tools for product delivery, trader support and account supervision
The purpose of Local Trade Copier MT5 is to provide controlled local copying between your own MT5 terminals, while fitting into a broader Signalator workflow for monitoring, reporting and managing trading tools.
This means the copier can be used as a standalone local MT5 copier, but it can also work as one part of a larger Signalator setup where trade execution, alerts, reports and user management are handled together.


