

NT Trade Manager is a graphical trading panel for MetaTrader 5. It attaches to a chart, and through its UI you open and close trades, manage risk, set up automatic partial-close, breakeven, and trailing-stop rules, keep a news calendar, set alarms, and save settings profiles. This article is a general tour of the product: you'll get a complete picture of what it can do and learn where to find in-depth coverage of individual subsystems.
Table of Contents[Useful Links & Other Articles]
- [Useful Links & Other Articles]
- [Introduction]
- [Installation & First Launch]
- [Interface Tour]
- [Trade Tab]
- [Close Tab]
- [Settings Tab]
- [Info Tab]
- [Grid Tab]
- [Subwindows]
- [Profiles: Save & Load]
- [Quick Parameter Reference]
- [FAQ & Troubleshooting]
- [What's Next]
Useful Links & Other Articles
- Free demo for testing on a demo account — [Installation & quick start]
- NT Trade Manager MT4 on mql5.com Market — [PRODUCT_LINK]
- NT Trade Manager MT5 on mql5.com Market — [PRODUCT_LINK]
Introduction
NT Trade Manager is built for active retail traders who feel constrained by the standard MT5 Order Form. The panel sits right on the chart and solves three everyday tasks of manual trading: calculating risk before every trade, keeping discipline while managing an open position, and switching quickly between tasks (open, close, adjust the SL, park an order until a news release) without diving into terminal windows.
Key features of the panel:
- RR Tool — three draggable lines (Entry, SL, TP) right on the chart. You place them with the mouse, and the lot is calculated automatically according to the chosen risk mode.
- Three risk modes — a percentage of the balance, a fixed amount in the account currency, or a fixed lot. Switch between them with a single click on the pill selector.
- Per-order Partial / Breakeven / Trailing settings — every open position carries its own auto-close rules, which don't overlap with the global defaults and aren't lost when the EA restarts.
- Virtual SL/TP — protection against stop-hunting: the levels are stored inside the EA and never sent to the broker.
- 5 tabs and 10 subwindows — a whole control layer over the terminal: price/time/line alarms, an economic calendar, a task scheduler, and settings profiles.
This article is an overview. If you need in-depth coverage of specific subsystems, it is split into four follow-up articles: Risk Management, Smart Closing, Visual Trading, and Grid Trading.

Installation & First Launch
The panel is an Expert Advisor (an .ex5 file). Installation is standard for MT5.
Step 1. Install the product from mql5.com Market. The panel is distributed only through mql5.com Market — it is a protected product, and the license is tied to your MQL5 account (a limited number of activations across terminals). For the terminal to see the license, sign in to your account: `Tools → Options → Community`, and enter your MQL5 login and password. After buying or renting, open the `Market` tab in the terminal (the `Toolbox` panel at the bottom), go to the `Purchased` section, and click `Install` next to NT Trade Manager. The product downloads and appears in the `Navigator` window under `Expert Advisors → Market`.
Step 2. Drag the EA onto a chart. Open a chart for the symbol you plan to trade and drag NT Trade Manager from the Navigator onto it. The EA properties window opens, with the `Common` and `Inputs` tabs.
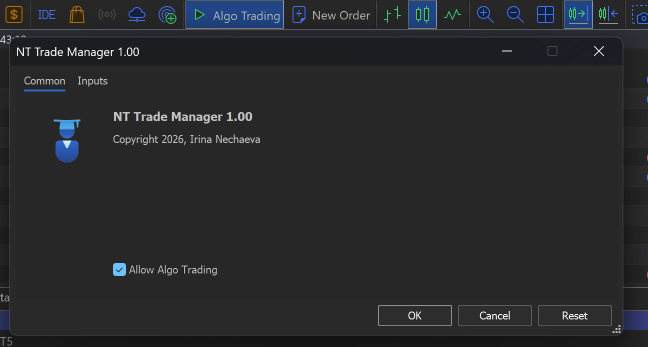
Step 3. Check the permissions. On the `Common` tab, make sure the following are enabled:
- `Allow Algo Trading` — without it the panel can't open trades
- In the MT5 toolbar, the `AutoTrading` button must be green (a single permission shared by all EAs)
Step 4. Magic Number. On the `Inputs` tab, find the `Magic Number` parameter. This number is attached to every trade opened through the panel and is used for filtering. If you plan to run several copies of the EA on one account, give each its own unique Magic Number — otherwise they will see and close one another's trades.
Step 5. Click OK. Once you confirm, the panel appears on the left side of the chart. If the AutoTrading indicator in the top-right corner of the chart is red or crossed out, algo trading isn't enabled yet. Check the `AutoTrading` button in the terminal's top menu.
Interface Tour
The panel is docks to the left edge of the chart. Structurally it is divided into four zones.
Header — the top strip. It holds the product name, a button to collapse to compact mode, and a button to close the panel. You can grab the Header with the mouse and drag it — the whole panel moves with the cursor. This is handy when you need to free up part of the chart for analysis.
Symbol Bar — a narrow strip below the header. It contains:
- ◀ ▶ arrows for quickly switching symbols without opening the Symbol Switcher
- the current symbol name (clickable — opens the Symbol Switcher)
- the time and spread
- a countdown to the nearest economic news event (clickable — opens the Economic Calendar)
- 4 quick-access icons: alarms (bell), task scheduler (clock), show/hide chart overlays (eye), screenshot (camera)
Tabs — five tabs: `TRADE`, `GRID`, `CLOSE`, `SET`, `INFO`. The active one is highlighted with an accent color and an underline.
Body — the contents of the active tab. It changes as you switch tabs.
Besides the panel itself, subwindows also appear during use — separate floating windows. They open on specific actions (clicking `Edit` on a trade, opening the Alarm Manager, and so on) and can also be dragged with the mouse. For more, see [Subwindows](#subwindows).
If you need to temporarily move the panel out of the visible area, click the minimize button in the header. The panel collapses to a compact indicator. To bring back the full view, click the indicator.
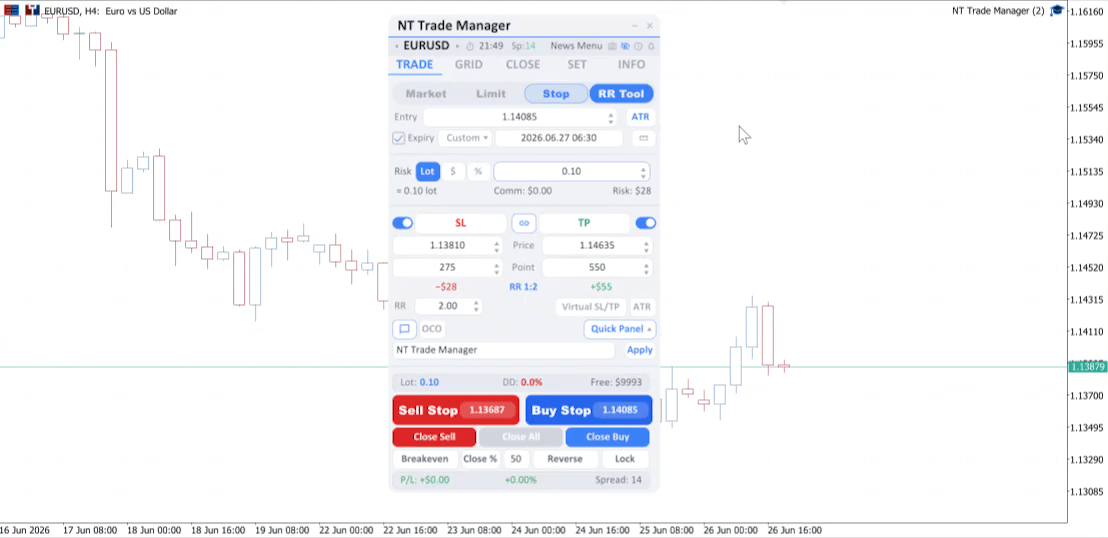
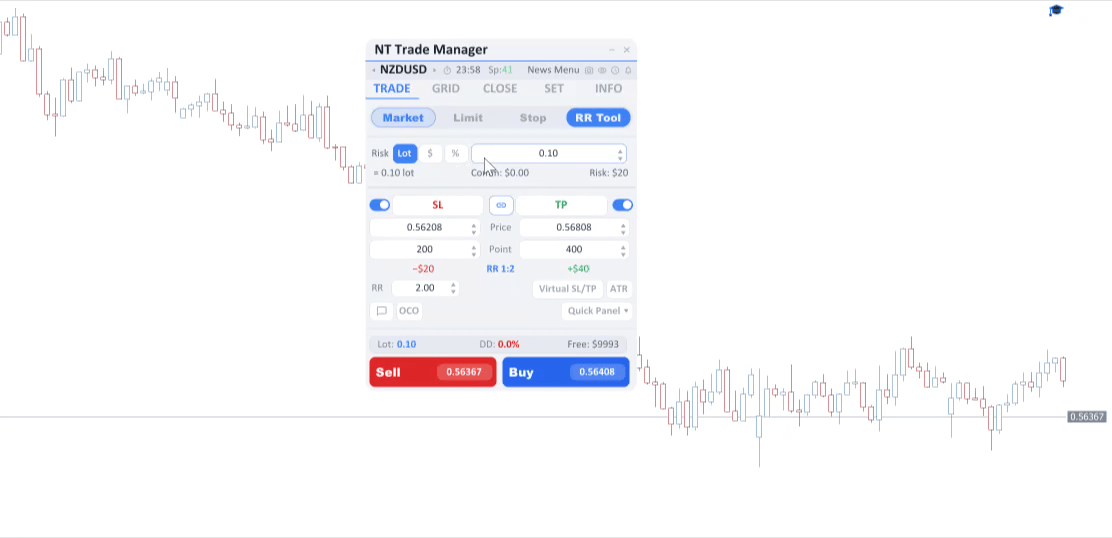
Trade Tab
The main tab for opening new trades. Here you choose the order type, risk mode, and SL/TP, set any extra options, and then click Buy or Sell.
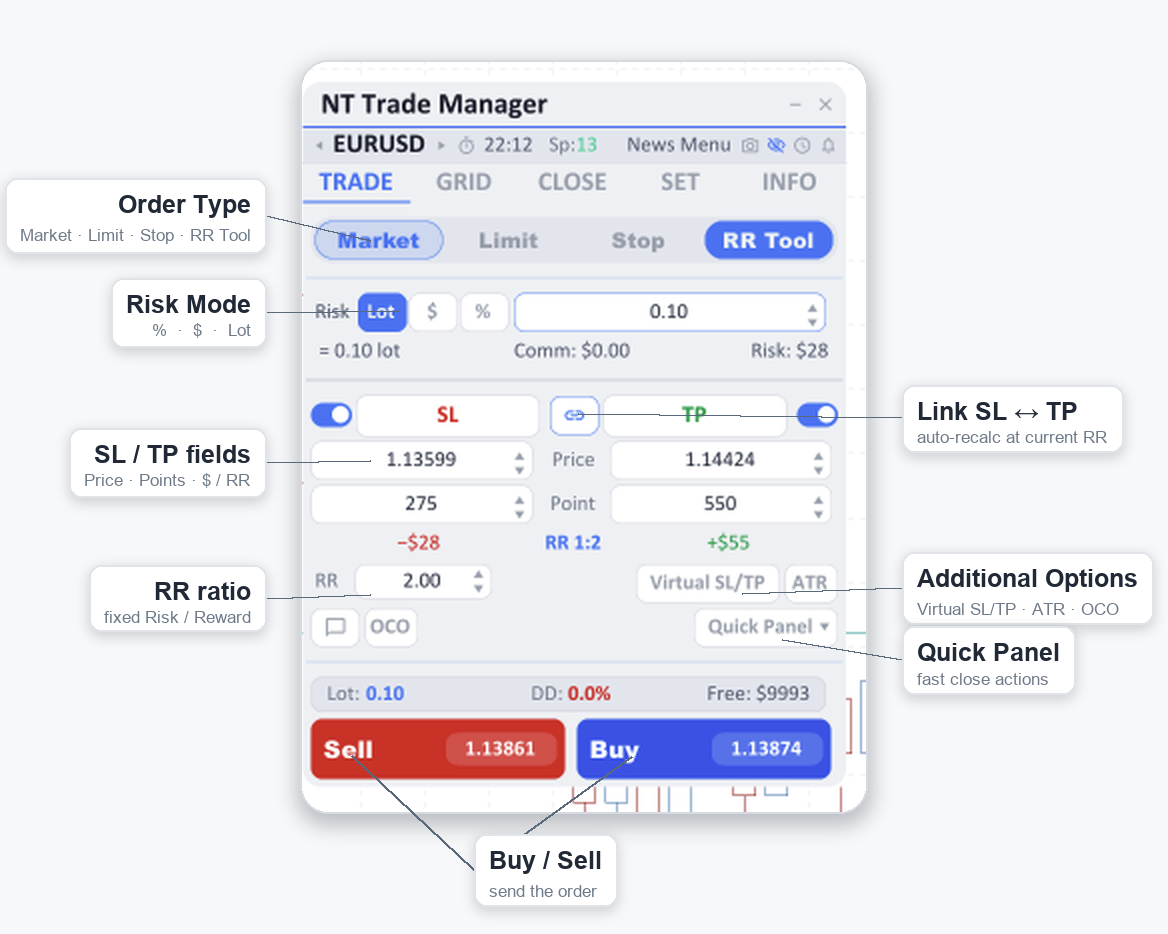
Order Type
At the top of the tab is a pill selector with four options:
- Market — a market order, executed at the current price
- Limit — a pending limit order (Buy Limit below the current price, Sell Limit above)
- Stop — a pending stop order (Buy Stop above the current price, Sell Stop below)
- RR Tool — a visual mode: instead of typing numbers, you drag the Entry, SL, and TP lines right on the chart
Market, Limit, and Stop switch between one another like ordinary options. RR Tool works separately — it is not an alternative to market mode but a visualization layer on top of any order type. The full breakdown of the RR Tool is in Deep Dive 3: Visual Trading.
When you select Limit or Stop, extra fields appear: the entry price (`Entry`) and an Expiry block with presets for the pending order's lifetime (Custom, 1 hour, 4 hours, End of day, 1 week).
Besides ordinary Limit and Stop orders, Stop-Limit is also supported — a combined pending order with two prices (the activation trigger and the limit execution price).
Risk Mode
On the `Risk` line is a pill selector with three modes:
- % — risk is set as a percentage of the balance (or equity / free margin — configured separately)
- $ — risk is set as a fixed amount in the account currency
- Lot — the lot is specified directly, without calculation from risk
Below the field is a substring with the calculations: the computed lot, the commission, and the amount at risk. This lets you see the financial consequences of any change before you click Buy/Sell.
An in-depth breakdown of lot calculation, how switching between % / $ / Lot affects the Inc/Dec steps, and the broker edge cases is in Deep Dive 1: Risk Management.
SL and TP
A symmetric section with two sides — SL on the left, TP on the right. Each side has an enable toggle and three rows of data:
- Price — the absolute price of the level
- Points — the distance in points from the Entry
- Dollar + RR — the calculated loss in the account currency (for SL), the profit (for TP), and the overall Risk/Reward ratio in the center
Between the sides is a `chain` icon. When the link is on, changing the SL automatically recalculates the TP at the current RR — and vice versa. This is convenient when you keep a fixed RR (for example, 1:2) and change only one side. When the link is off, the SL and TP are independent.
On the `RR` line below the section is an editable ratio field. Changing it moves the TP line proportionally to the SL, with no manual recalculation.
Additional Options
At the bottom of the tab are three toggles:
- Virtual SL/TP — when on, the SL and TP are not sent to the broker but kept inside the EA. The prices are tracked tick by tick, and when one is touched the EA closes the position itself. This protects against situations where the broker "takes out" stops with a brief spike. For more, see Deep Dive 1.
- ATR — opens a popup that previews the SL/TP calculated from the formula `SL = ATR × multiplier`, `TP = SL × RR`. Clicking Apply transfers the result into the Trade tab's Pip fields.
- OCO — when one order in a pair is triggered, the other is canceled automatically. Each OCO pair is created explicitly through the OCO Manager; there is no global default toggle.
The Comment button expands a hidden comment field — whatever you put there goes into the Order Comment when the trade is sent.
Quick Panel
At the bottom of the Trade tab is a Quick Panel button with an expandable layer of quick actions: Close Sell / Close All / Close Buy, Breakeven, Close N%, Reverse, Lock. It is a fast alternative to switching to the Close tab — the actions apply to the current symbol. For more, see Deep Dive 3.
Buy and Sell
Two large buttons at the bottom. In Market mode they read `Buy` / `Sell`, in Limit mode `Buy Limit` / `Sell Limit`, in Stop mode `Buy Stop` / `Sell Stop`, and in Stop-Limit mode `Buy Stop-Limit` / `Sell Stop-Limit`.
If `Confirm before trade` is enabled in the settings (on by default), a modal window with a summary appears before the order is sent: type, lot, SL, TP, risk. Cancel dismisses it without sending. It is a safeguard against accidental clicks.
RR Tool — Opening a Trade by Dragging
When the RR Tool option is active in the pill selector, three lines appear on the chart: Entry, SL, and TP. By dragging them with the mouse, you define the entire trade without typing numbers. The lot is recalculated automatically according to the chosen risk mode, and the RR and Dollar values update on the fly.
The full breakdown of the RR Tool, including the lock icons, reverse behavior, and edge cases, is in Deep Dive 3: Visual Trading.
Close Tab
Managing already-open positions and pending orders.

Scope Selector
At the top of the tab is a `This Symbol | All Symbols` pill selector plus a separate `Other EAs` checkbox. These three options work together:
- This Symbol — operations apply only to the current symbol
- All Symbols — operations apply to all positions opened by this panel
- Other EAs — when on, positions opened by other EAs or by hand are also included (that is, the Magic Number filter is turned off)
This is critical: by default NT Trade Manager works only with its own trades. If another EA is trading on your account, or you have positions opened through the standard Order Form, they are not touched — until you explicitly enable `Other EAs`.
Viewing Positions
The tab has two modes:
- All Positions — a summary view: three rows (Buy / Sell / Net) with the total P/L, percentage, lot, position count, and a Close button for each row.
- Single Ticket — the selected position is shown enlarged: open price, SL, TP, swap, and Close and Edit buttons. Edit opens the Edit Order subwindow, where you can change the SL/TP and set up partial and breakeven for this specific position.
You switch modes through the ticket dropdown at the top of the tab.
Close Buttons
In the All Positions view:
- Close Buy — close all Buy positions in the selected scope
- Close Sell — close all Sell positions
- Close All— close everything
- Close Profit — close only the profitable ones
- Close Loss — close only the losing ones
Below the main buttons is a `Close %` field with an increment: you specify a percentage (for example, 50), click Close %, and the specified share of each position's lot is closed.
Deleting Pending Orders
The `Positions / Pending` switch at the top changes the mode. In Pending mode the following are available:
- deletion by type (Del Buy Stop, Del Buy Limit, Del Sell Stop, Del Sell Limit)
- combined buttons (Delete All Stops, Delete All Limits, Delete All Pending)
The number in parentheses on each button shows the current count of pending orders of that type in the scope.
Confirm Before Close
If `Confirm before close` is enabled in the General settings, a modal dialog appears before a direct close. It is a second line of defense against accidental clicks.
Settings Tab
Three sub-tabs: `RISK`, `MANAGE`, `GENERAL`.
RISK sub-tab

Loss and profit limits:
- Max Daily Loss (% or $)
- Max Daily Profit (% or $)
- Max Weekly Loss
- Max Monthly Loss
Trading restrictions:
- Max Trades / Day
- Max Trades / Hour
- Max Allowed Lot — per individual trade
- Max Spread — blocks order submission if the current spread is above the specified value
The type of any limit (% or $) is switched by clicking the corresponding cell.
When a limit is hit, Breach Actions run — a separate scenario you configure in the subwindow of the same name (close all, delete pending, send a notification). The full breakdown of Risk and Breach Actions is in Deep Dive 1: Risk Management.
MANAGE sub-tab

Global defaults for the auto-close and position-maintenance subsystems:
- Auto Breakeven — trigger (RR or Points), offset, optional lock profit with commission compensation
- Trailing Stop — a choice of one of six types (Points, ATR, Moving Average, High/Low Bar, Fractals, Parabolic SAR) and its parameters (opened with the Configure Trail button)
- Auto Partials — partial closes by TP levels (up to five) and SL levels (up to five)
- Auto Screenshot — automatic screenshots on specified events
- Notifications — notification channels (Alert, Sound, Push, Email)
Below the subsystems are two split buttons: **Breakeven Now** and **Close N%**. A body click applies the action to the current scope (by default, only the current symbol); the `▼` arrow opens a scope-selection menu (All open positions / Current symbol only). This is a safe pattern: the default is a narrow scope, and widening it is an explicit choice.
A detailed breakdown of Partial / Breakeven / Trailing is in Deep Dive 2: Smart Closing.
GENERAL sub-tab

Basic EA settings:
- Measurement — units for SL/TP/Entry in the UI (Points or Pip)
- Theme — color scheme (5 options: Arctic, Graphite, Pearl, Amber, Slate)
- Language — interface language (Auto, English, Русский, Deutsch, Français, Español, Italiano)
- Slippage — allowed price deviation for market orders (in points)
- EA Comment — the text written into the Order Comment
- Confirm before trade — a modal confirm before every Buy/Sell
- Line width — the thickness of the Entry / SL / TP / Partial lines on the chart
- Magnet — the snapping distance when dragging chart lines
Changing the theme or language takes effect without restarting the EA — the panel rebuilds in place.
Each sub-tab has Save Settings and Load Settings buttons — they open the same Save/Load subwindow with three profile slots. For more, see the [Profiles](#profiles-save--load) section below.
Info Tab
Statistics on your trading and account state.

At the top of the tab are two filters:
- Symbol filter — This Symbol / All Symbols / This Magic. Affects all computed values and the CSV export.
- Time filter — All Time / Today / This Week / This Month. The window for aggregating statistics.
Below the filters are three sub-tabs.
P/L
A summary of trading results:
- Net P/L and today's P/L
- A Win/Loss bar with percentages
- Average win and loss
- Profit Factor
- Expectancy
- Average RR across closed trades
- Maximum drawdown (running-peak Max Drawdown)
- Current drawdown
- Best and worst winning/losing streak
All values update once a second while the Info tab is active; when you switch to another tab, the calculations pause.
Account
Account state:
- Balance, Equity, Free Margin, Margin Level
- Open P/L and the number of open positions (in scope)
- Long Trades / Short Trades
- Largest Win / Largest Loss
- Weekly P/L
- Swap (total)
Symbol
Properties of the current symbol, regardless of the filter:
- Spread, Pip Value, Point Value
- Min Lot, Max Lot, Lot Step, Contract size
- Swap Long, Swap Short (with a color-coded sign)
At the bottom of the P/L and Account sub-tabs is an **Export CSV** button. It saves a file to `MQL5/Files/` with a detailed table of closed trades: PositionID, OpenTime, Type, Volume, Symbol, OpenPrice, ClosePrice, CloseTime, HoldTime, Commission, Swap, Profit, NetPnL, Comment. The same filter that's used for the UI display applies.
Grid Tab
Grid trading is a strategy in which you place a series of pending orders at equal price steps. When the price reaches a level, the order is activated, and an averaged position is built from several trades.

On the Grid tab you configure:
- the initial lot (`Lot Init`)
- the lot multiplier between levels (`Lot Multiplier`, e.g. 1.5 — each next order has a lot 1.5× larger)
- the maximum-lot cap (`Lot Cap`)
- the number of orders in the grid
- the step between orders, in points
- a shared TP and SL for the whole grid
- the master order's offset from the current price (if 0, the master is placed as a Market order; otherwise as a pending order)
- the direction (Buy Grid / Sell Grid) and an optional Reverse
Before launching the grid, a Preview is available — you see all the future pending orders as lines on the chart and can adjust the parameters before they are actually sent.
Grids use a separate Grid Magic Number, which does not overlap with the regular Magic Number. This separates the logic: "regular" trades and grid orders are managed independently, and Close All operations on the Close tab do not affect the grid.
The full breakdown of grid trading, volume types, the master-order concept, and broker edge cases is in Deep Dive 4: Grid Trading.
Subwindows
Besides the main panel, floating subwindows appear during work — for specific tasks and advanced settings.
Edit Order
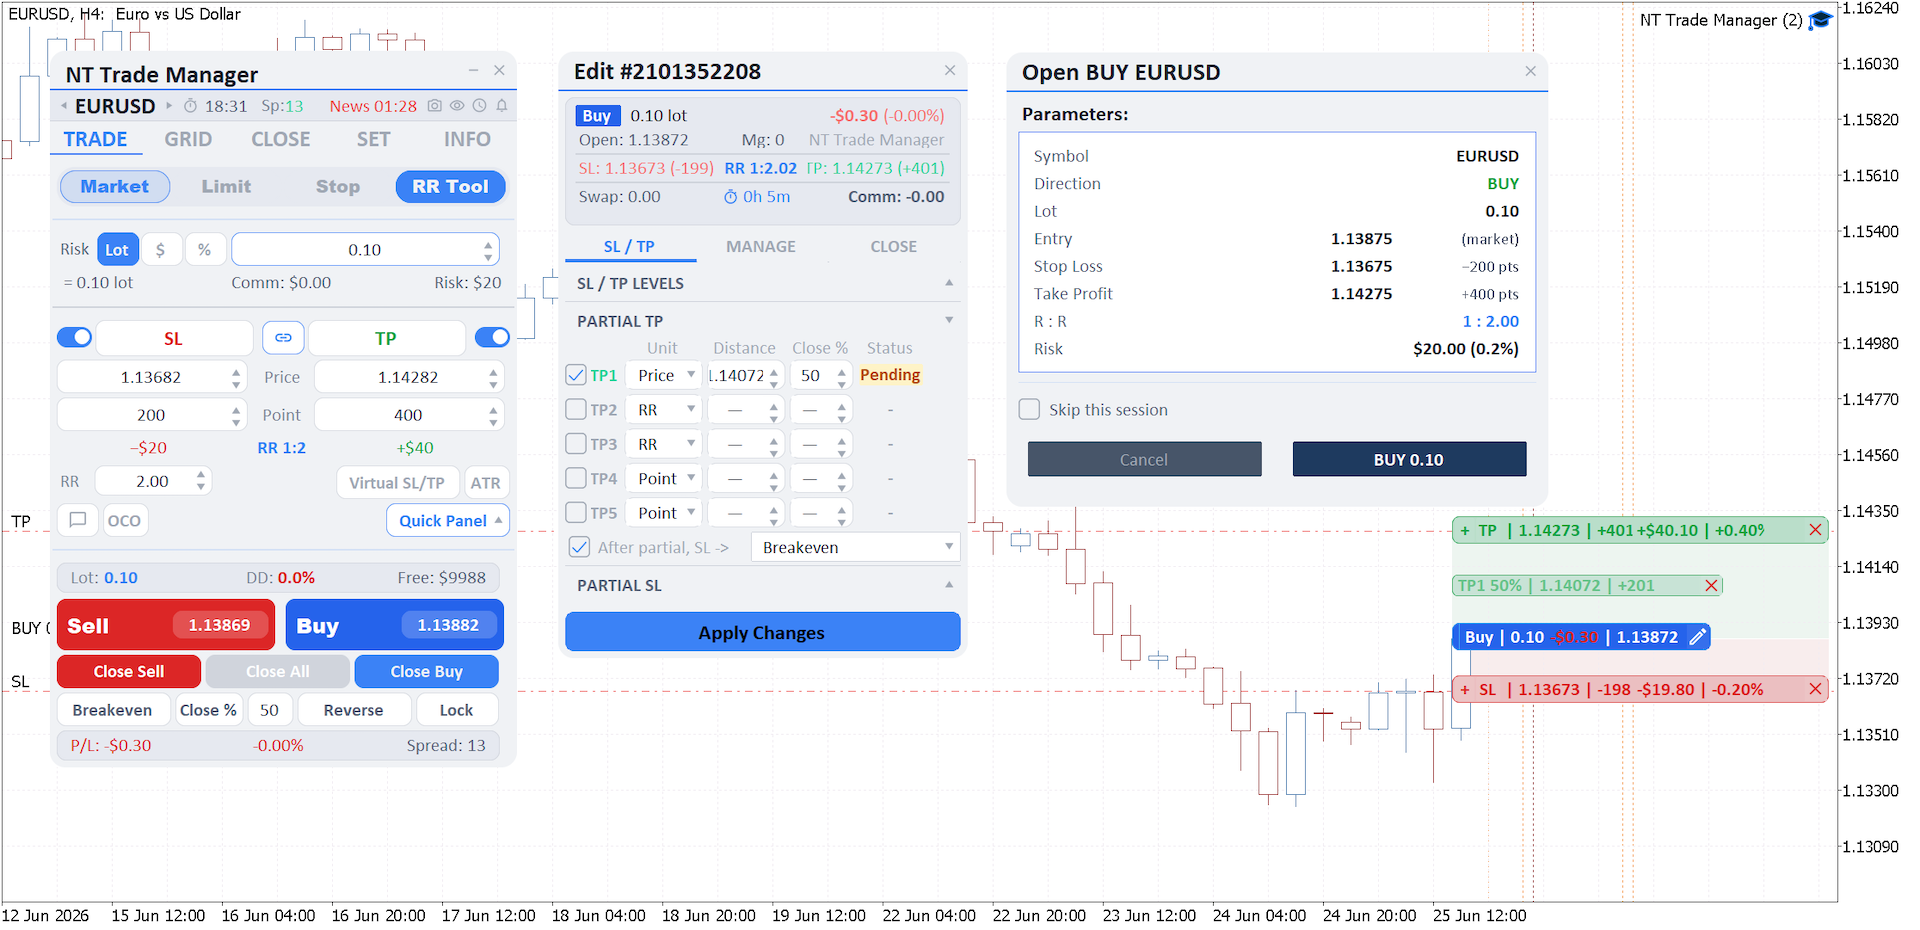
Opened by clicking the pencil icon on the banner of any open position on the chart, or with the **Edit** button on the Close tab when a specific ticket is selected. At the top is a persistent header with position info (type, lot, open price, P/L, SL, TP, RR, swap, commission, Magic Number, comment).
The window has three sub-tabs:
- SL/TP — change the position's levels, optionally converting them to Virtual SL/TP; contains a grid of 5 TP levels and 5 SL levels of partial close (type Points / RR / Price, distance, close percentage) and the RR-chain lock.
- Manage — individual Auto Breakeven, Trailing Stop, and Auto-Close settings for this specific position. These settings are independent of the global defaults on the Manage sub-tab.
- Close — Breakeven Now, Close N%, Close (full), Reverse (close the current position and open the opposite one with the same lot), and Hedge/Lock (open an opposite position of the same volume without closing the existing one — locking in the floating P/L).
Any changes are applied with the `Apply Changes` button at the bottom of the window.
Alarm Manager

Opened with the bell icon in the Symbol Bar. It supports three trigger types:
- Price — price above / below / crossing
- Time — a specific time (HH:MM daily, or one-shot after dragging a vertical line)
- Line touch — crossing an arbitrary trend line on the chart
Notification channels — Alert, Sound, Push, Email (any combination). Modes: one-shot (deleted after it fires) and persistent (after a series of triggers, the counter resets and the alarm resumes). Each alarm has its own line color (a 6×6 palette) and an optional lifetime (Never / 1h / 4h / 24h / 1 week).
Economic Calendar
Opened by clicking the countdown in the Symbol Bar. It shows economic events with filters by country, currency, and importance (Low / Medium / High). For the current symbol, it automatically highlights events for both base currencies.

Task Scheduler
Opened with the clock icon in the Symbol Bar. It lets you schedule actions (open a position, close everything, send a notification) for specific times and days of the week. Useful for systematic strategies with a fixed schedule, or for reminders.
Save/Load (settings profiles)

Three slots for saving sets of settings. For more, see the [Profiles] section below.
Notification Settings

Global notification configuration: which events (opening a position, closing, partial fill, BE trigger, limit exceeded, and so on) are sent over which channels (Alert, Sound, Push, Email).
Screenshot Settings

Configuring automatic screenshots: which events to capture (open, close, modify, partial), the resolution, and the folder path. Handy for post-trade analysis and journaling.
Partial Settings

Global Partial Close defaults — levels (up to five TP and five SL), types (Points / RR / Price), close percentage, and behavior after a trigger (Keep SL / Move to BE / Move to Previous TP level). These defaults apply to new trades; per-order overrides are made in Edit Order.
Trail Config

Global parameters for the selected trailing-stop type (Points / ATR / MA / High/Low / Fractals / Parabolic SAR). Each type has its own set of parameters (period, multiplier, timeframe). A detailed breakdown is in Deep Dive 2.
Breach Actions

What to do when any of the risk limits is hit: Close All, Delete Pending, send a notification (Alert / Push / Email / Sound), and Apply Once (once per period — no repeats). For more, see Deep Dive 1.
Symbol Switcher
A dropdown list of symbols from the Market Watch. Opened by clicking the symbol name in the Symbol Bar; the ◀ ▶ arrows in the Symbol Bar switch symbols without opening the list.
Profiles: Save & Load
All the settings on the Settings tab (RISK, MANAGE, GENERAL) can be saved to one of three profiles and loaded back when needed.
What Gets Saved
A profile is a CSV file that holds the current values of all the runtime variables you change through the UI:
- the Daily / Weekly / Monthly / Hourly limits
- Breakeven (trigger type, value, offset, lock profit)
- Trailing Stop (on / off, type, and all parameters of the selected type)
- Partial Close (all 5 TP levels and 5 SL levels)
- Auto Screenshot and Notification configuration
- General — Measure, Theme, Language, Slippage, EA Comment, Line width, Magnet, and the confirmation flags (ConfirmOpenTrade, ConfirmClose, etc.)
- Breach Actions toggles
If no profile is loaded manually, the EA uses the values from the properties Inputs as the initial ones at startup.
Manual Save / Load
The `Save Settings` and `Load Settings` buttons are available on all three Settings sub-tabs and in the Save/Load subwindow. The "try new settings and roll back" workflow:
- Save Settings to Slot 2 — save the current state
- Change the settings to the new ones
- If you don't like them — Load Settings from Slot 2
Profile Compatibility
The profile loader is tolerant of older file versions: if a saved profile is missing a new field (for example, new limits added after an EA update), that field takes its default value from Inputs. So old profiles remain compatible with new EA versions.
---
Quick Parameter Reference
The complete reference of all 227 EA inputs is in a separate article — [Parameter Reference]. The parameters are set in the EA properties window at drag-on-chart and saved to `.set` files for reuse.
FAQ & Troubleshooting
Q: "Trade is disabled" appears when I try to Buy/Sell.
A: The `AutoTrading` button in the MT5 toolbar is red. Click it — it should turn green. If that doesn't help, check that `Allow Algo Trading` is enabled on the Common tab of the EA properties.
Q: The panel doesn't appear after I drag the EA onto a chart.
A: Check the EA log (the Experts tab in the terminal's Toolbox). If there's an error about "Algo trading not allowed for this Expert," enable AutoTrading in the terminal toolbar and make sure `Allow Algo Trading` is enabled on the Common tab of the EA properties.
Q: Another EA is trading on the account. How do I isolate its trades from NT Trade Manager?
A: Give each copy of the EA its own unique Magic Number in Inputs at drag-on-chart. By default, NT Trade Manager works only with trades opened under its Magic Number and doesn't touch others. To do the opposite — manage other positions — enable `Other EAs` on the Close tab.
Q: I accidentally closed the panel with the X — are all my settings lost?
A: No, as long as you saved the settings manually with `Save Settings` beforehand. After dragging the EA on again, load the profile with `Load Settings` from the same slot.
Q: How do I reset the settings to defaults?
A: Remove the EA from the chart, delete the active slot's CSV file from `MQL5/Files/<EA>/Save Setting/Setting <N>.csv`, and drag the EA on again. The values from the properties Inputs will load.
Q: The Trailing Stop doesn't move the SL.
A: Check that the `Trailing Stop` checkbox is set on the Manage sub-tab. If you're using ATR / MA / Fractals, make sure the current pair has enough history on the chosen timeframe. Also, trailing only activates once the price has passed the initial threshold — set in the Trail Config subwindow.
Q: The grid doesn't place orders — broker rejection.
A: The most common cause is a TP/SL that's too close for the grid. The minimum TP must be larger than `(GridOrders - 1) × GridStepPts + 10`, otherwise the broker will reject it. Check the parameters or increase GridTPPts.
Q: Push notifications don't arrive.
A: In MT5: `Tools → Options → Notifications`. Check that Enable Push Notifications is on, and that the MetaQuotes ID in desktop MT5 matches the ID in your mobile MT5 app (MetaTrader 5 → Messages → MetaQuotes ID).
Q: Screenshots aren't saved.
A: By default they are written to `MQL5/Files/`. Open the Data Folder (`File → Open Data Folder` in the terminal) and find the EA's subfolder there. If the `Screenshots Folder Name` parameter is set explicitly, check that the path is correct and the folder exists.
Q: Where do I see the EA log?
A: The `Experts` tab in the terminal's bottom panel (Toolbox). Broker errors, breach events, and retry attempts are logged there. To debug a specific trade, it's easy to see from there whether the broker rejected it and why.
Q: Compatibility with indicators / other EAs.
A: NT Trade Manager doesn't block indicators and other EAs from running on the same chart. The panel's chart object names have a unique prefix so they don't collide with others. The only requirement is to keep distinct Magic Numbers between trading EAs.
Q: There are too many parameters in the Inputs window — do I need to configure them every time?
A: You configure the Inputs once — after the first launch and UI tweaks, it's enough to save a `.set` file through the standard MT5 mechanism (the Save button in the EA properties window). On later installs, just load that file. Alternatively, use the panel's Save/Load profile slots: after the first launch, the main runtime configuration is stored in a CSV profile, while the Inputs serve as the initial values on the first launch without a loaded profile.
---
What's Next
This article is a general tour. For in-depth breakdowns, head to the follow-up articles:
- [Deep Dive 1: Risk Management & Account Protection] — lot calculation from risk, the Daily/Weekly/Monthly/Hourly limits, Breach Actions, Virtual SL/TP, margin protection, and custom commission.
- [Deep Dive 2: Smart Closing — Partial + Trailing + Breakeven] — all six trailing types, the 5-level partial logic, breakeven with swap and commission compensation, scope apply, per-order vs global.
- [Deep Dive 3: Visual Trading — RR Tool, Chart Lines, Quick Panel] — the RR Tool with its drag-only workflow, lock icons, on-chart banners, the expiry timeline, and the Quick Panel.
- [Deep Dive 4: Grid Trading] — the grid concept, the master order, direction and reverse, volumes, the TP/SL for the whole grid, and the preview before launch.
Each article stands on its own, but they complement one another — once you've set up the risk limits from Deep Dive 1 and learned Partial + Trailing from Deep Dive 2, you have a connected toolkit for managing a position from open to close.


