

About
You can get this indicator here:
MT4:
https://www.mql5.com/en/market/product/165128/
MT5:
https://www.mql5.com/en/market/product/165129/

Introduction
If you've ever wanted a clearer way to identify ICT macro windows and important trading sessions on your MT4/MT5 charts, or struggled to align your trading with specific time-based opportunities, this indicator is designed to solve that problem.
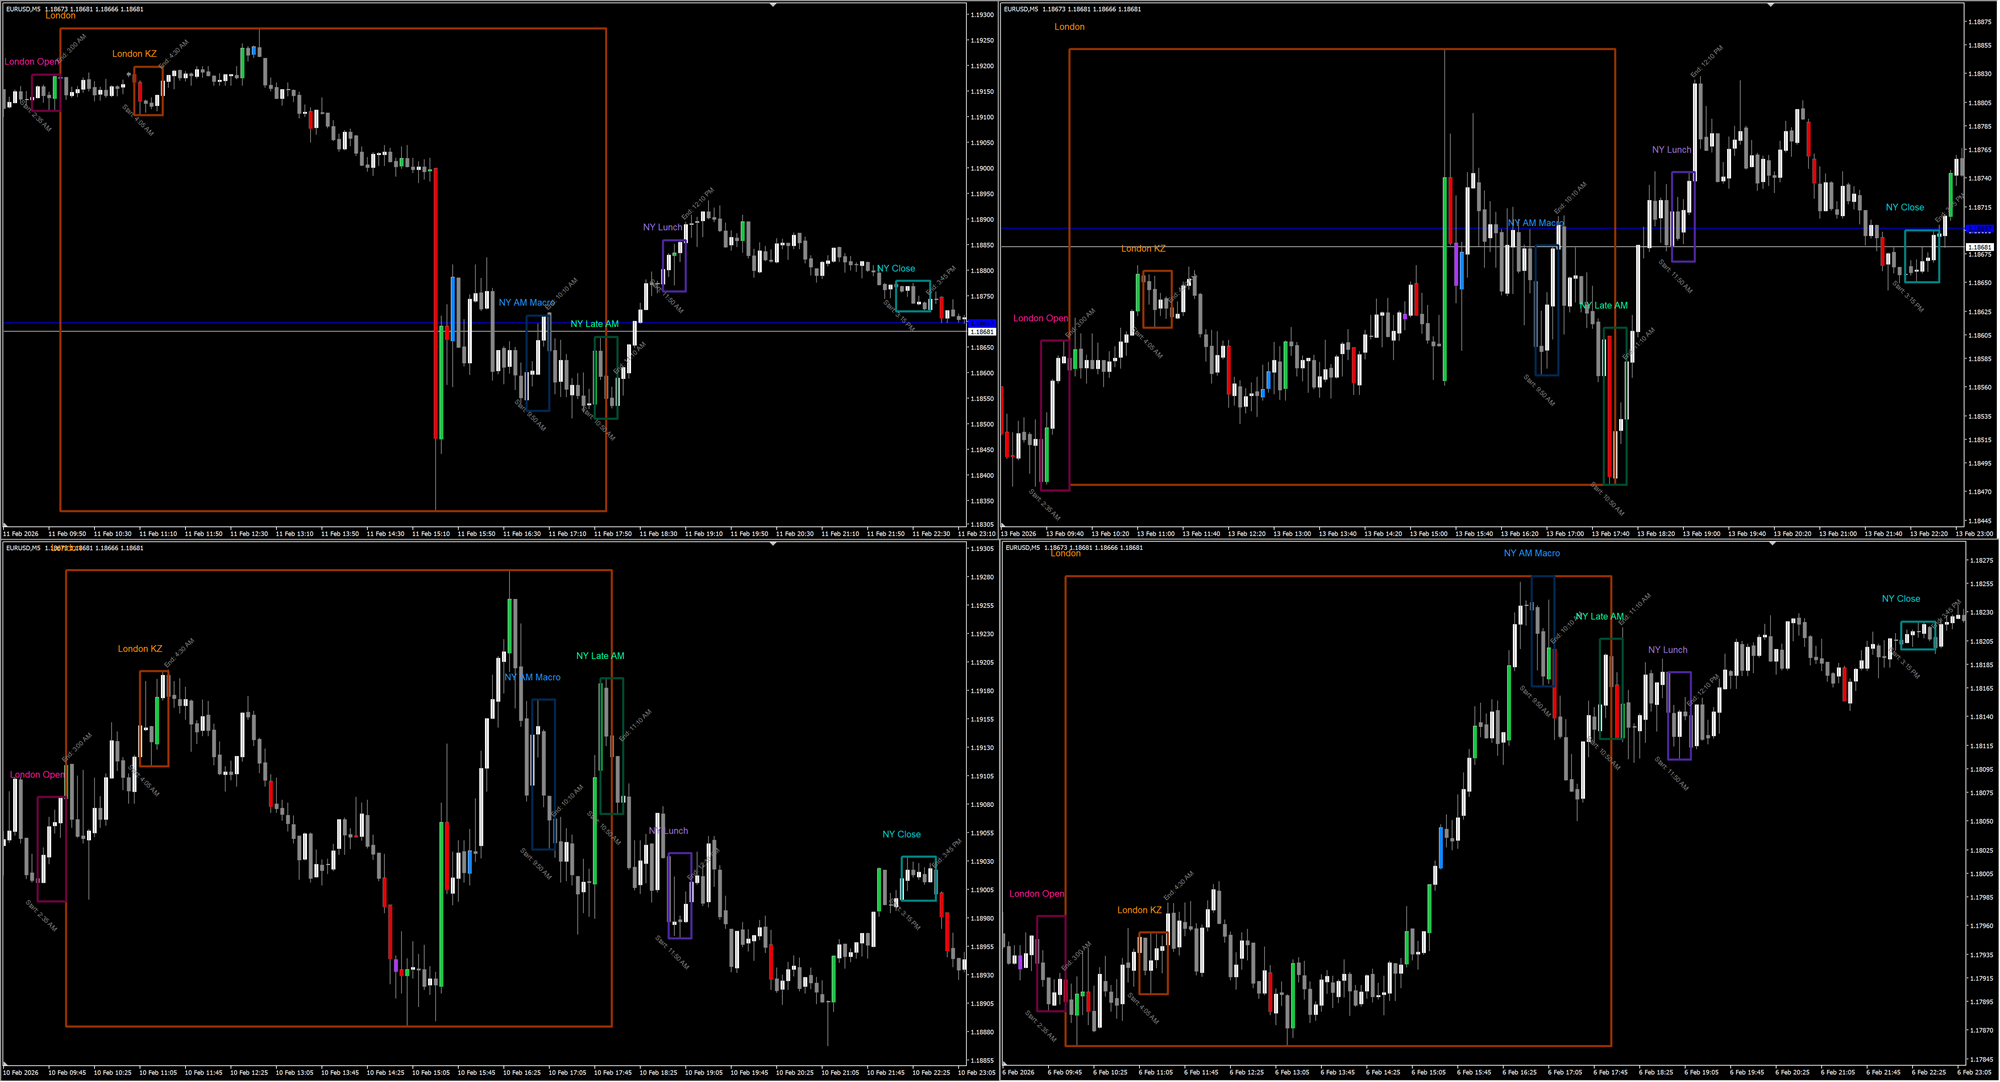
It draws clean session boxes directly on your chart and tracks each macro's high and low in real time. While it comes preconfigured with major global trading sessions, its real strength is flexibility. You can customize any of the six macro periods to match your strategy's specific time windows—whether that's ICT micro windows, Asian ranges, crypto sessions, or any other time-based strategy.
This guide walks you through what the indicator does, how to use it, and how to configure it correctly—especially the timezone settings, which are crucial for accurate session timing.
Key Features at a Glance
- Six fully customizable macro/session windows
- Real-time session high and low tracking
- Preconfigured with major global trading sessions (EST-based)
- Adjustable colors, line styles, and transparency
- Optional labels showing macro name and start/end times
- Automatic overnight session handling (crossing midnight)
- Manual timezone offset system for global compatibility
- Buffer values available for EAs and scanners
- Monitor extension zones with price entry/exit alerts (default 30 bars tracking after session ends)
- Optional alerts on session start/end and monitor crossings
What This Indicator Does
At its core, this is a session/macro window visualization tool. It draws boxes around specific time windows and continuously updates the high and low of each session as price moves. When a session ends, it enters a 30-bar monitor window that tracks whether price re-enters the session's high/low zone, with automatic alerts and extension lines marking these crossings.
Think of it as a precision timer for institutional order flow:
"The London session just started. Current high is X. Current low is Y. Watch for liquidity sweeps and structure formation."
As long as the session is active, the range adjusts dynamically. When the session ends, the box locks in place with its final high and low. For the next 30 bars, the indicator watches for when price returns to or escapes these levels, firing alerts and drawing extension lines when crossings occur.
Default Configuration – Global Trading Sessions (EST)
The indicator comes preconfigured with major global trading sessions, all displayed in Eastern Standard Time (EST), which is the standard for international market timing:

Macro 1 – Tokyo Session
Time: 19:00 PM – 04:00 AM EST (overnight)
Use: Asian market opening, range formation for daily bias, early volatility
Macro 2 – London Session
Time: 03:00 AM – 12:00 PM EST
Use: European market activity, overlaps with early US session, strong institutional participation
Macro 3 – New York Session
Time: 08:00 AM – 05:00 PM EST
Use: Highest volume and volatility, most liquid forex period, major news releases, order flow concentration
Macro 4 – Sydney Session
Time: 17:00 PM – 02:00 AM EST (overnight)
Use: Asian-Pacific market opening, alternative timeframe for range analysis, lower volatility continuation
Macro 5 – Frankfurt Session
Time: 02:00 AM – 11:00 AM EST
Use: Early European session, bridge period between Asia and London open
Macro 6 – Custom
Time: (Empty by default)
Use: Add your own session window
These sessions align with major forex market opens and represent the most liquid trading periods worldwide.
You can understand a lot about ICT trading concepts from multiple resources online. Example:
https://x.com/LumiTraders/status/1676641550829510656/photo/1

But remember: different markets and pairs will have different times and areas of liquidity. The same zones will not work equally well for all pairs. Test and adapt these sessions to your chosen instruments.
Understanding the Timezone System
This is the most important section to understand. The indicator uses a simple but powerful manual offset system.
How It Works
All bar times on your MT4/MT5 chart are in your broker's server timezone (usually GMT+2 or GMT+3). The indicator uses two offset settings to handle timezone conversions.
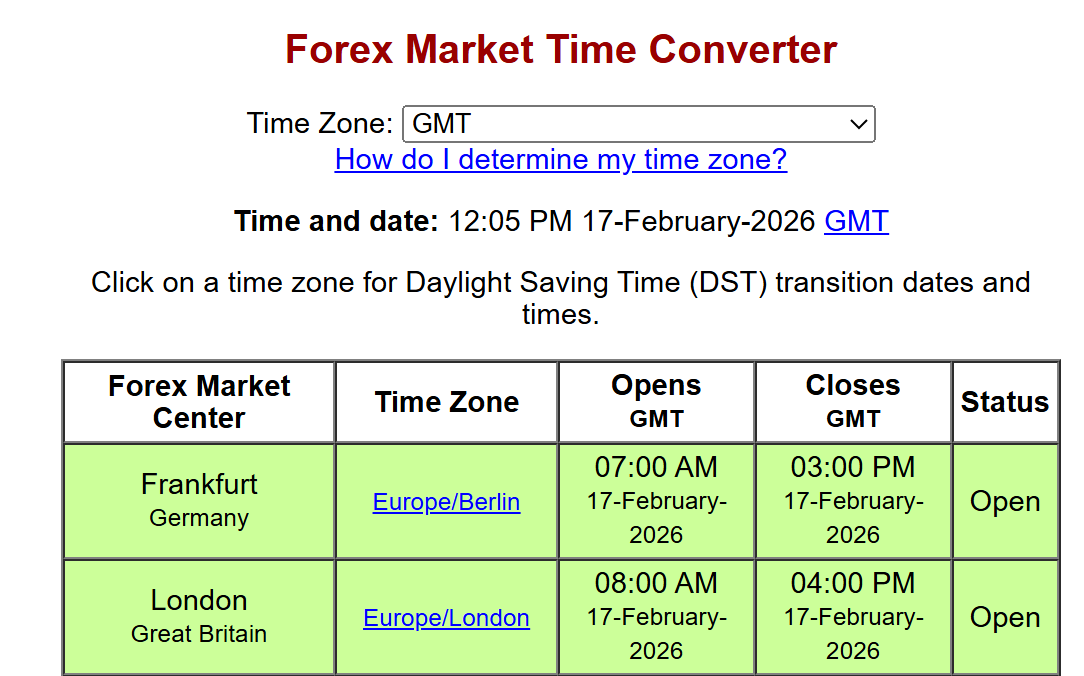
To figure out your broker timezone, just look at the time in Market Watch:

Next go to any forex timezone converter site like this one:
https://forex.timezoneconverter.com/
And look at the time.
My broker is at 2:05PM and GMT Timezone shows 12:05PM. So my broker is "GMT+2"
Meaning the offset is 2 hours.
Most online resources will give you trading times in EST Timezone (New York Timezone). Which is GMT-5.
Note that: It will switch to EDT (GMT-4) from March to November.
So, for my broker GMT+2, the EST timezone will always be at +7:00 offset.
Your broker might be different. This is just an example, if you are using EST related timings. Adjust according to timezones you prefer.
Below are the settings in the Indicator:

Macro TimeZone Offset (TimeZone to Broker):
This tells the indicator how to interpret the macro start/end times you enter. Default: +6:00
Example: If your broker is GMT+2 and you want to enter times in EST:
- EST is 7 hours behind GMT+2 (during winter)
- You set this offset to +7:00
- When you enter 19:00 as a start time, the indicator knows this is 19:00 EST and converts it to broker time automatically
Label Display Offset (Broker to TimeZone):
This controls what timezone to display in the chart labels. Default: -6:00
Example: To show EST times on labels when your broker is GMT+2:
- Set this second to -7:00
- Labels will display "Start: 7:00 PM" (EST) instead of broker time
If you prefer to see start/end labels in broker/server time, then just leave it at 00:00.
Note: I could have given drop down for multiple timezones, like GMT, EST, etc...
But this method gives you the most customization. To support every kind of timezone, like even when a timezone has full (GMT+5) or half (GMT+5:30) hour system.
A lot of countries have timezone changes because of Daylight Savings Time. And the sessions keep moving based on that.
So this self-customization will be the best method to have every possibility available to you.
Practical Examples
Scenario 1 – Broker is GMT+2, want to use EST times (default setup):
- Macro TimeZone Offset: +7:00
- Label Display Offset: -7:00
- Enter all macro times in EST
- Labels show EST times
Scenario 2 – Broker is GMT+2, want to use GMT times:
- Macro TimeZone Offset: +2:00
- Label Display Offset: -2:00
- Enter all macro times in GMT
- Labels show GMT times
Scenario 3 – Broker is GMT+2, want to use broker time directly:
- Macro TimeZone Offset: 00:00
- Label Display Offset: 00:00
- Enter all macro times in broker's timezone
- Labels show broker time
The format is always ±HH:MM (e.g., +7:00, -5:30, +3:00).
In case if you use EST times, but on chart you want to see your own broker times:
- Macro TimeZone Offset: +7:00
- Label Display Offset: 00:00
Suppose I live in India with timezone GMT+5:30 and I want to use EST times, but see India times on chart:
- Macro TimeZone Offset: +7:00
- Label Display Offset: +03:30
Monitor Windows and Price Alerts
Beyond session tracking, the indicator includes a powerful monitor feature:
What Happens After a Session Ends
When a session completes, the box locks in place with its final high and low. For the next 30 bars, the indicator enters "monitor mode" and watches for critical price events:
- Monitor Enter Alert: Fires when price opens OUTSIDE the session zone and closes INSIDE it
- Monitor Exit Alert: Fires when price opens INSIDE the session zone and closes OUTSIDE it
- Extension Lines: Visual lines are drawn showing exactly where these crossings occurred
This is invaluable for:
- Identifying when price is testing session boundaries for liquidity
- Spotting rejection zones (when price escapes and doesn't return)
- Finding return-to-zone setups (when price re-enters after leaving)
- Confirming institutional behavior patterns within and around session ranges
Configuring Monitor Alerts
In the indicator settings:
- Alert On Monitor Enter: Enable popup/sound alerts when price enters a session zone from outside
- Alert On Monitor Exit: Enable popup/sound alerts when price leaves a session zone
All alerts include the session name, direction (bullish/bearish), and bar index for reference.
Trading with Sessions and Macros
Best Practices
The New York Session (08:00–17:00 EST) is widely considered the most profitable window because:
- Highest volatility and volume in the forex market
- Increased liquidity and institutional participation
- Major U.S. economic news releases and data
- Overlaps with London close (morning) for diverse order flow
Optimal Timeframes
15-Minute Charts – Analyze directional bias, identify liquidity pools and imbalances within the session
5-Minute or 1-Minute Charts – Precision entries and executions during session highs/lows and monitor crossings
What to Look For During Sessions
- Fair Value Gaps (FVGs) forming within the session range
- Liquidity sweeps above/below session highs/lows
- Order blocks forming after displacement moves
- Return-to-zone setups as price revisits session boundaries
- Previous Day High/Low (PDH/PDL) alignment with session structure
- Equal highs/lows being targeted during or after the session
- Market structure shifts at session open or close
Avoid Trading
Between major sessions – reduced activity and wider spreads
During economic data prints without volatility confirmation
Other Uses Beyond Trading Sessions
While optimized for global session trading, traders also use this indicator for:
- ICT-specific micro windows (customize Macros 1-6 for your preferred ICT times)
- Crypto market sessions (24-hour markets, custom time ranges)
- Custom kill zones (any time window you want to highlight)
- Pre-market and after-market stock sessions
- Power hour windows
- Any time-based strategy or high-probability window
The indicator doesn't care what the session represents. It simply draws what you define, tracks the range, and monitors for price events. Perfect for multi-timeframe and multi-strategy traders.
Complete Settings Breakdown


Note: The styles for colors, lines, fill etc are kept separate from the session timings. This is because many users might use it with their EAs or other custom indicators.
And iCustom function only supports 64 parameters max.
So, only the session names, timings etc are important for EAs. The visual aspects are not important. Which is why they are kept behind, to support less than 64 params.
Display Settings
Object Name Prefix – Prefix for all chart objects created by the indicator. Change this if running multiple instances.
Show Boxes – Toggle all session boxes on/off globally.
Show Start/End Labels – Show "Start:" and "End:" time labels at box edges.
Show Heading Labels – Show macro/session name labels (e.g., "New York Session").
Label Offset Multiplier – Adjust label distance from price action. Higher = further away.
Macro TimeZone Offset (TimeZone to Broker) – Timezone offset for interpreting macro start/end times. Format: ±HH:MM (e.g., +7:00 for EST from GMT+2 broker).
Label Display Offset (Broker to TimeZone) – Timezone offset for label display. Format: ±HH:MM (e.g., -7:00 to show EST on GMT+2 broker).
Per-Macro Settings (Repeated for all 6 macros)
Enable MacroX – Turn specific macro/session on/off.
MacroX Custom Name – Custom name displayed on chart (e.g., "New York Session", "London Open").
MacroX Start Time (HH:MM) – When macro begins (HH:MM format, in timezone specified by Macro TimeZone Offset).
MacroX End Time (HH:MM) – When macro ends (HH:MM format). If end < start time, automatically treated as overnight session.
MacroX Label Color – Label text color.
MacroX Box Color – Box outline color.
MacroX Box Line Width – Box outline thickness (1-5).
MacroX Box Line Style – Box line style (Solid, Dashed, Dotted).
MacroX Fill Box with Color – Fill box with semi-transparent color.
MacroX Monitor Line Color – Color of extension lines drawn during monitor window.
MacroX Monitor Bars – Number of bars to monitor after session ends (default: 30). Set to 0 to disable monitoring for this session.
Global Settings
Refresh After Ticks – How many ticks before updating. Lower = more CPU usage. Default 200 is optimal.
Max Past Bars – How many historical bars to process. Higher values = more history but slower loading. Default 300 covers several weeks of data.
Font Settings
Font Name for Labels – Label font (Arial, Courier, etc.).
Font Size for Title Labels – Size for macro/session name headings.
Font Size for Start/End Labels – Size for start/end time labels.
Tilt Start/End Labels – Angle start/end labels at 45° for cleaner appearance.
Alert Settings
Alert On Session Start – Popup/sound alert when session begins.
Alert On Session End – Popup/sound alert when session finishes.
Alert On Monitor Enter – Alert when price enters session zone during monitor window.
Alert On Monitor Exit – Alert when price exits session zone during monitor window.
Debug Settings
Show Debug Values – Print detailed timezone offset calculations and session events to Experts log. Useful for troubleshooting timezone issues.
Show Debug Objects Info – Print chart object and monitor zone summary on indicator load.
Using with Expert Advisors (EAs) or Scanners
The indicator exposes 18 buffers for programmatic access:
For each macro (1-6):
- MacroX_High – Current or final high of the session
- MacroX_Low – Current or final low of the session
- MacroX_Active – 1.0 when macro is running, 0.0 otherwise
All buffers update at bar index zero (current bar). During monitor window, High/Low remain locked at the final session values.
Example EA Logic
"Only take trades during New York Session"
if (iCustom(Symbol(), Period(), "Abiroid ICT Macro Zones MT4", ...buffer_index_Macro3_Active, 0) == 1.0)
"Buy when price returns to New York Session low during the session"
double session_low = iCustom(...buffer_index_Macro3_Low, 0);
if (Close <= session_low + spread_buffer && Macro3_Active == 1.0)
"Trade only if price is currently in a monitor window zone"
Check if current bar is within 30 bars of any session end, and use monitorHigh/monitorLow values exposed by the indicator.
These buffers make it easy to build time-filtered and session-aware trading systems.
Combining with Other ICT Tools
The indicator works exceptionally well alongside:
- Fair Value Gap (FVG) indicators
- Order block drawing tools
- Liquidity sweep indicators
- Market structure break tools
- SMT divergence scanners
- Multi-timeframe structure analyzers
Session boxes tell you WHEN to look for setups. Monitor alerts tell you WHEN price is testing boundaries. Other tools tell you WHAT to look for and WHY price is likely to move.
Handling Overnight and Multi-Day Sessions
The indicator automatically detects and handles overnight sessions seamlessly:
- Overnight Detection: If a macro's start time is later than its end time (e.g., 19:00 start, 04:00 end), it's automatically treated as an overnight session
- Automatic Wrapping: Session begins on Day 1, continues past midnight, ends on Day 2 without any manual configuration
- Box Drawing: The box correctly spans across the midnight boundary on your chart
No AddDays setting or multi-day configuration needed—the indicator handles it all automatically.
Troubleshooting Common Issues
Sessions appearing at wrong times
- Check your broker's timezone (usually visible in Market Watch)
- Verify Macro TimeZone Offset is correct for your timezone conversion
- Enable ShowDebugValues and check the Experts log for offset calculations
- Remember: positive offset means you're entering times from a timezone AHEAD of broker time
Boxes look distorted or incomplete
- Use timeframes M30 or lower for best visual results
- Ensure session length is reasonably long (at least a few bars on your timeframe)
- Increase MaxPastBars if historical sessions are missing
Not seeing monitor alerts or extension lines
- Verify Alert On Monitor Enter/Exit are enabled in settings
- Check if MonitorBars is set to 0 (disables monitoring)
- Ensure timeframe is short enough to see monitor events (longer timeframes may not trigger alerts if bars are too large)
- Monitor window starts after session ends and lasts for 30 bars by default
Daylight Saving Time (DST) Considerations
When clocks change for DST:
• If your region observes DST and broker does too: No adjustment needed
• If broker doesn't observe DST but you do: Adjust offsets by ±1 hour seasonally
• If following EST times: Remember EST becomes EDT (GMT-4) in summer vs EST (GMT-5) in winter
Pro tip: Always follow New York local time for session trading to avoid confusion. Adjust your Macro TimeZone Offsets when DST changes if your broker doesn't observe it.
Final Thoughts
The ICT Macro Zones indicator transforms abstract time concepts into concrete visual references. It doesn't predict direction—it shows you WHEN to pay attention, WHERE price ranged during key sessions, and WHEN price tests those levels afterward through monitor alerts and extension lines.
Start with the default global session configuration. Spend a week observing how price behaves during each session. Notice which sessions produce the cleanest liquidity sweeps, FVG formations, and zone tests on your chosen instruments. Then refine your focus to 2-3 key sessions that align with your schedule and trading style.
The custom Macro 6 slot is perfect for testing ICT-specific micro windows or any other time opportunity you want to track.
Remember: The boxes show time and price structure. Extension lines show where price tests these zones.
Your edge comes from understanding market dynamics:
liquidity, imbalances, institutional behavior, and zone testing...within those sessions and monitor windows.
Master the timing. Identify the zones. Watch for the tests. Trust the process.
Happy trading!


")

")