

HOW TO TEST THE MANHEDGER
-
Download the demo file from the bottom of this page.
-
Copy it into MQL5/Experts (File → Open Data Folder → Experts).
-
Restart MetaTrader and enable Algo Trading.
The Demo can be used for 2 weeks (it has been changed), if you want an extension of the Demo period, just write me a message.

HOW TO SET UP
- The EA needs the balance to calculate relative risk, so make sure the account has positive balance. The EA does not work if the balance is 0.
- The Account should be a hedging account. If hedging is not allowed, neither hedging nor zone recovery strategies can be started.
- Algo Trading should be allowed before applying the utility to the chart.

INPUT PARAMETERS
Basic Setup
-
Included Operations — choose which trades are affected (ManHedger / All Manual / All).
-
Magic Numbers & Comments — set unique magic numbers and trade comments for each strategy.
-
HardStopLossPoints: backup SL in points (used only for emergency). If this parameter is 0 no Hard stoploss will be used.
-
Allow Margin based Volume calculation: if it's set to true, the volume boxes will have "In Money" and "Balance %" options, which would tell the margin used for the given Volume.
- Theme: The color theme of the ManHedger. Choose between Dark / Standard Light / LightBlue.
- Transform chart automatically based on the Theme to a modern chart style inspired by tradingview.
- Font Size: font size on the dialog. Change this if the displayed text is too small/big.
- Show trade levels on chart.
- Use the colors from the dialog to display trades. If it is set to true, the remaining parameters are irrelevant, and the color of the "long" button will be used for displaying long trades and "short" color for sell trades.
- Colors for chart displayal. Only the button colors can be set, the box will be a transparent color between the chart, and the button colors.

TRADE MODE
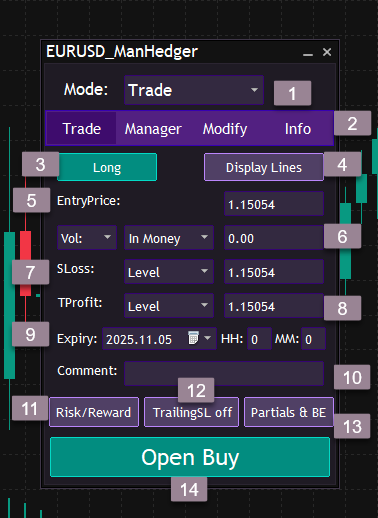
- 1: Mode Navigator: Combobox for selecting Mode between Trade, Grid, Zone Recovery, Hedge
- 2: Navigation bar inside the Trade Mode: These buttons allow 4 layouts: Trade for opening trades, Manager for closing trades and protecting your capital, Modify for modifying trades and Info for symbol/account/trade information.
- 3: Direction Button: This button allows the trader to choose between going long or short. Clicking it changes the trade direction, toggling between "long" and "short". When 'short' is selected, the corresponding button will display "Open Sell".
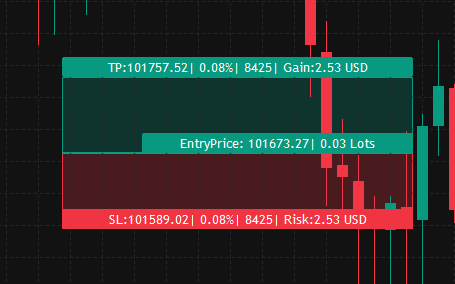
- 4: Display on Chart: This button will create a visual representation on the chart. The buttons are drag-enabled. Sometimes the correct representation of the parameters in the dialog is not possible, in this case the trade will be entered based on the parameters in the dialog. (The EA attempts to synchronise the dialog and the trading box).
- 5: Entry Price: This parameter allows the trader to define the entry price for the trade.
- 6: Volume: In this section, the trader can specify the lot size of the trade or order they wish to enter. The first selection box enables the trader to choose the method for calculating the trade size. Selecting "Vol:" allows setting the Volume/Margin used for the trade. Choosing "Risk:" or "Gain:" enables specifying the desired amount to risk or gain from the trade. With the second selection box, the trader can further refine the calculation method. For example, selecting "Risk:" and "Balance %" allows specifying the risk as a percentage of the balance. Choosing "Gain:" and "In Money" allows setting a specific monetary gain, such as $15. Opting for "Vol:" and "In Money" enables specifying the margin used for the trade. This option is only enabled if the user allows the margin based volume calculation in the inputs.


- 7: Stop Loss: Here the trader can set the stoploss of the trade/order.
- 8: Take Profit: Here the user can set the takeprofit of the trade/order. Both Stoploss and Takeprofit can be specified in 1: The Level where the position needs to be closed 2: In the percentage of the Entryprice 3: in Points.

- 9: Expiry: Input for setting an expiry. Expiry for a position means, that it will be closed at the given local time, whereas a pending order's expiry tells the time of deletion. If a pending order has an expiry, and the order is executed, the expiry will be removed, to ensure safety and avoid situations, where the order is executed seconds before expiry. It is possible to set an expiry to the executed trade later in the modify mode.
- 10: Comment: Trader can set the Comment of the Trade/Order.
- 11: RiskReward: Clicking this button will fixate the current Risk/Reward ratio. Changing the SL or the TP after the RiskReward is on will change the other parameter accordingly.
- 12: Trailing Stop: A trailing stop can be set by clicking this button. If "TrailingStop on" is displayed the stoploss of the trade will automatically change whenever the price moves in favor of the trade.
- 13: Partials and BreakEven: With this button the trader can activate/deactivate the Advanced Panel which allows further configurations of the trade: Partial Takeprofits, Partial StopLosses and automatic Break Even.
- 14: Open Buy/Open Sell Button: With this button the user can enter the trade/place the order, with the parameters specified above. If the Advanced Panel is active the advanced parameters (partial TP and SL, auto breakeven) will also be taken into account, if the panel is not active the trade won't have any further parameters.

- 1: The trader can set the calculation method just as with the Takeprofit and Stoploss. the BreakEven can be set as level also. The first column is responsible for the distance/level at which the partial closing will happen.
- 2: The second column is responsible for the volume that will be closed. While the Advanced Panel is active the only Volume calculation method allowed is "Vol:", "Gain:" and "Risk:" are disabled.
- 3: Automatic BreakEven: Auto BreakEven can be activated/deactivated by clicking the "Auto BreakEven off" Button.
- 4: The BreakEven can be set in level, in the percentage of the Entryprice or in points.
- A: Activate Partial Levels with RadioButtons. Partial TakeProfits: The trader can activate partial takeprofits with a valid volume and distance by clicking the responsible radiobutton. The sum of the activated partial takeprofits volume must be less than the original volume of the trade. Partial StopLoss: The trader can activate partial stoplosses with valid volume and distance by clicking the responsible radiobutton. The sum of the activated partial stoplosses volume must be less than the original volume of the trade.
- B: Set Level values.
- C: Set Volumes.

- 1 & 2 : Drag enabled chart display with partial levels.
MANAGER MODE
This mode enables traders to delete orders and close trades with specific properties & protect their equity.

- 1: Pool Selection: The trader can select the pool of trades/orders to be affected. To select the type of trades/orders the trader has to click the radiobutton and if the corresponding radiobutton is active, the type is selected. In the example above the buy and sell trades are selected, buy limit, buy stop, sell limit, sell stop are not selected.
- 2: Profit above: Select trades that have a floating profit above the specified amount.
- 3: Loss below: Select trades that have a floating loss below the specified amount.
- 4: Magic Number: Select the trades & orders with the specified Magic Number.
- 5: Symbol: Select trades & orders with the specified Symbol.
- 6: Comment: Select trades & orders with the specified Comment.
The attributes selected have an and connection. This means that if the Symbol, Magic, Comment are all selected, the trades/orders with the given Magic and Comment and Symbol are selected. In the example above the selected pool is: open trades which have 0 as Magic Number and their Symbol is "EURUSD".
- 7: Close button: With this button the trader can close/delete all the trades/orders selected with the radiobuttons, with the specified attributes.
- 8: Cut Loss: If this is activated, the EA will function as an equity protector. Whenever the drawdown limit specified by the trader is reached, all trades will be closed and all orders will be deleted.
- 9: Win Close: If this is activated, the EA will close all trades and delete all pending orders when the floating profits of the trades reach the specified level.
Cut Loss and Win Close can be specified in monetary amount or in the percentage of the balance.
Modify Mode
This mode enables traders to modify & manage their existing orders and trades.

- 1: Order/Position Selection: Select the desired position or order, based on direction, open time, and ticket. The trader can later modify the properties of the selected trade manually.
- 2: StopLoss: Set the stoploss of the position/order.
- 3: TakeProfit: Set the Takeprofit of the position/order.
- 4: PartialClose: After specifying the Volume, it's possible to close a part of the trade with this button. Only positions can be partially closed, for pending orders this is disabled.
- 5: Expiry: Set an Expiry date for the order/position. An orders expiry is removed after the price reaches the opening price of the order. An expiry means closure or deletion of the position/order at the given LOCAL time.
- 6: Manual Break Even: For profitable trades it's possible to manually force the stoploss to be moved to the entry price.
- 7: Trailing Stop toggle: Turn the trailing stop on or off. Turning it on means, that the current stoploss will act as a trailing stop. The trader can define any arbitrary trailing stop, with setting the stoploss and the trailing stop aswell.
- 8: Partials & Be: Set or unset partials and auto breakeven for the trade.
- 9: Modify: The trader can finalize and send the modifications with this button.
- 10: Display: Display the trade on the chart, same as with the Trade mode.
- 11: Delete Order / Close Trade: Deletes the order if it's a pending order, closes the trade if it's an existing position.
Info Mode
This Mode allows traders to view information about the account, the symbol, or a given trade.
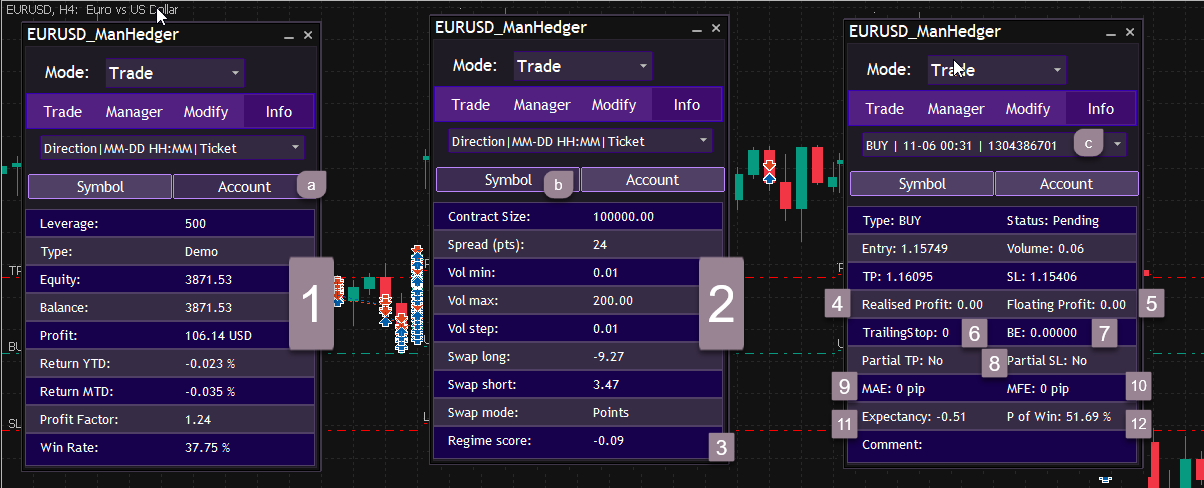
- A: Account button, for viewing account information -B: Symbol button, for viewing symbol information -C: Trade selection, for viewing information about a particular trade/order
- 1: Account information. General information about the Account, such as Balance, Equity, Profit, return in the last year, return in the last month, the profit factor, and the winrate.
- 2: Symbol information. General information about the Symbol, such as swaps, volumes, spread (updating dynamically), contract size.
- 3: Regime score: A statistical measure for current trend strength. It is calculated using the last 200 bars of the one hour period (H1). The mean of the logarithmic returns is divided by the standard deviation. Generally, an instrument is in a strong uptrend, whenever this number is a positive number close to 1, the market is in a downtrend, when the number is negative and close to -1. If the regime score is ~ 0 the market is currently ranging / volatile.
- 4: Realised profit of a trade, if partial closes happened.
- 5: Floating profit of a trade.
- 6: Trailing Stop in points.
- 7: BreakEven level.
- 8: Partials. Can't list all, to view them, go to the Modify section.
- 9: Maximal Adverse Excursion: The worst possible state of the trade in points.
- 10: Maximal Favorable Excursion: The best possible state of the trade in points. These two measures may give information about the proper risk management format of the trade. For example a high MFE low MAE may indicate, that Trailing stop losses could be beneficial for the trade, meanwhile if both values are the same, partial takeprofits could help the trade. If MAE is high and the MFE is low, partial stoplosses could be useful.
- 11: Expectancy: Probabilistic expectancy based on random walks, generated with the statistical properties of the last 200 candles. This expectancy is for demonstration purposes only and the underlying model is not neccessarily precise.
- 12: Probability of Winning: The probability of reaching TakeProfit before StopLoss based on random walks, generated with the statistical properties of the last 200 candles. This expectancy is for demonstration purposes only and the underlying model is not neccessarily precise.
ZONE RECOVERY
What is a Zone Recovery strategy?
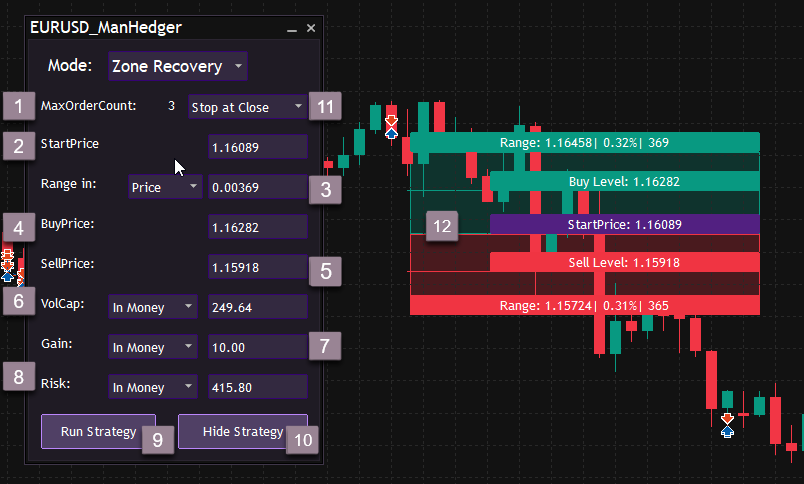
- 1: MaxOrderCount: This label displays the maximum amount of trades the strategy can take. This parameter has to be greater than 1 to be able to run the strategy. The maximum order count can not be set by the trader, but it is calculated based on the parameters of the strategy. If the maxordercount is 2 for example, it means the strategy can take two trades: the first in the direction where the price moved and a second hedging trade. If it is 3, 2 hedging trade could be made. (This value usually can be increased, by increasing Risk and/or Volume).
- 2: StartPrice: This is the parameter where the strategy would start, if this price is reached the buy and sell stop orders will be placed.
- 3: Range: The Range sets the Takeprofit level of the Buy/Sell trades. The Takeprofit of the buy trades will be the Startprice+Range. The Takeprofit of the sell trades will be the StartPrice-Range.
- 4: BuyPrice: The level at which the Zone Recovery strategy will enter long trades.
- 5: SellPrice: The level at which the Zone Recovery strategy will enter short trades.
- 6: VolCap: The total allowed volume for the strategy. This does not mean the volume of the first trade, but if the MaxOrdercount is 3 it would mean the the sum of the volumes of the 3 trades(1 starting and 2 hedging). This can be given in lots or in margin used, if allowed.
- 7: Gain: The amount the trader would like to make on the strategy. The volumes of the trades will be calculated, so that the trades can close out with this amount of profits at the end of the Range.(Even if it's the first trade or already a hedging trade)
- 8: Risk: The amount the trader is willing to lose on the strategy. The trader can set this as an "ideal" parameter so that it will be at the next hedging level after entering the last trade, by filling out every information, leaving this textbox blank and hitting enter. (This strategy usually has a huge Risk:Reward ratio. A 15:1 or above Risk:Reward ratio is completely reasonable for this strategy.)
- 9: Run Strategy: Clicking this button will run the strategy if every parameter is filled out. This button then changes to "Stop Strategy" with which the user can stop the strategy any time (closing out all the trades and deleting all order made by the EA).
- 10: Display on Chart: With this button a visualisation of the strategy is possible.
- 11: This Selectionbox allows the user to decide what the EA should do after it closes out with profits. If the strategy loses it'll immediately stop. There are 3 options: 1: Stop at Close: If this is selected, the EA will stop the strategy after it hit the profit target. 2: Keep Trading: The EA runs the strategy again, with the same parameters except for the startprice which will be the current ask price. Buy and Sell orders will be placed immediately. 3: Status quo: The EA will run the strategy again, with exactly the same parameters, even the startprice is the same.

- 12: Drag enabled visual representation of the Zone Recovery Strategy on the chart.
GRID MODE

- 1: DirectionBox: Here the Direction of the Grid can be selected. There are 3 options to choose from. 1: Long/Short. A buy limit and a sell limit will be placed one OrderDistance (Range/Density) below/above the Startprice. If the price goes down and reaches the buy order, the EA will delete the sell order and activate the long grid below the Startprice. If the price reaches the sell level first, the buy order will be deleted and the sell grid will be activated above the Startprice. 2: Long only. A buy trade is opened at the Startprice activating the long grid below the Startprice. 3: Short only. A sell trade is opened at the Startprice activating the short grid above the Startprice.
- 2: Startprice: This is where the strategy will start. If this level is reached, the EA will enter trades/open orders.
- 3: Range: This parameter is the precedented range where the user thinks the price will not break out of. The last order in the grid will be entered at the end of the Range (Startprice-Range for buy trades, Startprice+Range for sell trades)
- 4: Volume: The volume of the strategy can be set with two different methods, using the first selectionbox. 1: Start: The user can set the starting volume of the strategy. This will be the volume used for the first trade. 2: Cap: The user can set the total volume used by the strategy. The EA will calculate the size of each trade and the sum will be equal to this value. Both ways the user can specify wether he'd like to use lots or the calculated margin needed for running the strategy, if this calculation method is allowed in the inputs.


- 5: Gain: The amount the user would like to make on the strategy.
- 6: Risk: The amount the user is willing to risk on the strategy. If every other parameter is filled out and the user hits enter the EA calculates an "ideal" Risk amount exactly one OrderDistance (Range/Density) below/above the Range, so the strategy will close out with a loss, where the next order would take place. (The Risk/Reward ratio of these strategies is usually above 1:10)
- 7: Volstep: Here the user can define the difference or the ratio between the volume of the orders in the grid. The user can choose from 2 options. 1: Multiply: The Volstep parameter would be the multiplication of the volumes in the grid. If for example the value is 1.2 and the first order was 0.1 lots, the second order would be 0.12 lots. 2: Addition: The Volstep defines the difference between the volumes in the grid. If for example the value of this parameter is 0.05 and the size of the first order was 0.1 lots the second order would be 0.15 lots.

- 8: Number of trades: Defines the amount of orders to be taken in the grid.
- 9: Run Button: Runs the strategy with the current parameters (if the parameters are valid). The text will change to "Stop Strategy" and this button will enable the trader to stop the strategy any time, closing out all open trades and delete all order made by the strategy. If the user changes the risk or the gain while the strategy is running the text will change to "Set Gain" or "Set Risk" and the trader can set the risk or the gain even when the strategy is running.
- 10: Display on chart: The trader can get a visual representation of the strategy using this button. If the strategy is running both SL Level (where the losses of the strategy would reach the risk) and TP Level (where the profits would reach the gain. This level is floating, with each new order reached in the grid it will get closer to the current price.) If everything is filled out the SL level is visible even before running the strategy.
- 11: This Selectionbox allows the trader to decide what the EA should do after it closes out with profits. (if the strategy loses it'll immediately stop) There are 3 options: 1: Stop at Close: if this is selected, the EA will stop the strategy after it hit the profit target. 2: Keep Trading: The EA runs the strategy again, with the same parameters except for the startprice which will be the current ask price. 3: Status quo: The EA will run the strategy again, with exactly the same parameters, even the startprice is the same.
- 12: Visual representation of the strategy on the chart.

HEDGE MODE

- 1: Buy Level: The strategy will open a buy trade at this level.
- 2: Sell Level: The strategy will open a sell trade at this level.
- 3: Volume: The trader can specify the size of the buy and sell order/trade.
- 4: Takeprofit: The takeprofit of the buy and sell orders can be specified here. If the price goes above the buy level with this amount, the buy trade will be closed closing out a part of the hedging sell trade (if it exists). If the price goes this much in the direction of a sell trade in the hedging batch, the sell trade will be closed out with a part of the hedging buy trade. This parameter applies for each trade. If this parameter is changed the TP of each trade/order in the hedge would change.
- 5: Gain/Lot (In Money): The trader can specify how much money should be made when closing out a sell or a buy trade at the takeprofit. The EA will try to reach this goal and will close out parts of the unprofitable trades in the hedging batch. In the example above if there is both a sell and a buy trade open both with 0.15 lots (48.12$ of free margin is needed to open 0.15 lots) and the sell trade reaches it's goal of 64393-548.6 = 63845 the 0.15 lot sell trade would be closed out, with some amount of the buy trade also, to realise a profit of 0.15*10 = 1.5$. The buy trade remains open with the remaining volume. If there is no sell volume remaining (the previous sell trade was the last sell trade in the hedging batch) the strategy will enter "Squeezing" mode, creating a new pending sell stop order.
- 6: Stop at Gain: The trader can specify the amount of money to be made on the strategy. If this value is 0 the strategy will keep running. If it is not 0 the strategy will stop
- 7: Accumulated Profits label: Here the trader can see the amount of profits realised with the currently running strategy. This does not include the drawdown and the floating loss of the strategy (if there is any).
- 8: Run/Stop button: With this button the trader can run the strategy with the above specified parameters. If a strategy is running this button will turn to "Stop Strategy" enabling the trader to stop the strategy any time. Stopping the strategy will result in the deleting of all the orders and closing of all the trades included in the strategies batch. If any parameter is changed in the panel, while the strategy is running, the trader has the opportunity to change this parameter of the running strategy using this button.
- 9: Display on Chart: With this button the trader can get a visual representation of the strategy on the chart.
- 10: Build From the Inside: The trader can decide to build a new pair of hedging trades inside of the current sell and buy price. This can be useful if the strategy is stuck between the last 2 trades for too long.
- 11: Settings: This is only for running strategies useful. Clicking this will result in the popup of the Hedge settings panel, where the trader can add/delete ordertickets from the Strategy's batch or change the Squeezingdistance, used after a trimming was successful.
- 12: TicketEdit: The ticket number entered here will be affected
- 13: Add to batch button: The entered ticket will be added to the strategy's batch.
- 14: Delete from batch button: The entered ticket will be deleted from the strategy's batch, if it was included in the strategy.
- 15: Squeezing Distance Edit: The trader can select wether the Squeezing range should be given in price or in points. The value entered here can be the squeezingrange of the strategy. Set Button: Set's the Running hedge strategies squeezing distance. The original distance after running the strategy is the distance between the buy and the sell level.
- 16: Print Button: The trader can print out the strategy in the experts tab, to get information about the included tickets and further parameters of the strategy.
- 17: Visual Representation


This picture displays the old version of the Hedging layout, where there was no "Settings" button, it was not possible to set the Squeezingdistance or to delete tickets.
My advice for using the product:
- By leaving a textbox blank, the EA automatically fills i with a sensible value for the current chart.
- If one wants to see the parameters of a currently running strategy selecting the corresponding layout, will display every information: If a Hedge strategy is running, clicking Hedge in the selectionbox next to "Mode:" would display the parameters of the strategy in the panel.
- When interpreting zone recovery or grid strategies, it is advisable to set a risk much higher than the gain, with a recommended Risk-Reward ratio of at least 15:1.
- When changing the gain or risk of a running strategy, it is not recommended to set a much higher gain or a much lower risk, as it may have negative effects on the well-calculated strategies.
- I do not recommend running zone recovery and grid strategies at the same time on the same security.
- Setting the EA for the same securities multiple times with the same magic numbers may result in unexpected errors. (The EA distinguishes other EAs with the help of symbols and magic numbers).
- I recommend using the EA for securities which have the account currency as either the base or margin currency.
- With price changing the size of a lot in your base currency may change, re-enter the volume if you are calculating in monetary amount.
- Don't remove Expert/close chart/close MetaTrader, when a strategy is running.
- If the Balance is 0 the Expert won't work.
- It is not recommended to just run one of the strategies forever. The EA is not designed to be an auto trading bot, generating profit over months without any human input. This is a SEMI-AUTO EA, mainly created to automate tasks, saving the time of the user.


