Support and Resistance Dashboard
Product Page MT5 : click here
Product Page MT4 : click here
You can download the demo version from bottom of the page.
INPUT PARAMETERS:

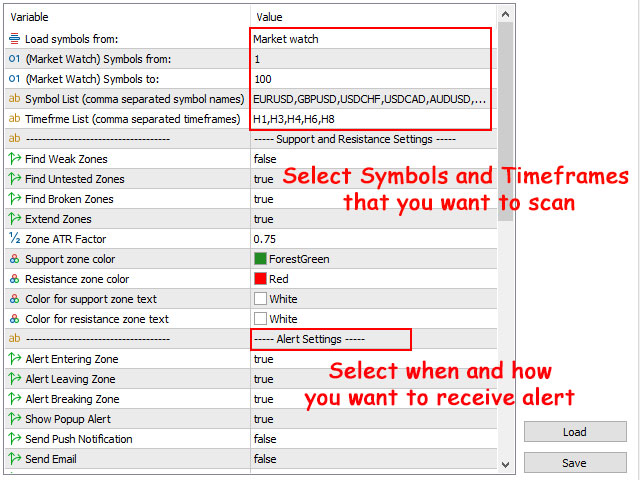
- Load Symbols from: Select the source of the symbols to load into the dashboard, it can be market watch or comma separated symbol names from the next parameter.
- (Market Watch) Symbols from: Start loading market watch symbols from this number.
- (Market Watch) Symbols to: End loading market watch symbols to this number.
- Symbol List: Comma separated list of symbol names to show in dashboard, ignore this parameter if you select market watch as source of symbols.
- Timefrme List: Input comma separated list of timeframes for showing in dashboard, like: M1,M15,H4,D1.
- Update dashboard on: Update dashboard every minute or on candle close of related timeframe.
- Dashboard shows Entering the S/R zone: If set to true, the dashboard will show whether the price has entered the support or resistance zone.
- Dashboard shows Leaving the S/R zone: If set to true, the dashboard will show whether the price has returned from the support or resistance zone.
- Dashboard shows Breaking the S/R zone: If set to true, the dashboard will show whether the price broke the support or resistance zone.
- Dashboard shows if price is inside S/R zone: If set to true, the dashboard will show whether the price (both open and close prices of the candle) is inside the support or resistance zone.
Support and Resistance Settings:
By clicking on the dashboard cells before and after changing the parameters, you can see the effect of these parameters on the S/R zones.
- Find Weak Fresh (Untested) Zones: If set to false, weak zones won't show in dashboard and alerts won't trigger for them.
- Find Fresh (Untested) Zones: If set to false, untested zones won't show in dashboard and alerts won't trigger for them.
- Find Broken Zones :If set to false, broken zones won't show in dashboard and alerts won't trigger for them.
- Find Verified Zones: If set to false, verified zones won't show in the dashboard and alerts won't trigger for them.
- Find Proven Zones: If set to false, proven zones won't show in the dashboard and alerts won't trigger for them.
- Extend Zones: If set to true, EA goes dipper in history bars to find support and resistance zones. The result will be wider zones.
- Zone ATR Factor: Changes zone height based on ATR indicator values, less value means thinner and more accurate zones, but less chance to trigger the alert.
- Fractal Fast Factor: This parameter changes the sensitivity of fractals for calculating the S/R zones. It added for more compatibility with "Shved Supply and Demand" indicator, and you don't need to change it unless you want to do an extended customization on the calculating of zones.
- Fractal slow Factor: Same as above parameter.

S/R Zones Alert Filters:
- Use alert filters (for S/R zones): Set to true if you want to use following filters for maximizing the quality of signals.
- Apply filters to: You can show all signals on dashboard but receive alert after applying filters to them.
- Minimum candle height (points): Receive alert only if the difference between high and low of the candle that deals with a zone is >= this parameter (in points). Be careful in using this parameter if you are loading symbols from different markets on the dashboard, for example 10 points is very small for forex market but can remove many signals in crypto market.
- Min. candle body to height ratio: By using this parameter, you can ignore the doji candles. For example, if set to 0.5, then the signal candle body must be bigger than half of the candle height (body+shadows) to receive alert for the signal.
- Min. candle height to zone height ratio: By using this parameter, you receive the alert if the price movement is big enough in compare with zone height. For example, if set to 0.5, then the height of the signal candle must be bigger than half of the zone height to receive alert for the signal.
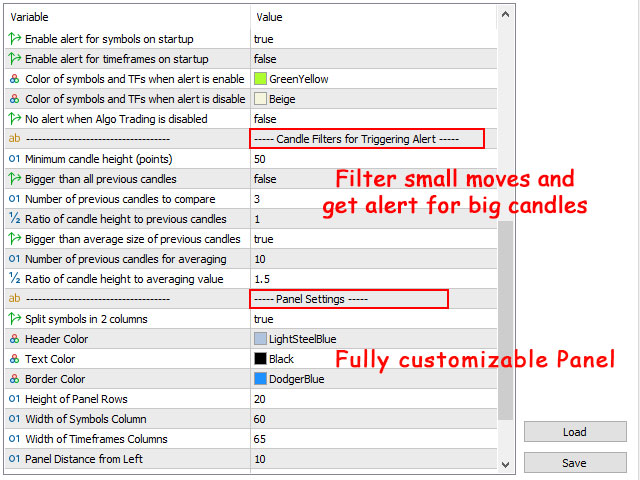
- Candle height bigger than height of all previous candles: Alert triggers if the difference between high and low of the candle that deals with a zone is bigger than all previous candles (check the two following parameters).
- Number of Previous Candles to Compare: Number of previous candles that must be compared with the last candle to check if it is big enough or not.
- Ratio of candle height to height of previous candles: How many times the last candle must be bigger than previous candles to not consider as small candle. For example, if you set this parameter=1.2, then candle must be at least 1.2 times bigger than the previous candles. If this parameter=1 then this candle must be bigger than previous candles.
- Candle body bigger than average body of previous candles: Alert triggers if the body (difference between close and open) of the candle that deals with the zone is bigger than the average body of previous candles (check the two following parameters).
- Number of previous candles for averaging: Number of previous candles to use for averaging.
- Ratio of candle body to average body value: How many times the last candle's body must be bigger than the average size of previous candles.
Pivot Points Settings:
- Enable Pivot Points: Receive alert when price breaks the pivot point levels or returns to them.
- Time interval between pivot alerts: Time interval between pivot alerts for each symbol. Smaller periods give more alert, because price can multiple times break the pivot level and return to it.
- Pivot Points Calculation Type: You can choose to calculate pivot levels base on the one of the five different methods (Standard, Fibonacci, Camarilla, Woodie and Demark).
- Fibonacci Pivot Levels (up to 4 comma separated levels): You can set up to 4 level for fibonacci pivot levels.
- Calculate Daily Pivot Points: Calculate and give alert for daily pivot levels.
- Calculate Weekly Pivot Points: Calculate and give alert for weekly pivot levels.
- Calculate Monthly Pivot Points: Calculate and give alert for monthly pivot levels.
- Calculate S1/R1 Levels: Calculate S1/R1 pivot levels.
- Calculate S2/R2 Levels (if exist): Calculate S2/R2 pivot levels (demark method only has S1/R1 levels).
- Calculate S3/R3 Levels (if exist): Calculate S3/R3 pivot levels (woodie method doesn't have S3/R3 and S4/R4 levels).
- Calculate S4/R4 Levels (if exist): Calculate S4/R4 pivot levels (standard method doesn't have S4/R4 level).
Alert Settings:
- Enable alert for symbols on startup: Enable alert for all symbols when attaching the dashboard to chart. You can also enable/disable alerts for each symbol by clicking on its cell on the dashboard.
- Enable alert for these timeframes on startup: Comma separated list of timeframes to enable alert for them when attaching the dashboard to chart. You can also enable/disable alert for each symbol by clicking on its cell on the dashboard.
- Enable alert for pivot points on startup: Enable alert for pivot levels when attaching the dashboard to chart. You can also enable/disable pivot alerts by clicking on its cell on the dashboard.
- Alert Entering S/R Zone: Alert triggers when price enters in a support or resistance zone (candle opens outside the zone and closes inside the zone).
- Alert Leaving S/R Zone: Alert triggers when price leaves a support or resistance zone (price turns back from the zone and candle opens inside the zone and closes outside the zone).
- Alert Breaking S/R Zone: Alert when price breaks a support or resistance zone (price goes through the zone and candle opens inside the zone and closes outside the zone).
- Alert Breaking Pivot Level: Alert when price breaks a pivot level (candle opens below/above the one of pivot resistance/support levels and then breaks it).
- Alert Returning to Pivot Level: Alert when price returns to a pivot level (all the previous candle must be beyond the pivot level before price returning to it).
- Show Popup Alert: Show popup alerts when the selected patterns appear in the selected timeframes of the selected symbols.
- Send Push Notification: Send push notification to mobile phone when dashboard alert triggers (you should set metatrader Notifications options).
- Send Email: Send email when dashboard alert triggers (you should set metatrader email options).
- No alert when Algo Trading is disabled: If true, then you can disable alerts by disabling "Algo trading" button on metatrader terminal.
Dashboard Settings:
- Split symbols in 2 columns: Set true if you want to show more symbols on the dashboard by splitting the symbols into 2 columns.
- Header Color:Color of the header of the dashboard.
- Color of symbol & TF cells when alert is enable: Color for symbol and timeframe cells when alert is enabled.
- Color of symbol & TF cells when alert is disable: Color for symbol and timeframe cells when alert is disabled.
- Color of symbol & timeframe text: Text color for symbol & timeframe cells.
- Color of support zone text: Text color for cells that show support zones.
- Color of resistance zone text: Text color for cells that show resistance zones
- Border Color: Color of borders of the dashboard and its cells.
- Height of Dashboard Rows: Height of the dashboard rows.
- Width of Symbols Column: Width of the first column of the dashboard that shows the symbol names.
- Width of Timeframe Columns: Width of other columns of the dashboard .
- Dashboard Distance from Left:Dashboard distance from the left of the chart.
- Dashboard Distance from Top: Dashboard distance from the top of the chart.
- Text Font Name: Font name of dashboard text.
- Font Size: Font size of dashboard text.
- Draw dashboard behind the price chart: If set to true, the dashboard will be drawn behind the chart candles.
- When clicking on the dashboard cells: You can save a template with default.tpl or custom.tpl name, then use this option to open the chart with that template when clicking on the dashboard cells. Also, you can choose to show the S/R zones and pivot lines on the current chart (the chart that the dashboard is running on it). BUT please REMEMBER, dashboard must be run on a symbol that receives price ticks frequently (like EURUSD or Bitcoin), so if you clicked on a cell that changes the chart symbol to a symbol that doesn't get price ticks frequently, then you must again click on a cell that returns the chart symbol to the EURUSD symbol.
- Show zones/pivots in opened chart: After clicking on table cells, show zones and pivot levels in opened chart.
- Show zone/pivot name: After clicking on table cells, show zone/pivot names in opened chart with default template.
- Show zone price labels: After clicking on table cells, show price labels in opened chart with default template.
- Custom template name for opened charts: Template name for opened chart, if you want to open chart with custom template.
DOWNLOAD DEMO:
Demo version works on M4,M6,M12,H3,H8 timeframes ( M1,M5,M30,W1 for MT4 version).


