
By the end of this article, you’ll have a complete understanding of how to install and operate the Dynamic Pips EA, as well as the meaning and purpose of each input parameter in the settings.
I. Input Parameters
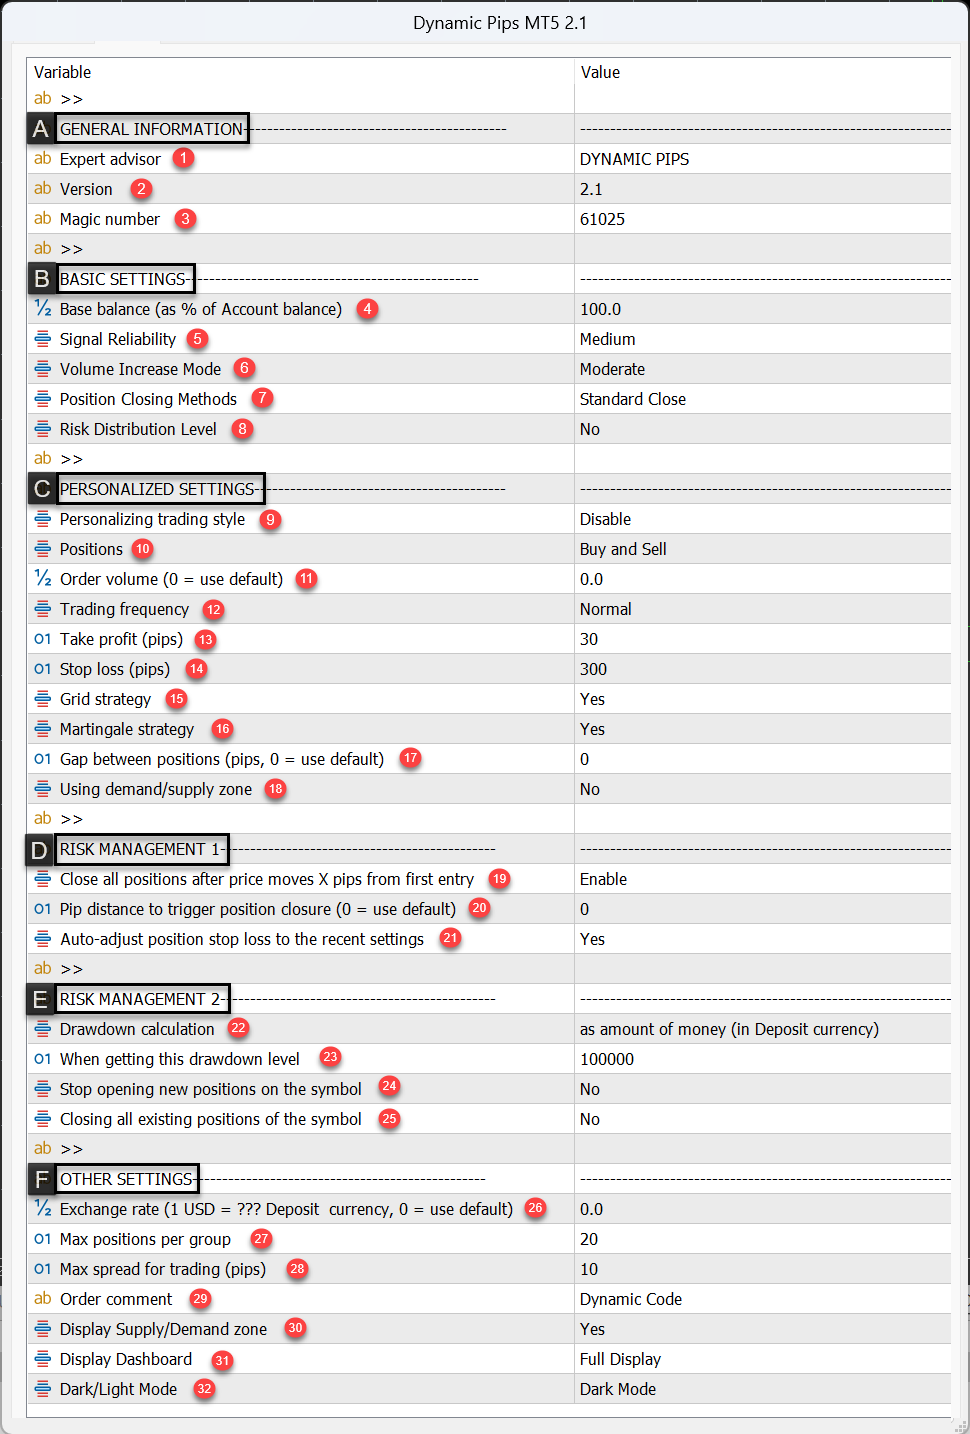
Figure 1: Dynamic Pips EA - Installation interface
A. General Information
-
Expert Advisor
The name of the EA. -
Version
The current version of the EA. It helps you keep track of updates and ensure you are using the latest features and improvements. -
Magic Number
A unique identifier assigned to each trade placed by the EA.
Trades executed by Dynamic Pips EA will carry this magic number, allowing the EA to manage its own trades independently from others.
B. Basic Settings
-
Base Balance
This represents the percentage of your account balance allocated for trading with the EA.
-
For example, if your account balance is $5000 and you want to use the full amount, enter '100' in the Base Balance input. The EA will then treat 100% of your balance as the base for calculating position size, starting with 0.02 lots.
-
If you only want to use 50% of your capital, enter ‘50’, and the EA will consider $2500 as the base, starting with 0.01 lot.
-
For higher risk exposure, entering ‘200’ will make the EA operate as if the account has $10,000, opening positions from 0.04 lots.
❓How is the initial trading volume calculated?
Initial Volume = (Base Balance in USD / 2500) × 0.01 lots
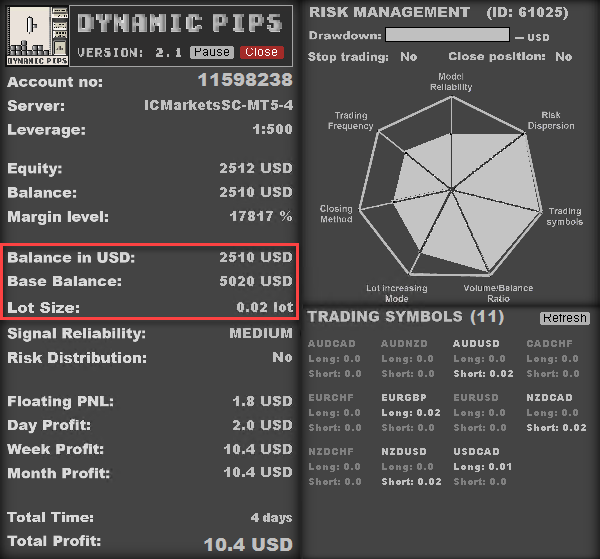
💡Tip: Please verify the displayed Base Balance and calculated lot size in the Dashboard to ensure everything is working as expected. The Lot Size shown reflects the actual volume the EA will use to open trades — adjust this setting carefully based on your risk preference.
Figure 2: Dynamic Pips EA – Balance and Trade Volume Information on the Dashboard
-
Signal Reliability
This setting defines how strict the EA is when validating trade signals.
Higher reliability leads to safer entries but fewer opportunities.
Available levels:
-
Very High
-
High
-
Medium
-
Low
-
Very Low
-
Volume Increasing Mode
Determines how the lot size increases across sequential trades.
Available modes:
-
Conservative – slowest increase rate
-
Moderate – balanced increase
-
Aggressive – fastest volume escalation
This setting affects risk scaling and potential profit acceleration during favorable market conditions.
-
Position Closing Methods
Controls how and when positions are closed:
-
Choose early closure for safety and quicker capital recovery
-
Or allow later exits to potentially capture more profit
This parameter helps you tailor the exit behavior to your trading goals — more defensive or more profit-seeking.
-
Risk Distribution Level
Rather than opening a single large position, the EA can split it into smaller sub-positions, each with independent entry and exit points.
-
A higher level of distribution means more sub-positions, spreading risk and reducing exposure to sharp market moves.
C. Personalised Settings
Personalised Settings allow for deeper customization across all aspects of the EA. These settings override the parameters defined in the Basic Settings.
For example, if the Signal Reliability is set to Medium in the Basic Settings, then adjusting trading frequency here will affect how medium-reliability signals are interpreted and used.
The current values in this section (under default settings) mirror those in Basic Settings. If you wish to modify a specific parameter, you must first enable 'Personalizing trading style' and then adjust the corresponding settings. Parameters that are not adjusted will retain their original behavior.
-
Personalizing Trading Style
Enable this option to activate and apply any changes made under the Personalised Settings section. -
Positions
Choose the direction you wish to trade:
-
Buy Only
-
Sell Only
-
Both
-
Order Volume
Sets the volume of the initial position.
-
Default is 0, meaning the volume from Basic Settings will be used.
-
If a specific number is entered, that value will be used for initial trade entries.
Note: Use a period . for decimals (not a comma , ).
The volume must be within your broker’s allowed range (typically 0.01 to 100), and no more than 2 digits after the decimal.
-
Trading Frequency
Adjust how often the EA opens trades:
-
Low
-
Normal
-
High
This setting tightens or relaxes signal criteria, directly affecting how frequently signals are triggered.
-
Take Profit (pips)
Set the profit target for the first position.
Subsequent grid positions will follow a dynamic closing method based on Fibonacci retracement levels.
-
Stop Loss (pips)
Define the stop-loss level for individual trades.
⚠️ If Risk Management 1 (see Section D – Parameters 19–21) is enabled, this stop loss will be replaced by a group stop-loss, where all trades in a group will close together at a preset distance from the initial entry of that group.
-
Grid Strategy
Enabled by default. When disabled, each signal will open only one position, and no additional trades will be added to form a grid sequence. -
Martingale Strategy
Enabled by default. When disabled, all trades will open with the same volume as the initial position.
Disabling this will also deactivate the Volume Increasing Mode (Setting #6).
⚠️ Note: Martingale is not applicable if the Grid Strategy is turned off.
-
Gap Between Positions (pips)
Defines the minimum distance between trades in a grid.
-
If set to 0, the EA will apply its default spacing based on the currency pair being traded.
-
Using Demand/Supply Zone
Enable this to allow the EA to use automatically detected demand and supply zones as an additional condition for trade entries.
D. Risk Management 1
-
Close all positions after price moves X pips from first entry:
This option allows you to manage risk by closing all positions in a group once the price moves significantly against the initial entry.
✅ 'Enable' is recommended setting.
-
Pip distance to trigger position closure:
Defines the pip distance used to trigger the closure of all positions in a group.
If set to 0, the EA will apply a default distance based on the currency pair.
✅ '0' is recommended setting.
-
Auto-adjust position stop loss to the recent settings:
When the EA is reloaded, the stop loss of existing positions will automatically be adjusted to match the latest configuration.
This is useful if you do not plan to manually modify stop-loss levels.
✅ 'Yes' is recommended for most users.
E. Risk Management 2
This risk management option allows the EA to perform certain actions (such as stopping trading or closing positions) when the drawdown reaches a predefined threshold.
-
Drawdown calculation:
Allows users to define how drawdown is measured — either as a percentage of the account balance or as a fixed value in the base currency (e.g. USD). This setting determines how the actions in items 24 and 25 will be triggered. -
When getting this drawdown level:
Set the specific drawdown value here. It must match the method chosen in item 22:
-
If using percentage-based calculation, a value of 100 means 100% of the account balance.
- If using currency-based calculation, a value of 100 means 100 units of the account’s base currency (e.g., 100 USD for a USD-denominated account, 100 EUR for a EUR account).
-
Stop opening new positions on the symbol:
Yes/No.
If enabled, the EA will stop opening new positions on the current symbol once the drawdown level in item 23 is reached.
Existing positions will still be managed and closed according to the EA’s logic. -
Closing all existing positions of the symbol:
Yes/No.
If enabled, all current positions managed by the EA on the affected symbol will be closed when the drawdown threshold is hit.
⚠️ The EA will only calculate drawdown and manage/close positions that it has opened.
💡 Tip: You can also manually pause trading or close positions on a specific symbol via the Dashboard. See more in the "Pause Trading and Close Positions Manually" section at the end of this guide.
F. Other Settings
-
Exchange rate:
To maintain consistent trading performance across accounts, regardless of the deposit currency (account base currency), the EA automatically converts the account balance into USD to calculate the appropriate trading volume.
If the conversion fails or the applied exchange rate is inaccurate, users can manually update the value in this field.
For example, if your account currency is GBP and 1 USD = 0.79 GBP, enter 0.79 in the "Exchange Rate" field.
💡 Tip: Please verify the converted balance in the Dashboard to ensure the EA has applied the correct exchange rate and make adjustments if necessary. -
Max positions per group:
The EA groups multiple positions into a sequence (or "group") that is closed together.
This setting defines the maximum number of positions allowed per group. -
Max spread for trading (pips):
This sets the maximum floating spread (in pips) allowed for opening a new position.
-
If the current spread exceeds this value, no new trades will be placed.
This helps avoid trading during low liquidity or high volatility events (e.g., major news releases).
1 pip = 10 points.
-
Order comment:
You may enter a custom comment (maximum 15 characters) to be included in the comment section of each order.
Note: The EA will append internal management tags to your comment automatically. -
Display Supply/Demand zone:
Toggle the visibility of supply and demand zones generated by the EA on the chart. -
Display Dashboard:
Enable or disable the display of the EA's Dashboard panel. -
Dark/Light Mode:
Choose between dark or light mode for the Dashboard interface.
II. Installation Guide
Dynamic Pips EA is a single-symbol Expert Advisor, meaning it can only be tested or applied to one currency pair at a time — specifically the pair of the chart where the EA is attached.
To operate the EA across multiple pairs, follow these steps:
- Enable ‘Algo Trading’ (MT5) or ‘Auto Trading’ (MT4) to allow the terminal to execute EA operations.
- Open the charts of all the currency pairs you wish to trade.
- Set the timeframe of each chart to M5.
- Drag the EA onto each chart, configure the desired parameters, and click OK to complete the setup.
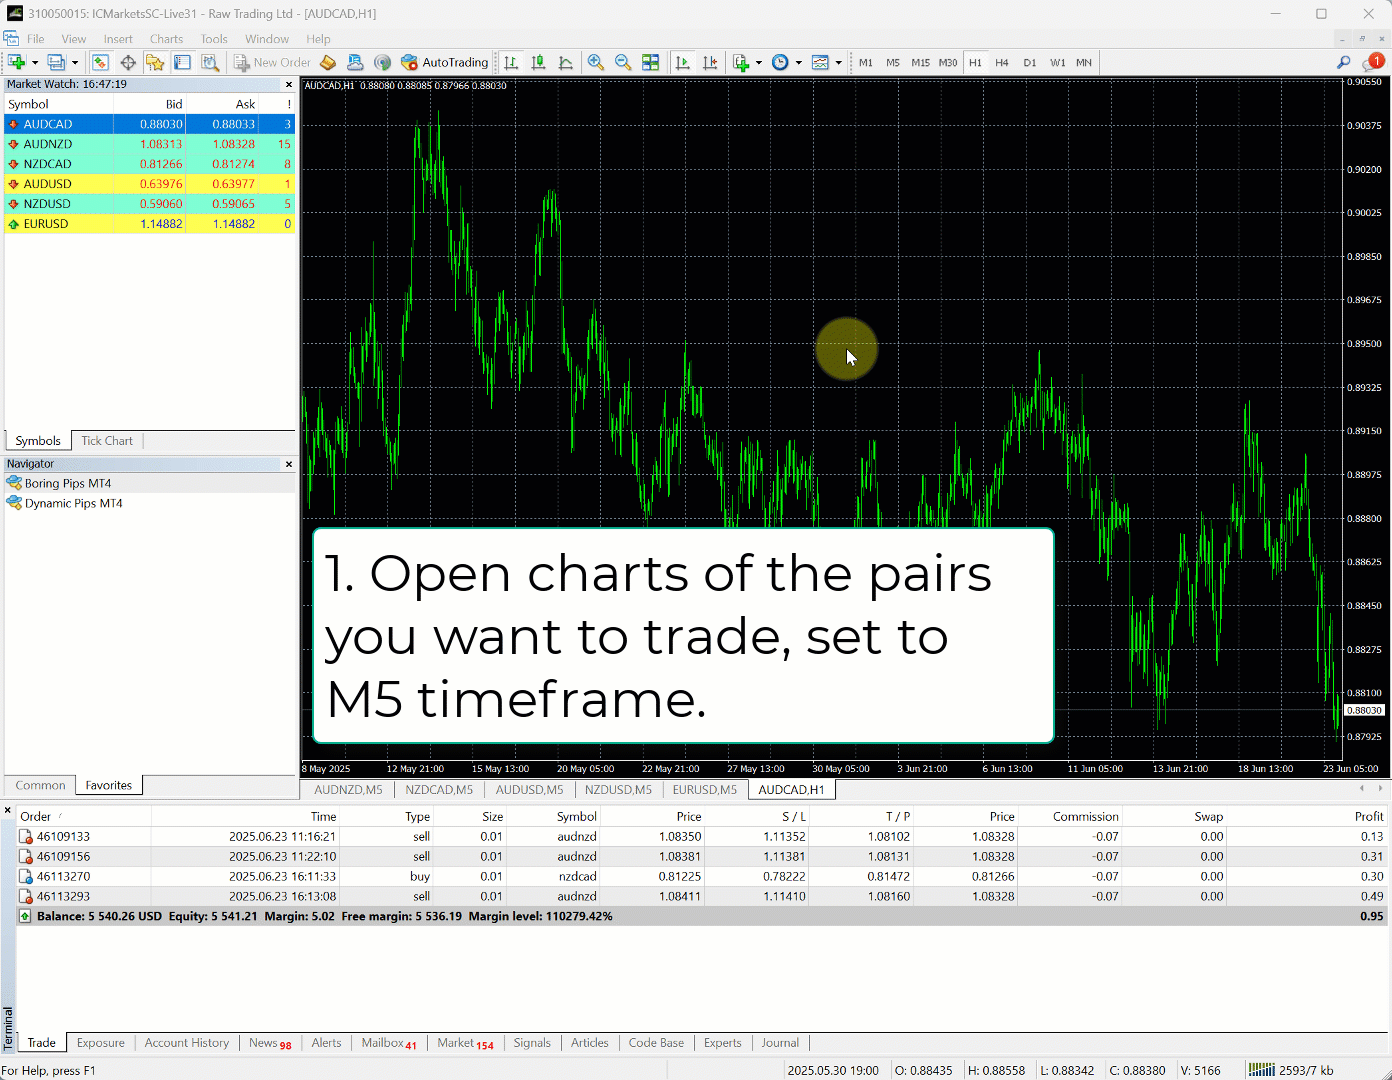
Figure 3: Dynamic Pips EA – Installation Guide
The EA comes with pre-configured settings for 11 currency pairs:
AUDNZD, NZDCAD, AUDCAD, AUDUSD, NZDUSD, EURUSD, USDCAD, CADCHF, EURGBP, NZDCHF, EURCHF.
➡️ Preset files have been prepared for each pair: "Dynamic Pips EA: Installation File".
Simply download the relevant file and apply it to the corresponding chart.
⚠️ Ensure you are using the correct version of the EA (MT4 or MT5) that matches the preset file.
💡 Tip: It’s recommended to use the provided preset files during the first 2–3 months.
Once you understand how the EA operates, you can begin customizing deeper settings or exploring use on other instruments, including indices and cryptocurrencies.
With full control over signal filters, trading frequency, direction, gap, TP, SL, volume, and more — the power is truly in your hands.
Recommended minimum capital to use the EA is $1000.
Here are our portfolio suggestions based on your account size:
-
$1000: AUDCAD, NZDCAD, AUDNZD
-
$1500: AUDCAD, NZDCAD, AUDNZD, AUDUSD, NZDUSD
-
$2000: AUDCAD, NZDCAD, AUDNZD, AUDUSD, NZDUSD, EURCHF, EURGBP
-
$2500 or more: All 11 supported pairs — AUDCAD, NZDCAD, AUDNZD, AUDUSD, NZDUSD, EURCHF, EURGBP, EURUSD, USDCAD, CADCHF, NZDCHF
Note: These are fast-start portfolio recommendations based on the preset files prepared in: "Dynamic Pips EA: Installation File".
III. Pause Trading and Close Positions Manually
Dynamic Pips EA users can manually pause trading or close all positions at any time using the Pause and Close buttons on the control panel.
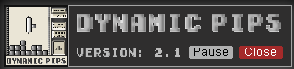
Figure 4: Dynamic Pips EA – Pause/Close Button Interface on the Dashboard
-
The 'Pause' button
 :
:
In its default state, this button is gray.
When clicked, a confirmation dialog will appear. Once confirmed, the EA will pause trading on the current symbol — no new positions will be opened, but existing positions will continue to be managed and closed normally.
While paused, the button changes to 'Paused' and turns red.
Clicking it again will resume normal trading activity.
⚠️ If you're unable to resume trading (the button still shows 'Paused' in red), check Risk Management 2 settings, particularly sections 23 and 24.
The EA may have hit the maximum allowed drawdown and auto-disabled trading.
To resolve this, modify the drawdown threshold in section 23 and/or disable the stop-trading action in section 24, then click the 'Pause' button again to reactivate trading.
-
The 'Close' button
 :
:
This button allows you to manually close all positions on the current symbol.
After clicking, a confirmation dialog will appear. Upon confirmation, the EA will immediately close all positions it manages on that symbol.
If you’ve made it this far and still have questions about the EA, please feel free to send me a private message.
Thanks and Best Regards,
Andy


")
