
Custom Graphical Controls. Part 3. Forms
Introduction
The first article "Creating a Simple Control" dealt with graphical control creation principles and provided a step-by-step example demonstrating the creation of a simple control. The continuation article "Control Library" set forth a set of ready-made controls. There is yet another very important graphical interface component - the form.
The form represents a rectangular specially designated part of the screen against which the controls are displayed. Besides, the form is also a container that allows to simultaneously manage all the controls it contains: to hide, display and move them all together.
The closing article will set forth the creation of forms and their use in combination with the controls.
Classes for working with the forms have been added to IncGUI.mqh file used in the previous articles (new file name is IncGUI_v3.mqh). In addition to the classes for working with the forms, some more classes have been added to the file, CHMenu (Horizontal Menu) and CVMenu (Vertical Menu) classes have been updated and a few errors fixed.
Classes added:
- CFrame Class - Frame. The class is identical to the frame created by the Frame method of CWorkPiece class.
- CButton Class - Button. A regular button (OBJ_BUTTON).
- CLabel Class - Label. Apart from displaying the label as it is done by the graphical object "Label" (OBJ_LABEL), this class allows for display of a text in a few lines whereby the lines are separated by "\n" symbol.
As a result of adding new classes, CColorSchemes class has been modified, as follows: colors for the new controls have been added.
Changes in CHMenu and CVMenu classes: the applied changes allow to create two-level menus with drop-down tabs. This will be considered in more detail in section "Creating the Main Menu" below.
Errors: a correction in the Frame() method of CWorkPiece class - a subwindow number for a rectangle label could not be set. CListMS Class - Selected() and SetSelected() methods - the array size is now checked, otherwise it was impossible to use an empty list.
1. Forms
The form is based on the graphical objects "Rectangle Label" OBJ_RECTANGLE_LABEL with use of several buttons OBJ_BUTTON. Visually, the form represents a rectangle (Fig. 1) with a bar in the top part of the form where the form name and control buttons are displayed.
A button moving the form (with a hand image) is situated at the left, minimizing button (with a rectangle image) and close button (with a cross image) are situated at the right.
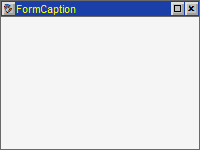
Fig. 1. Form
In order to move the form, press the move button (the button will get into the pushed position) and click anywhere in the chart where the form should be moved to. As a result, the move button will get released and the form will move to the indicated place (its top left corner will be situated on the clicked point).
Where the indicated place is at the edge of the chart and the form has to be placed outside the chart border, the form position will be adjusted so that it is completely visible in the chart.
It is possible to create several types of forms:
- Type 0 (Fig. 1);
- Type 1 - with additional "Cancel" and "Apply" buttons (Fig. 2);
- Type 2 - with additional "Close" button (Fig. 3);
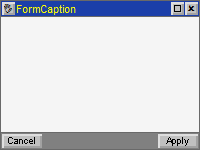
Fig. 2. Form of type 1 (with "Cancel" and "Apply" buttons)
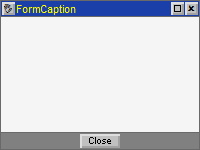
Fig. 3. Form of type 2 (with the "Close" button)
Programmatic means for working with the forms are represented by two classes: CFormBase and CFormTemplate.
CFormBase class is a base class while CFormTemplate is a subclass of the CFormBase class. In effect and principle (including the application principle), CFormBase class is exactly the same control as other controls previously described.
CFormBase class has the Init() method for control preparation, SetPos() and Show() methods for display of a form (creation of graphical objects representing a form), Hide() method for hiding, Refresh() method for refreshing the display, Event() method for event handling and other methods as in all other controls.
Application of a form as well as the use of the controls starts with the call of the Init() method, followed by setting a position with the use of the SetPos() method and enabling the display by the Show() method or else the display can be enabled utilizing just the Show() method with parameters, and a form can be hidden using the Hide() method.
An Event() method call is added to the OnChartEvent() function to ensure the form control capability (moving, minimizing, closing, etc.). Where it is required to ensure the operation of the form in a subwindow, the SetSubWindow() method is used which is called right after calling the Init() method as well as in the OnChartEvent() function upon the CHARTEVENT_CHART_CHANGE event. Everything is the same as in other controls.
While the standard controls are independent (they do not have to be associated with other controls), the form implies the existence of a mandatory association with other controls in order to ensure simultaneous display/hiding of the controls situated in the form together with hiding/display of the form. Thus, a synchronized operation of the Init(), Show() and Hide() methods of the form and related controls should be ensured.
One certainly can just call (e.g. when calling the Show() method of the form) the Show() methods of all controls relating to the form but when several forms are used in the program such approach will result in a code which is unstructured and inconvenient for understanding, debugging and updating.
One can make a copy of the form class for each form and add working code with controls into it; however this will again result in the unstructured code (where the code of the form will not be separated from the code related to control operation), excessive duplication of the code where only the code part in charge of the design and functionality of the form will be duplicated; all these will complicate the application of modifications to any form functions as it will require the changes to be made in every class copy.
The division into the base class and subclass helps to solve the problem of creating several forms, synchronization of display of the form and related controls and clear separation of the code relating to different forms. In addition to solving the basic problems, the use of the class and subclass will allow for the future upgrading of the base class without having to make any changes to already completed work.
In order to synchronize the call of the Init(), Show() and Hide() methods of the controls and the form, the CFormBase class has some differences from the standard control class: a few virtual methods in a protected section:
virtual void MainProperties() {}
virtual void OnInitEvent() {}
virtual void OnShowEvent() {}
virtual void OnHideEvent() {}
virtual void EventsHandler(const int id, const long& lparam, const double& dparam, const string& sparam){}
virtual void OnWindowChangeEvent(int aSubWindow) {}
virtual bool OnCancelEvent() {return(true);}
virtual bool OnApplyEvent()  {return(true);}
These methods are virtual which means that redirection to the corresponding real methods of the CFormTemplate subclass is carried out via them.
CFormTemplate subclass is not used by itself, it is a template. In order to create a new form, make a copy of the CFormTemplate class with a unique name (just copy the code of the CFormTemplate class, rename it and repeat the same for every form). The copying of subclasses allows for separation of the code relating to different forms.
Virtual methods are situated in the protected section and will therefore be inaccessible for a call which is not even necessary since the methods are already called from the base class upon different form events - you should only add a code for operation of the controls corresponding to these events.
The below graph shows the interaction between the Expert Advisor functions and standard control class methods. (Fig. 4) and as a comparison the interaction with the form class methods (Fig. 5).
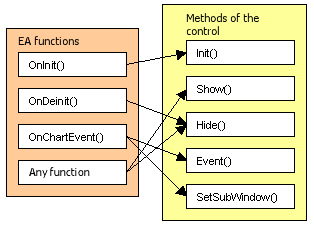
Fig. 4. Interaction between the Expert Advisor functions and the control methods
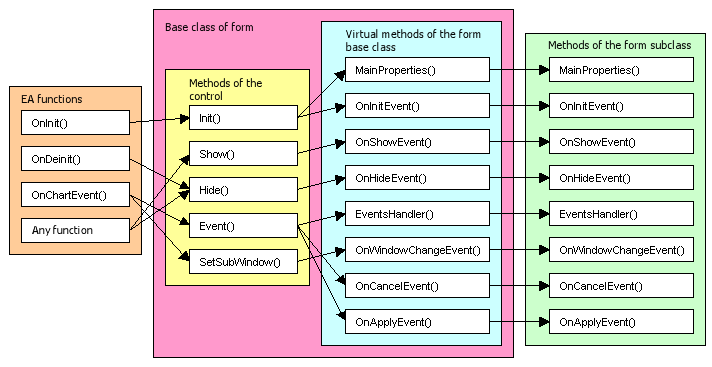
Fig. 5. Interaction between the Expert Advisor functions and the form class methods
Let's review the purpose of each method in detail:
MainProperties() and OnInitEvent() methods are called from the Init() method of the form. The MainProperties() method sets the appearance of the form (form type, presence of the move, minimize and close buttons). The OnInitEvent() method calls the Init() methods of all the controls and sets default values to the controls.
The OnShowEvent() method is called from the Show() method; the calling code of the Show() methods of all the controls is added to it.
The OnHideEvent() method is called from the Hide() method; the calling code of the Hide() methods of all the controls is added to it.
The EventsHandler() method is equivalent to the Expert Advisor's OnChartEvent() function. The Event() method of the form is called from the Expert Advisor's OnChartEvent() function and all chart events are simply redirected to this method. The calling code of the Event() methods of all the controls and the corresponding event handling are added to EventsHandler().
The OnWindowChangeEvent() method is called from the SetSubWindow() method when changing a subwindow. The calling code of the SetSubWindow() methods of all controls is added to it. The method has a parameter that conveys a new subwindow number to be set in all controls.
The OnCancelEvent() method is executed upon closing the form (when clicking the button with a cross image, "Cancel" or "Close" buttons). One can add some check code into it at closing of the form, for example a call of a confirmation window to make sure that the form really needs to be closed. If the method returns true, the code closing the form will be completed and the form will close; if the method returns false, running of the code that closes the form will be interrupted and the form will remain open.
The OnApplyEvent() method is executed when clicking the "Apply" button of the form. Here (as in the OnCancelEvent() method) one can execute some check and see if the method returns true or false thus allowing or not allowing the form to close. This method can also contain a code for saving the control values so that the control values at the next start of the Expert Advisor are the same as before the program was closed. And for this purpose, the saved values should be loaded in the OnInitEvent() method and set to the controls.
2. A Step-By-Step Procedure for Creating a New Form
So a step-by-step procedure for creating a new form is, as follows:
1. Include IncGUI_v3.mqh file.
#include <IncGUI_v3.mqh>
2. Copy the code of the CFormTemplate class from the IncGUI_v3.mqh file to a file of your Expert Advisor (the subclass is at the end of the file) and rename it (in the example of the library use the subclass is named CForm).
class CFormTemplate: public CFormBase{
   public:
   protected:
      void MainProperties()
     {
        m_Name        = "Form";       // Form name. The names of all the controls of this form should start with it.
        m_Width       = 200;           // Form width
        m_Height      = 150;           // Form height
        m_Type        = 1;             // Form type: 0 - without buttons, 1 - with "Apply" and "Cancel" buttons, 2 - with the "Close" button
        m_Caption     = "FormCaption"; // Form caption
        m_Movable     = true;          // Movable form (the button with a hand image is displayed in the top left corner)
        m_Resizable   =  true;         // Form minimizing/maximizing allowed (the button with a rectangle image
                                           // is displayed in the top right corner)
        m_CloseButton = true;          // Form closing allowed (the button with a cross image is displayed in the top right corner)
     }
      void OnInitEvent() {}
      void OnShowEvent(int aLeft, int aTop) {}
      void OnHideEvent() {}
      void OnWindowChangeEvent(int aSubWindow) {}
      void EventsHandler(const int id,const long& lparam,const double& dparam,const string& sparam){}
      bool OnApplyEvent()  {return(true);}
      bool OnCancelEvent() {return(true);}
};
One can create a separate include file for the form code, include it in the Expert Advisor, copy the code of the CFormTemplate subclass into it and do the remaining coding relating to the form operation in this file.
Drawing an analogy with the use of a visual editor, this step would be quite similar to clicking the button to create a new form following which a new form file with functions of various form events would appear in the project.
3. Set the main properties of the form. This step is executed in the MainProperties() method by assigning values to the variables declared in the base class. Detailed comments on the purposes of all variables are provided in the template. You may note the similarity of this step with the use of the form properties window in a visual editor (for example VBA in Excel).
void MainProperties()
{
   m_Name         =  "Form";        // Form name. The names of all the controls of this form should start with this one.
   m_Width        =  200;           // Form width
   m_Height       =  150;           // Form height
   m_Type         =  1;             // Form type: 0 - without buttons, 1 - with "Apply" and "Cancel" buttons, 2 - with the "Close" button
   m_Caption      =  "FormCaption";   // Form caption
   m_Movable      =  true;          // Movable form (the button with a hand image is displayed in the top left corner)
   m_Resizable    =  true;          // Form minimizing/maximizing allowed (the button with a rectangle image
                                    // is displayed in the top right corner)
   m_CloseButton = true;            // Form closing allowed (the button with a cross image is displayed in the top right corner)
}
One can notice another difference of the form from the other controls - the form name is set in the MainProperties() method instead of being transmitted as the Init() method parameter.
The main work on the form is done in a subclass; every subclass of the form is only declared once so there is no need in specifying different names when calling the Init() method of one subclass of the form.
The only parameter that can be transmitted to the Init() method is the State parameter but even this one is not mandatory. The value of the State parameter determines the initial state of the form when displayed: maximized or minimized. If the value is 1, the form is maximized (Fig. 1, 2, 3), if the value is 2, the form is minimized (Fig. 6).
![]()
Fig. 6. Minimized form
4. Declare a class.
CForm frm;
5. Make standard steps to use of the control: call the Init() method of the form from the Expert Advisor's OnInit() function, call the Deinit() method from the OnDeinit() function, call the Event() method from the OnChartEvent() function and, where necessary, call the SetSubWindow() method upon the CHARTEVENT_CHART_CHANGE event.
The form should afterwards be visible in the chart and respond to clicking the move, minimize, close buttons, etc.
We then proceed to adding the controls to the form.
3. A Step-By-Step Procedure for Adding the Controls to the Form
Declaring the controls. If you need to ensure access to the control methods outside the form, the control classes should be declared in the public section; if all the work can be done within the form class, the control classes should be declared in the protected section.
Declaring the variables to restore the control values. An optional step. If you are going to use the form with "Cancel" and "Apply" buttons, a variable should be added to every control for storing the value the control had upon opening of the form in order to restore the value if a user changes the control value but presses the "Cancel" button.
Calling the Int() methods of all the controls. It is executed in the OnInitEvent() method.
Loading the saved data. An optional step. It is executed in the OnInitEvent() method. The step is used when it is necessary for the controls to retain their values after restarting the Expert Advisor, Terminal or computer. Data saving is performed in step 12.
Setting the default values. In this step, all the controls are set at values that will be seen in the controls upon the first opening of the form after starting the Expert Advisor (until their values are changed by a user). If the data was loaded in step 4, the loaded data is used. Further preparation of the controls is also performed in this step, for example list and menu items are also added here.
Calling the Show() methods (version with parameters) for all the controls is executed in the OnShowEvent() method. The OnShowEvent() method has two parameters (int aLeft, int aTop) which convey the coordinates of the top left corner of the workspace of the form. The control positions are set subject to values of these variables (values should be added).
A call of the Hide() method for all the controls of the form is executed in the OnHideEvent() method.
Calling the SetSubWindow() method. An optional step. If it is necessary to display the form in a subwindow, the SetSubWindow() method is called for all the controls. It is executed in the OnWindowChangeEvent() method which has a parameter (int aSubWindow) that conveys a new subwindow number.
Calling the Event() methods of all the controls. This is executed in the EventsHandler() method.
Handling control events. An optional step. If it is required to ensure interaction between the controls upon their events, it is in this step that the events are handled and appropriate actions are executed. This is executed in the EventsHandler() method.
Applying new values. An optional step which is executed by using the "Apply" button. It is executed in the OnApplyEvent() method. In this step, the control values are checked for accuracy; if any incorrect values are found, the user must be notified, the method shall return false and the form will remain open. If the values are correct, true shall be returned for the form to close.
Data saving. An optional step. It is executed in the OnApplyEvent() method by using the "Apply" button. Data can be saved (depending on objectives and purposes) in a file, global variables, invisible objects in the chart, etc.
Check in the OnCancelEvent() method. An optional step. If false is returned from the OnCancelEvent() method, the form will remain open, i.e. the close button will not respond. In order for the form to close, true should be returned from the method.
An example of working with forms can be found in the appended eIncGUI_v3_Test_Form.mq5 file. The main form with different controls opens at startup (Fig. 7).
Note that the form doesn't have a close button; this is the main form and it should not be made to disappear from the chart otherwise the Expert Advisor will have to be restarted for the form to reappear.
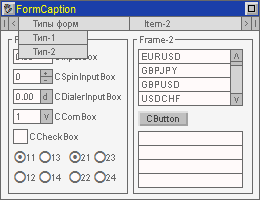
Fig. 7. Main form from the eIncGUI_v3_Test_Form.mq5 example with an open main menu tab
Using the main menu commands, you can open the other two variants of the form.
Main menu - Form types - Type 1 opens a form of type 1 (with "Cancel" and "Apply" buttons).
Main menu - Form types - Type 2 opens a form of type 2 (with the "Close" button).
Both forms require confirmation upon their closing (done using the MessageBox() function). The type 1 form has an input box; an input value is checked by clicking the "Apply" button. The type 2 form has a new control "Label" (CLabel class) and a few buttons (CButton class) to test it.
Now, as mentioned in the introduction, let us review the changes in the CHMenu and CVMenu classes as exemplified by creating the main menu.
4. Creating the Main Menu
First of all, I would like to say that only two-level menus can be created: a horizontal bar (based on the CHMenu class) and tabs (based on the CVMenu class). In principle, it is possible to create even more levels but the process will be very complicated and laborious which is why it is not recommended and will not be considered any further.
In fact, creation of the main menu for the form was not even planned, and CHMenu and CVMenu classes were supposed to be used individually and independently of each other to enable/disable various functions and instruments. However a slight improvement of CHMenu and CVMenu classes made it possible to get the main menu which is appropriate enough for the majority of cases.
In order to create a full-fledged multi-level menu, a somewhat different approach has to be applied (creation of a tree-like data structure) which can serve a subject for a whole separate article so we will now limit ourselves to the existing means.
Let us first review all changes and corrections applied to CHMenu and CVMenu classes.
In CVMenu class, a response to clicking the graphical object "Label" has been fixed which is used to display the tick symbol. Accordingly, there have been changes in operation of the LastClickedX(), LastClickedY() and LastClickedQuarter() methods. When clicking the labels values are now returned as in case with text boxes. Similar corrections have been applied to the CHMenu class and LastClickedX(), LastClickedY(), LastClickedQuarter() and LastClickedW() methods.
Both classes have been updated by adding SolvePosX() and SolvePosY() methods which are intended for calculating the coordinates of a graphical object displayed at the menu command. The width of the displayed object is transmitted to the SolvePosX() method and the height of the displayed object is transmitted to the SolvePosY() method which return X- or Y- coordinate of the displayed object, respectively. Now there is no more need to use the LastClickedX(), LastClickedY(), LastClickedQuarter() and LastClickedW() methods.
Both classes have been updated by adding LastClickedName1() and LastClickedName2() methods. These methods return the names of graphical objects forming the last clicked menu item. LastClickedName1() returns the name of the text box, LastClickedName2() returns the name of the label for the tick symbol.
ToggleNameAdd() and ToggleNamesClear() methods have been added to CVMenu. The ToggleNameAdd() method is used to create a list of "toggle" names, the ToggleNamesClear() method is used to clear this list. When using the ToggleNameAdd() method (adding a name to the list), the menu will close automatically upon any chart event except for the events of the graphical objects forming the menu and the graphical objects whose names were added by the ToggleNameAdd() method. The menu returns to the normal operating mode when the list is cleared by the ToggleNamesClear() method.
The operation of the two-level menu is, as follows: when the event of clicking the horizontal menu item is defined by the LastClickedName1() and LastClickedName2() methods, we get the names of the objects of this item which are further transmitted to ToggleNameAdd() of the vertical menu.
Following this, the vertical menu will be hidden upon any chart even except for events of the vertical menu and one horizontal menu item (by means of which the vertical menu was opened).
If a user selected an item of the vertical menu, the vertical menu should be closed and the actions corresponding to this item should be executed. If a user repeatedly clicked the same horizontal menu item (by means of which the vertical menu was opened), the vertical menu should be hidden.
Let us review an example of t/phe menu creation.
The main menu has three items therefore we need three vertical menus. Declare a horizontal menu class and three vertical menu classes in the public section of the form subclass (the below example shows it in exactly the same way as in eIncGUI_v3_Test_Form.mq5 example):
class CForm: public CFormBase{
public:
   CHMenu m_hm;
   CVMenu m_vm1;
   CVMenu m_vm2;
   CVMenu m_vm3;
Initialize the menu classes in the OnInitEvent() method and add menu items:
// Horizontal menu
m_hm.Init(m_Name+"_HM",m_Width,2);
// Adding horizontal menu items
m_hm.AddItem("Form types");
m_hm.AddItem("Item-2");
m_hm.AddItem("Item-3");
// Vertical menu 1
m_vm1.Init(m_Name+"_VM1",70,10);
// Adding items to vertical menu 1
m_vm1.AddItem("Type-1");
m_vm1.AddItem("Type-2");
// Vertical menu 2
m_vm2.Init(m_Name+"_VM2",70,3);
// Adding items to vertical menu 2
m_vm2.AddItem("Item-2-1");
m_vm2.AddItem("Item-2-2");
m_vm2.AddItem("Item-2-3");
m_vm2.AddItem("Item-2-4");
m_vm2.AddItem("Item-2-5");
// Vertical menu 3
m_vm3.Init(m_Name+"_VM3",70,3);
// Adding items to vertical menu 3
m_vm3.AddItem("Item-3-1");
m_vm3.AddItem("Item-3-2");
m_vm3.AddItem("Item-3-3");
m_vm3.AddItem("Item-3-4");
m_vm3.AddItem("Item-3-5");
Hide the menu in the OnHideEvent() method:
void OnHideEvent()
{
   m_hm.Hide();
   m_vm1.Hide();
   m_vm2.Hide();
   m_vm3.Hide();
}
Display the horizontal menu in the OnShowEvent() method:
void OnShowEvent(int aLeft,int aTop)
{
    m_hm.Show(aLeft,aTop);
}
Finally, the main work in the EventsHandler() method.
Call the Event() methods of all the menus:
void EventsHandler(const int id,const long& lparam,const double& dparam,const string& sparam)
{
    int m_event0=m_hm.Event(id,lparam,dparam,sparam);
    int m_event1=m_vm1.Event(id,lparam,dparam,sparam);
    int m_event2=m_vm2.Event(id,lparam,dparam,sparam);
    int m_event3=m_vm3.Event(id,lparam,dparam,sparam);
Depending on m_event0 value (horizontal menu item index), work with the appropriate vertical menu (e.g. with item 0 and vertical menu 1):
if(m_event0==0)
{ // Clicking item 0
   if(m_vm1.Visible())
   {
      m_vm1.Hide(); // If the vertical menu is open, close it
   }
   else{ // If the vertical menu is closed
      m_vm1.ToggleNamesClear(); // Clear the list of "toggle" names
      // Add to the list the names of the graphical objects forming the item
      // of the horizontal menu which led to the last event
      // of the horizontal menu
      m_vm1.ToggleNameAdd(m_hm.LastClickedName1());
      m_vm1.ToggleNameAdd(m_hm.LastClickedName2());
      // Display the vertical menu
      m_vm1.Show(m_hm.SolvePosLeft(m_vm1.Width()),m_hm.SolvePosTop(m_vm1.Height()));
   }
}
Such actions should be performed for all horizontal menu items opening the vertical menu. If the vertical menu event occurred, close the menu.
Depending on the index of the clicked item do, as follows:
if(m_event1>=0)
{ // Vertical menu event 1
   m_vm1.Hide(); // Hide the menu
      if(m_event1==0)
      { // Clicking item 0
        //...
      }
      if(m_event1==1)
      { // Clicking item 1
        //...
      }
}
Such actions should be performed for all vertical menus and all their items.
The creation of the main menu has now been completed.
Conclusion
This article finalizes the series of articles devoted to creation of a graphical interface.
As a result of our work, we have quite a considerable arsenal of means for a quick creation of a multi-functional and easy-to-use graphical interface. This is quite consistent with existing requirements to a graphical interface:
- Using the framework in the form of a caption and a form which can be minimized/maximized, moved;
- Clearly designated areas of code relating to one form or another;
- Display/hiding of the controls is synchronized with the display/hiding of the form.
All controls and the form have a common design and color scheme which can be quickly changed.
Let us repeat the procedure for creating a form.
A brief procedure for creating a form:
Include IncGUI_v3.mqh file.
Make a copy of the CFormTemplate class with a unique name and declare this class.
Set the form properties in the MainProperties() method of the subclass copy.
Call the Init(), Hide() and Event() methods of the form from the Expert Advisor's OnInit(), OnDeinit() and OnChartEvent() functions, respectively. Call the Show() method from the Expert Advisor's OnInit() function or as necessary.
Work with the controls. Declare the control classes in the subclass copy. Call the Init(), Show(), Hide() and Event() methods of the controls from the OnInitEvent(), OnShowEvent(), OnHideEvent() and EventHandler() methods of the subclass copy.
Appendix
List of Appended Files:
- IncGUI_v3.mqh - an include file containing all the classes to create a graphical interface. The file should be placed in MQL5/Include directory of the Terminal Data Directory.
- eIncGUI_v3_Test_Form.mq5 - an example of working with forms. The file should be placed in MQL5/Experts directory of the Terminal Data Directory.
- IncGUIv3mqh.chm - documentation to IncGUI_v3.mqh file.
Translated from Russian by MetaQuotes Ltd.
Original article: https://www.mql5.com/ru/articles/322
Warning: All rights to these materials are reserved by MetaQuotes Ltd. Copying or reprinting of these materials in whole or in part is prohibited.
This article was written by a user of the site and reflects their personal views. MetaQuotes Ltd is not responsible for the accuracy of the information presented, nor for any consequences resulting from the use of the solutions, strategies or recommendations described.
 The Role of Statistical Distributions in Trader's Work
 Object-Oriented Approach to Building Multi-Timeframe and Multi-Currency Panels
 Universal Regression Model for Market Price Prediction
 Interview with Andrea Zani (ATC 2011)
- Free trading apps
- Over 8,000 signals for copying
- Economic news for exploring financial markets
You agree to website policy and terms of use
Two polarised approaches.
They're also polar. I was talking about the equator. In short, everyone is right. I don't see the point of discussion without the second realisation at all. When it appears, we will continue :)
Thanks for this article, very usefull.
But i cant see the chm file (IncGUIv3mqh.chm - documentation to IncGUI_v3.mqh file.), seems it missing.
Isbit possible to draw graph like chart in such form ?
Thanks for this article, very usefull.
But i cant see the chm file (IncGUIv3mqh.chm - documentation to IncGUI_v3.mqh file.), seems it missing.
...
You know, comrade Sergeyev, could you tell me what's going on? It's just a matter of making all classes members of one class, attaching them to a form, and making an array of objects in the form. Although the convenience of this is questionable. But no - you have to get into a pose and turn your nose away defiantly.
I have tried several libraries for creating GUI, I can say with full responsibility for my words that my library at the moment, even despite the fact that some elements are obsolete, is the best. Simple, easy, obvious to use.
Oh, and all the theory and practice and reference manual in three articles.