Grid CCI EA
- 专家
- 版本: 3.14
- 激活: 5

A GRID THAT WAITS FOR THE STRETCH TO SNAP BACK
Grid CCI EA lets the Commodity Channel Index decide when a cycle is worth starting, then hands the position to a disciplined manager that banks small net gains and shrinks its oldest orders step by step.
Watch it before you pay anything: load Grid CCI EA in the MetaTrader 5 Strategy Tester, tick visual mode and play back your own broker's history. You will see arrows land on the candles where a cycle armed, the CCI Pulse row count down to the next trigger and the Hedge Vault sit quietly under the main panel. In our own runs ($1,000,000 and $10,000 on EURUSD H1, $10,000 on XAUUSD D1) the tester finished with zero "not enough money" messages and zero stop-outs. Repeat it on your data and judge for yourself.
- Signal: the classic CCI (period 20, typical price) arming a cycle only when it LEAVES an extreme zone, read on closed candles, never repainting.
- New Exhaustion Guard: a runaway move that blew far past the extreme is skipped, so the first cycle does not open against a crash or a spike.
- Optional EMA trend filter: follow the trend side, fade it, or ignore it.
- Full grid engine: separate BUY and SELL ladders, ATR spacing, group closures measured after swap and commission, slicing of the heaviest order.
- Isolated per chart by account, symbol and magic numbers; hedging and netting accounts; no DLLs.
WHY CCI
The Commodity Channel Index measures how far price has wandered from its own typical level. Readings beyond +100 or below -100 mean the market is stretched. Many traders jump in the moment the line touches those zones and get run over while the stretch keeps stretching. Grid CCI EA does the opposite: it waits until the line turns and walks back out of the zone. That moment says the push has paused, and it is the only moment the first grid level is allowed to open.
THE KAIZEN STEP IN THIS EDITION: EXHAUSTION GUARD
Not every exit from a zone is equal. When CCI has just screamed to an extreme reading in the last few candles, the market is usually in a news spike or a breakout, and the first bounce is often a trap. The Exhaustion Guard looks back a few bars and skips the signal if the CCI went beyond your extreme level (300 by default). The CCI LENS row on the panel shows the guard as HOT or calm, so you always know why the EA is waiting.
START HERE: YOUR FIRST TEN MINUTES
- Open the Strategy Tester, choose Grid CCI EA, select EURUSD H1, deposit close to what you would really use.
- Leave every input on its default and switch on visual mode.
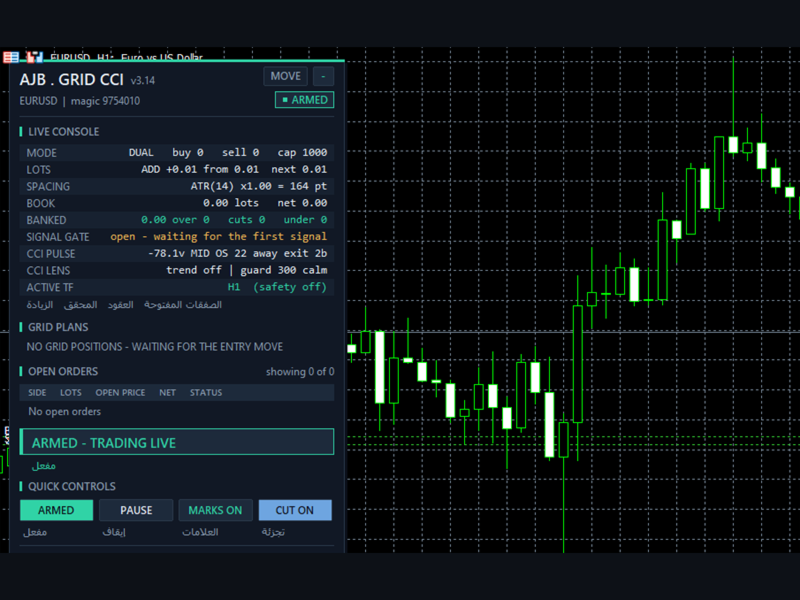
- Press Start and watch the CCI PULSE row: value, slope arrow, zone tag (OVERSOLD / MID / OVERBOUGHT), how far the next trigger is and how many bars since the last exit.
- When the first arrow appears, follow the plan cards: which orders are grouped for closure and what target they must clear.
- Open the journal and confirm there are no money or volume errors on your broker's contract specifications.
- Try XAUUSD D1 next, then decide on a live lot size your account can carry through a long trend.
ONE CYCLE, FIVE STAGES
1. The sign. CCI leaves an extreme zone on a closed candle; the guard and the optional trend filter must agree; a quiet spacing of bars must have passed since the last accepted signal.
2. The ladder. Levels open at a distance that follows volatility through ATR, with a floor and a ceiling you set, and lots that grow additively or by a multiplier up to your maximum lot.
3. The harvest. The closer combines the oldest and the newest orders and closes the group as soon as the combined result clears your target after swap and commission. When a whole old order is too heavy, it buys back only a slice of it with profit already on the table.
4. The guard. A reopen guard rejects closures that would instantly reopen the same level; every closure is verified against the deal history; a stalled plan clears itself automatically once a fresh scan proves the book is consistent, and a broker refusal of partial closes expires after a few minutes instead of blocking the session.
5. Optional hedge cycle. Off by default. When enabled it holds a balanced pair on a symbol you choose and retires it in slices paid by a small surcharge on closures the grid already makes. Its Hedge Vault block docks directly under the main panel.
THE PANEL
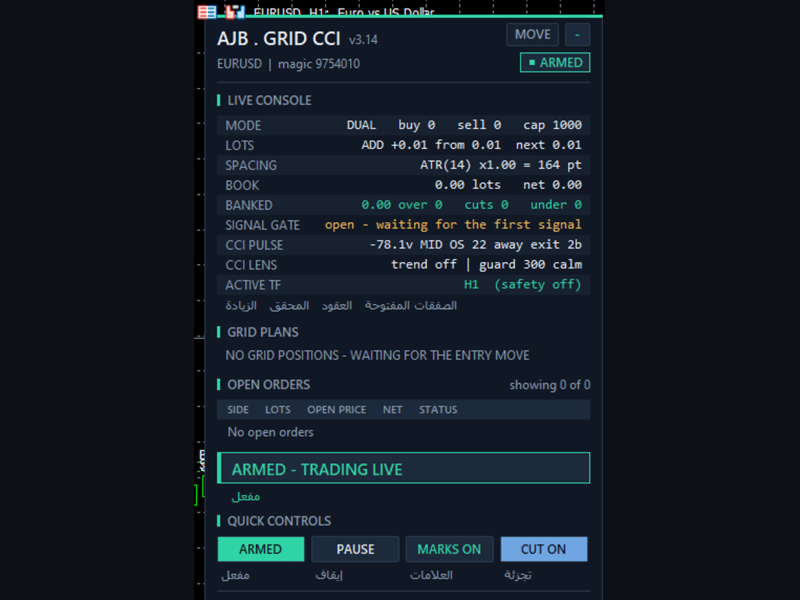
A dark console on the left side of the chart, leaving the right side and the price scale clean. It shows status, mode, lot ladder, spacing, the book, banked profit, the signal gate, CCI PULSE (live CCI value and zone tag), CCI LENS (trend filter and Exhaustion Guard state), the active timeframe, the closing plan for each side with its own button, and the open orders. It can be dragged and minimised, adapts to any screen, and draws nothing in non-visual optimisation so tests run at full speed.
SAFETY YOU CONTROL
- No forced close-all: protection works by refusing new levels, never by dumping the book at the worst price.
- The money check asks one honest question: is there enough free margin, with a 50 percent buffer, for this order? No hidden hard limits.
- Margin Timeframe Safety (off by default): when margin level falls to your chosen levels, the signal and ATR timeframe step up to widen the grid, and step back once margin recovers.
- Caps on levels per grid, orders per side and lot per order; a netting cap on the net position's margin.
- Scan Only mode shows every decision without sending a single order.
EVERY SETTING EXPLAINED
Grid
- TradeMode: dual grid (BUY and SELL ladders together) or one direction at a time.
- GridSpacePoints: fixed distance between levels when ATR spacing is off.
- GridSpaceMultiplier: widens each next level by this factor (1.0 keeps them equal).
- MaxGridLevels: maximum levels per grid.
- UpDirectionIsBuy: whether an up move arms the BUY side in distance mode.
- EAMagicNumber: magic number of the grid orders; give every chart its own.
- GridOrderComment: comment written on grid orders.
- OneOrderPerBar: at most one new level per candle.
Lot ladder
- InitialLotSize: starting lot (0.01).
- LotSizingMode: additive or multiply.
- LotMultiplier: multiply mode factor per level.
- LotAddStep: additive mode step per level.
- MaxOrderVolume: largest lot any single order may have.
- UseAutoLot / AutoLotBaseBalance / AutoLotAllowDecrease: scale the starting lot with balance against a reference, optionally also downwards.
ATR spacing
- GridSpacingMode: fixed points or ATR.
- ATRTimeframe / ATRPeriod / ATRBarShift: where and how ATR is read.
- ATRSpacingFactor: spacing equals ATR times this.
- ATRMinSpacingPts / ATRMaxSpacingPts: floor and ceiling of the spacing in points.
- ATRFreezeOnStart: keep one spacing for the whole cycle.
Profit target
- DesiredProfitPerClosure: money each closure must clear.
- ProfitMultiplier: final multiplier on the target.
- ProfitTargetMode: fixed or scaled by volume and depth.
- ProfitVolumePower / ProfitDepthBonus: how the scaled target grows with volume and with open levels.
- ProfitMaxMultiple / ProfitMaxReachFraction: upper caps so a target always stays reachable.
Fragment scanner and target slicing
- UseMultiLegScan: test multi-order groups before the plain pair.
- MaxOldestLegs / MaxNewestLegs: how many oldest and newest orders a group may hold.
- ScanPriority: how qualifying groups are ranked.
- NeverBankLessThanPair: a group must also beat the plain pair target.
- RequireCloseVolumeExceedsTarget / MinCloseVolumeRatio: the closing volume must outweigh the order being retired.
- EnableTargetSlicing: close a slice of the oldest order when the whole lot is out of reach.
- FragProfitWeightPower / FragMinSlicePercent: slice sizing and the smallest slice allowed.
- FragAllowMultiCloser: several newest orders may fund one slice together.
- FragPreferFullClosure: a full closure always wins over a slice.
Reopen guard and account protection
- ReopenGuard / ReopenGuardCushion: block closures that would immediately reopen a level, and the safe distance used.
- MinMarginLevelPercent: no new levels under this margin level (0 = off).
- MaxAccountRiskPercent: no new levels beyond this floating loss of balance (0 = off).
- NetMaxMarginPercent: netting accounts, cap on the net position's margin.
- MaxTotalOrders: absolute cap of grid orders per side.
Execution and verification
- RunMode: Armed or Scan Only.
- CloseSequence: order in which legs are sent.
- MaxSlippagePoints / MaxSpreadPoints: execution limits.
- MinSecondsBetweenClosures: pause between closures on one side.
- CloseAttemptsPerLeg / VerifyTimeoutSeconds: retries and how long a leg is verified.
- DeferWhenMarketClosed / MarketClosedRetrySeconds: wait calmly through closed sessions.
- AutoResumeAfterSeconds: clear a halt automatically after this time.
- NoPartialRetryMinutes: retry partial closes this many minutes after a broker refusal.
- AbortIfBookChanged: cancel a plan if a leg changed between scan and send.
- UseFullCommission / CommissionPerLot: how commission is counted.
- CloseOrderComment: comment on closing deals.
Hedge cycle and weekly cash day
- EnableHedgeCycle: switch the hedge module on (off by default).
- HedgeSymbols / HedgeSymbolRotation / HedgeMaxSymbolsInTester: which symbols carry the hedge and how they rotate.
- HedgeCycleLots / HedgeSliceLots: pair size and slice size.
- HedgeFragmentBonus / HedgeBonusIsPercent: extra paid on top of each slice.
- HedgeMaxSurcharge / HedgeMaxSurchargePercent: caps on how much the hedge may raise a closure target.
- HedgeMagicNumber: magic of the hedge legs, must differ from the grid.
- HedgeReopenOnFinish / HedgeStartRequiresTrade: when cycles start and restart.
- HedgeIntegritySeconds / HedgeAutoRepair / HedgeNakedAction: checking and repairing a one-sided pair.
- HedgeMaxSpreadPoints / HedgeSlippagePoints / HedgeAttemptsPerLeg / HedgeVerifyTimeout: hedge execution limits.
- HedgeCommissionPerLot / HedgeOrderComment: commission fallback and comment.
- WeeklyCashDay / CashDayOfWeek / CashCutoffHour: no new cycle or slice over your withdrawal window.
Panel and chart
- ShowPanel, PanelX, PanelY, PanelFontSize, PanelCorner: panel visibility, position, size and corner.
- ShowArabic: second-language line under the English.
- ShowChartMarks: draw plans and levels on the chart.
- MaxTableRows: order rows shown per grid.
Entry trigger and CCI signal
- EntryTriggerMode: CCI signal, price distance, or both.
- SignalBarShift: candle the signal is read from (1 = last closed).
- SignalBarsDelay: bars required between two accepted signals.
- SignalValidBars: how long a signal stays valid.
- SignalAllowBuy / SignalAllowSell / SignalReverse: allowed directions and inversion.
- InpCCIPeriod: CCI period (20).
- InpCCIPrice: applied price (typical).
- InpCCIOversold / InpCCIOverbought: the zones (-100 / +100) whose exit arms a BUY or a SELL.
- InpCCITrendFilter: 0 off, 1 only with the EMA side, 2 only against it.
- InpCCITrendMAPeriod: EMA period for the filter.
- InpCCIExtremeLevel / InpCCIExtremeBars: Exhaustion Guard level and look-back (0 switches it off).
- InpShowSignalArrows: arrows on armed candles.
- DebugMode: verbose journal.
Margin timeframe safety
- UseMarginTFSafety: on/off (off by default).
- Level1MarginPct / Level1TF: first margin level and the timeframe used below it.
- Level2MarginPct / Level2TF: second level and its timeframe.
- MarginTFHysteresisPct: recovery needed before stepping back.
HONEST EXPECTATIONS
A grid manages a position; it does not predict the future. A long move against an open ladder can produce a large floating loss, and there is no stop loss on every order. Spread, swap, commission, symbol and lot size shape the result, and past tests do not promise future ones. Test on your own broker first, start small, and grow only when you know how far your instrument usually runs. Works on any symbol and timeframe.
If Grid CCI EA proves useful in your testing or trading, an honest review, positive or critical, helps other traders decide.