Chart Score AI Panel
- Göstergeler
- Sürüm: 1.10
- Etkinleştirmeler: 5
Chart Score AI Panel
What is Chart Score AI Panel?
A real-time environment scoring panel that combines 6 technical elements into a single 0-100 score. It helps you quickly judge whether current chart conditions appear favorable for trading. Designed by a data analyst using statistical methods. Non-repainting. Works on all Forex pairs, Gold, indices, and crypto.
Do any of these sound familiar?
- You use several indicators such as EMA, RSI, ADX, and ATR, but still struggle to decide whether current chart conditions are worth trading.
- You enter a trade, only to see price reverse soon after, and wish you had filtered the setup more carefully.
- You trade during low-liquidity hours and get caught in weak or noisy conditions.
A common problem is that multiple technical signals remain disconnected. You can see each piece separately, but not the overall quality of the current environment.
Chart Score AI Panel helps solve that by combining multiple technical factors into a single 0-100 score. It is designed as a decision-support panel that helps you judge whether current conditions appear favorable, mixed, or unfavorable.
Despite the name containing "AI", this is not a self-learning AI. It is a transparent, rule-based scoring panel that quantifies and visualizes multiple technical elements. Scores are evaluated on closed bars for signal confirmation, and the panel is intended to be used together with your own trading rules.
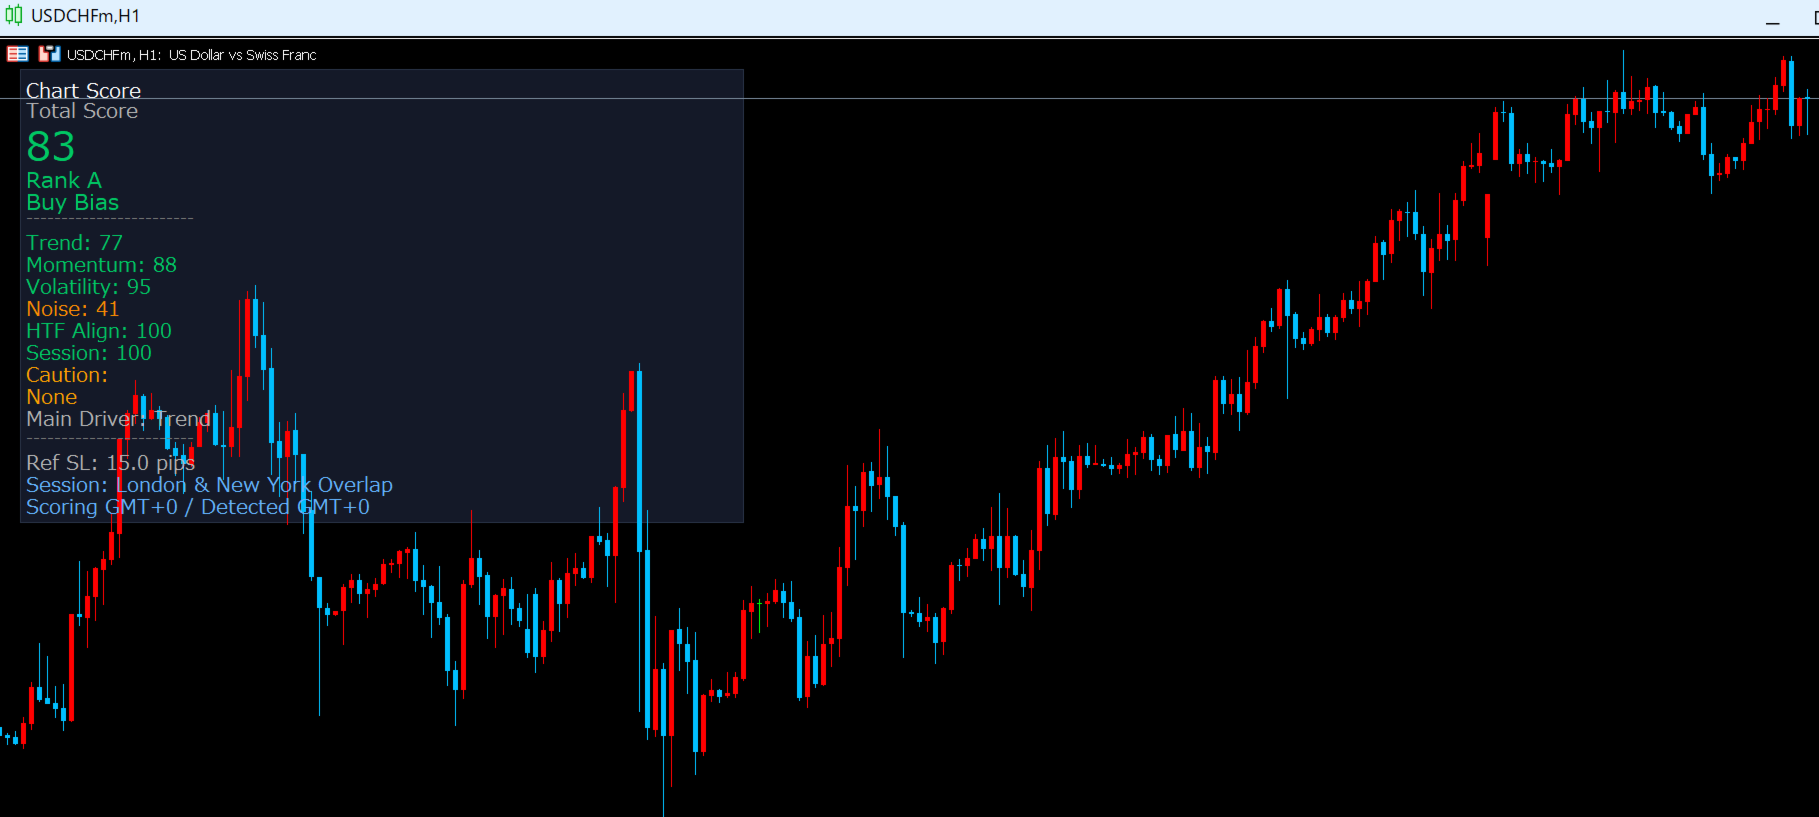
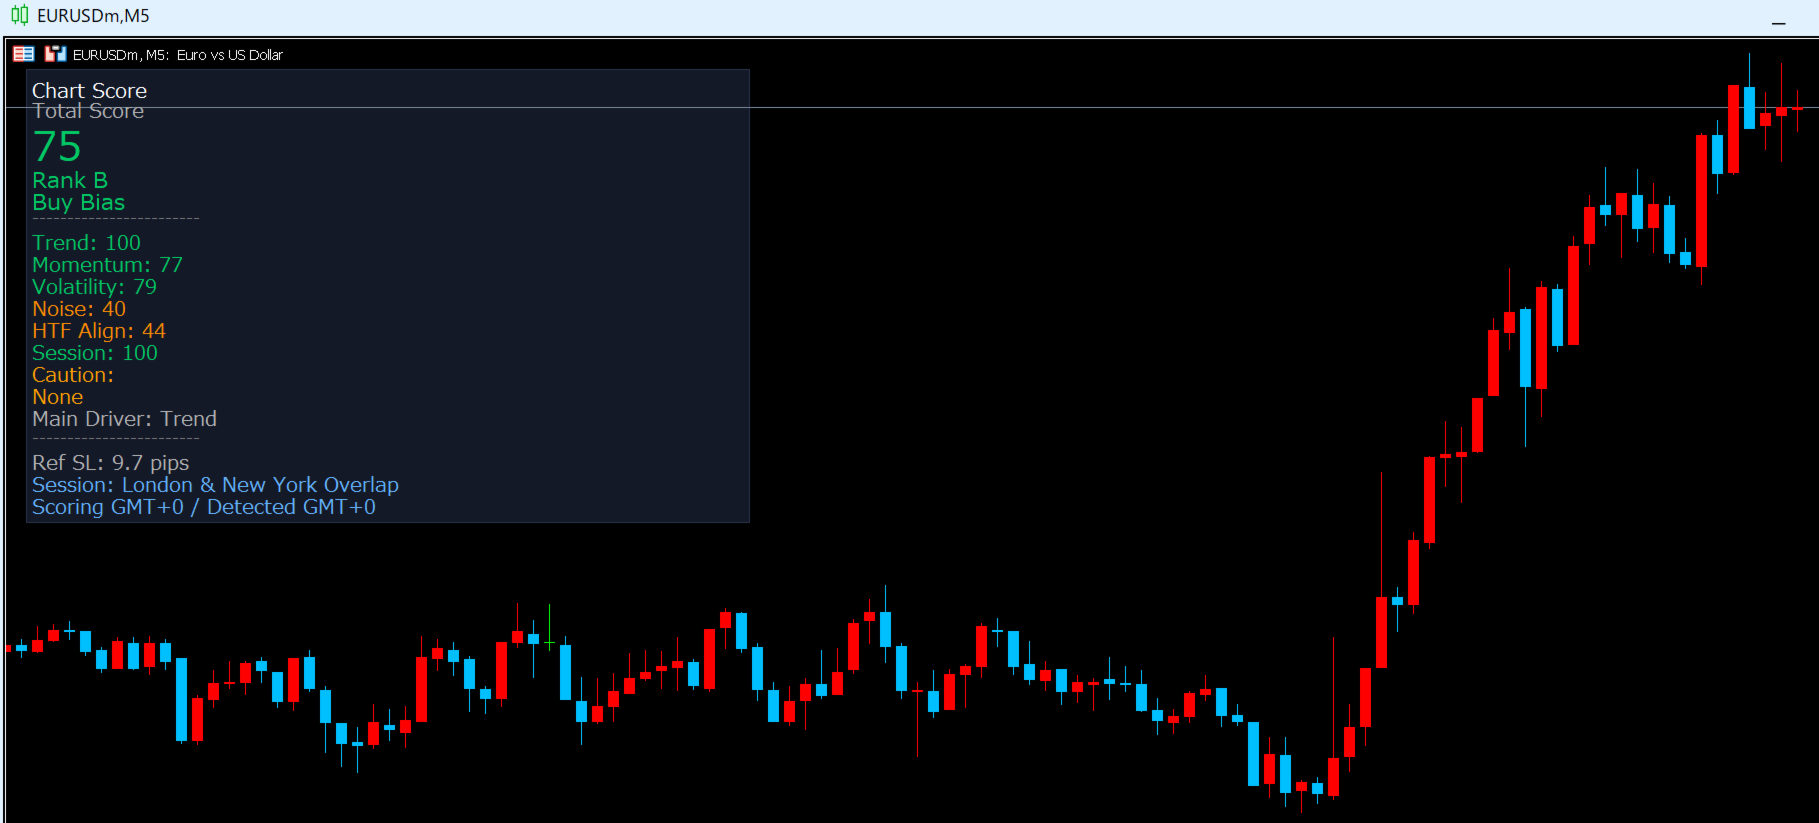
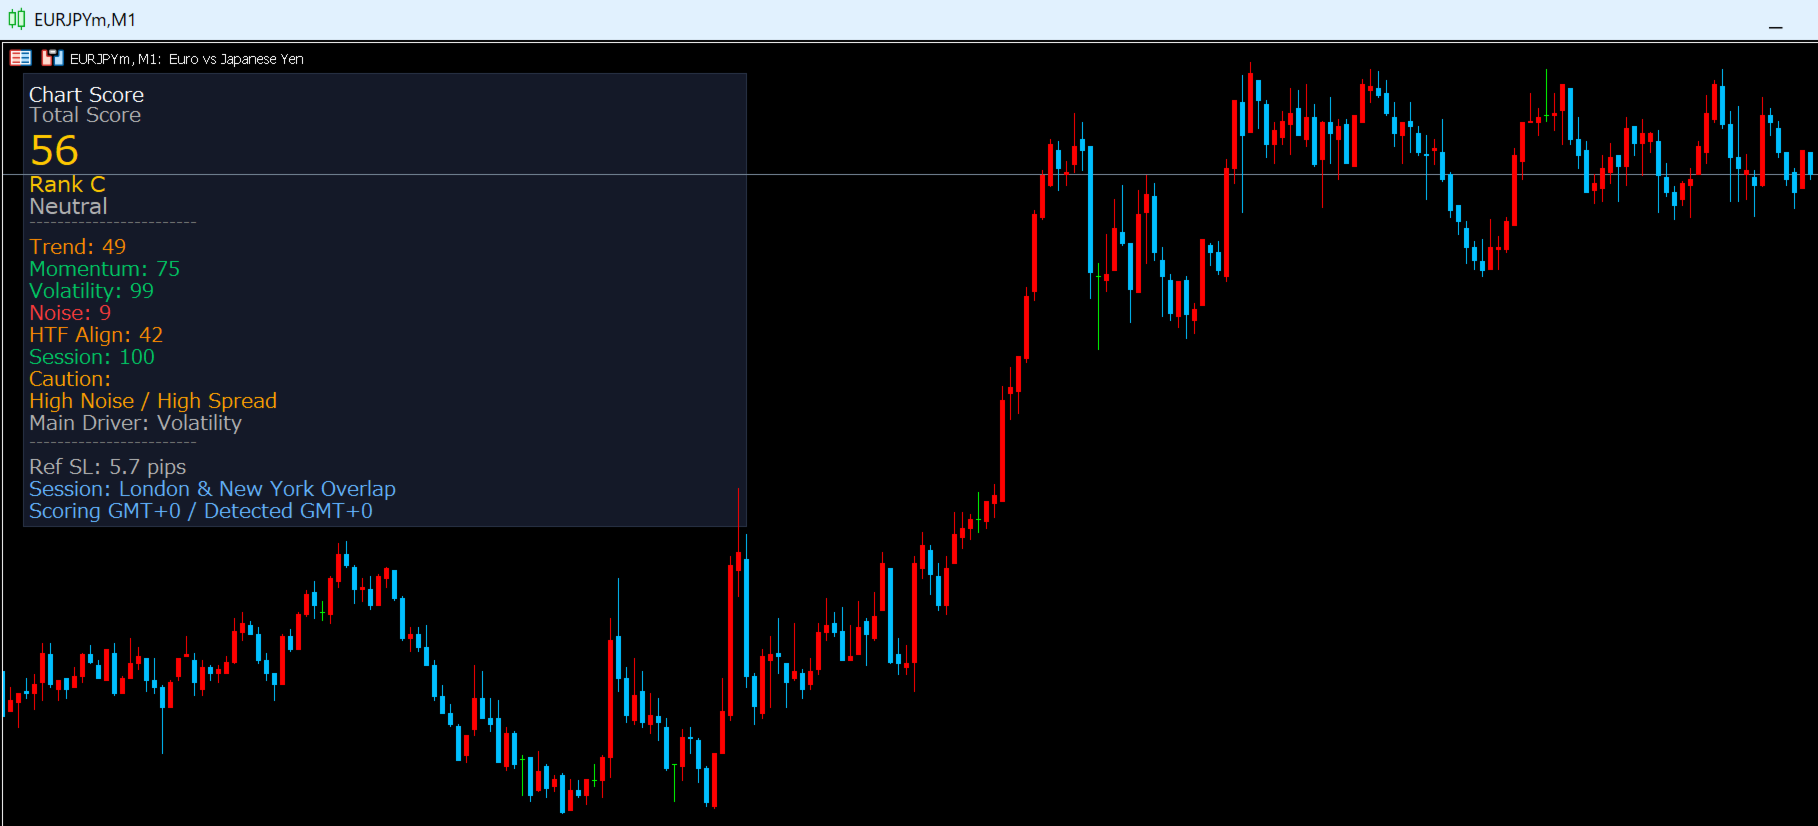
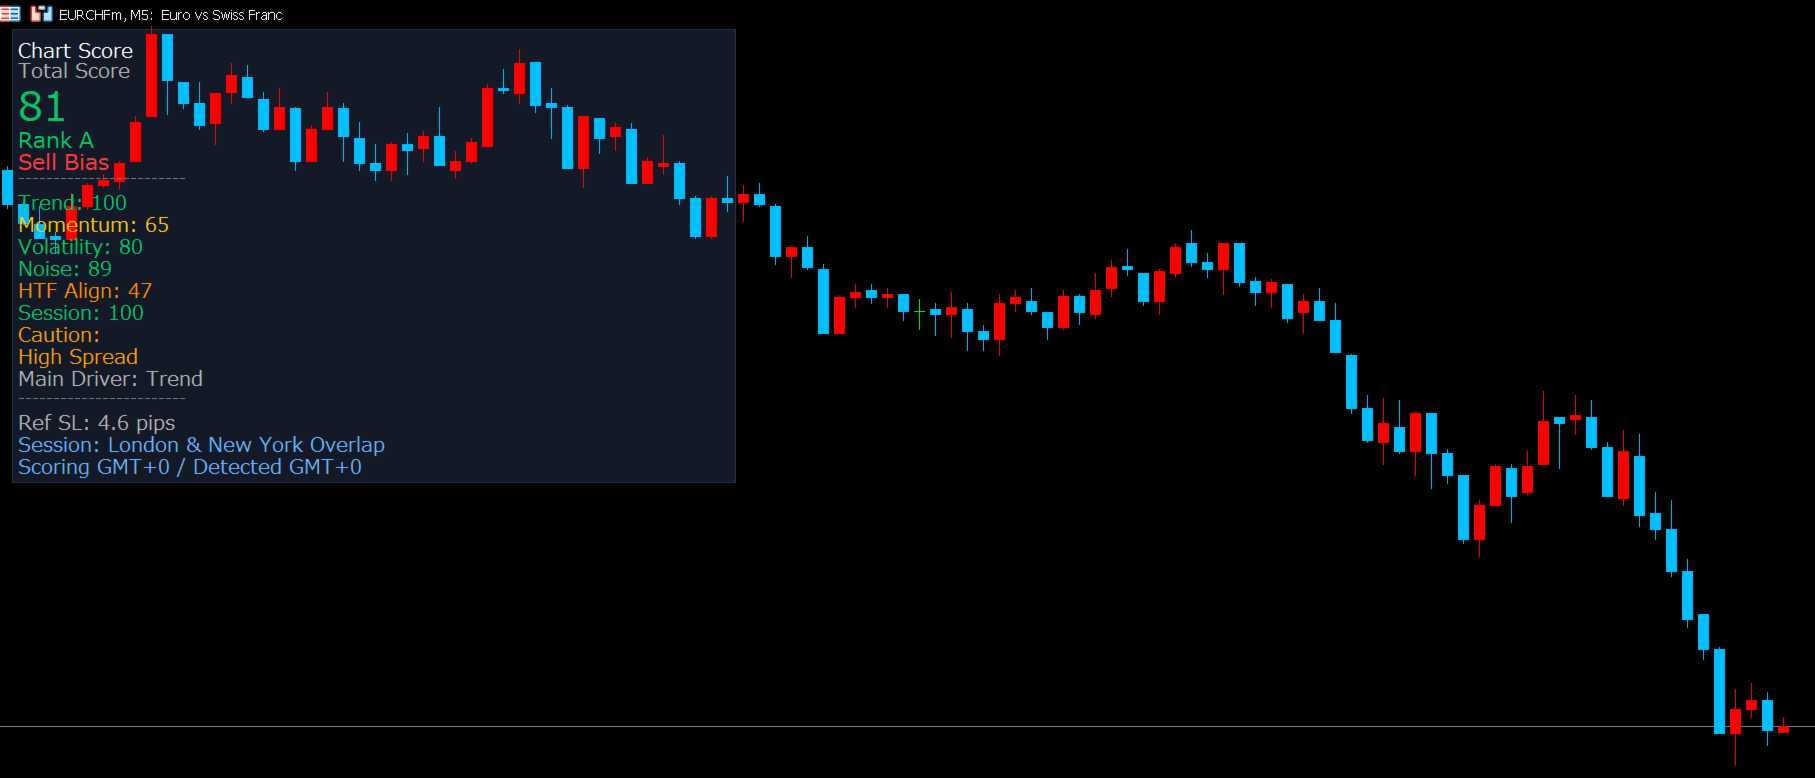
What the Panel Shows
When applied to a chart, the panel displays the following information:
Total Score (0-100) - A weighted score based on 6 technical elements.
Rank (A-E) - The total score grouped into 5 levels for quick reading.
Direction Signal - Displays Buy Bias, Sell Bias, or Neutral.
Detail Scores - Trend, Momentum, Volatility, Noise, HTF Align, and Session.
Caution Tags - Tags such as High Noise, Weak Trend, Low Vol, or Off-hours when conditions are weak.
Main Driver - Shows which component contributed most strongly to the current score.
Ref SL - A reference stop-loss distance based on ATR and noise conditions. Displayed in pips for Forex symbols and points for non-Forex symbols.
Session - Current session name, with GMT-based session evaluation.
How It Helps in Practice
Before:
- Entering because the chart "looks okay" without a clear quality filter
- Switching between multiple indicators and still feeling uncertain
- Taking setups during noisy or weak sessions that could have been filtered out
After:
- Checking one score first before spending time on detailed chart analysis
- Using low scores as a reason to skip weak conditions
- Focusing on pairs and sessions where conditions appear more organized
A Practical Example
Step 1: You open GBPUSD on H1 during the London session. The panel shows Score 78 / Rank B / Buy Bias.
Step 2: In detail view, Trend, Momentum, and Volatility are healthy, caution tags are minimal, and the overall environment appears organized.
Step 3: Your own entry rule is also satisfied. You consider a long setup and use the displayed Ref SL only as a reference for stop placement.
Step 4: Another pair shows a low score with caution tags such as High Noise or Weak Trend, so you decide to leave it alone and focus elsewhere.
This makes the panel useful as a quick filter: not to force trades, but to reduce entries during poor conditions.
6 Scoring Elements
The total score is calculated from the following 6 elements:
1. Trend (25%) - Uses EMA separation and ADX strength to estimate how clear the current trend is.
2. Momentum (15%) - Uses RSI in relation to the current directional bias.
3. Volatility (20%) - Compares current ATR to its recent average and penalizes conditions that are too quiet or excessively stretched.
4. Noise (15%) - Uses efficiency-style price movement analysis to estimate whether price action is clean or noisy.
5. HTF Align (15%) - Checks whether higher-timeframe EMA direction aligns with the current chart direction when HTF data is available.
6. Session (10%) - Adds session-based context for Forex symbols when session adjustment is enabled.
Rank Guide
Rank A (80-100) - Conditions appear favorable.
Rank B (65-79) - Conditions are relatively good.
Rank C (50-64) - Mixed conditions.
Rank D (35-49) - Unfavorable conditions.
Rank E (0-34) - Poor conditions.
The panel is especially useful as a filter: low scores can help you avoid spending time on weak setups.
Signal Logic
The panel shows one of three direction states:
Buy Bias - Current directional conditions lean bullish.
Sell Bias - Current directional conditions lean bearish.
Neutral - No meaningful directional bias is detected.
This is a directional assessment, not a standalone entry signal.
Session Handling
For Forex symbols, the panel evaluates session conditions using GMT-based time windows with DST-aware handling for London and New York.
Typical session categories are:
Tokyo
London
New York
London & New York Overlap
Off-hours
For non-Forex symbols, session scoring is disabled automatically and shown as not applicable.
Who This Is For
Recommended for:
- Traders who want a clearer environment filter before entering
- Traders using multiple indicators and wanting a single summary score
- Traders who want a practical reason to skip low-quality setups
- Traders who want to combine chart analysis with a structured scoring panel
Not recommended for:
- Those looking for a fully automated Expert Advisor
- Those expecting guaranteed results from one indicator alone
- Those who want simple arrow-only entry signals without context
Parameters
Panel Display
PanelX (default: 20) - Horizontal panel position in pixels.
PanelY (default: 30) - Vertical panel position in pixels.
FontSize (default: 10, range: 6-24) - Panel text size.
ShowDetails (default: true) - Shows or hides the detailed component breakdown.
CornerPos (default: Top Left) - Panel anchor corner.
Server Time Offset
ServerGMTOffset (default: 3, range: -12 to +14) - Difference between broker server time and GMT, used for session evaluation.
SessionAdj (default: true) - Enables or disables session-based score adjustment. Automatically treated as not applicable for non-Forex symbols.
Notifications
AlertEnabled (default: false) - MT5 alert notification.
PushEnabled (default: false) - Push notification to the MT5 mobile app.
MailEnabled (default: false) - Email notification via MT5 mail settings.
AlertThreshold (default: 70.0, range: 0-100) - Threshold used for score-based notifications.
Notifications are checked on confirmed bars. They can fire when the score crosses above the threshold, or when a previously non-neutral signal reverses between Buy Bias and Sell Bias.
FAQ
Q: The panel does not appear.
A: The chart needs enough history for EMA, ATR, RSI, and ADX calculations. If there is not enough history, the panel will display a loading/error message. Also check that PanelX and PanelY are not placing the panel off-screen.
Q: Notifications are not working.
A: Make sure AlertEnabled, PushEnabled, or MailEnabled is turned on. Push notifications require MetaQuotes ID configuration, and email requires SMTP setup in MT5. Notifications are checked on confirmed bars only.
Q: Which timeframe should I use?
A: The indicator supports multiple timeframes. On Monthly charts, the HTF component may be unavailable because there is no higher mapped timeframe.
Q: Does it work on XAUUSD and non-Forex symbols?
A: Yes. The indicator supports Forex and non-Forex symbols. For non-Forex symbols, session scoring is disabled automatically, and Ref SL is displayed in points instead of pips.
Q: Does it repaint?
A: The panel is designed to confirm signals and notifications on closed bars. Once a bar is closed, those confirmed results do not change retroactively.
Q: Can I trade using only the score?
A: This indicator is a decision-support tool, not a complete trading system. It is best used as a filter together with your own entry and risk-management rules.
Key Features
- Real-time 0-100 score
- A-E rank display
- Buy Bias / Sell Bias / Neutral signal
- Detail mode for all 6 scoring elements
- Caution tags for weak conditions
- Main Driver display
- ATR-based Ref SL display
- GMT-based session handling with DST-aware London/New York overlap logic
- Alert, push, and email notifications on confirmed bars
- Supports Forex and non-Forex symbols including XAUUSD
- Supports multiple timeframes, from M1 to MN
- No DLL required
About the Developer
Designed and developed by a data analyst with a statistics-focused background.
Unlike typical arrow-signal indicators, this tool is built as an environment assessment panel. Its purpose is to help quantify whether current market conditions appear favorable, mixed, or weak before you apply your own trading rules.
Concept: Data-driven decisions, not gut feelings.
Disclaimer
This indicator does not provide investment advice. Scores, ranks, signals, and Ref SL values are reference information based on technical analysis and do not guarantee future market behavior. All trading decisions are made at the user's own risk. The author assumes no liability for losses incurred through the use of this indicator.