Multi-Level Hybrid EA — Liquidity Sweep & Fair Value Gap Confluence System
The Trader's Dilemma This EA Solves
Every serious trader eventually hits the same wall: manually scanning dozens of pairs for institutional liquidity sweeps and Fair Value Gaps is exhausting, slow, and inconsistent. Miss the moment price sweeps a liquidity pool on the H1, and by the time you've switched charts to confirm the M5 retracement, the opportunity is gone. Do it across your entire Market Watch, every session, every day — and burn-out replaces discipline.
Multi-Level Hybrid EA was built to end that trade-off. It is not a black box. It is a fully transparent, dashboard-driven Smart Money Concepts scanner that watches your entire Market Watch continuously, ranks every setup by strength, draws every level on the chart for you to verify with your own eyes — and, if you choose, executes the single best setup of the day for you automatically, with broker-grade safety checks built directly into the order pipeline.
Whether you are a discretionary trader who wants a tireless assistant doing the scanning grunt-work, or a systematic trader who wants disciplined, unemotional, one-trade-a-day execution — this EA adapts to how you actually trade.
The Core Strategy: Liquidity Sweep + Fair Value Gap Confluence
At the heart of this EA is a well-documented institutional order-flow concept: smart money hunts liquidity before it moves price in its true intended direction. The EA is built entirely around detecting that footprint, in three independently-verifiable ways, then only surfacing a trade when multiple methods agree.
Higher Timeframe (H1) — Where the market shows its hand
The EA continuously marks Buy-Side Liquidity (the highest high of the lookback range) and Sell-Side Liquidity (the lowest low). When price wicks through one of those levels and closes back inside the range, that is a liquidity sweep — a strong tell that stops have just been hunted and a reversal is now in play. This becomes an "HTF Active Signal" on your dashboard.
Lower Timeframe (M5) — Where the entry is confirmed
A sweep alone is not enough. The EA then drops to the M5 chart and waits for genuine structural confirmation: a Change of Character (CHoCH) — the first close beyond a minor swing point in the new direction — followed by identification of the Fair Value Gap (FVG) created by that impulsive move. Only once price retraces back into that FVG is the setup marked "LTF Ready" — meaning entry, stop loss, and take profit are all fully calculated and displayed.
Three Independent Confirmation Engines
Rather than relying on a single method, the EA runs three separate detection strategies and can require them to agree before a signal is ever shown as "ready":
Strategy 1 — Trend + Pullback: Uses an EMA-based H1 trend filter, locates the most recent H1 Fair Value Gap in that trend's direction, confirms price has pulled back into it, then drops to M5 to catch the sweep of a minor structure point before entering with the trend.
Strategy 2 — The Baseline Liquidity Sweep: The classic HTF sweep → LTF CHoCH → FVG retracement sequence described above. This is also what independently populates your "HTF Active Signals" list, regardless of which strategy mode you run, so you never lose visibility of raw H1 sweep activity.
Strategy 3 — Equal Highs/Equal Lows: Operates entirely on a single timeframe, hunting for the classic "equal highs" or "equal lows" liquidity pools that precede a sweep, then confirming with its own FVG and retracement.
You choose how strict you want to be: run all three and require confluence for the highest-probability setups only, or isolate any single strategy if you prefer a leaner, faster signal flow. Every ready signal on your dashboard shows exactly which strategies agreed — for example "[S1+S2]" — so you always know the strength behind a setup before you act on it.
The Dashboard: Your Command Center
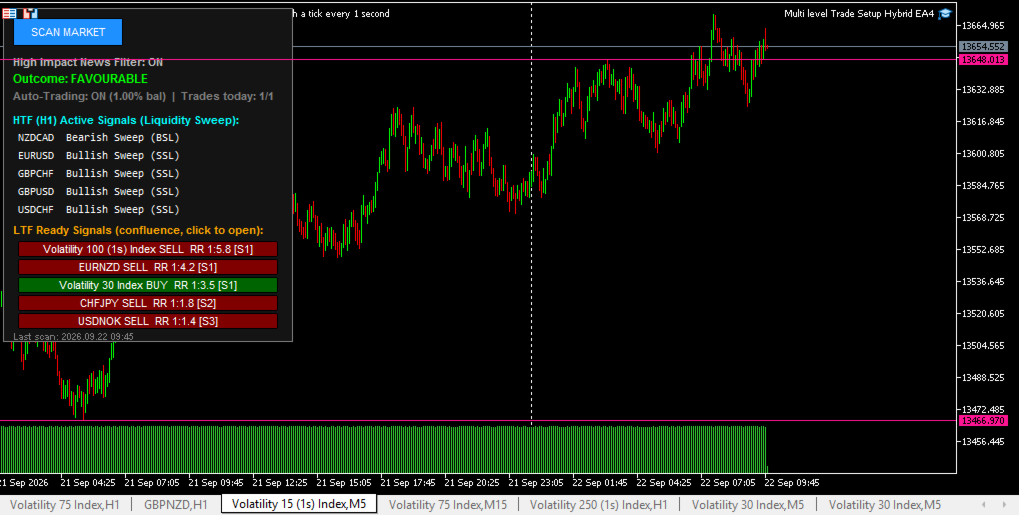
This is not an EA that trades silently in the background with no visibility. A full on-chart control panel gives you complete situational awareness at all times:
SCAN MARKET button — trigger an instant, full Market Watch scan whenever you want, on demand.
High Impact News readout — a live "Favourable / Not Favourable" verdict for the symbol you're currently viewing, based on upcoming high-impact economic calendar events.
Auto-Trading status line — shows at a glance whether automated execution is on or off, your current lot-sizing mode, and how many trades have been taken today against your daily limit.
HTF Active Signals list — every symbol currently showing a genuine H1 liquidity sweep, most recent first.
LTF Ready Signals list — every symbol with a fully confirmed, tradeable setup, ranked by confluence strength and then by Reward:Risk, with direction and R:R shown directly on each entry.
Click-to-open charts — click any ready signal and its M5 chart opens automatically in a new window, with every level already drawn: Buy-Side/Sell-Side Liquidity lines, the Fair Value Gap box, and the full Entry → Take Profit / Entry → Stop Loss trade boxes with confluence tagging. Nothing to draw yourself. Nothing to hunt for. It's all there the instant you click.
This dashboard alone makes the EA worth running even if you never flip on auto-trading — it turns hours of discretionary chart-flipping into a two-second glance.
The Trading Engine: Disciplined, Automated, and Safety-First
For traders who want the EA to act on its own analysis, a full execution engine sits behind the scanner — built with capital preservation as the first priority, not an afterthought.
Scheduled Auto-Scanning
Set your own trading window (default 07:00–17:00 broker time) and scan interval (default every 10 minutes). The EA works quietly through your session, re-scanning the entire Market Watch on schedule, so you're never relying on being at your screen the moment a sweep happens.
One Trade Per Day — By Design, Not By Accident
This EA enforces strict daily discipline: only the single best-ranked ready signal — the one with the highest confluence, and then the highest Reward:Risk among equals — gets traded, and only once per day. This flag isn't just held in memory either: it is re-verified against your account's actual trade history and open positions every time the EA initializes, so even a platform restart mid-session can never allow a second trade to slip through. This is built for traders who understand that overtrading, not bad analysis, is what quietly destroys most accounts.
Two Lot-Sizing Modes, Fully Adjustable
Percent of Balance (default 1%, fully adjustable) — position size is calculated from your real account balance and the live risk distance of the trade, so your dollar risk stays consistent no matter which symbol or setup triggers.
Fixed Lot (minimum 0.001, fully adjustable) — for traders who prefer a constant position size regardless of account fluctuation.
Strict 1:1 Risk:Reward Execution — With the Full Setup Still Visible
Here is something most scanner EAs get wrong: they either trade the full, wide Reward:Risk the setup technically offers, or they quietly change your stop loss to manufacture a tidier ratio. This EA does neither. The original Stop Loss calculated by the detection engine is left completely intact — it is never recalculated or altered for the live order. What changes is only the Take Profit: the EA closes its own automated trade at a strict 1:1 Reward:Risk, giving you consistent, predictable position outcomes trade after trade — while the chart and dashboard continue to display the original, wider projected target, so you always see the full opportunity the setup offered, not just what the EA chose to lock in.
A Magic Number for Clean Trade Tracking
Every order the EA places carries its own dedicated magic number, so its activity is always cleanly separable from any other EA or manual trade on your account, in your history, and in your reporting.
High-Impact News Protection
Beyond the informational dashboard readout, the execution engine has its own dedicated, independently-configurable trade-blocking news filter. Before any automated order is sent, the EA checks the economic calendar for the traded symbol's underlying currencies and will refuse to open a position if a high-impact event falls within your configured buffer (default 240 minutes / 4 hours) ahead. You are never automatically walked into a position right before a rate decision or NFP print.
Broker-Grade Order Safety, Built In
This is where the engineering really shows. Before any live order is ever sent, the EA runs it through a full validation gauntlet:
Spread protection — orders are refused if the live spread exceeds your configured maximum, protecting you from execution during illiquid or volatile spread spikes.
Minimum stop-distance verification — the EA checks your broker's own required stop and freeze distance for the symbol and will not submit an order whose Stop Loss or Take Profit falls inside that minimum, preventing rejected or invalid orders.
Side-of-price sanity checks — a final logical check confirms the Stop Loss and Take Profit are genuinely positioned correctly relative to the live entry price before submission, catching any setup that may have gone stale between detection and execution.
Live margin verification — rather than trusting a risk formula blindly, the EA calculates the real, broker-accurate margin requirement for the position size before sending it, and automatically scales the lot size down to fit safely within your available free margin if needed — or skips the trade cleanly if it genuinely cannot be sized safely, rather than risking a margin call.
Volume limit compliance — position sizing is automatically clamped to your broker's minimum, maximum, and aggregate volume-limit rules for the traded symbol, so orders are never rejected for exceeding trading-rule boundaries.
In short: the analysis engine decides what to trade, and an entirely separate, rigorous safety layer decides whether it is safe to actually send that order right now. That separation is what turns a clever scanner into a genuinely reliable, production-grade Expert Advisor.
Built for Hybrid Use — Manual, Automated, or Both
This is a true hybrid system, and that flexibility is intentional:
Fully manual mode. Turn automated trading off entirely and use the EA purely as a professional-grade multi-pair scanner. Press SCAN, review the ranked dashboard, click through to any ready signal's fully-drawn M5 chart, and execute the trade yourself, on your own terms, with total discretionary control. The EA never places an order without your permission in this mode.
Fully automated mode. Let the EA scan on schedule and take the single best-ranked opportunity of the day on your behalf, within your defined trading window, governed by every safety check described above.
True hybrid mode. Run automated scanning and trading in the background for disciplined, hands-off execution — while still glancing at the dashboard whenever you like, reviewing any signal the EA is watching, and using your own judgment on symbols or setups you want to study or trade manually alongside it. The EA never stops you from clicking through and trading anything it finds, whether or not auto-trading is active.
Works Across Any Symbol, Any Chart
Attach it to any chart, on any timeframe you prefer to look at — the EA's analysis is completely independent of the chart it sits on. Detection always runs on H1 for the higher-timeframe liquidity structure and M5 for lower-timeframe confirmation, and the scanner sweeps your entire Market Watch symbol by symbol, every single scan. The timeframe you're viewing only affects the visual styling applied to your own chart (clean candle colors, no clutter grid, automatic period separators) — never the underlying analysis.
This means one instance, on one chart, is watching your entire watchlist — forex majors, minors, metals, indices, whatever you have added to Market Watch — for the same institutional footprint, simultaneously.
Full Control Through Input Settings
Every meaningful parameter of the engine is exposed and adjustable, organized into clear groups:
Scanner Settings let you tune how many signals display at once, how far back the liquidity range looks, how recent a sweep must be to count, how far the M5 search extends for CHoCH/FVG confirmation, the minimum acceptable FVG size, and the Stop Loss buffer beyond the sweep extreme.
Strategy Mode Settings let you choose full three-way confluence or isolate any single strategy, set your minimum required confluence level, tune the EMA periods driving Strategy 1's trend filter, its M5 swing lookback, and Strategy 3's tolerance for what counts as "equal" highs or lows.
News Filter Settings are split cleanly in two: a dashboard-facing symmetric buffer for at-a-glance situational awareness, and a completely separate, forward-looking trade-blocking buffer that governs whether the automated engine is actually allowed to open a position.
Auto-Scan Settings give you full control of the daily trading window's start and end hour and the scan interval within it.
Trade Execution Settings cover the master automated-trading switch, your magic number, maximum acceptable spread, and maximum acceptable slippage.
Lot Sizing Settings let you switch between Percent-of-Balance and Fixed Lot modes and set your exact risk percentage or fixed lot size.
Visual Settings let you customize candle colors, liquidity line colors, the Fair Value Gap box color, and your Take Profit / Stop Loss box colors to match your own charting style.
A full Debug Mode is also available, printing detailed step-by-step reasoning to your Experts log for every symbol on every scan — invaluable if you want to understand exactly why a setup was or wasn't flagged.
Who This EA Is Built For
Discretionary traders drowning in charts who want a tireless assistant doing the scanning and level-drawing for them.
Smart Money Concepts / liquidity-and-FVG traders who want a systematic, rules-based implementation of the strategy they already believe in, rather than eyeballing it manually across dozens of pairs.
Disciplined traders who want the accountability of a strict one-trade-per-day rule enforced by code, not willpower.
Anyone who has been burned before by an EA that sized positions without checking margin, ignored broker volume rules, or placed trades minutes before high-impact news — and wants those specific failure modes engineered out from the ground up.
A Straightforward Word on Risk
No trading system, automated or discretionary, can promise profit, and past strategy performance is never a guarantee of future results. Trading forex, metals, and other leveraged instruments carries genuine risk of loss, including the potential loss of capital beyond what may seem apparent from a strategy description alone. What this EA offers is not a promise of guaranteed returns — it is a rigorously engineered, transparent, and disciplined framework for identifying and executing high-probability institutional-style setups, with real safety infrastructure protecting your account at every step of the order pipeline. Always test thoroughly on a demo account, understand every input setting before enabling live automated trading, and only risk capital you are prepared to lose.
The Bottom Line
Multi-Level Hybrid EA gives you the eyes of a full-time, multi-pair Smart Money Concepts analyst, the discipline of a strictly rules-based execution engine, and the safety architecture of a broker-aware risk system — all in a single, transparent tool that shows you exactly what it sees, exactly why it's ready to act, and exactly how it protects your account before it ever pulls the trigger. Whether you trade alongside it or let it trade for you, this is the scanner-turned-EA built to finally close the gap between spotting a liquidity sweep and actually being in the trade.