Anchored VWAP Pullback and Target Zones MT4
- Indicators
-
Duc Hoan Nguyen
 I develop practical trading tools for MetaTrader 4/5, with a focus on indicator integration, Multi-Timeframe analysis, market scanning, and automated trading solutions.
My work mainly includes:
• Indicator-to-EA Solutions - Version: 1.0
- Activations: 10
See more MT5 version at: Anchored VWAP Pullback and Target Zones — MT5
See more MT4 version at: Anchored VWAP Pullback and Target Zones — MT4
See more products at: All Products or Trading Indicators, Special Offers & New Releases
New tools will be $30 for the first week or the first 3 purchases!
Trading Tools Channel on MQL5: Join my MQL5 channel to get my latest news
Reading a pullback takes more than a touch of a line. Connect trend structure, the value area and the reclaim reaction to understand why a setup deserves attention.
Read the full indicator logic and usage guide
From a pullback into value to a clear reference plan
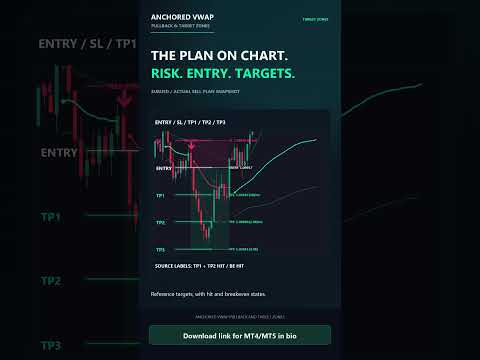
Anchored VWAP Pullback and Target Zones identifies pullbacks after a sufficiently strong impulse, waits for price to reclaim AVWAP, and displays BUY/SELL signals with Entry, SL and three targets. Scanner and Multi-TF extend your view across symbols and timeframes.
What the indicator provides
- Swing-anchored AVWAP: bullish/bearish value lines and dispersion bands identify retracement areas. Swings require confirmation data; Bullish/Bearish Dots mark the start of displayed line segments, rather than trade entries.
- Conditional BUY/SELL signals: a sufficient impulse, valid pullback and directional reclaim candle are required. Filters consider trend efficiency, quality, relative activity, pullback depth and strong opposing moves; another same-direction plan is blocked while one remains active.
- BUY/SELL quality percentages combine closing position, movement efficiency and relative activity. This is a 0–100 setup score, not win probability or a buyer/seller proportion. Rejected candidates can be displayed as SKIP markers.
- Multiple filter modes: Balanced, Conservative, Aggressive, Shallow Pullback, Deep Value Reclaim, Volume Climax and Custom Thresholds. Default Auto-Optimize selects a preset using closed-plan statistics on chart data; selection may change and does not guarantee future results.
- Entry–SL–TP ladder: Entry is the signal bar's close, and SL derives from the pullback/value area with an ATR buffer and limits. Fixed R Ladder uses 1R/2R/3R; default Hybrid mode can anchor TP2 or TP3 to a suitable impulse extreme. 1R is the distance from Entry to initial SL.
- Hit and breakeven tracking: optional BE after TP1 updates the active stop in the logic; the SL line remains at its initial price and labels show state. Plans can end at SL/BE, TP3, an opposite signal or 60 bars. The indicator does not trade or manage live orders.
- Display control: retain historical ladders or show only an active plan when history is off; ladder count defaults to 3, with 0 removing that option's count limit. BUY/SELL quality labels have separate visibility, count and a default 0.45 ATR distance. Data scope and drawing limits still apply.
- Scanner and Multi-TF: monitor multiple symbols/timeframes, distinguish Buy/Sell reclaims from Up/Dn segment starts, select a display timeframe and use separate parameters per timeframe when needed.
How to use it
- Identify AVWAP direction and price's position relative to the value bands; examine the impulse preceding the pullback.
- Wait for a BUY/SELL reclaim and read quality in context. A dot or SKIP marker alone does not replace signal conditions.
- Read Entry, initial SL, targets and hit/BE status together. Use Scanner to find charts to inspect and Multi-TF to add context.
- Enable BUY/SELL alerts for the current symbol or Scanner as needed; alerts reference closed bars. Live-bar markers and unfinished higher-timeframe data may update. Choose label and ladder counts that keep the chart readable.