
AW Trade Manager is a trade panel for MetaTrader 5 built around a risk/reward tool on the chart. A trade is planned with Entry, Stop Loss and Take Profit lines that are dragged with the mouse: the plates on the lines show the price, the distance and the money, the zones show profit and loss, and the panel calculates the volume from the risk. After the entry the panel manages the position by its rules: breakeven, seven trailing types, partial closes on the Take Profit and Stop Loss side, closing by time and hidden levels.
MT5 version -> HERE / All AW products -> HERE
Instruction Part 1: sections 1-9 -> HERE / Part 2: sections 10-18 -> HERE
Beyond a single trade the panel places pending orders, Stop-Limit and OCO pairs included, keeps account risk limits, closes a basket, runs scheduled tasks, watches alerts and the economic calendar of MT5 and counts statistics of closed positions. Every tab, window and input is described below.
The panel in two minutes - video
Watch on YouTube -> HERE
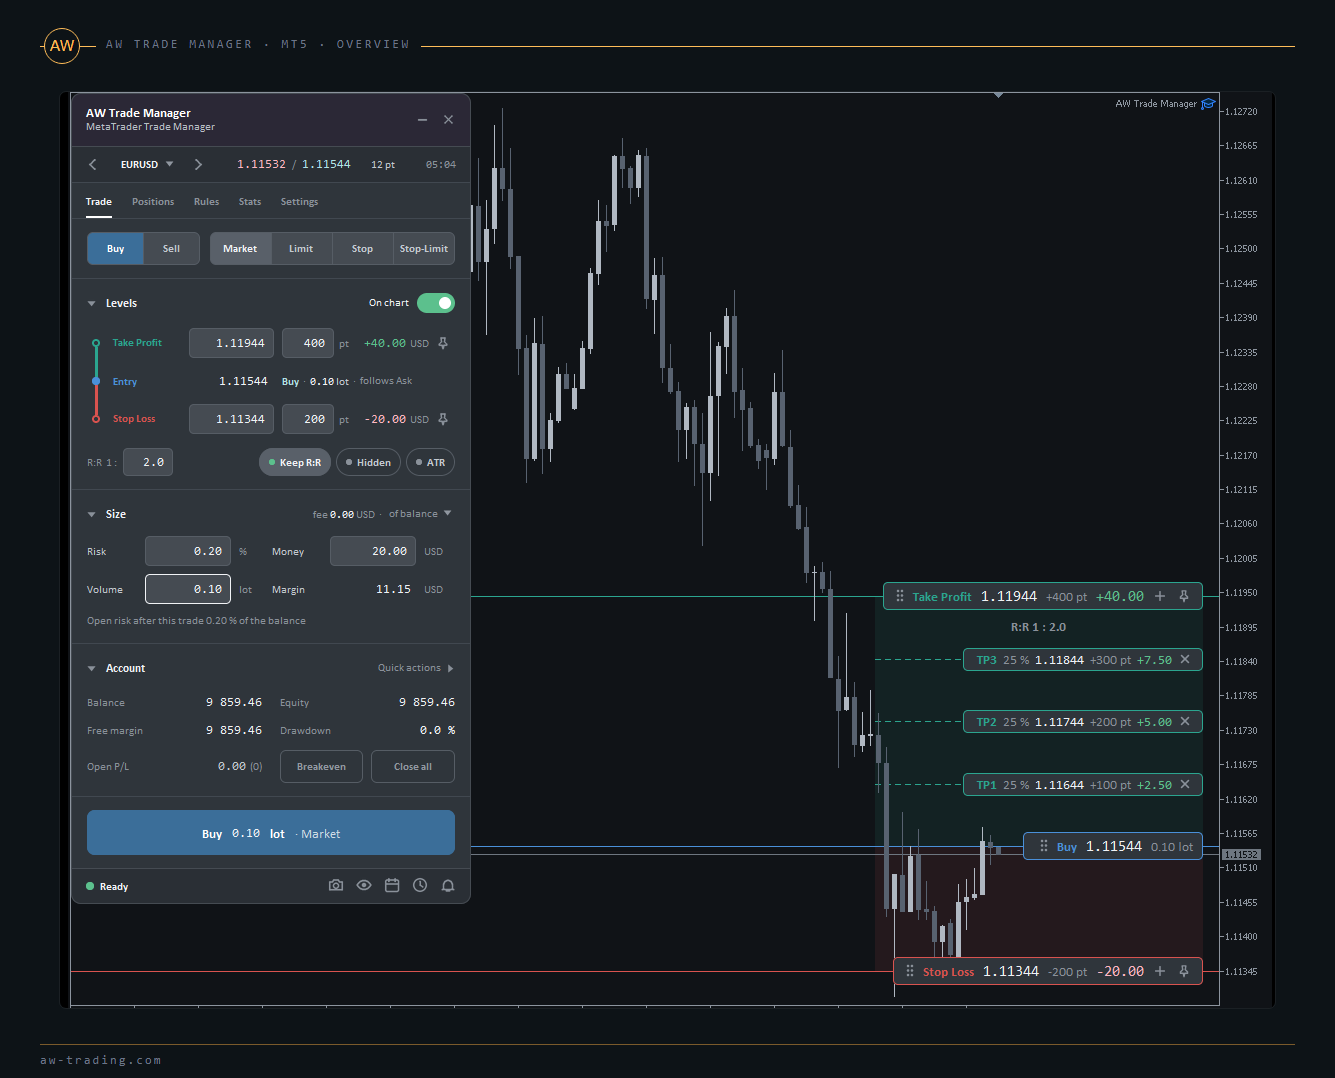
What to know before the start. The panel is an Expert Advisor and needs a chart of its own: in MetaTrader 5 one chart runs one EA. One copy of the panel works on one symbol of an account, several symbols need several charts (section 15). The rules work while the terminal and the panel run: hidden levels are kept by the panel, and while the terminal is off the emergency broker stop guards them. The Hedge, Reverse and Reverse all buttons exist on hedging accounts only. The interface of the panel is in English, the button names in this manual are written as on the panel.
The article contains the following sections:
- Installation and first start
- Free LIVE Demo
- The panel at a glance
- Planning a trade: the Trade tab
- Lines on the chart
- Pending orders: Limit, Stop, Stop-Limit, expiry and OCO
- The confirmation window
- Managing positions: the Positions tab
- Position and Pending windows
- Rules: Breakeven, Trailing, Partials, Auto-close, Hidden SL/TP
- Protection: Limits, Basket, Time, News
- Statistics: the Stats tab
- Settings: the Settings tab
- Tools: Alerts, Tasks, Economic calendar, Symbol picker, Screenshot, Clean chart
- Several charts, trades of other EAs, terminal closed
- Hotkeys
- Input settings
- Questions and answers
1. Installation and first start
After the purchase the panel appears in the Navigator window under Expert Advisors - Market. It is attached to the chart of the symbol that will be traded.
Step 1 - Open a chart of the symbol, any timeframe.
Step 2 - Drag AW Trade Manager from the Navigator onto the chart.
Step 3 - On the Common tab tick Allow Algo Trading and press OK.
Step 4 - Check that the Algo Trading button on the toolbar of the terminal is on. The panel appears in the upper left corner of the chart on the Trade tab, the footer shows Ready.
The panel is dragged by its header and stops at the edges of the chart. Its position, folded blocks and the open tab are remembered for each chart. The "-" button of the header folds the panel into a small plate with the name, the button on the plate brings it back. The "x" button removes the panel from the chart after the Exit panel confirmation (section 7).
When trading is not possible, the footer says why.
| Footer line | What happened |
|---|---|
| Trades not allowed · Algo Trading is off | The Algo Trading button is off, or Allow Algo Trading is not ticked in the EA properties |
| Trades not allowed · the account cannot trade | Trading on the account is not allowed, for example the login used the investor password |
| Trades not allowed · the broker disabled expert trading | The broker does not allow EAs to trade on this account |
| No connection · waiting for the server | No connection to the trade server |
| Market closed · waiting for the session | The trading session of the symbol is closed |
Where the settings live. Almost everything is set on the panel itself, on the Rules and Settings tabs. Every edit is written at once to the account file in MQL5\Files\AW_TM\<account number>\ and survives a terminal restart. The inputs set the start values. A value saved by the panel wins over the input, but an input changed since the previous start wins for its field.
A second copy on the same symbol. One panel works on one symbol of one account. A second copy on a chart of the same symbol does not start: the Alert window of the terminal names the chart where the panel already runs ("AW Trade Manager already runs on the EURUSD H1 chart of this account...").
2. Free LIVE Demo
For testing there is a free LIVE demo version of the panel. It works without limits on demo accounts: every function of the product can be tried not only in the strategy tester, but live, on the chart with live quotes - dragging of the lines and plates, hotkeys, the economic calendar and notifications included.
Free LIVE Demo -> HERE
The post has the file of the demo version, its installation and answers to common questions.
3. The panel at a glance
The panel consists of a header, a market row, five tabs and a footer. The tabs follow the order of work: open a trade, manage it, set the rules, look at the results, set up the panel.
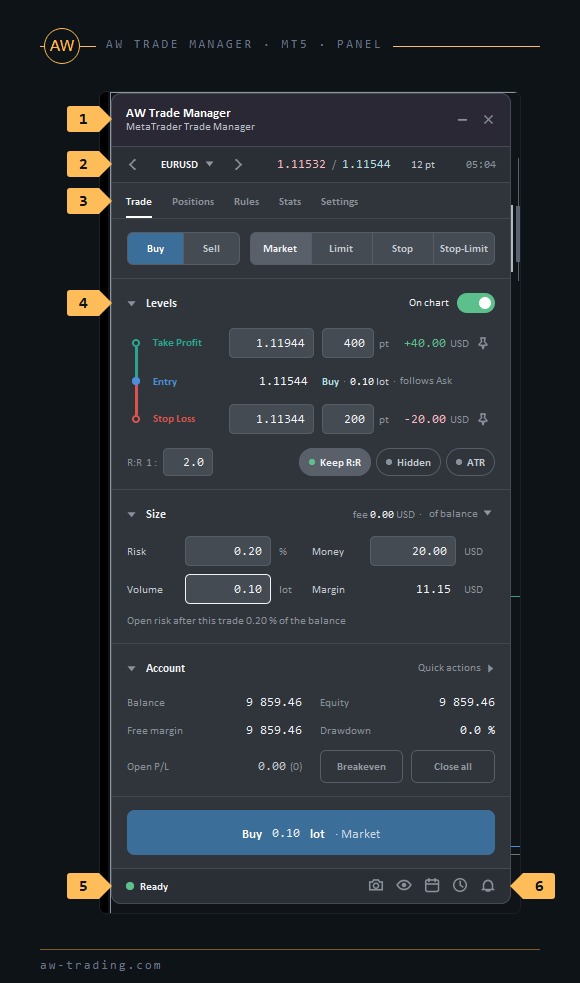
| No. | Element | What it does |
|---|---|---|
| 1 | Header | Name of the panel, clock, the "-" button folds the panel, "x" removes it from the chart. A click on the clock switches the server time to the time left to the close of the current candle and back |
| 2 | Market row | The ‹ › arrows switch the chart to the previous and the next symbol of Market Watch. A click on the symbol name opens the symbol picker (section 14). On the right Bid / Ask and the spread |
| 3 | Tabs | Trade · Positions · Rules · Stats · Settings |
| 4 | Body of the tab | Blocks of the tab. A click on a block header folds it, a folded block shows a short summary in its header |
| 5 | Status line | Ready, a news warning, a BLOCKED limit, the reason trading is not allowed and short results of actions |
| 6 | Footer icons | Screenshot of the chart, clean chart, economic calendar, tasks, alerts |
The time left to the candle close is shown as mm:ss below H1, h:mm:ss from H1 and "1d 03:12" while more than a day is left. The chosen mode is remembered for the chart. The clock stands in the header, or at the end of the market row when the row has room for it.
Status line
| Text | Meaning |
|---|---|
| Ready · 2 positions, 1 pending | Everything is fine, the number of positions and orders the panel manages |
| News in 12 m · USD CPI · High | A yellow warning about the next news by the News rule (section 11). Trading is not blocked |
| Entries paused · ... | A pause of new entries around news. Open positions and their rules are not touched |
| BLOCKED · reason · until 00:00 | A risk limit fired (section 11): new entries are closed until the time shown |
| Trades not allowed · ..., No connection · ..., Market closed · ... | Trading is not allowed by the terminal, the broker or the session schedule (section 1) |
| Changes applied · #..., Saved ..., Blocks folded to fit the chart | Short results of actions, shown for a few seconds. Refusals of the broker are shown in red |
When the chart is lower than the panel, the blocks fold by themselves from the bottom up, and the footer shows Blocks folded to fit the chart. A block opened by hand is not folded for room: while it is open, the panel can reach below the bottom edge of the chart.
Footer icons from left to right: camera - screenshot of the chart, eye - hide or show everything the panel draws on the chart, calendar - the economic calendar window, clock - the tasks window, bell - the alerts window. The eye is crossed while the chart is clean, the bell is crossed while the alerts are snoozed with Snooze 1 h.
4. Planning a trade: the Trade tab
The Trade tab holds the trade plan: direction, order type, entry, Stop Loss, Take Profit, expiry, OCO and volume. The lines on the chart show the same plan with the same numbers: an edit in a field moves the line, dragging the line changes the field. A change of the tab, the timeframe or a restart does not reset the plan.
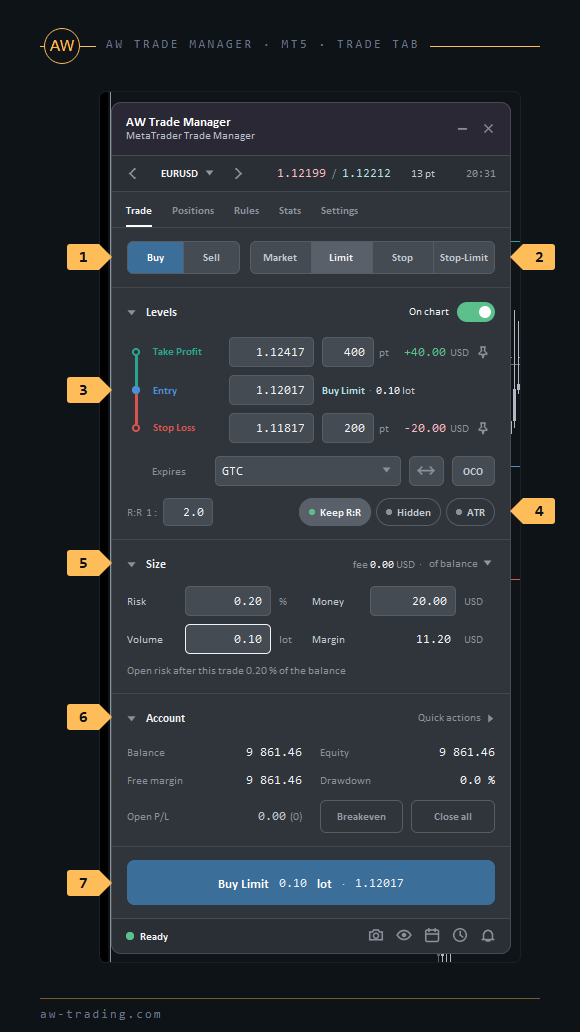
| No. | Element | What it does |
|---|---|---|
| 1 | Buy / Sell | Direction of the trade |
| 2 | Market / Limit / Stop / Stop-Limit | Order type: market or one of three pending types (section 6) |
| 3 | Levels ladder | Take Profit, Entry and Stop Loss: price field, distance field, result in money, pin. The On chart switch shows and hides the plan lines |
| 4 | R:R, Keep R:R, Hidden, ATR | Reward to risk ratio, Take Profit moving with the stop, hidden levels, levels from the ATR |
| 5 | Size | Risk in percent and in money, volume and margin. Base of the risk and commission in the risk |
| 6 | Account | Balance, equity, free margin, drawdown, open result, the Breakeven and Close all buttons, the Quick actions row |
| 7 | Open button | Shows what goes to the broker and sends the plan through the confirmation window |
Levels
The ladder stands the same way as the lines on the chart: a Buy has Take Profit on top, a Sell has Stop Loss on top. Each level row has three numbers: the price, the distance from the entry and the result in money at the chosen volume.
| What to do | How |
|---|---|
| Set a level by price | Type the price into the price field |
| Set a level by distance | Type points into the distance field. The field also takes other units: 1.5R - for Take Profit 1.5 times farther than the stop, for Stop Loss so that R:R becomes 1.5. 2% - the level where the result equals 2 % of the risk base. 50$ - the level where the result equals 50 in the account currency. 1.2atr - 1.2 ATR from the entry |
| Remove a level | Type 0 or clear the field, or click the Take Profit or Stop Loss label. Another click on the label brings the level back. A trade without a level is a normal state unless Require Stop Loss is on |
| Pin a level | The pin in the level row. A pinned level keeps its price when the entry moves. An unpinned one keeps its distance |
| Market entry | The Entry row shows "Buy · 0.10 lot · follows Ask": the entry follows the price, the levels follow the entry. A click on follows Ask stops the entry, the levels then stay at their prices. Another click makes the entry follow the price again |
| Pending entry | The Entry price field. An entry moved across the price turns Limit into Stop and back by itself |
R:R 1: is the reward to risk ratio. A new value in the field moves the Take Profit. Keep R:R - a stop that is moved takes the Take Profit along at the same ratio. When the Take Profit is moved, the R:R changes. A pinned Take Profit is not taken along. Hidden - Stop Loss and Take Profit of this trade are kept by the panel, not by the broker (section 10). ATR opens the ATR row: the current ATR, the stop multiplier Stop Loss x, the Take Profit by R:R distance, and for a pending order the entry multiplier Entry x. The Apply button sets these levels now.
Size
Three linked values: Risk (percent of the base), Money (risk in money) and Volume (lot), next to them Margin - the margin of the trade. A click on a field makes it the leading one: the leading field keeps its value when the stop moves, the others are recalculated. With Volume leading, a moved stop changes the risk. With Risk or Money leading, it changes the volume.
The list next to the block header picks the base of the risk percent: of balance, of equity or of free margin, and switches Commission in the risk - the commission of the entry and the exit counts as part of the risk. The fee line shows this commission for the current volume.
Volume = risk in money / (stop distance in points × value of a point for 1 lot), rounded down to the lot step.
For example, a balance of 10 000 USD, Risk 0.5 %, a EURUSD stop 250 points away, a point of 1 lot worth 1 USD: 50 / (250 × 1) = 0.20 lot. With the stop 270 points away the result is 0.185, the panel sets 0.18 lot, and the risk is 48.60 USD, that is less than asked. Rounding is always down, so a rounded lot never risks more than set. When even the minimum lot risks more, the line under the fields shows the real risk percent.
The Open risk after this trade line shows how many percent of the balance will be at risk in all positions of the Positions tab scope together with this trade. Without a stop it says No Stop Loss · the risk is not limited.
Account
Balance, Equity, Free margin, Drawdown and Open P/L with the number of positions. The Breakeven button moves the stops of the positions in profit to breakeven, Close all closes every position of the scope. The Quick actions row opens Close Buy, Close Sell and Close part with a percent field. All these buttons take the scope chosen on the Positions tab and go through the confirmation window.
Open button
The caption of the button is exactly what goes to the broker: "Buy 0.10 lot · Market", "Buy Limit 0.10 lot · 1.14074", "Buy Stop-Limit 0.10 lot · 1.14074 → 1.14044", "Place fork · 0.10 lot · 1.14074 / 1.13661". Without a stop it ends with no stop. When the plan cannot be sent, the button is grey and shows the reason instead of the trade.
| Reason on the button | What to fix |
|---|---|
| Stop Loss must be below the Ask / Take Profit must be above the Ask | The level is on the wrong side of the price |
| Entry closer than ... to the price (stops level) | The pending entry is closer than the minimum distance of the broker |
| Volume ... is below the minimum ... / above the maximum ... | The volume is outside the limits of the symbol |
| Not enough margin: need ..., free ... | Not enough free margin |
| Stop Loss required (Settings · Execution) | Trades without a stop are switched off |
| Expiry is in the past | The expiry of the pending order has already passed |
| A reason from the status line | A limit block, a news pause or trading not allowed (section 3) |
A trade step by step
Step 1 - On the Trade tab choose Buy or Sell and Market.
Step 2 - Drag the Stop Loss plate on the chart to the level where the idea of the trade breaks, or type the distance into the field.
Step 3 - Click the Risk field and type the percent. The volume is recalculated by itself.
Step 4 - Set the Take Profit with its plate on the chart or with a number in the R:R field.
Step 5 - Press the open button, check the trade in the confirmation window and press Buy or Sell in the window.
5. Lines on the chart
Everything the panel draws on the chart is built the same way: a thin line across the chart, a plate in a column at the right edge and a zone between the entry and the level. A solid line is a plan or a position, a dashed line is a pending order, dots are a hidden level or a rule that has not fired yet.
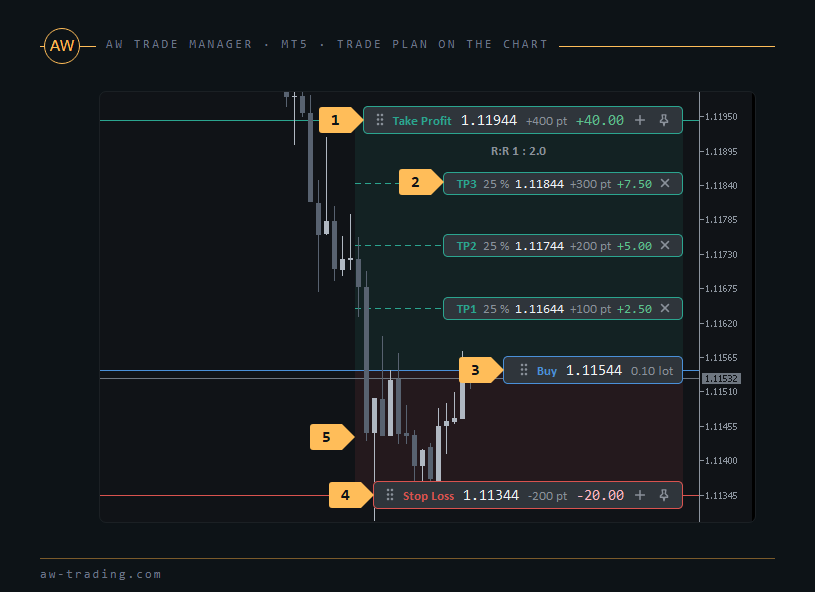
| No. | Element | What it does |
|---|---|---|
| 1 | Take Profit plate | Price, distance and money of the level. Dragged with the mouse. The "+" button adds a partial close level on this side, the pin pins the level |
| 2 | Partial close levels | TP1, TP2, TP3 of the plan: share of the volume, price, points and money. The plate is dragged, the cross removes the level |
| 3 | Entry plate | Order type, entry price and volume. Dragged up and down, sideways it moves the whole column of plates. A click puts the cursor into the Entry field of the Trade tab |
| 4 | Stop Loss plate | The same as Take Profit: price, distance, money, "+" and the pin |
| 5 | Profit and loss zones | Coloured zones between the entry and the levels: the profit zone between the entry and the Take Profit, the loss zone between the entry and the Stop Loss |
Plan lines
- A plate is dragged up or down, the fields of the Trade tab change with it. Esc cancels a drag.
- The Entry plate of a market plan can be pulled away from the price: the plan becomes a pending order, Limit or Stop by the side of the price. A pending entry dragged across the price turns Limit into Stop and back.
- A level dragged through the entry turns the plan round: Buy becomes Sell and back.
- The mouse wheel over a plan plate moves it by one point per notch.
- A double click on the Take Profit or Stop Loss plate puts the cursor into its field on the Trade tab.
- A level closer than the minimum distance of the broker is highlighted, the tooltip of the plate explains why.
- Hidden levels of the plan are drawn with dots, the plate has a crossed eye and the word hidden.
- The On chart switch of the Levels block hides the plan lines, the eye in the footer hides everything the panel draws.
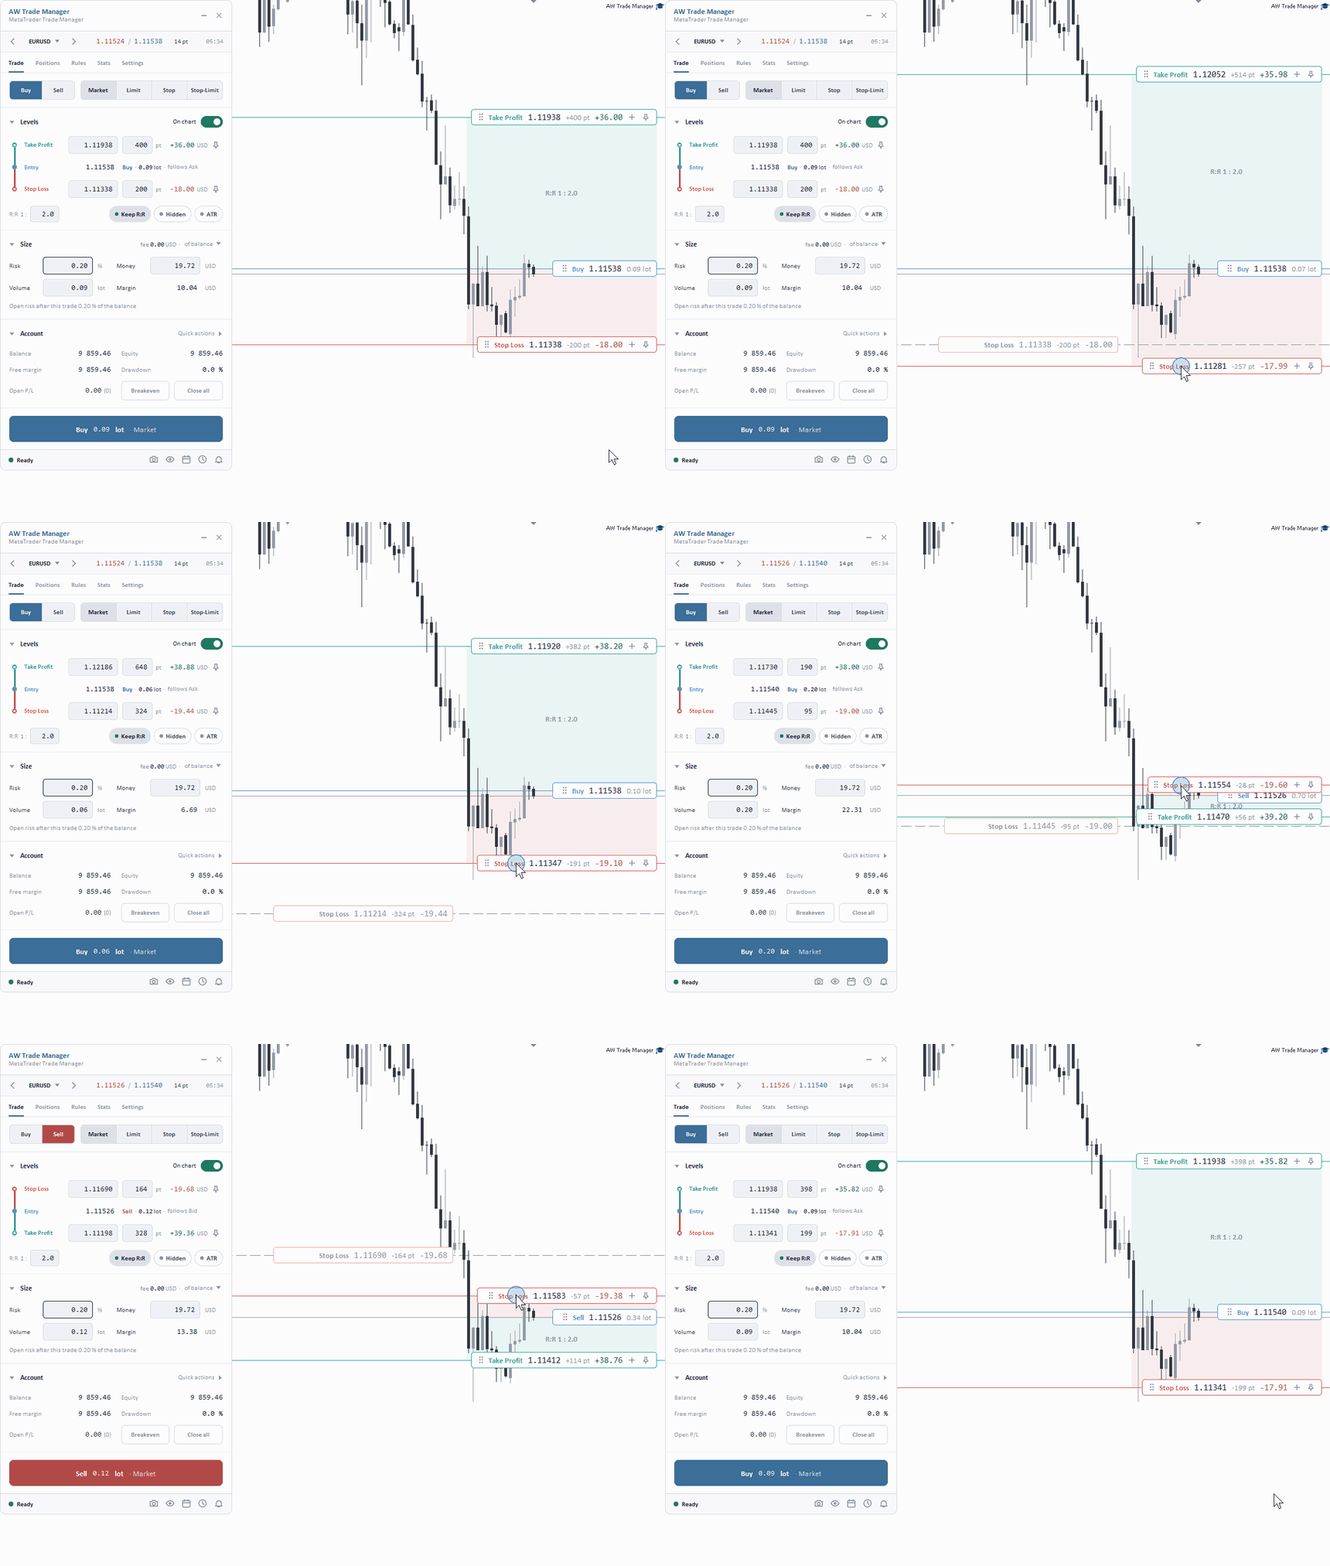
The Stop Loss of the plan is dragged with the mouse. When Risk is the leading field, the lot is recalculated from the risk, Keep R:R moves Take Profit along, and a stop dragged through the entry turns the plan from Buy to Sell. The fields of the Trade tab update when the mouse button is released.
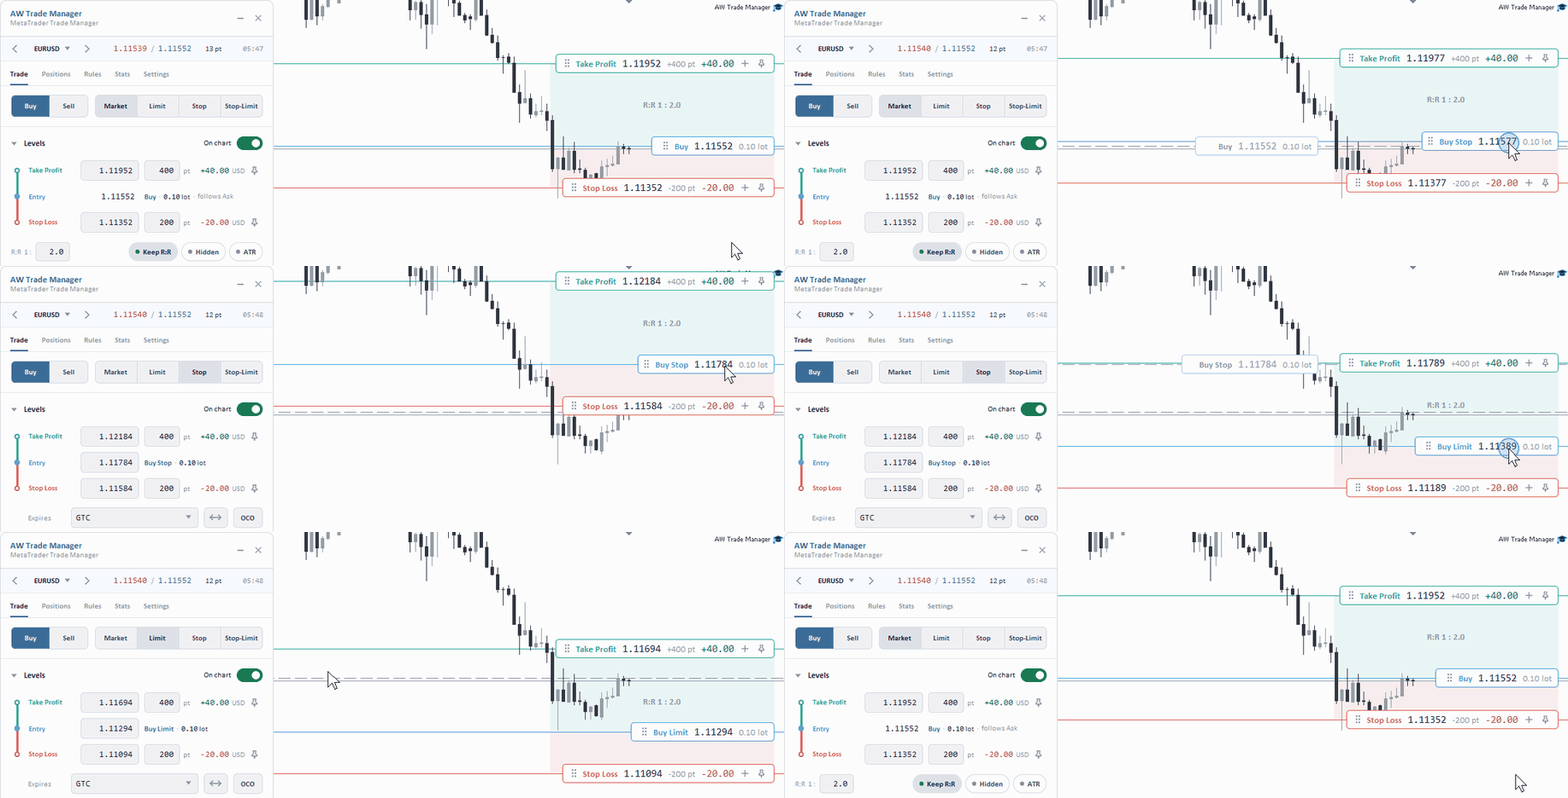
The Entry plate dragged above the price turns the market plan into a Buy Stop, below the price into a Buy Limit: the Trade tab lights the order type and adds the Expires row. The Market button brings the plan back to the price.
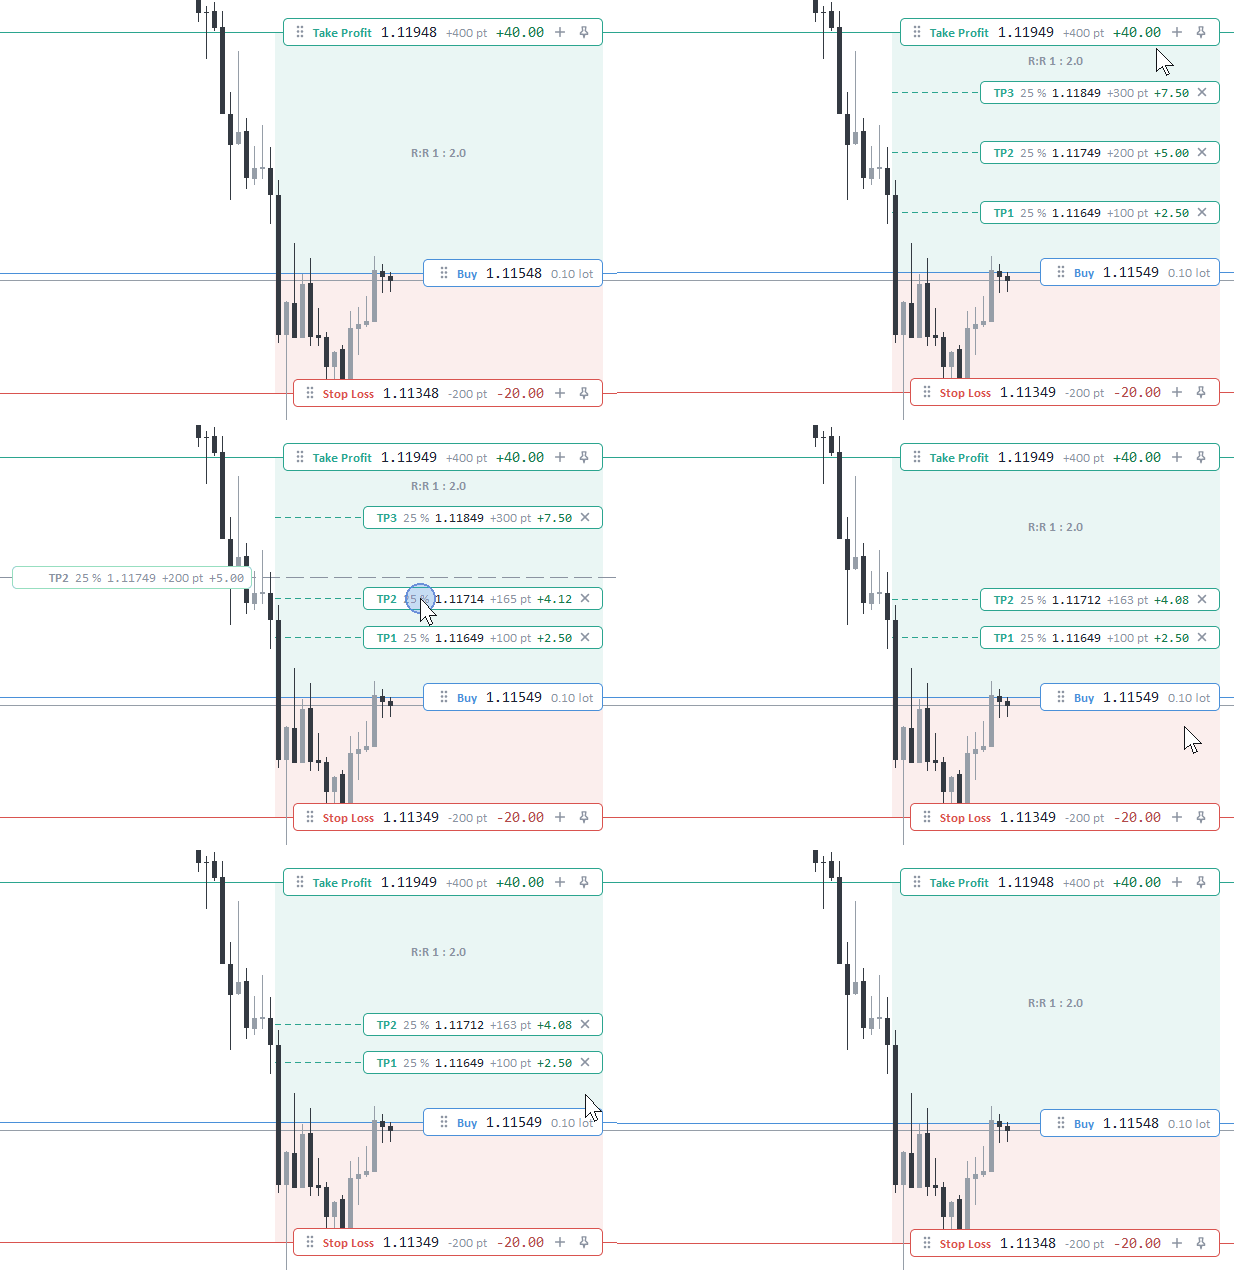
«+» on the Take Profit plate adds partial levels: the first one takes 50 % of the volume, after the third there are TP1, TP2 and TP3 at 25 % each. A level is dragged with the mouse, the cross removes it, «+» on the Stop Loss plate adds the SL1 level.
Positions and orders on the chart
Each position and each pending order of the symbol has an entry plate: direction, volume, price and the current result, with a pencil on the right. Its lines and level plates appear only while the trade is edited: its row is selected on the Positions tab, its window is open, or its entry plate was clicked. Another click on the entry plate removes the selection. The rest of the time the trade is shown by the terminal's own trade levels, and hidden levels are drawn as thin dots when the input Thin lines of hidden SL / TP when the position is not being edited is on. While a trade is edited, the terminal's levels of the symbol are hidden so that the lines do not double. When the panel is removed from the chart, the setting of the terminal comes back.
| Element | What it shows and what to do with it |
|---|---|
| Take Profit and Stop Loss of a position | Dragged with the mouse. The new level goes to the broker when the button is released, without the confirmation window. A refusal of the broker puts the plate back. "+" adds a partial close level of the position |
| BE | Where breakeven fires and where the stop goes: "BE at +1.5 R → SL 1.12306". The mark is dragged to move the trigger of this position. After it fires it shows done for a minute |
| Trail | Where trailing starts ("Trail from +1.5 R", "from after BE"), while it works - "Trail on" and the distance to the stop. Before it starts, the mark can be dragged |
| TP1 ... TP5, SL1 ... SL5 | Partial close levels: share, price, points and money. The plate is dragged, the cross removes the level. A closed level shows a tick for a minute |
| broker stop | The emergency broker stop under a hidden Stop Loss, grey dots |
| Close #... | The vertical line of the auto-close of a position with the time and a countdown. Dragged left and right, it changes the close time |
| Pending order | The entry plate is dragged, the order is moved at the broker. Take Profit and Stop Loss of the order are dragged too. A Stop-Limit shows its Limit price with dots |
| OCO | A bracket with the OCO tag between the legs of a pair when one leg is selected |
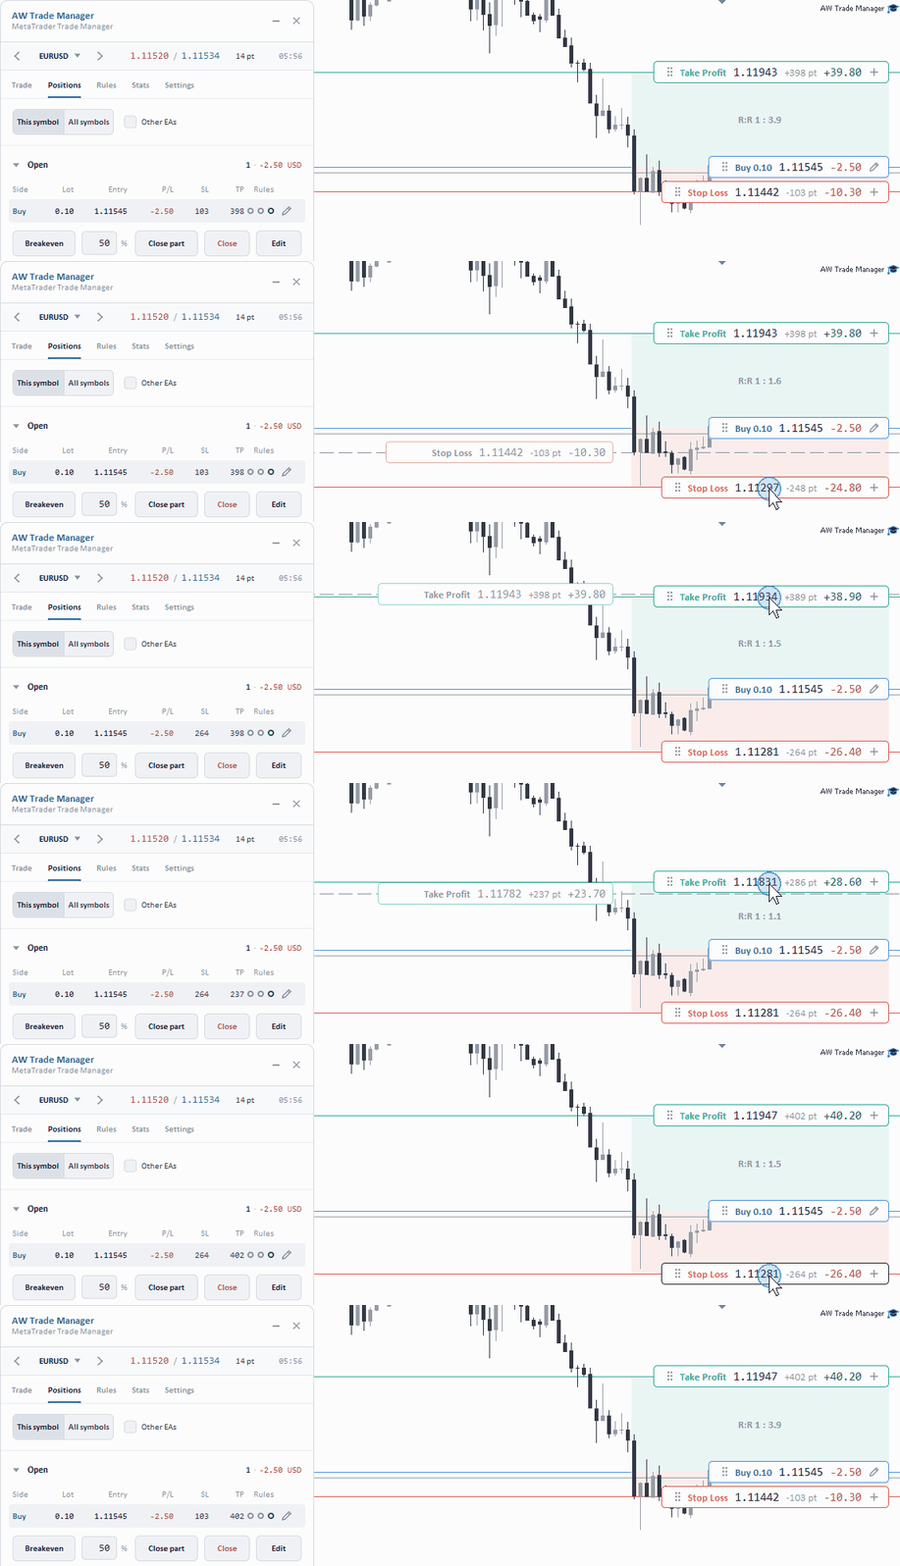
Levels of an open position are dragged right on the chart: the new Stop Loss or Take Profit goes to the broker when the mouse button is released, the SL and TP columns of the Positions tab change at once.
A click on the BE or Trail mark, on a partial close level or on the auto-close line opens the position window at this rule. The pencil on the entry plate opens the window of the trade, another click closes it.
News, alerts and tasks
News are drawn as dashed vertical lines with a currency tag, folded into a short "⚠ USD" tag: a click on a tag opens all news as full plates, another click folds them. "+2" in the tag means two more news come out at the same time. The tooltip of a tag shows the forecast, the previous and the actual value. The lines are switched on in Rules → News, the number of lines and the past news are set in the calendar window (section 14). Price alert lines are dragged with the mouse, each has a cross. Tasks are drawn as vertical lines in the colour of the action: red ones close and remove, blue ones open a trade, grey ones do the rest. A task line is dragged in time, a click on it opens the task in the Tasks window.
6. Pending orders: Limit, Stop, Stop-Limit, expiry and OCO
| Type | Where the entry is | What happens |
|---|---|---|
| Limit | Buy below the price, Sell above | The order fills when the price comes back to the entry |
| Stop | Buy above the price, Sell below | The order fills at market when the entry is broken |
| Stop-Limit | The trigger as for Stop | When the price reaches the trigger, the broker places a limit order the set number of points inside. The Limit row shows the limit price and the offset below trigger or above trigger |
The type follows the price: an entry moved across the price turns Limit into Stop and back, and the panel remembers the choice between Stop and Stop-Limit.
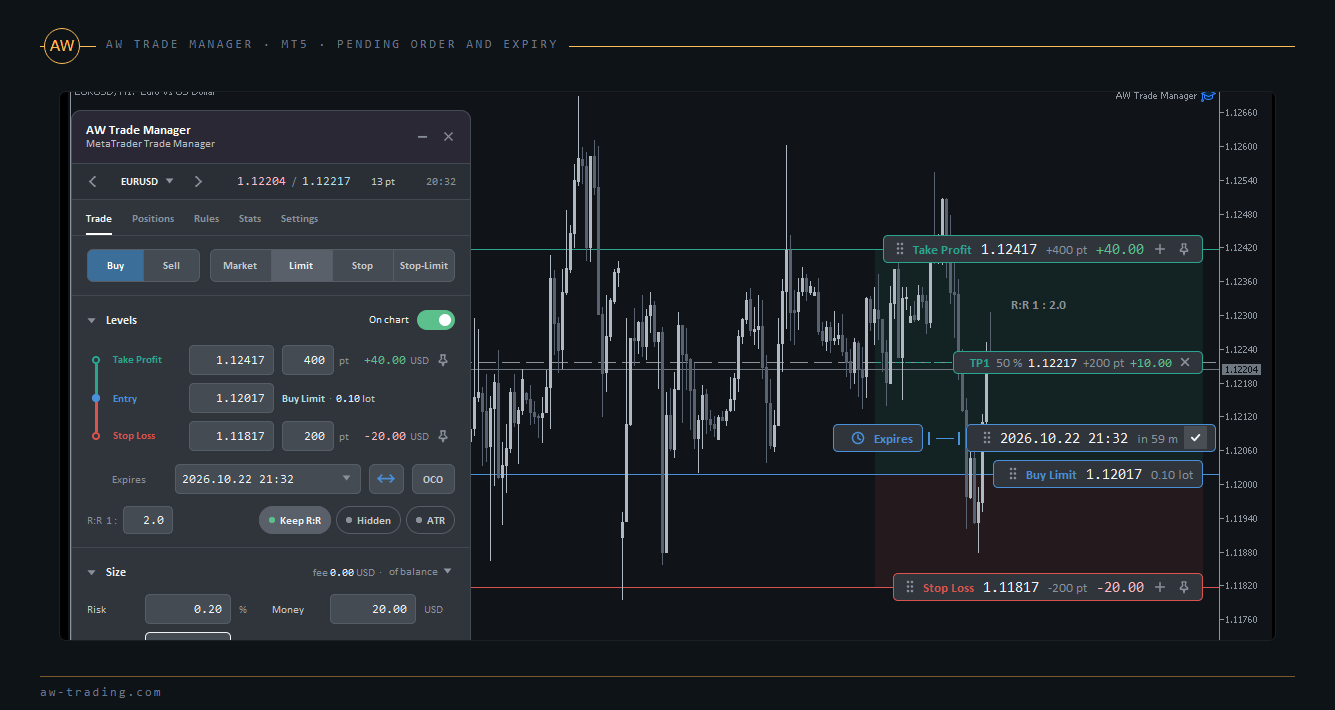
Expiry of the order
The Expires row: a date field in the yyyy.mm.dd hh:mm format and the list GTC (no expiry), 1 hour, 4 hours, End of day, 1 week and On the chart. The ↔ button and the On the chart item open the ruler: an Expires vertical line on the chart with the date and a countdown. It is dragged to the time and confirmed with the tick on its plate, Esc cancels. The time is server time. When the symbol does not accept GTC or a time expiry, the open button says so directly, the panel does not swap the expiry silently.
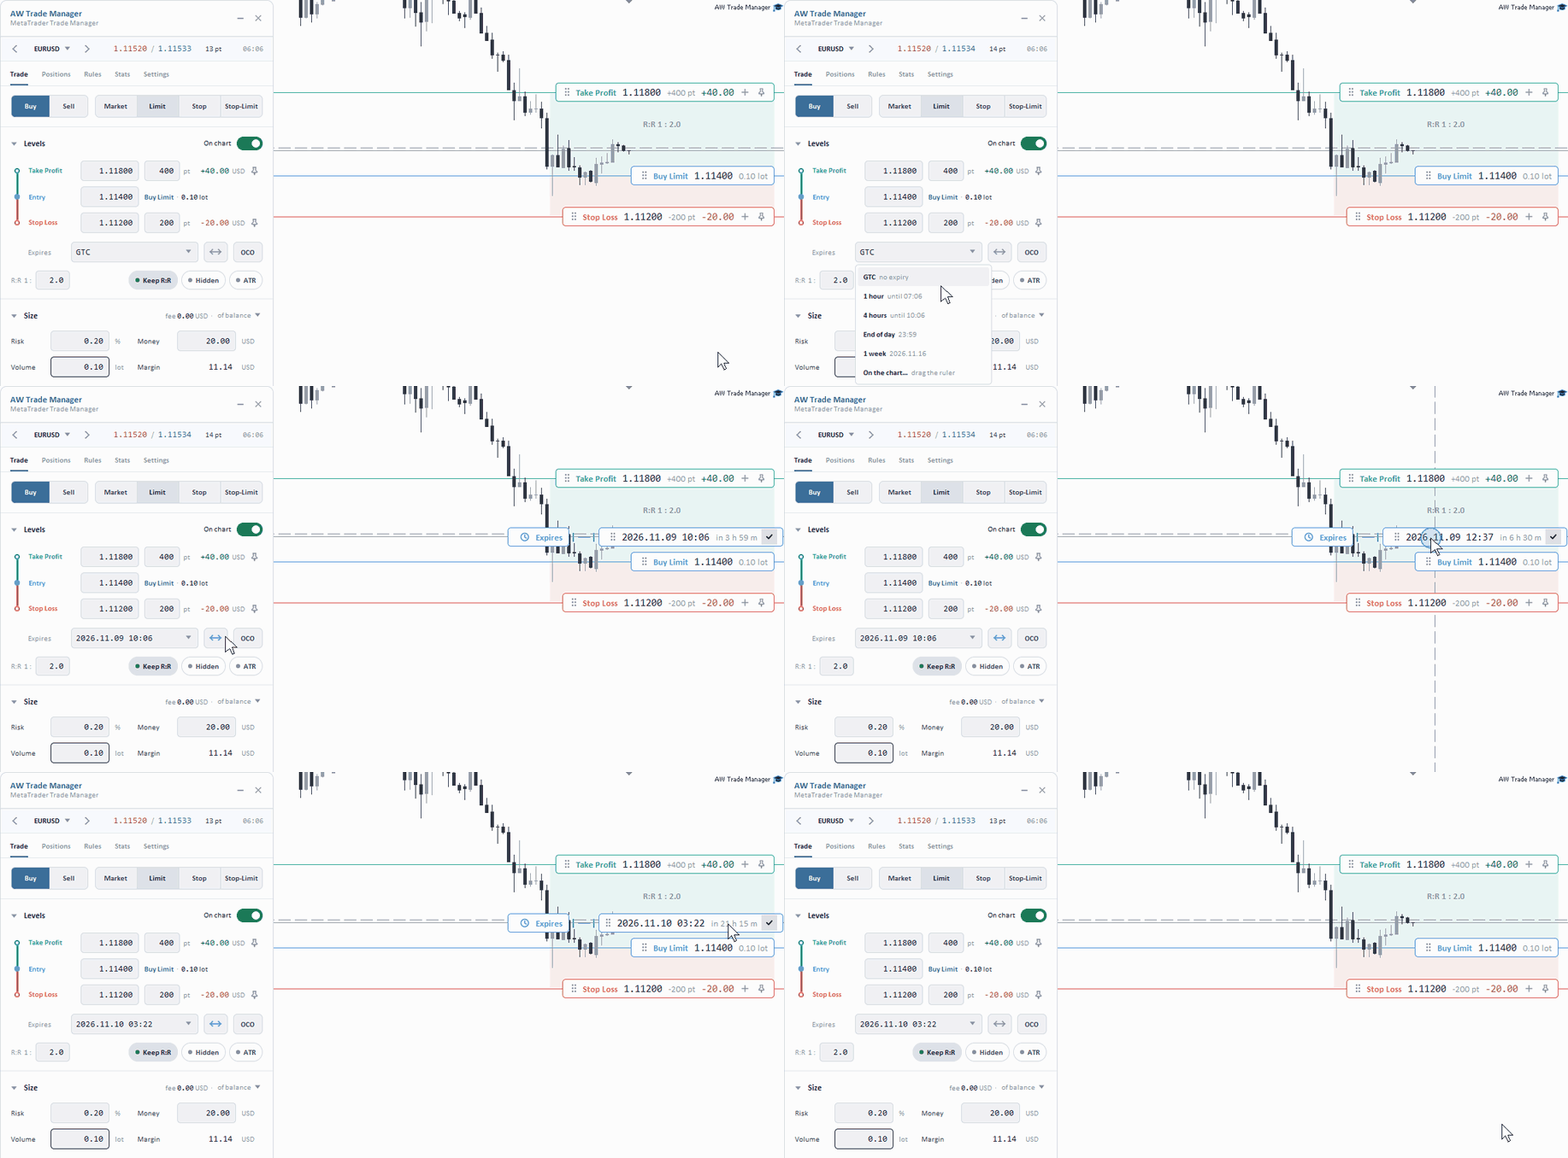
Expiry from the panel and from the chart: the 4 hours preset, then the Expires ruler. The date plate is dragged in time, the tick puts the date into the Expires row.
OCO: one cancels the other
The OCO button in the expiry row opens the OCO row with a list. When one leg of a pair fills, the panel deletes the other. At start the panel checks the pairs: if a leg became a position while the panel was not running, the other leg is removed.
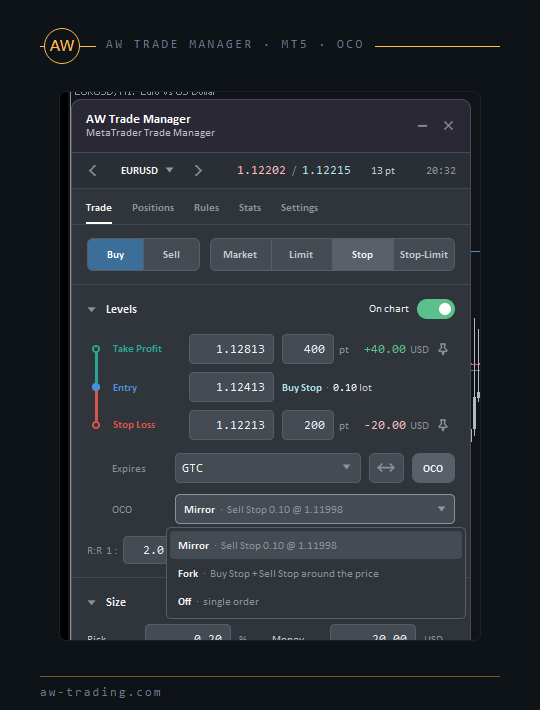
| Item | What is placed | When to choose it |
|---|---|---|
| Mirror | An opposite order on the other side of the price at the same distance, Stop Loss and Take Profit mirrored. For a Limit the opposite Limit, for Stop and Stop-Limit the opposite Stop | An entry to one of the two sides of the current price |
| Fork | Buy Stop and Sell Stop around the price. The button becomes Place fork, both legs are shown on the chart with the OCO bracket, the second leg can be dragged | A breakout to either side, for example before news |
| Pair | A pair with a pending order of this symbol that is already placed, listed by ticket | To link a new order with an order that already waits |
| Off | A single order | No link |
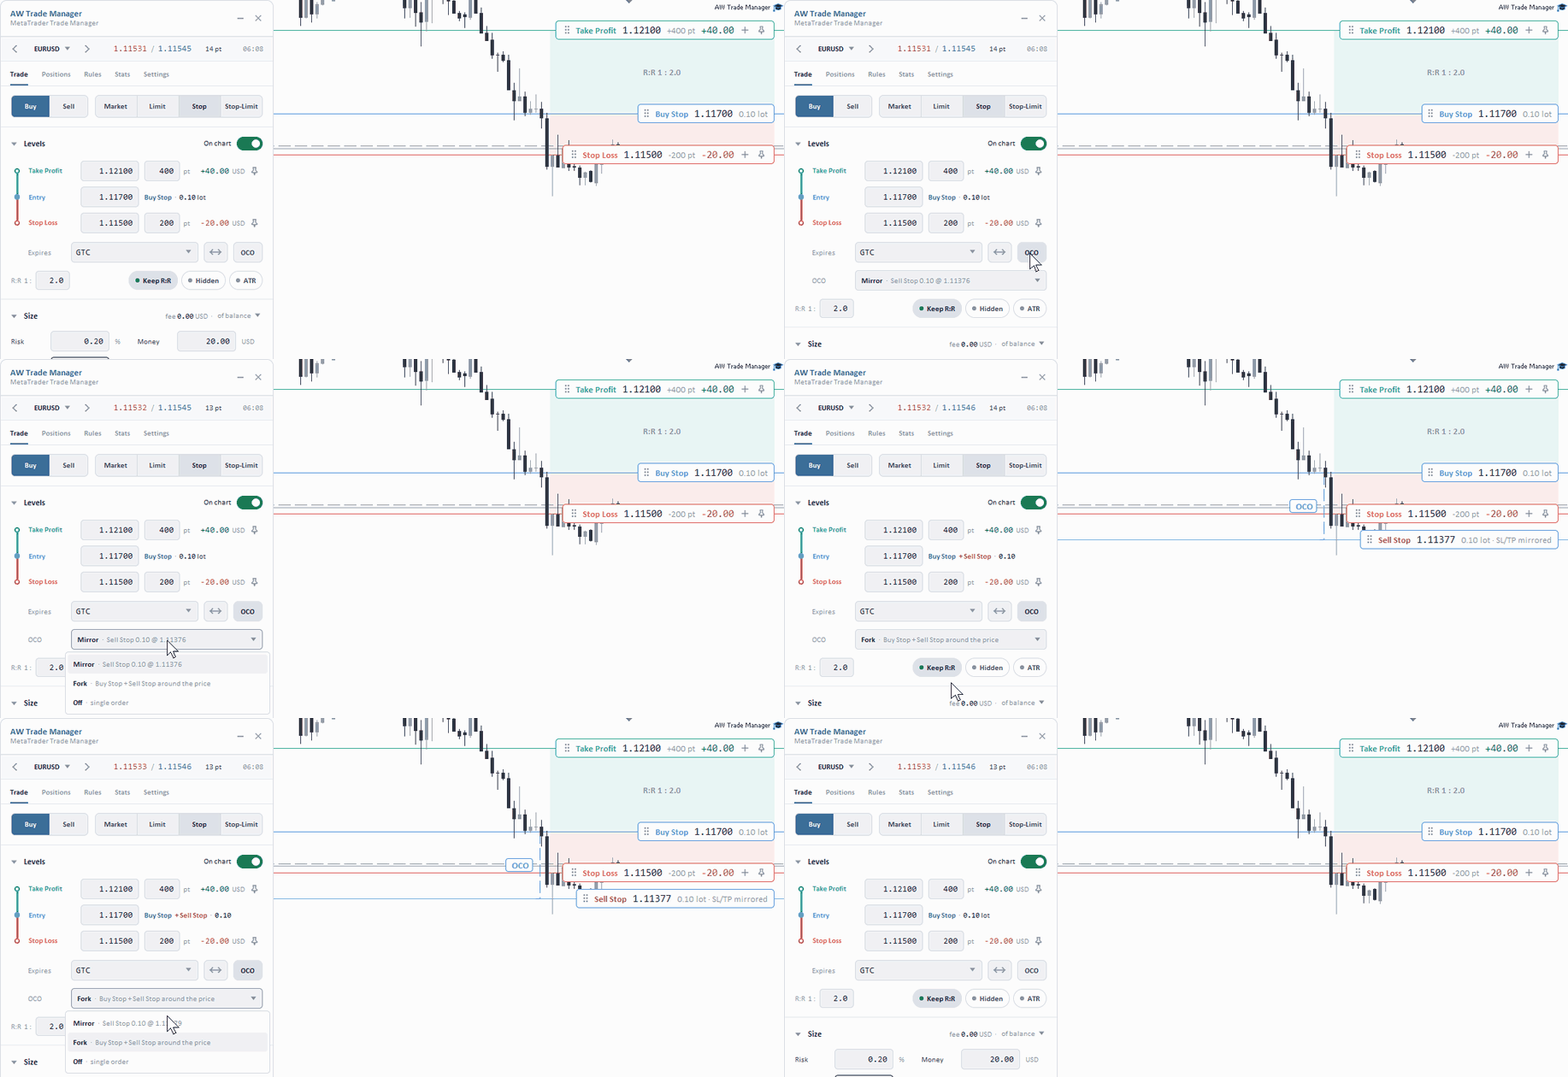
OCO on the Trade tab: Mirror shows the second leg as a line of the panel, Fork draws the Sell Stop leg with the OCO bracket on the chart, Off brings back a single order.
Fork needs Stop orders: with Limit chosen, Fork switches the type by itself. An edit of the Stop Loss or Take Profit of one leg can be repeated on the other one: the Mirror SL / TP edits to the partner box in the order window and the common setting OCO: mirror SL / TP edits by default in Settings → Execution.
7. The confirmation window
Every action that opens, closes, removes or changes trades goes through one confirmation window. The window shows the contents and the amount, not a general question. The set of tickets is fixed at the moment of the question: a position opened while the trader reads the window is not touched.
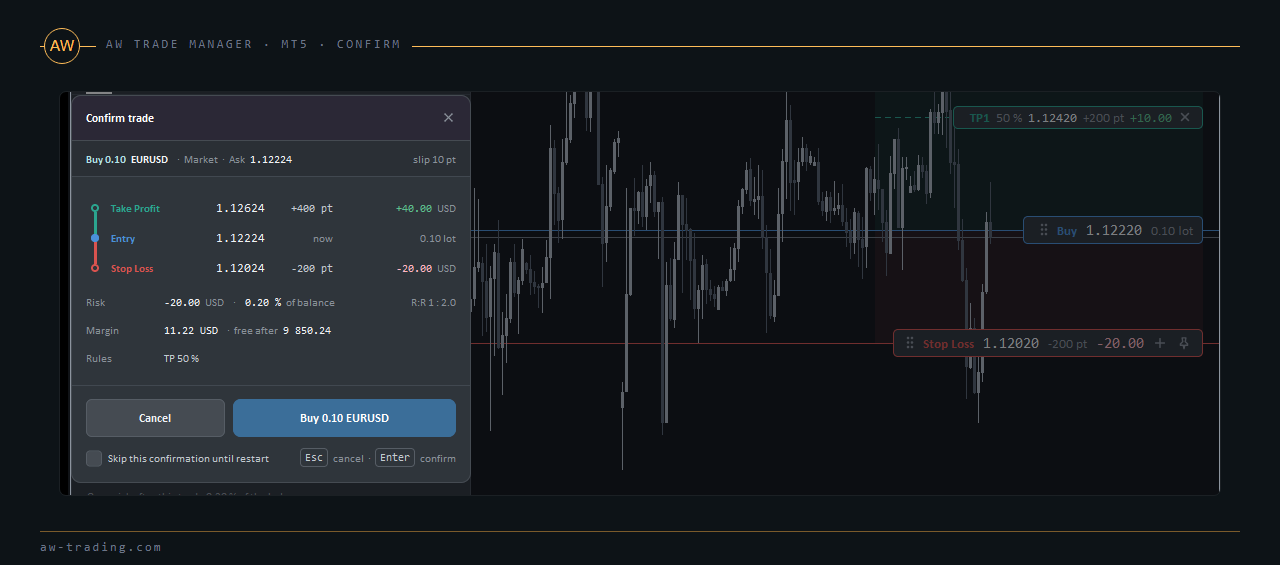
| Window title | What is inside |
|---|---|
| Confirm trade / Confirm order | A mini ladder of Take Profit, Entry, Stop Loss with prices, points and money, risk in money and in percent of the balance, R:R, margin and free margin after the trade, rules of the position, the OCO pair, a yellow line about close news. On a netting account - what the trade does to the open position |
| Closing positions / Close part | Up to four positions with their result, then "and N more", the Net now total with swap and commission. Close at market with the slippage from the settings, the largest loss closes first |
| Breakeven | Which stops move and by how much, which positions are skipped |
| Hedge, Reverse | Opposite volume or reversal of the net volume. Hedging accounts only |
| Remove pending | The orders to remove. For a leg of an OCO pair three buttons: Cancel, This leg only, Both legs |
| Activate now | The price of the market order that replaces the pending one |
| Apply to open | How many positions get the default rules of the Rules tab and how many of them have own settings |
| Apply changes | What exactly changes in the position or order window |
| Exit panel | What happens when the panel is removed: hidden levels go back to the broker, the rules stop, positions and orders stay |
Esc cancels, Enter runs the main button. While the window is open, the panel and the chart do not react to clicks. The Skip this confirmation until restart box switches the question off for this one action until the panel restarts. The permanent switches of the questions are in Settings → Execution, the Confirm row. Hotkeys that close, remove, move stops or open a trade always ask (section 16).
8. Managing positions: the Positions tab
The Positions tab shows everything the panel manages and the actions on it: on one row and on a group.
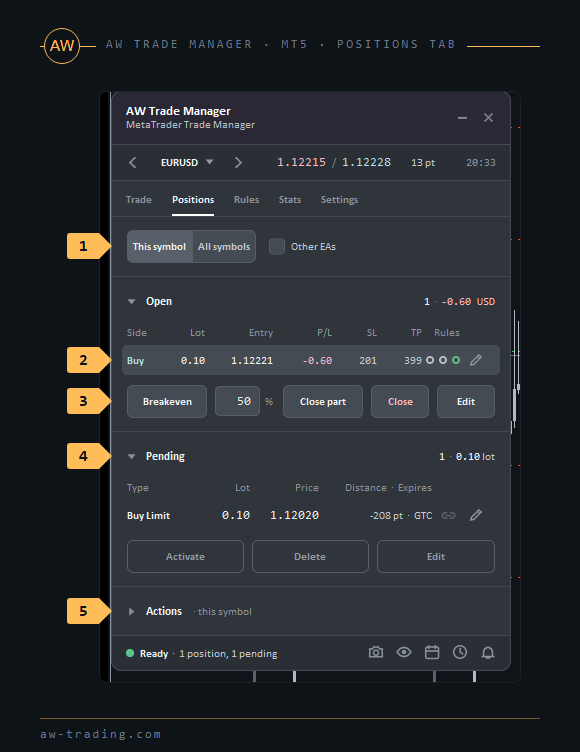
| No. | Element | What it does |
|---|---|---|
| 1 | This symbol / All symbols, Other EAs | Scope of the lists and the group actions: the chart symbol or all symbols. The Other EAs box adds trades of other EAs, their rows carry a grey mark |
| 2 | Open list | Columns Side, Lot, Entry, P/L, SL, TP, Rules and the pencil that opens the position window |
| 3 | Actions of the selected row | Breakeven, percent field, Close part, Close, Edit |
| 4 | Pending list | Columns Type, Lot, Price, Dist. · Expires, the OCO pair icon and the pencil, under the list Activate, Delete, Edit |
| 5 | Actions block | Group actions on the whole scope |
SL and TP in the Open list are distances from the entry in points or pips, an amber dash means there is no level. The Rules column holds three dots: Breakeven, Trailing, Partials. An empty dot - the rule is off, a ring - it waits, a filled dot - it has fired or works. The tooltip of a row shows the ticket, the levels, the result and the result in R when the initial risk is known. With All symbols the rows are grouped by symbol, a click on a symbol row folds the group. The list shows five rows, scrolls further with the wheel, and its header counts "1-5 of 12".
| Button | What it does |
|---|---|
| Breakeven | Stop of the selected position to breakeven, only when it is in profit |
| Close part | Closes the percent from the field on the left of the current volume of the selected position |
| Close, Edit | Close the selected position, open its window |
| Activate | A market order now with the volume and the levels of the selected pending order, then the pending order is deleted. The rules on fill move to the position |
| Delete | Delete the selected order. For an OCO leg the window asks whether to delete one leg or both |
| Close all, Close Buy, Close Sell | Close every position of the scope, only Buy, only Sell |
| Close profit (N), Close loss (N) | Close the positions in profit or in loss, their number in brackets |
| Close part · all | Close the percent from the field of the Open row of every position of the scope |
| Breakeven all | Stops of all positions in profit to breakeven, the others are skipped |
| Hedge all | Opposite volume to every position, the new legs get no rules. Hedging accounts only |
| Remove pending ▾ | Remove pending orders of the scope by kind: All, Stops, Limits, Stop-Limits, Buy, Sell, with the number of orders of each kind |
| Reverse all | Close every position of the scope and open the net volume the other way, Stop Loss and Take Profit from the plan of the Trade tab. Hedging accounts only |
Selecting the row of an OCO leg highlights its partner in the list and draws the OCO bracket between the legs on the chart. Selecting a position row shows its levels on the chart (section 5).
9. Position and Pending windows
A window opens with the pencil in a list row or on the entry plate, with the Edit button or with a double click on a level plate of a position. One trade window is open at a time: the pencil of another trade switches it. Edits in the window are a draft: the chart shows the draft levels at once (the On chart switch of the Levels block), and the broker gets them in one modification with the Apply changes button. Before sending, the panel reads the values at the broker again. While nothing is changed, the button reads No changes.
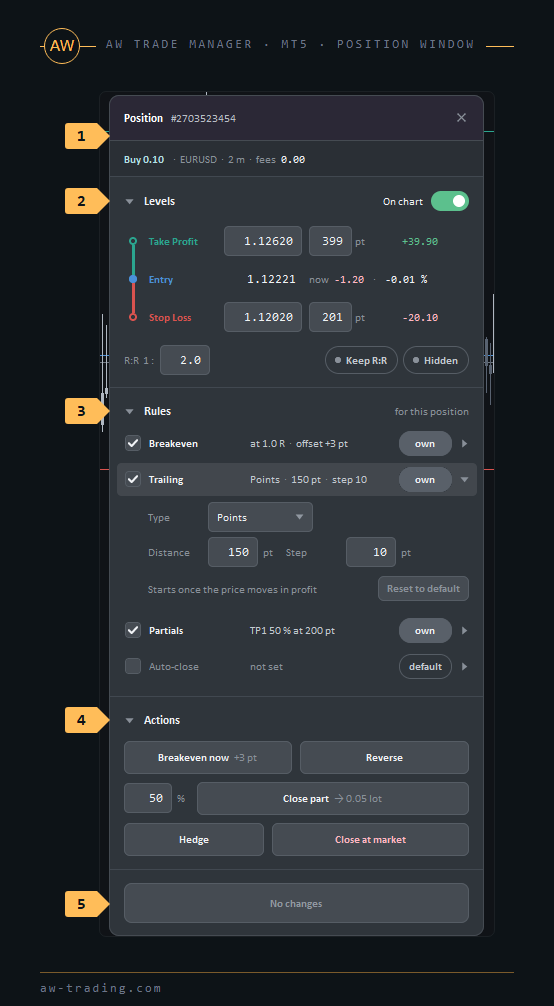
| No. | Element | What it does |
|---|---|---|
| 1 | Header | Position #ticket, under it a line: direction and volume, symbol, age of the position, fees - swap and commission, the comment when it is not the comment of the panel |
| 2 | Levels | Take Profit and Stop Loss by price and by points, the result of each level in money. The Entry row shows the current result in money, in percent of the balance and in R. R:R field, Keep R:R, Hidden |
| 3 | Rules · for this position | Breakeven, Trailing, Partials and Auto-close of this position: a box, a summary and the default or own mark. A click on a row opens the fields of the rule |
| 4 | Actions | Breakeven now, Reverse, Close part with a percent field and the volume, Hedge, Close at market |
| 5 | Apply changes button | Sends all edits of the window in one request |
Points in the level fields work on both sides of the entry: a negative value means the level is beyond the entry, for example a stop in profit after breakeven. The rules of a position start equal to the rules of the Rules tab and are marked default. An edit of any field makes the rule its own, the mark turns to own. The Reset to default button of an open rule takes the values of the Rules tab back. Reverse and Hedge exist on hedging accounts only.
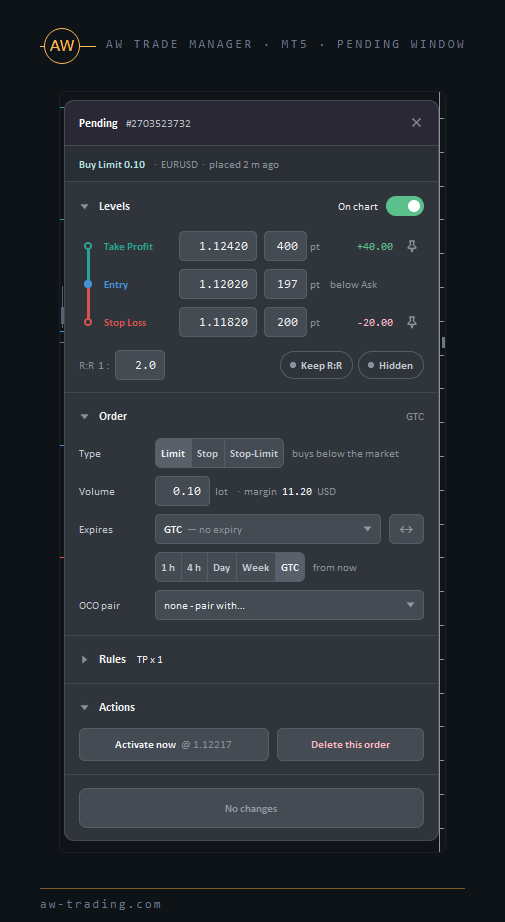
| Block of the Pending window | What is in it |
|---|---|
| Header | Pending #ticket, type, volume, symbol and how long the order has been waiting |
| Levels | Entry by price or by points from the market (Ask for Buy, Bid for Sell). Take Profit and Stop Loss follow the entry unless pinned. R:R, Keep R:R, Hidden: on fill the levels stay with the panel, the broker keeps only the emergency stop |
| Order | Type Limit / Stop / Stop-Limit, for Stop-Limit the Limit at field. Volume with the margin. Expires: the list, the ↔ ruler button and the quick terms 1 h, 4 h, Day, Week, GTC from now. OCO pair: choice of the partner among the orders of the symbol, the Unlink button, the Mirror SL / TP edits to the partner box |
| Rules · on fill | The same four rules as for a position. They switch on when the order fills |
| Actions | Activate now at the current price, Delete this order, for an OCO pair also Delete both OCO orders |
The broker cannot change the type or the volume of an order, so the panel places the order anew: the new ticket gets the OCO link, the rules and the hidden levels of the old one, then the old one is deleted. If the old one cannot be deleted, the new one is removed and nothing changes. An edit of an order does not reset its expiry to GTC.
Continued in part 2: Rules, Protection, Stats, Settings, Tools, Hotkeys, Input settings, Questions -> HERE
Buy AW Trade Manager:
MT5 version
👉 https://www.mql5.com/en/market/product/205654

AW Trading Software