Boring Pips EA 6.0 – No Grid, No Martingale, 100% Hard SL with Balance-Based Risk Allocation

This article introduces Boring Pips EA 6.0 — the 10th major update released over the past three years, and the most significant change yet to the EA’s trading algorithm and overall trading approach.
Version 6.0 introduces a completely redesigned structure:
-
No Grid and no Martingale
-
100% of positions use a hard Stop Loss, with risk allocated based on account balance for easier per-trade risk control
-
New trading logic and configuration designed around clearer and more controlled risk management
Compatibility Notice:
- Version 6.0 is not compatible with version 5.0 or earlier versions.
- Do not load old setting files into version 6.0, and do not install version 6.0 on an account that still has open positions from previous versions using the same Magic Number.
- Consider keeping a local backup of version 5.0 (or older version) before updating if you may want to continue using it. Starting from version 6.0, support for providing older EA versions will no longer be available.
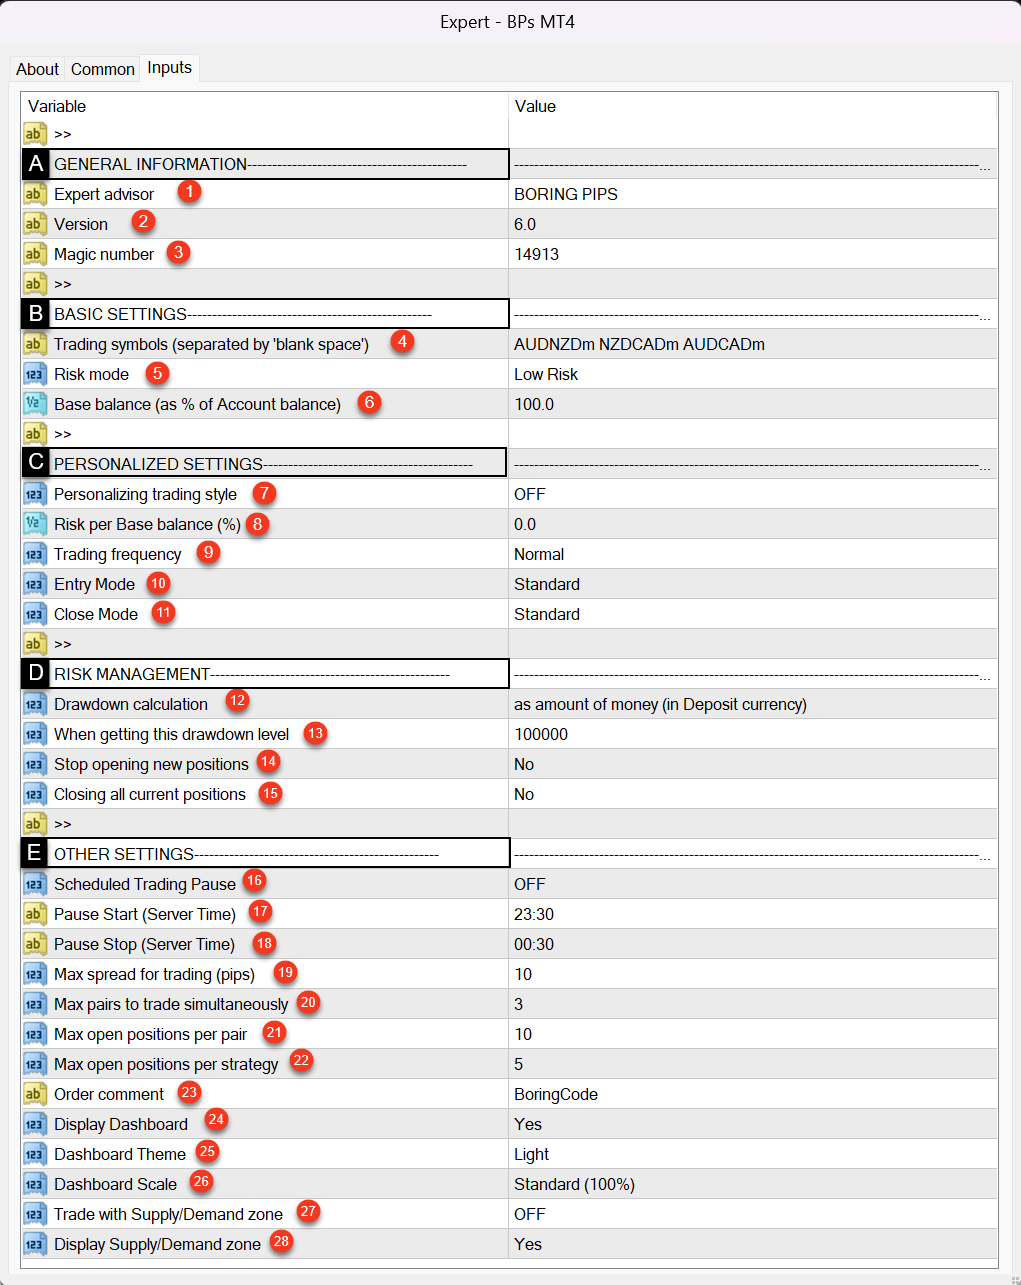
Figure 1: Version 6.0 - Installation interface
A. General information
Introducing the name and version of the EA, users can also change the 'magic number' for the EA.
1. Expert advisor: Name of the EA.
2. Version: Current version.
3. Magic number: the ID that positions of Boring Pips will carry, helping the EA manage its positions separately. If you use Boring Pips along with other EAs, ensure that the magic numbers of each EA are unique.
B. Basic Settings
4. Trading symbols: enter the currency pairs you want to trade with Boring Pips, some notes when entering currency pairs:
- Enter currency pairs exactly as provided by your broker, including any suffix/prefix if applicable (e.g., AUDNZDf, AUDNZD.g…)
- Separate currency pairs with spaces.
- The maximum number of entries in 'Trading symbols' is 3 currency pairs. If you enter 1 or 2 currency pairs, only those will be traded. If you enter more than 3 currency pairs, only a maximum of 3 currency pairs will be traded.
- If you want to trade more than 3 currency pairs, it is recommended to install Boring Pips on more than 1 chart, where the 'Trading symbols' on these charts will enter different currency pairs.
Please refer to question 28 in the FAQ for more information.
5. Risk mode: choose a risk mode that suits you, with 4 risk modes from low to high: Boring Mode, Low risk, Medium risk, High risk.
Please refer to question 12 in the FAQ for more information.
6. Base balance: This represents the percentage of your account balance allocated for trading with the EA.
- For example, if your account balance is $1000 and you want to use the full amount, enter '100' in the Base Balance input. The EA will then treat 100% of your balance as the base for calculating position size.
- If you only want to use 50% of your capital, enter ‘50’, and the EA will consider $500 as the base.
- For higher risk exposure, entering ‘200’ will make the EA operate as if the account has $2,000.
Base Balance and the estimated loss are measured in the account currency. Volume is adjusted to the broker’s lot step and minimum/maximum limits.
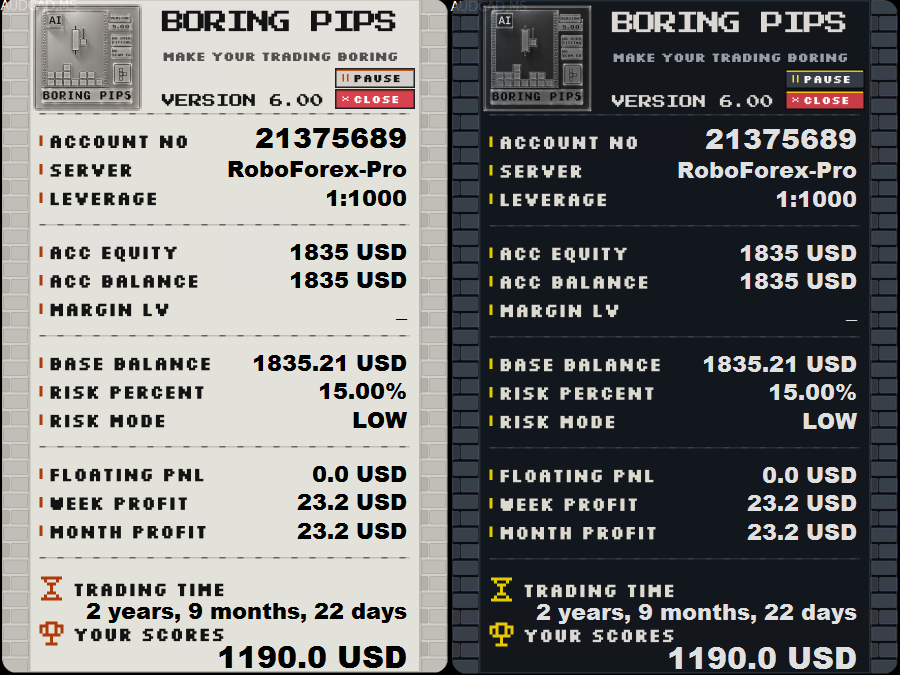
💡Tip: Please verify the displayed Base Balance and Risk percent in the Dashboard to ensure everything is working as expected. Adjust this setting carefully based on your risk preference.
Figure 2: Dashboard interface
C. Personalized Settings
Personalised Settings allow for deeper customization across all aspects of the EA. These settings override the parameters defined in the Basic Settings.
For example, if the Risk Mode is set to Medium in the Basic Settings, then adjusting trading frequency here will affect how medium-risk signals are interpreted and used.
The current values in this section (under default settings) mirror those in Basic Settings. If you wish to modify a specific parameter, you must first enable 'Personalizing trading style' and then adjust the corresponding settings. Parameters that are not adjusted will retain their original behavior.
It is recommended to make changes in Personalized Settings only after operating the EA for 2-3 months and understanding how it functions.
7. Personalizing trading style: You need to switch it to ON first for changes in Personalized Settings to take effect.
8. Risk per Basse balance (%):
Set “Risk per Base balance (%)” to 0 to use the Risk mode’s default. A custom percentage applies only when Personalising is ON. Risk is calculated per position, not for the entire portfolio.
❓How is the trading volume calculated?
Trading Volume (lots) = (Base Balance × Risk Percent / 100) ÷ Estimated Loss at Stop Loss for 1 Lot
Example: With a Base Balance of 1,000, a Risk Percent of 15%, and an estimated loss at Stop Loss of 3,000 per lot—all monetary amounts in the account currency:
Trading Volume = (1,000 × 15 / 100) ÷ 3,000 = 0.05 lots
If the calculated volume is below the broker’s minimum, the EA uses the minimum lot size. This may exceed the selected risk percentage.
9. Trading frequency: Adjust how often the EA opens trades:
This setting tightens or relaxes signal criteria, directly affecting how frequently signals are triggered.
Low
Normal
High
10. Entry mode:
Entry Mode allows you to select the entry behavior that best suits your trading preferences:
- Zone Confirmed: Uses confirmed entry conditions similar to version 4.3 and earlier.
- Standard: Uses the current standard entry method.
- Delayed: Waits for price to move further than the Standard entry level.
- Extended: Provides the most delayed entry and requires a greater price movement than Delayed mode.
These options can also help diversify risk when running different EA configurations across multiple trading accounts.
11. Close Mode:
Close Mode allows you to customize the EA’s group-closing target:
- Early: Closes the position group sooner, prioritizing stability.
- Standard: Uses the current closing method, balancing stability and profit potential.
- Extended: Waits for a more distant closing target, aiming for greater profit potential.
Close Mode can be changed while positions are open, and the relevant Take Profit levels will be adjusted accordingly.
D. Risk Management
This risk management option allows the EA to perform certain actions (such as stopping trading or closing positions) when the drawdown reaches a predefined threshold.
12. Drawdown calculation:Allows users to define how drawdown is measured — either as a percentage of the account balance or as a fixed value in the base currency (e.g. USD). This setting determines how the actions in items 16 and 17 will be triggered.
13. When getting this drawdown level:
Set the specific drawdown value here. It must match the method chosen in item 14:
If using percentage-based calculation, a value of 100 means 100% of the account balance.
- If using currency-based calculation, a value of 100 means 100 units of the account’s base currency (e.g., 100 USD for a USD-denominated account, 100 EUR for a EUR account).
14. Stop opening new positions: Yes/No. Option to stop opening new positions when condition 15 is met. In this case, the EA will halt opening new positions.
Existing positions will still be managed and closed according to the EA’s logic.
15. Closing all current positions: Yes/No. Option to close all current positions managed by the EA when condition 15 is met.
⚠️ The EA will only calculate drawdown and manage/close positions that it has opened.
💡 Tip: You can also manually pause trading or close positions on a specific symbol via the Dashboard. See more in the "Pause Trading and Close Positions Manually" section at the end of this guide.
E. Other Settings
16-17-18: Scheduled Trading Pause:
Scheduled Trading Pause allows you to define a daily period during which the EA suspends routine trade opening and closing. This can help avoid periods of low liquidity, unusually wide spreads, or increased slippage.
Enable the feature and configure:
- Pause Start: Enter the start time in HH:MM format.
- Pause Stop: Enter the end time in HH:MM format.
Both settings use your broker’s server time, as displayed on the chart and in Market Watch.
Important notes:
- Two red lines appear on the chart to indicate the scheduled pause period.
- The lines disappear if the feature is disabled or the time format is invalid.
- The schedule repeats daily, and the chart markers update automatically.
- Emergency closures triggered by Risk Management remain active.
- Physical Stop Loss levels can still be executed by the broker during the pause.
19. Max spread for trading (pips):
This value, measured in pips (10 points), sets the maximum allowable spread for opening/closing positions. Positions will not be openned/closed if the floating spread exceeds this limit. This feature helps prevent trading in low liquidity conditions or during major news releases.
20. Max simultaneous trading pairs:
This setting determines the maximum number of currency pairs that can be traded simultaneously.
If set to '1', pairs are traded sequentially. Once a pair closes its position, the next pair can be traded.
21. Max open positions per pair:
Sets the maximum number of positions that can be open at the same time for each trading symbol. The default is 10 positions.
If set to 1, that symbol can have only one open position at a time, regardless of whether it is a Buy or Sell trade.
22. Max open positions per strategy:
Sets the maximum number of positions that each strategy can open at the same time. The default is 5 positions.
Each currency pair may use one or more entry formulas, referred to as strategies. Whenever a strategy meets its entry conditions, it opens one position with a predefined TP and SL.
This setting allows you to control the maximum number of positions that can be opened simultaneously by each individual strategy.
23. Order comments:
Here, users can input text to be displayed in the order comment section. A maximum of 15 characters is supported. It's important to note that the system will also include a character string dedicated to position management along with the user's input.
24-25-26 Display Dashboard:
This option toggles the visibility of the Dashboard on/off.
27. Trade with Supply/Demand zones:
If enabled, trades will only be executed within the corresponding Supply/Demand zones.
This provides additional confirmation of a potential price reversal, but the trade-off is later entry execution.
28. Display Supply/Demand zones:
This setting controls the display of supply and demand areas on the trading chart. Users can opt to show or hide these zones as needed.
II. Pause Trading and Close Positions Manually
Users of Boring Pips can also utilize the Pause and Close buttons on the control panel to Pause trading or Close all positions whenever desired.
- The 'Pause' button
: in its normal state, it is gray; when clicked, a confirmation dialog for Pausing trading will appear. Once confirmed, the EA will temporarily stop opening new positions, while current positions are still managed and closed as usual.
While the EA is Paused, the 'Pause' button changes to 'Paused' and turns yellow
.
You can click this button again to return the EA to normal trading mode.
Note that if you are unable to reactivate the EA (the 'Pause' button still shows 'Paused' in yellow), go to the settings and check sections 13, 14 under 'Risk management'; the EA might have reached the maximum allowed drawdown and halted trading. In this case, adjust conditions in section 13 and/or disable actions in section 14 first, then reactivate the EA using the 'Pause' button.
- The 'Close' button
: Used to close all positions managed by Boring Pips. After clicking this button, a confirmation dialog will appear to confirm your intention to close all positions. Once confirmed, the EA will close all current positions it has opened.
If you have read this far and still have questions about EA, please refer to
If you have read this far and still have questions about EA, please refer to 31 frequently asked questions here.
Or feel free to leave me a private massage.
Thanks and Best Regards, Andy.