

Bull Scalper v4.01 User Manual
Scalping expert advisor system

Introduction
The Bull Scalper v4.01 is a sophisticated Expert Advisor (EA) for MetaTrader 4/5, designed by Ofer Dvir, available at MQL5 Market. This EA employs a dynamic trailing stop mechanism and an optional AI-driven approach to manage buy or sell positions in a scalping strategy. It is tailored for traders seeking automated trading with customizable risk management, position sizing, and visual feedback on the chart.
This manual provides a comprehensive guide for installing, configuring, and understanding the Bull Scalper v4.01 EA.
We will covers each setting as described in the EA’s input parameters, explains their functionality, and offers practical tips for optimization.
Visual references to the EA’s on-chart elements (e.g., position count, profit/loss labels, and next position/trailing stop lines) are included to aid understanding.

Table of Contents
-
Overview
-
Installation
-
Input Parameters
-
General Settings (#general-settings)
-
Dynamic and AI Settings (#dynamic-and-ai-settings)
-
Trailing Stop Settings (#trailing-stop-settings)
-
Risk Management Settings (#risk-management-settings)
-
Lot Size Adjustment Settings (#lot-size-adjustment-settings)
-
Display Settings (#display-settings)
-
On-Chart Visuals (#on-chart-visuals)
-
Usage Tips (#usage-tips)
-
Troubleshooting (#troubleshooting)
-
Contact and Support (#contact-and-support)
Overview
The Bull Scalper v4.01 is designed to open and manage buy positions based on price movements, with features like:
-
Dynamic Trailing Stops: Adjusts stop-loss levels dynamically based on price action or user-defined settings.
-
AI Module: Optionally calculates optimal trailing stop and position spacing based on historical candle data.
-
DCA Magnetizer: Aligns new positions to recent price lows for better entry points.
-
Risk Management: Includes drawdown limits, position loss limits, and margin checks.
-
Visual Feedback: Displays open position counts, profit/loss labels, and next position/trailing stop lines on the chart.
The EA is highly customizable, allowing traders to balance automation with manual control. It is suitable for scalping on volatile instruments but requires careful configuration to align with your risk tolerance and trading goals.
Installation
-
Purchase and Download:
-
Acquire the Bull Scalper v4.01 from MQL5 Market.
-
Download the .ex4 or .ex5 file to your computer.
-
Install in MetaTrader:
-
Open MetaTrader 4 or 5.
-
Navigate to File > Open Data Folder > MQL4/MQL5 > Experts.
-
Copy the Bull Scalper v4.01 file into the Experts folder.
-
refresh the Navigator panel.
-
Attach to a Chart:
-
Open a chart for your desired trading instrument (e.g., EURUSD).
-
Drag the Bull Scalper v4.01 EA from the Navigator panel onto the chart.
-
In the settings window, configure the input parameters (see Input Parameters (#input-parameters)).
-
Ensure “Allow Algo Trading” is enabled in MetaTrader’s settings.
-
Enable Auto-Trading:
-
Click the AutoTrading button in MetaTrader (it should turn green).
-
Verify that the EA’s academic hat is blue or smiley face on MT4 appears in the top-right corner of the chart, indicating it is active.
Note: Ensure your account has sufficient margin and is connected to a reliable data feed. Test the EA on a demo account before using it on a live account.
Input Parameters
The Bull Scalper v4.01 offers a range of settings grouped into five categories. Below, each parameter is explained based on its description in the code, with guidance on how to configure it and its impact on trading behavior. The settings are presented as they appear in the EA’s input dialog.
General Settings 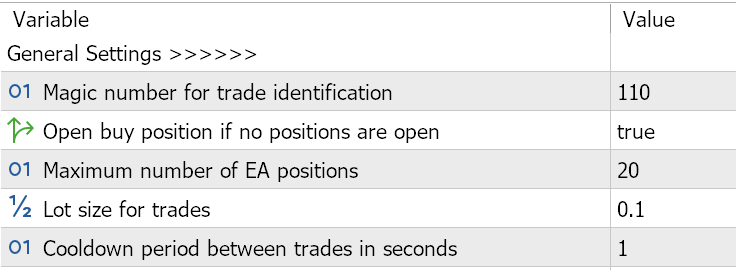
These settings control the core behavior of the EA, including trade identification and position management.
-
Magic number for trade identification (Default: 123)
-
Purpose: Assigns a unique identifier to trades opened by this EA, allowing it to distinguish its positions from others.
-
Usage: Enter a unique number (e.g., 123456) to avoid conflicts with other EAs or manual trades on the same chart.
-
Tip: Ensure the magic number is unique for each instance of the EA if running on multiple charts.
-
Open buy position if no positions are open (Default: true)
-
Purpose: Determines whether the EA opens an initial buy position when no positions are open.
-
Usage: Set to true to allow automatic opening of a buy position when no positions exist. Set to false to disable this behavior.and place first position on you own choosing
-
Tip: Enable this for fully automated scalping; disable it if you want manual control over initial positions.do note that without first position EA will not open any positions
-
Maximum number of EA positions (Default: 1)
-
Purpose: Limits the number of simultaneous buy positions the EA can open.
-
Usage: Set a value (e.g., 10–50) based on your risk tolerance and account size. Higher values increase exposure.
-
Tip: Start with 2–5 positions on smaller accounts to limit risk. Adjust based on backtesting results.
-
Lot size for trades (Default: 0.01)
-
Purpose: Defines the base lot size for each trade.
-
Usage: Enter a value within your broker’s minimum and maximum lot size limits (e.g., 0.01–10.0). The EA adjusts this if it exceeds broker limits.
-
Tip: Use a small lot size (e.g., 0.01) for testing. Increase cautiously based on account balance and risk management.
-
Cooldown period between trades in seconds (Default: 100)
-
Purpose: Sets a minimum time delay between opening new positions to prevent over-trading.
-
Usage: Enter a value in seconds (e.g., 60–300). Higher values reduce trade frequency.
-
Tip: Increase this value in low-volatility markets to avoid rapid position openings.
Dynamic and AI Settings 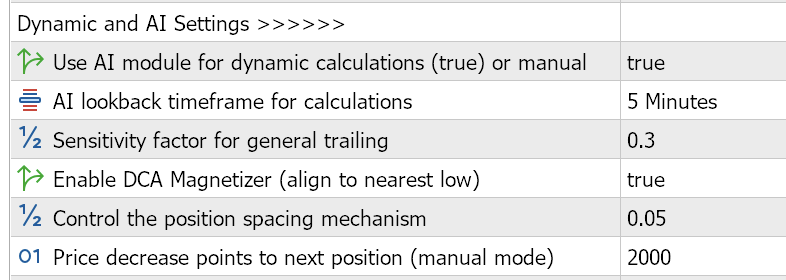
These settings enable the EA’s AI-driven calculations for dynamic trailing stops and position spacing.
-
Use AI module for dynamic calculations (true) or manual (Default: true)
-
Purpose: Enables or disables the AI module, which calculates trailing stop and position spacing based on historical candle data.
-
Usage: Set to true for AI-driven dynamic values or false to use manual settings (e.g., Price decrease points, Trailing stop start).
-
Tip: Enable AI mode for adaptive behavior in volatile markets. Use manual mode for upfront set of controls.
-
AI lookback timeframe for calculations (Default: PERIOD_M15)
-
Purpose: Specifies the timeframe for the AI module to analyze candle data (e.g., M15 = 15-minute chart).
-
Usage: Choose a timeframe (e.g., PERIOD_M5, PERIOD_M15, PERIOD_H1) that matches your trading style. Shorter timeframes are more sensitive to price changes.
-
Tip: M15 is a good balance for scalping. Test M5 for faster markets or H1 for slower, trend-based trading.
-
Sensitivity factor for general trailing (Default: 1.0)
-
Purpose: Adjusts the aggressiveness of AI-calculated trailing stops and position spacing.
-
Usage: Enter a value (e.g., 0.5–2.0). Higher values make trailing stops tighter and position spacing wider.
-
Tip: Start with 0.5 and adjust based on backtesting to balance profit capture and risk.
-
Enable DCA Magnetizer (align to nearest low) (Default: true)
-
Purpose: Aligns new buy positions to the nearest low price within the AI lookback timeframe, improving entry points.
-
Usage: Set to true to enable magnetizer logic or false to use standard spacing.
-
Tip: Enable in trending markets to optimize entries. Disable in choppy markets to avoid premature entries.
-
Control the position spacing mechanism (Default: 3.0)
-
Purpose: Multiplies the AI-calculated position spacing to control the distance between new positions.
-
Usage: Enter a value (e.g., 1.0–5.0). Higher values increase spacing, reducing position frequency.
-
Tip: Use 0.5–2.0 for moderate spacing. Increase in volatile markets to avoid over-trading.
-
Price decrease points to next position (manual mode) (Default: 2000)
-
Purpose: Sets the price drop (in points) required to open a new position in manual mode.
-
Usage: Enter a value (e.g., 500–5000). Used only when AI module is disabled.
-
Tip: Adjust based on the instrument’s volatility (e.g., 1000 for EURUSD, 3000 for XAUUSD,9000 for nasdaq100).
Trailing Stop Settings 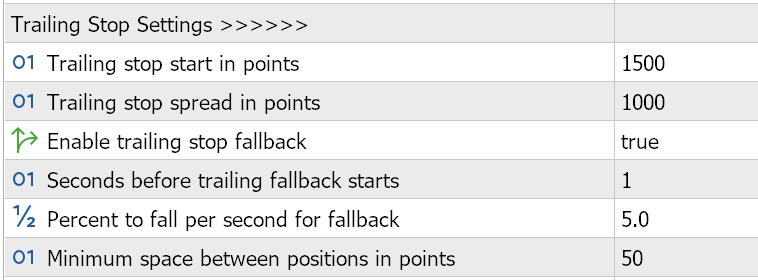
These settings configure the trailing stop mechanism, which protects profits by adjusting stop-loss levels as prices move favorably.
-
Trailing stop start in points (Default: 1000)
-
Purpose: Sets the profit threshold (in points) at which the trailing stop activates.
-
Usage: Enter a value (e.g., 500–2000). Higher values delay trailing stop activation.
-
Tip: Use smaller values (e.g., 500) for scalping; larger values for swing trading. By switching back and forth to profit in points at the mt5 Trade tab you can have an understanding of the points to profit in currency
-
Trailing stop spread in points (Default: 800)
-
Purpose: Defines the distance (in points) between the current price and the trailing stop level.
-
Usage: Enter a value (e.g., 400–1500). Smaller values create tighter stops, increasing risk of early exit.
-
Tip: Adjust based on market volatility. Use 500–800 for forex pairs like EURUSD.
-
Enable trailing stop fallback (Default: true)
-
Purpose: Allows inactive trailing stops to gradually loosen if the price stagnates.
-
Usage: Set to true to enable fallback or false to keep trailing stops fixed.
-
Tip: Enable to avoid premature stop-outs in ranging markets. Disable for strict stop management.
-
Seconds before trailing fallback starts (Default: 120)
-
Purpose: Sets the time delay before the fallback mechanism adjusts inactive trailing stops.
-
Usage: Enter a value in seconds (e.g., 60–300). Longer delays preserve tighter stops.
-
Tip: Use 120–180 seconds for scalping to balance flexibility and protection.
-
Percent to fall per second for fallback (Default: 1.0)
-
Purpose: Defines the rate at which inactive trailing stops loosen (as a percentage per second).
-
Usage: Enter a value (e.g., 0.5–2.0). Higher values loosen stops faster.
-
Tip: Keep at 1.0 for moderate adjustments. Increase for highly volatile markets.
-
Minimum space between positions in points (Default: 100)
-
Purpose: Ensures a minimum distance between open positions to prevent clustering.
-
Usage: Enter a value (e.g., 50–200). Higher values reduce position frequency.
-
Tip: Use 100–150 for forex pairs to maintain manageable spacing.
Risk Management Settings 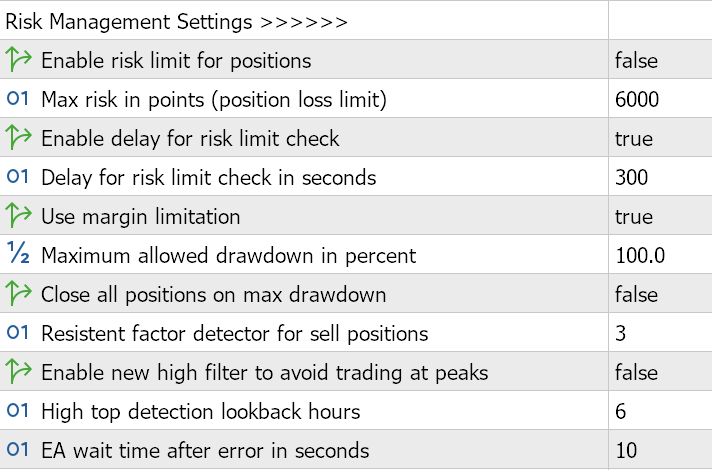
These settings protect your account by limiting losses and managing margin usage.
-
Enable risk limit for positions (Default: true)
-
Purpose: Closes positions that exceed a specified loss threshold.
-
Usage: Set to true to enable loss limits or false to disable.
-
Tip: Disable for trading.
-
Max risk in points (position loss limit) (Default: 6000)
-
Purpose: Sets the maximum loss (in points) allowed per position before it is closed.
-
Usage: Enter a value (e.g., 1000–10000). Higher values allow larger losses.
-
Tip: Set based on your risk tolerance (e.g., 2000 for conservative trading).
-
Enable delay for risk limit check (Default: true)
-
Purpose: Delays closing positions that exceed the loss limit, allowing potential recovery.
-
Usage: Set to true to enable the delay or false for immediate closure.
-
Tip: Enable to avoid premature exits in volatile markets.
-
Delay for risk limit check in seconds (Default: 300)
-
Purpose: Sets the delay before closing a position that exceeds the loss limit.
-
Usage: Enter a value in seconds (e.g., 60–600). Longer delays increase risk.
-
Tip: Use 180–300 seconds for a balance between safety and flexibility.
-
Use margin limitation (Default: true)
-
Purpose: Prevents opening new positions if margin levels are insufficient.
-
Usage: Set to true to enforce margin checks or false to bypass them.
-
Tip: Keep enabled to protect against margin calls, especially on leveraged accounts.
-
Maximum allowed drawdown in percent (Default: 5.0)
-
Purpose: Sets the maximum account drawdown percentage before trading halts or positions close.
-
Usage: Enter a value (e.g., 1.0–10.0). Lower values are more conservative.
-
Tip: Set to 2–5% for conservative trading; adjust higher for aggressive strategies.
-
Close all positions on max drawdown (Default: false)
-
Purpose: Closes all open positions if the maximum drawdown is reached.
-
Usage: Set to true to close all positions or false to halt trading without closing.
-
Tip: Enable for strict risk control; disable to allow manual intervention.
-
Resistent factor detector for sell positions (Default: 3)
-
Purpose: Triggers a buy order when a specified number of sell positions cluster at a price level.
-
Usage: Enter a value (e.g., 2–5). Higher values require more sell positions to trigger a buy.
-
Tip: Use 2–3 for faster reaction to sell clusters; increase for confirmation in strong trends.
-
Enable new high filter to avoid trading at peaks (Default: false)
-
Purpose: Prevents opening new positions if the price reaches a recent high, avoiding overbought conditions.
-
Usage: Set to true to enable the filter or false to disable.
-
Tip: Enable in trending markets to avoid buying at peaks.
-
High top detection lookback hours (Default: 6)
-
Purpose: Sets the lookback period (in hours) for detecting recent price highs.
-
Usage: Enter a value (e.g., 1–24). Longer periods consider older highs.
-
Tip: Use 4–8 hours for scalping to balance sensitivity and reliability.
-
EA wait time after error in seconds (Default: 10)
-
Purpose: Pauses trading after an error (e.g., insufficient margin) to prevent rapid retries.
-
Usage: Enter a value in seconds (e.g., 5–30). Longer delays reduce retry frequency.
-
Tip: Keep at 10–15 seconds to allow recovery from temporary issues.
Lot Size Adjustment Settings 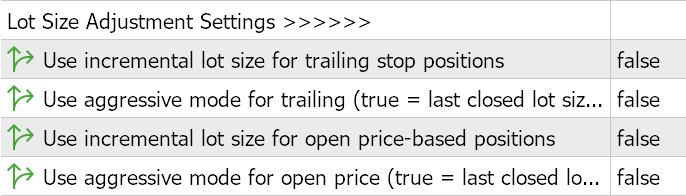
These settings control how the EA adjusts lot sizes for new positions.
-
Use incremental lot size for trailing stop positions (Default: false)
-
Purpose: Increases lot sizes for positions opened due to trailing stop triggers.
-
Usage: Set to true to enable incremental lot sizes or false to use the base lot size.
-
Tip: Enable for aggressive strategies; disable for consistent position sizing.
-
Use aggressive mode for trailing (true = last closed lot size) (Default: false)
-
Purpose: Doubles the lot size of the last closed position for trailing stop positions.
-
Usage: Set to true for aggressive sizing or false for standard increments.
-
Tip: Use cautiously, as this can significantly increase risk.
-
Use incremental lot size for open price-based positions (Default: false)
-
Purpose: Increases lot sizes for positions opened based on price drops (DCA).
-
Usage: Set to true to enable incremental lot sizes or false to use the base lot size.
-
Tip: Enable to scale into positions during pullbacks; disable for conservative trading.
-
Use aggressive mode for open price (true = last closed lot size) (Default: false)
-
Purpose: Doubles the lot size of the last closed position for price-based positions.
-
Usage: Set to true for aggressive sizing or false for standard increments.
-
Tip: Use with caution due to increased risk exposure.
Display Settings 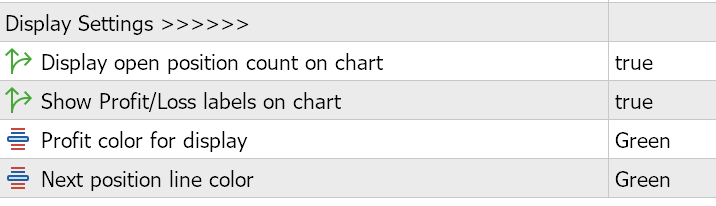
These settings control the visual feedback displayed on the chart.
-
Display open position count on chart (Default: true)
-
Purpose: Shows the number of open positions and maximum allowed positions on the chart.
-
Usage: Set to true to display the count or false to hide it.
-
Tip: Enable for real-time monitoring of position limits.
-
Show Profit/Loss labels on chart (Default: true)
-
Purpose: Displays profit/loss labels for closed positions at their closing price and time.
-
Usage: Set to true to show labels or false to disable.
-
Tip: Enable to track trade performance visually. (See On-Chart Visuals (#on-chart-visuals) for examples.)
-
Profit color for display (Default: Green)
-
Purpose: Sets the color for positive profit/loss labels.
-
Usage: Choose from Green, Lime, Blue, Yellow, White, or Gold.
-
Tip: Select a color that contrasts with your chart background (e.g., Green on dark backgrounds).
-
Next position line color (Default: Green)
-
Purpose: Sets the color for the horizontal line indicating the next buy position level.
-
Usage: Choose from Green, Lime, Blue, Yellow, White, or Gold.
-
Tip: Use a distinct color (e.g., Yellow) to differentiate from other chart lines.
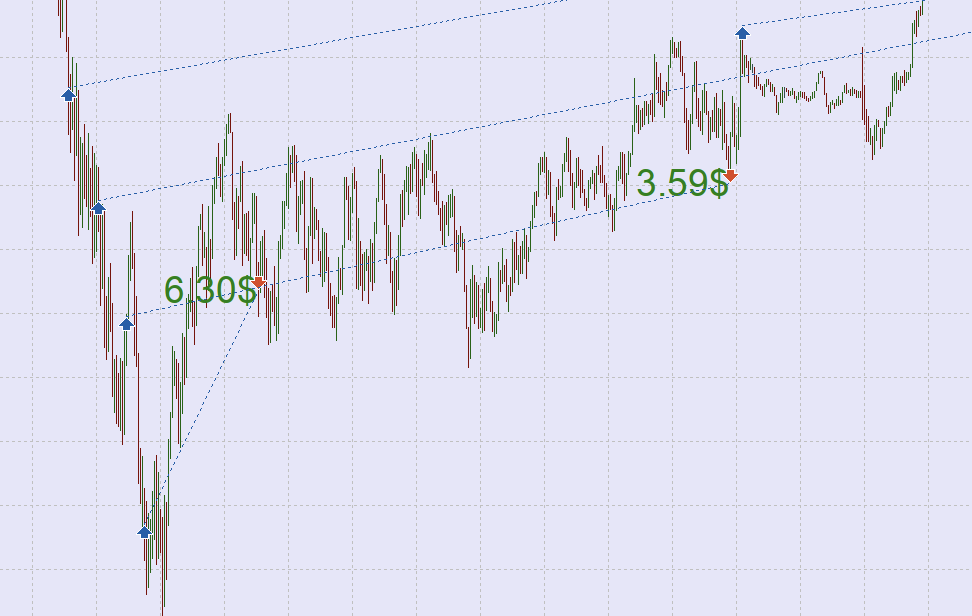
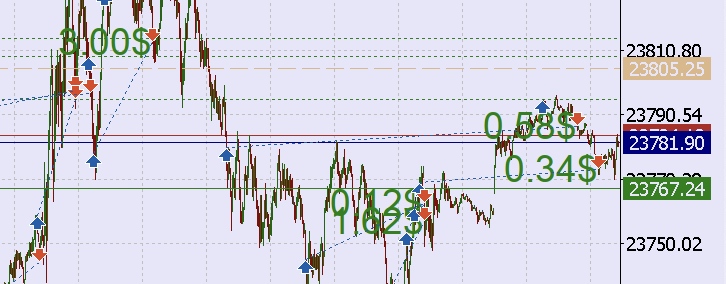
On-Chart Visuals
The Bull Scalper v4.01 enhances usability with visual elements displayed on the chart. Below are descriptions of these elements.
-
Open Position Count:
-
Description: A label at the top center of the chart showing the current number of open buy positions and the maximum allowed (e.g., “Buy Positions: 2/5”).
-
Purpose: Helps monitor position limits in real-time.

-
Profit/Loss Labels:
-
Description: Text labels appear at the closing price and time of each closed position, showing the profit/loss (e.g., “+25.50$” or “-10.75$”).
-
Purpose: Provides a visual history of trade outcomes.
-
Next Position Level Line:
-
Description: A horizontal Green line indicating the price level where the next buy position will open.
-
Appearance: Solid line in the selected Next position line color (e.g., Green)
-
Purpose: Visualizes the entry point for the next position, aiding in strategy planning.
-
Trailing Stop Level Line:
-
Description: A horizontal line showing the theoretical trailing stop entry level for the lowest open position, calculated as the open price plus the trailing stop start.
-
Appearance: Dashed line in BurlyWood, with a tooltip (e.g., “Theoretical Trailing Stop (Visual Only): 1.12400”).
-
Purpose: Helps visualize the trailing stop trigger point for the lowest position.this will change with the sensitive settings
Note: Ensure Display open position count on chart and Show Profit/Loss labels on chart are enabled to view these elements. Adjust chart colors to ensure visibility against your chart background.
Usage Tips
-
Test on Demo First: Always backtest and forward-test the EA on a demo account to understand its behavior with your chosen settings and instrument.
-
Optimize for Instrument: Adjust settings like Price decrease points to next position and Trailing stop start based on the volatility of the traded instrument (e.g., lower for forex, higher for commodities like XAUUSD).
-
Monitor Margin: Enable Use margin limitation to prevent over-leveraging, especially on small accounts.
-
Use AI Mode Wisely: The AI module (Use AI module for dynamic calculations) adapts to market conditions but may require tweaking the Sensitivity factor for optimal performance.
-
Check Visuals: Use the on-chart visuals to monitor the EA’s actions in real-time. Ensure Display Settings are enabled for full transparency.
-
Backtest Settings: Use MetaTrader’s Strategy Tester to experiment with settings like Maximum number of EA positions and Maximum allowed drawdown to find a balance between risk and reward.
-
Timeframe Selection: The AI lookback timeframe should align with your trading style (e.g., M5 for aggressive scalping, M15 for balanced trading).
Troubleshooting
-
EA Not Trading:
-
Check if AutoTrading is enabled in MetaTrader.
-
Verify that Magic number for trade identification is unique.
-
Confirm that Error wait time after error has elapsed if an error occurred.
-
Invalid Parameters Error:
-
Ensure manual mode settings (Price decrease points, Trailing stop start, Trailing stop spread) are greater than zero when Use AI module is disabled.
-
Positions Closing Prematurely:
-
Check Max risk in points and Delay for risk limit check settings. Increase the delay or risk limit if positions close too quickly.
-
Disable Close all positions on max drawdown if you prefer manual intervention.
-
No Visuals on Chart:
-
Enable Display open position count on chart and Show Profit/Loss labels on chart.
-
Ensure chart colors contrast with the selected Profit color for display and Next position line color.
-
High Drawdown:
-
Lower Maximum number of EA positions or Lot size for trades.
-
Reduce Maximum allowed drawdown or enable Close all positions on max drawdown.
For persistent issues, consult the MQL5 community or contact the developer (see Contact and Support (#contact-and-support)).
Contact and Support
-
Developer: Ofer Dvir
-
MQL5 Product Page: https://www.mql5.com/en/market/product/116071
-
Support: contact and message freely
-
Feedback: Share your experience on the MQL5 product page to help improve the EA.
This manual provides a comprehensive guide to using the Bull Scalper v4.01 EA. By carefully configuring the settings and monitoring the on-chart visuals, you can tailor the EA to your trading style and risk preferences. For further assistance, refer to the troubleshooting section or contact me via MQL5.
Happy Trading!


")
![[XAUUSD]: Weekly Liquidity Activation Points (timings), June 22-26, 2026](https://c.mql5.com/6/1013/splash-preview-771790.png "[XAUUSD]: Weekly Liquidity Activation Points (timings), June 22-26, 2026")
")