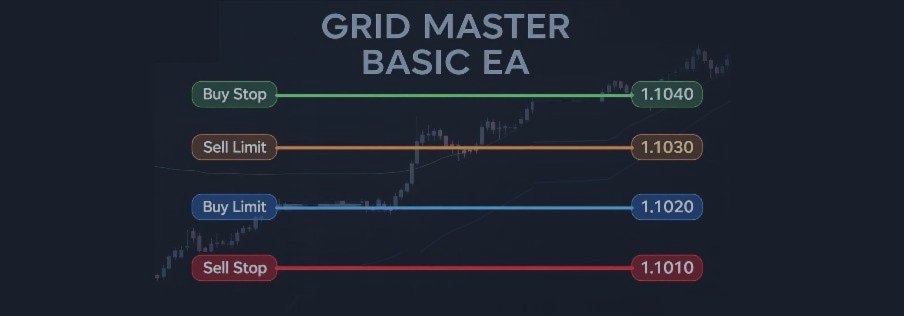

📘 Grid Master Basic EA — Documentation Overview
Welcome to the official guide for Grid Master Basic EA — a flexible, fully automated, and customizable grid trading Expert Advisor for MetaTrader 4.
Unlike traditional grid bots with locked-in strategies, Grid Master Basic is a powerful execution engine that adapts to your trading logic. Whether you're a beginner exploring the fundamentals of grid trading or an advanced user designing layered strategies, this EA gives you full control over order placement, grid levels, and risk logic — with no built-in strategy, so you decide exactly how it trades.
Use this documentation to configure, optimize, and understand all aspects of Grid Master Basic EA. Each section below opens a focused, easy-to-read page for that specific part of the system.
📂 Documentation Sections
- 🔧 Getting Started & Installation
How to install the EA, apply it to a chart, and activate trading permissions. - 🧩 Grid Mode & Configuration
Understand Static vs. Dynamic modes, how grid levels are calculated, and how they visually display on the chart. - 🔍 Grid Line Visualization & Customization
Customize how buy/sell grid lines appear on the chart, including dynamic color changes, labeling, and enabling/disabling visual elements for live trading or backtesting. - 🔁 Order Placement Settings
Set up your Buy/Sell zones, distances, and toggle order types like Buy Stop or Sell Limit — with individual control for TP/SL, lot size, and pending order limits. - ⚙️ Smart Order Logic
Learn how the EA intelligently tracks grid levels and modifies orders to avoid duplication or adjust dynamically to market movement. - 🛡️ Risk Management Tools
Configure close-all logic based on total profit, loss, or target price — including combined logic for managing Buy + Sell orders. - 🖥️ Display Panel & Visual Tools
Explore the interactive on-chart panel: grid visuals, order toggles, market execution buttons, live stats, and profit monitoring. - 🚨 Master Switch & Input Validation System
The built-in safety system that prevents misconfiguration by checking for invalid inputs and alerting the user before trading starts. - 🧠 Tips, Use Cases & Strategy Ideas
Optional strategies, use-case setups (scalping, range trading, etc.), and configuration examples for inspiration. - ❓ Troubleshooting & FAQ
Common setup questions, platform-specific tips, and links to contact support or view community discussions.
1. 🔧 Getting Started & Installation
✅ Step 1: Install the EA
🔹 Option A: MQL5 Market (Recommended)
- Log in to your MQL5 account in MetaTrader 4 (click the profile icon in the top-right corner).
- Open the Terminal (Ctrl+T), go to Market > Purchases, and find Grid Master Basic EA.
- Click Install to download it.
- Open the Navigator (Ctrl+N), then go to:
Expert Advisors > Market > Grid Master Basic EA
🔹 Option B: Manual Installation
- Download the .ex4 file from your MQL5 product page.
- Go to File > Open Data Folder > MQL4 > Experts
- Paste the file and restart MetaTrader 4
- Find the EA in Navigator > Expert Advisors > Grid Master Basic EA
📈 Step 2: Apply to a Chart
- Open any chart (e.g., EURUSD)
- Drag the EA from Navigator onto the chart
- Or right-click and choose "Attach to chart"
🔒 Step 3: Enable Trading
- In the EA’s settings window:
✅ Check "Allow live trading"
✅ Check "Allow DLL imports" - Make sure AutoTrading is turned on (green)
⚠️ Step 4: Confirm It's Working
- You should see the Grid Master panel on the chart
- A smiley face in the top-right confirms it’s active
- If not, click AutoTrading to activate
📌 Note:
- You can run the EA on multiple charts/symbols at the same time.
- It is recommended to test on a demo account or use Strategy Tester first to understand the input behavior.
2. 🧩 Grid Mode and Configuration
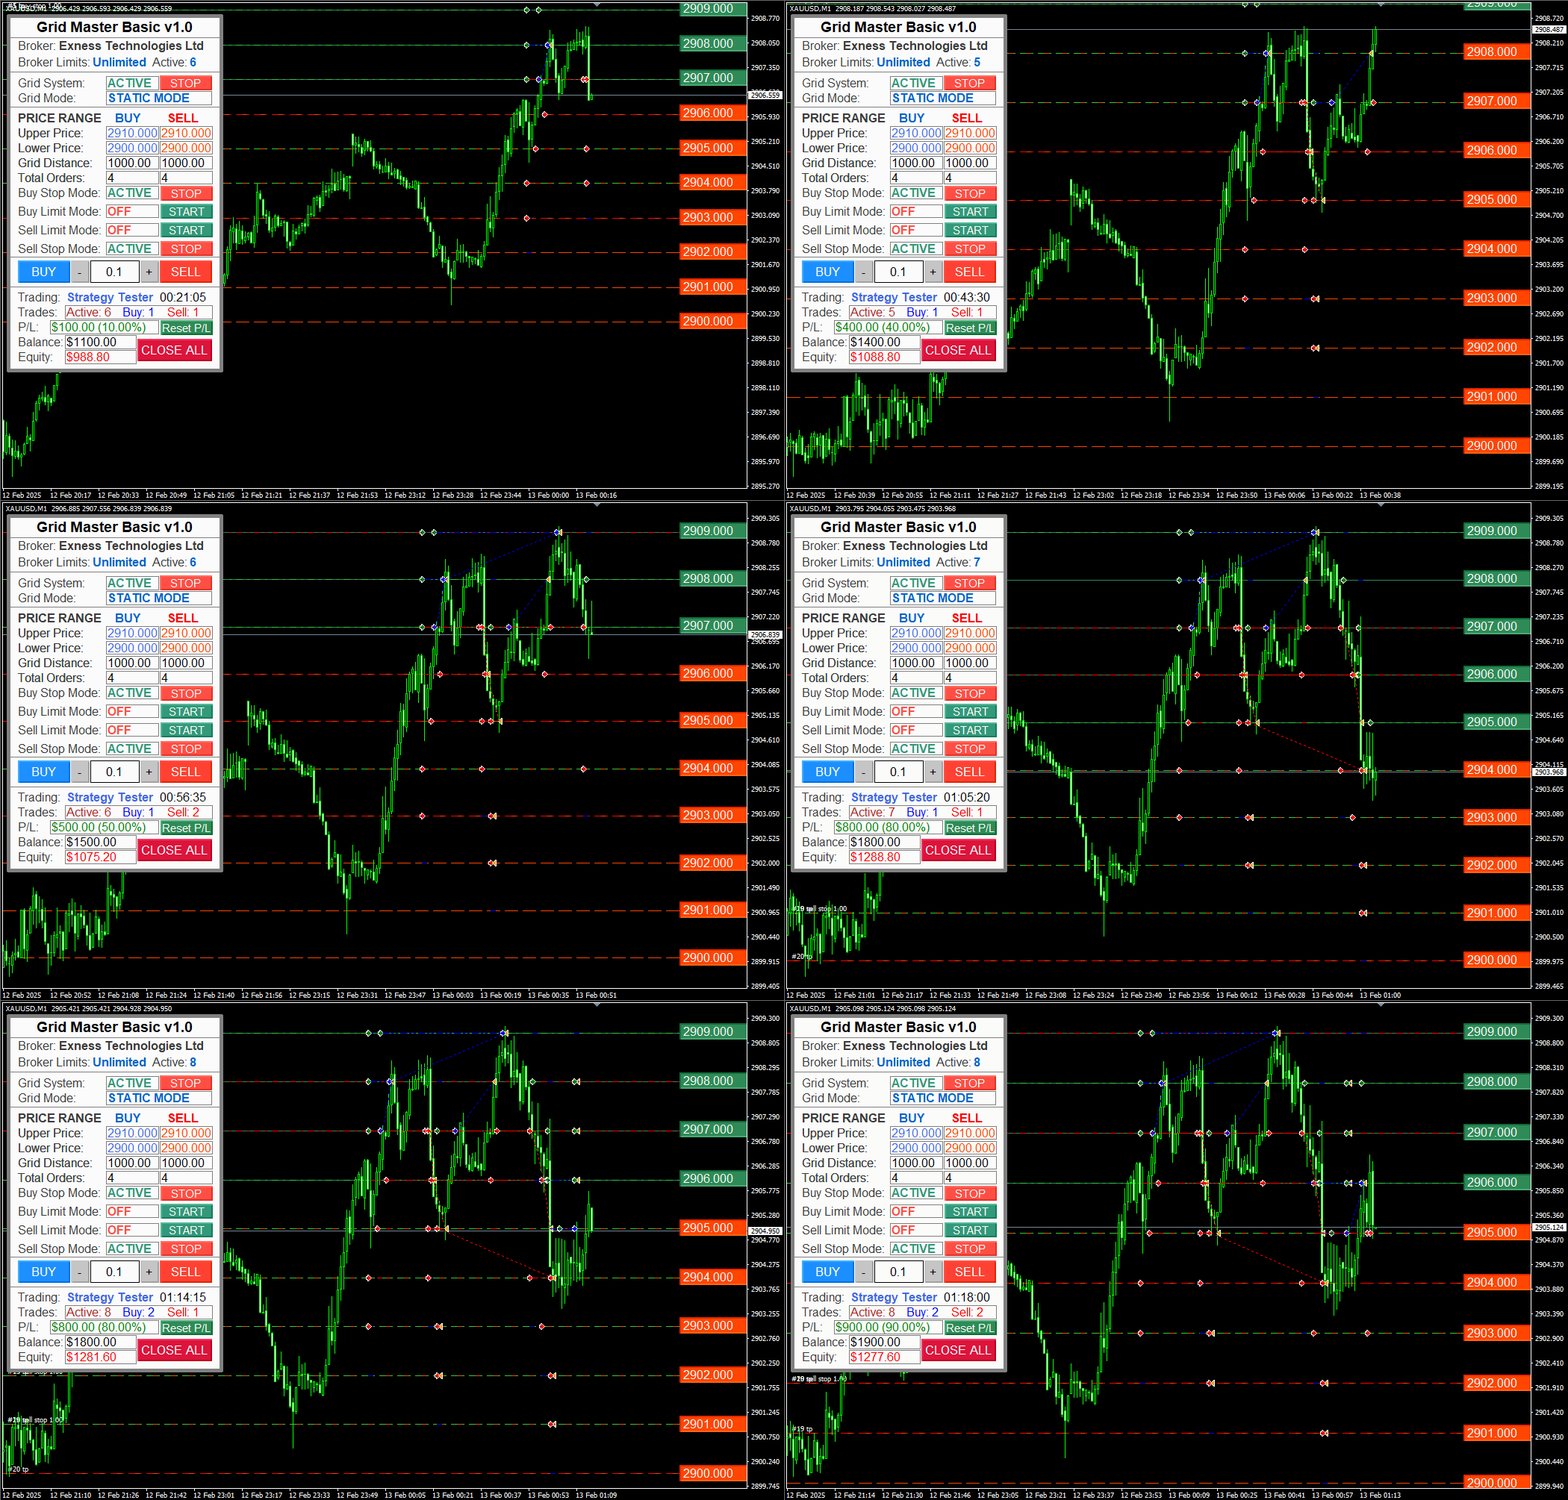
📌 Grid Mode: Static Mode
In Static Mode, the grid levels are fixed, meaning they do not change during trading. The order placement, however, remains dynamic within this static grid range. The EA places orders at predefined grid levels, calculated based on the price range and grid distance you define.
⚙️ How it Works
- Example: If you set the price range from 1.0000 to 1.0100 and select a grid distance of 10 pips, the EA will place orders at the following levels:
1.0000, 1.0010, 1.0020, 1.0030, 1.0040, 1.0050, 1.0060, 1.0070, 1.0080, 1.0090, and 1.0100.
These orders will be dynamically activated or closed depending on the market movements, but the grid levels remain fixed.
🎯 Purpose
- Ideal for users who want to place orders at specific, fixed price levels.
- Suitable when there's no need for the grid to adjust based on market movements.
- Although order placement is dynamic within these levels, the grid itself remains constant throughout the session.
Example of Static Grid Mode, XAU/USD, 1-Minute Chart, Buy Stop and Sell Stop Orders
📌 Grid Mode: Dynamic Mode
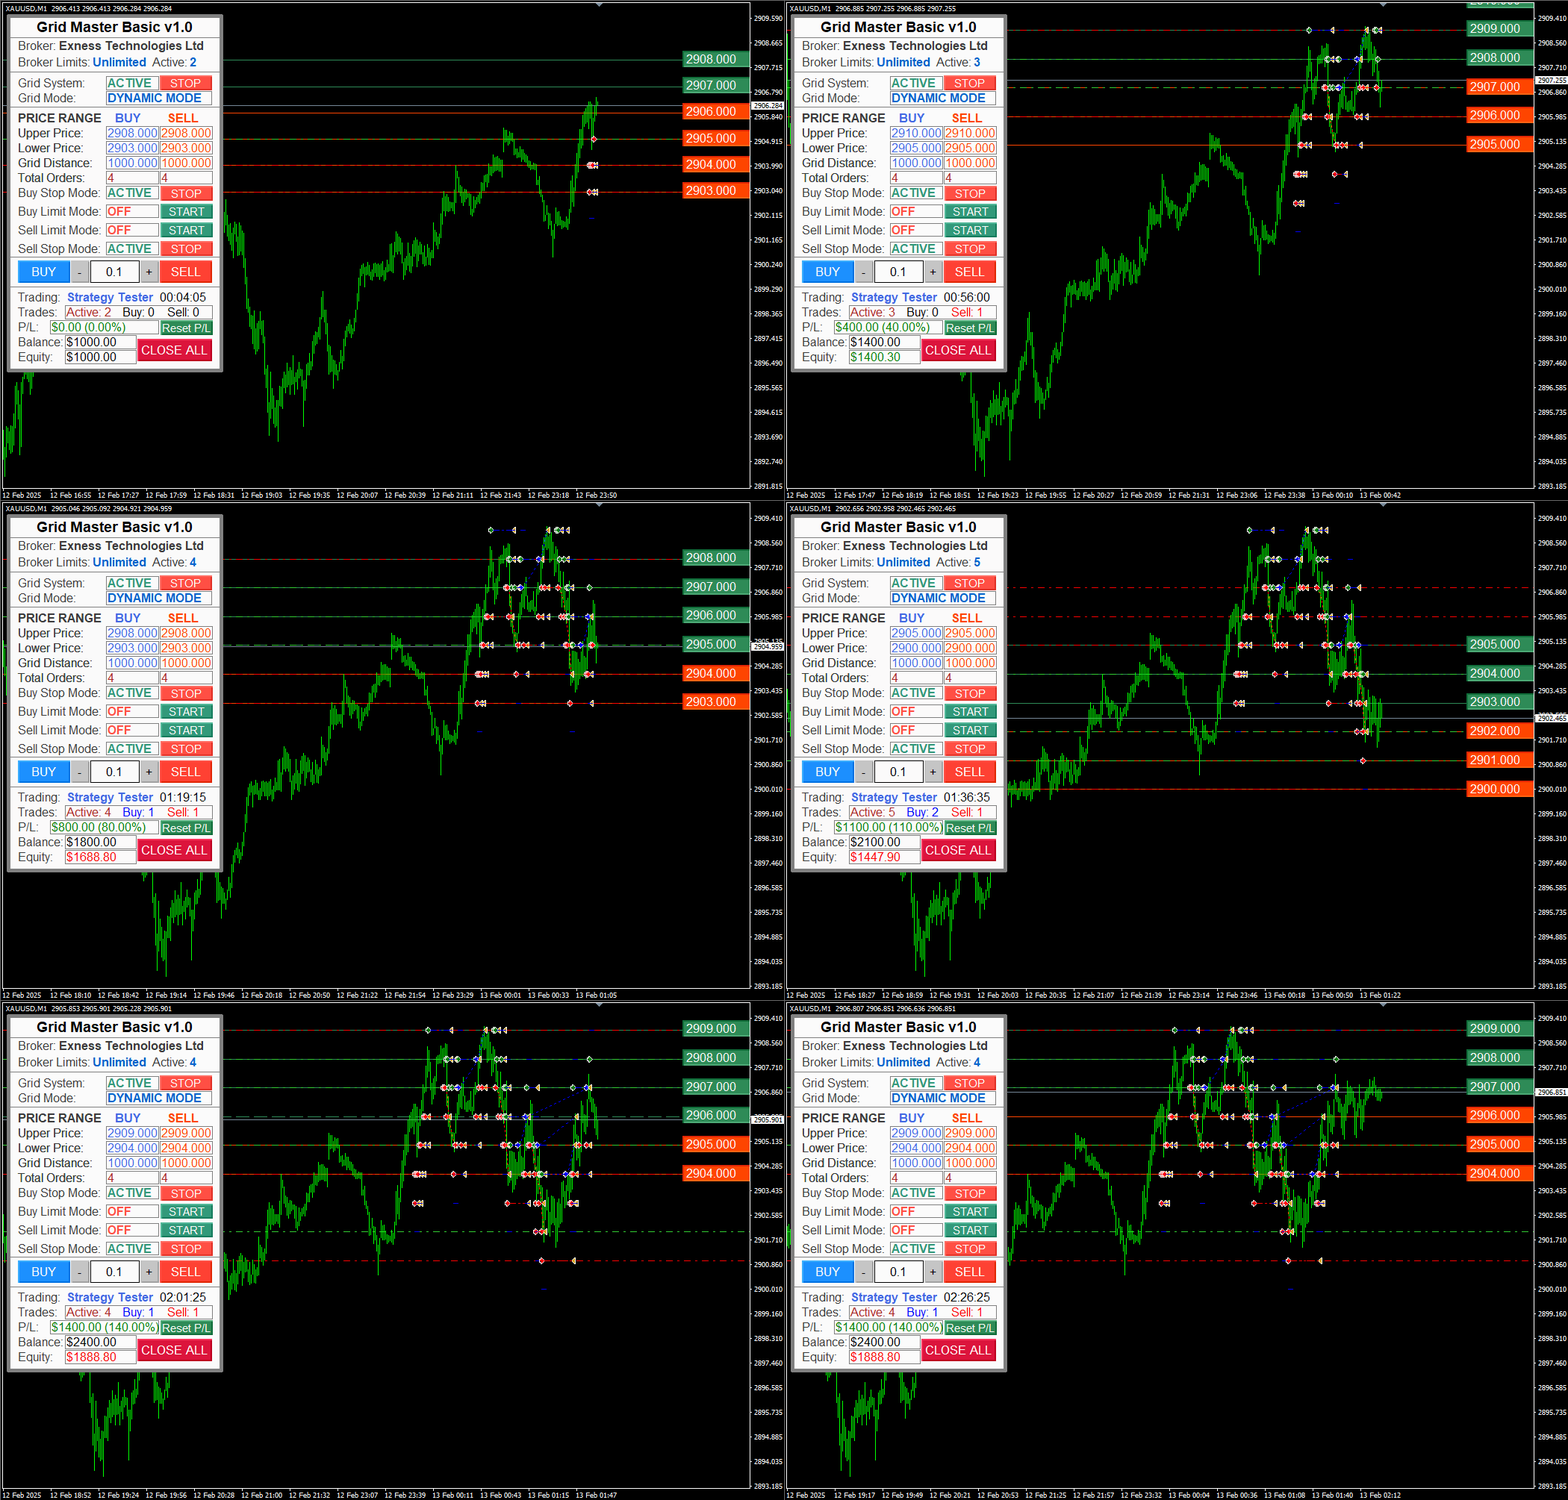
In Dynamic Mode, the grid range adjusts automatically in real-time as the market moves. When the price nears the upper or lower boundary, the EA shifts the entire grid in that direction—maintaining consistent spacing and ensuring your strategy stays in sync with market action.
⚙️ How It Works
Dynamic Mode monitors the current market price and shifts the grid range when price moves within one full grid distance of either boundary.
📈 Example
- Buy Grid Distance: 10 pips
- Initial Grid Range: 1.0000 to 1.0050
If price rises to 1.0040 (within 10 pips of the upper boundary), the EA shifts the entire range upward:
- Old Range: 1.0000 – 1.0050
- New Range: 1.0010 – 1.0060
The same logic applies in reverse—if price nears the lower boundary, the grid shifts downward accordingly.
➡ This mechanism ensures that the grid remains evenly spaced, clean, and responsive to market trends, dynamically adjusting with real-time price action.
Example of Dynamic Grid Mode, XAU/USD, 1-Minute Chart, Buy Stop and Sell Stop Orders
🛠️ Simplified & Smarter Behavior
Dynamic Mode now uses a single, intuitive input—no more juggling multiple distance or buffer settings.
-
Core Input:
Grid Distance – your main spacing (e.g., 10 pips) -
Built-In Logic:
The EA automatically uses 1× grid distance as a buffer zone to detect when price nears a boundary.
✅ Benefits:
- Cleaner Configuration – Just one key setting to manage
- Automatic Scaling – Works seamlessly across Forex, Gold, Indices
- Simplified Logic – No fine-tuning of extra thresholds
- Consistent Grid – Even spacing, no overlaps, no gap
🎯 Best Use Case
Use Dynamic Mode when you want your grid to automatically adapt to price movement.
Perfect for:
- Trending or volatile markets
- Strategies that evolve with price action
- Avoiding fixed-range limitations of Static Mode
3. 🔍 Grid Line Visualization & Customization
The Grid Master Basic EA includes advanced visual tools to help users track and manage grid-based orders efficiently. These tools offer clear, customizable grid lines for both Buy and Sell orders, with dynamic color coding, price labels, and toggling options.
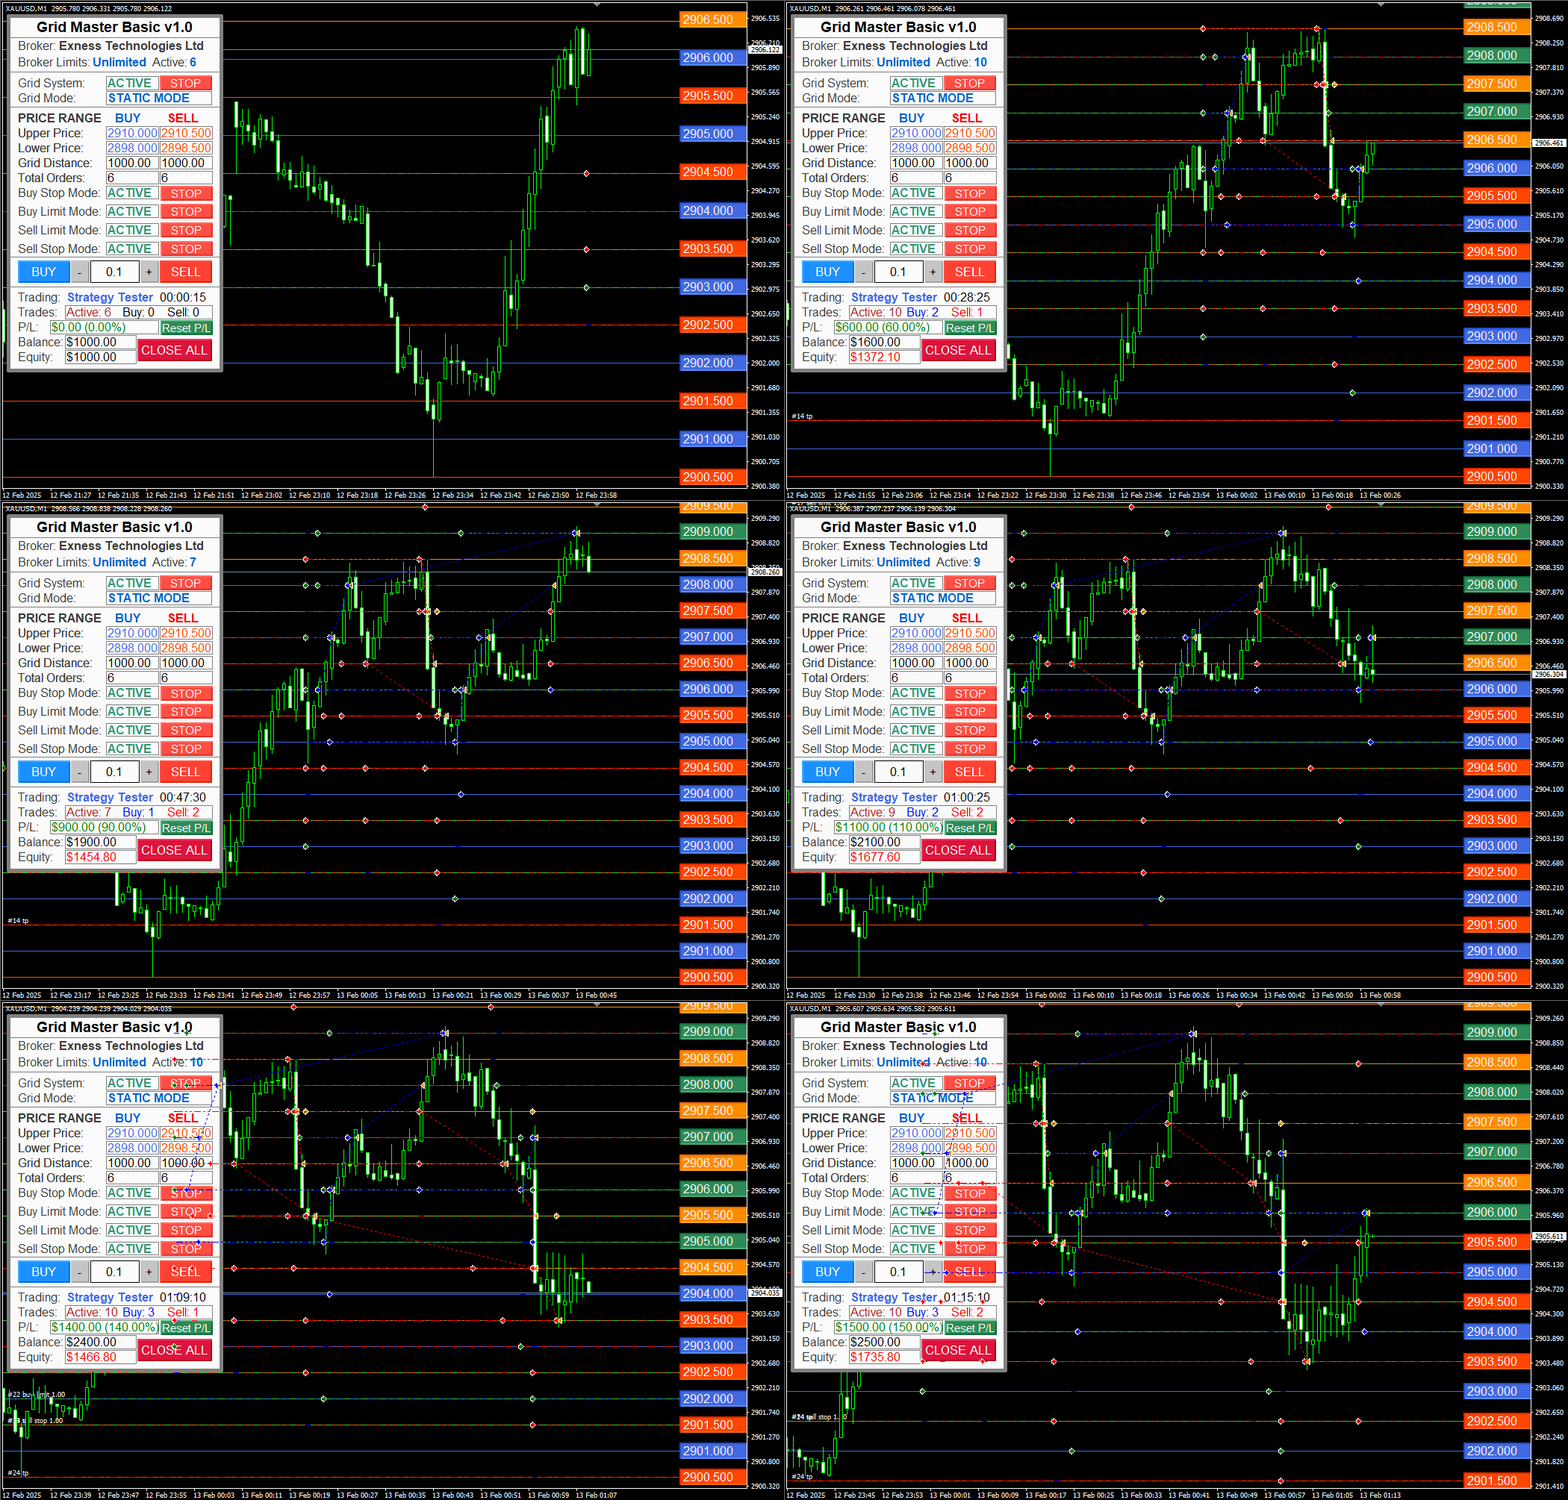
1️⃣ Separate Grid Lines for Buy and Sell Orders
- Buy Orders
Grid lines are generated based on the Buy price range (e.g., 1.0000, 1.0020, etc.). - Sell Orders
Grid lines are drawn from a different Sell price range (e.g., 0.9990, 1.0010, etc.).
✅ These two grids are independent, allowing for custom price ranges for Buy and Sell sides while maintaining distinct, organized visual levels.
Example of Static Grid Mode, XAU/USD, 1-Minute Chart, All Order Types: Buy Stop, Buy Limit, Sell Stop, Sell Limit
2️⃣ Dynamic Color Change for Active Orders
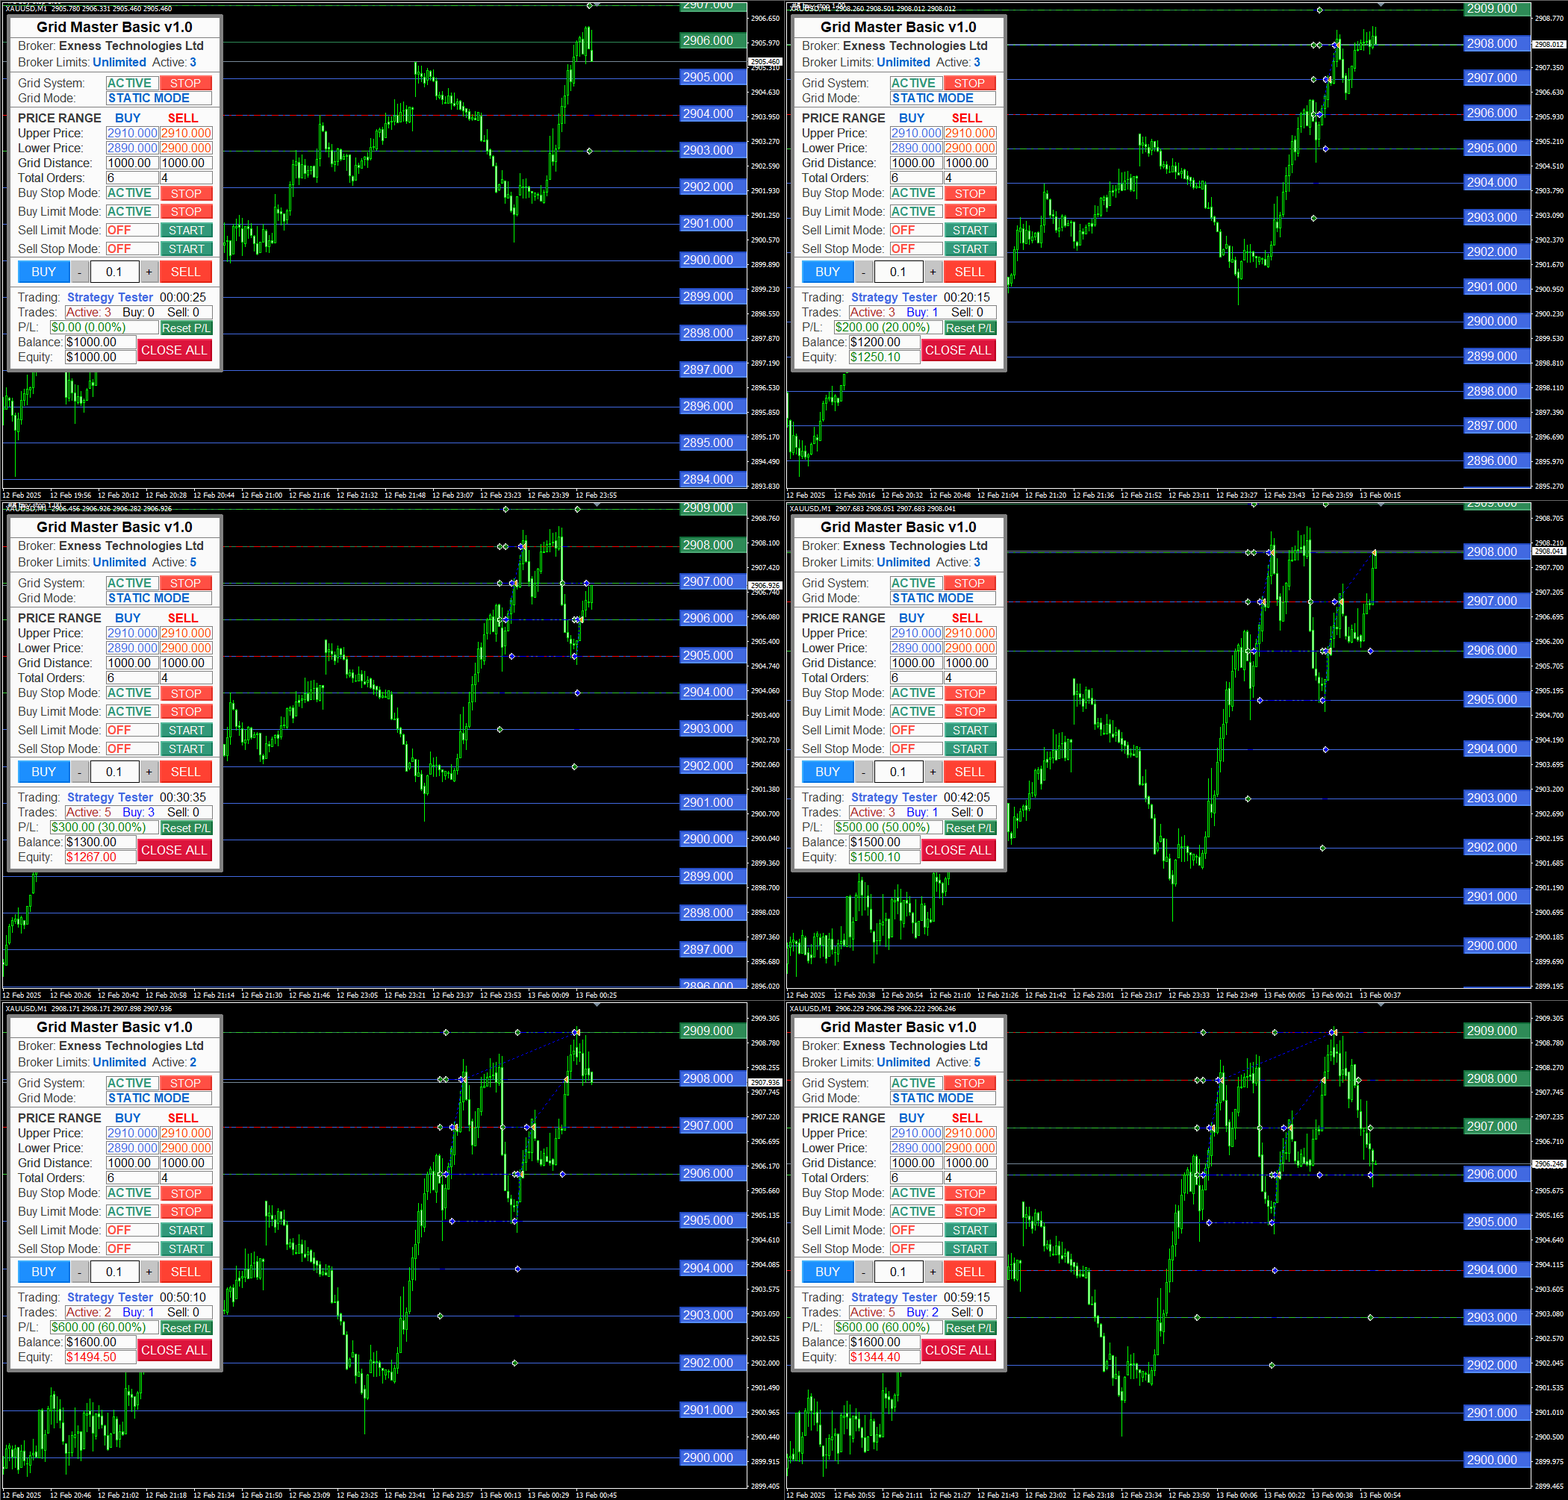
Grid lines change color dynamically depending on the order type and status at each level:
🔵 Buy Orders
- Buy Stop (above current price) → 🟢 Green (solid)
- Buy Limit (below current price) → 🔵 Blue (solid)
- Both types at same level → Switches between Green ↔ Blue based on price movement.
- No active orders → ⚪ Gray (dashed)
Example of Static Grid Mode, XAU/USD, 1-Minute Chart, Buy Stop and Buy Limit Orders
🔴 Sell Orders
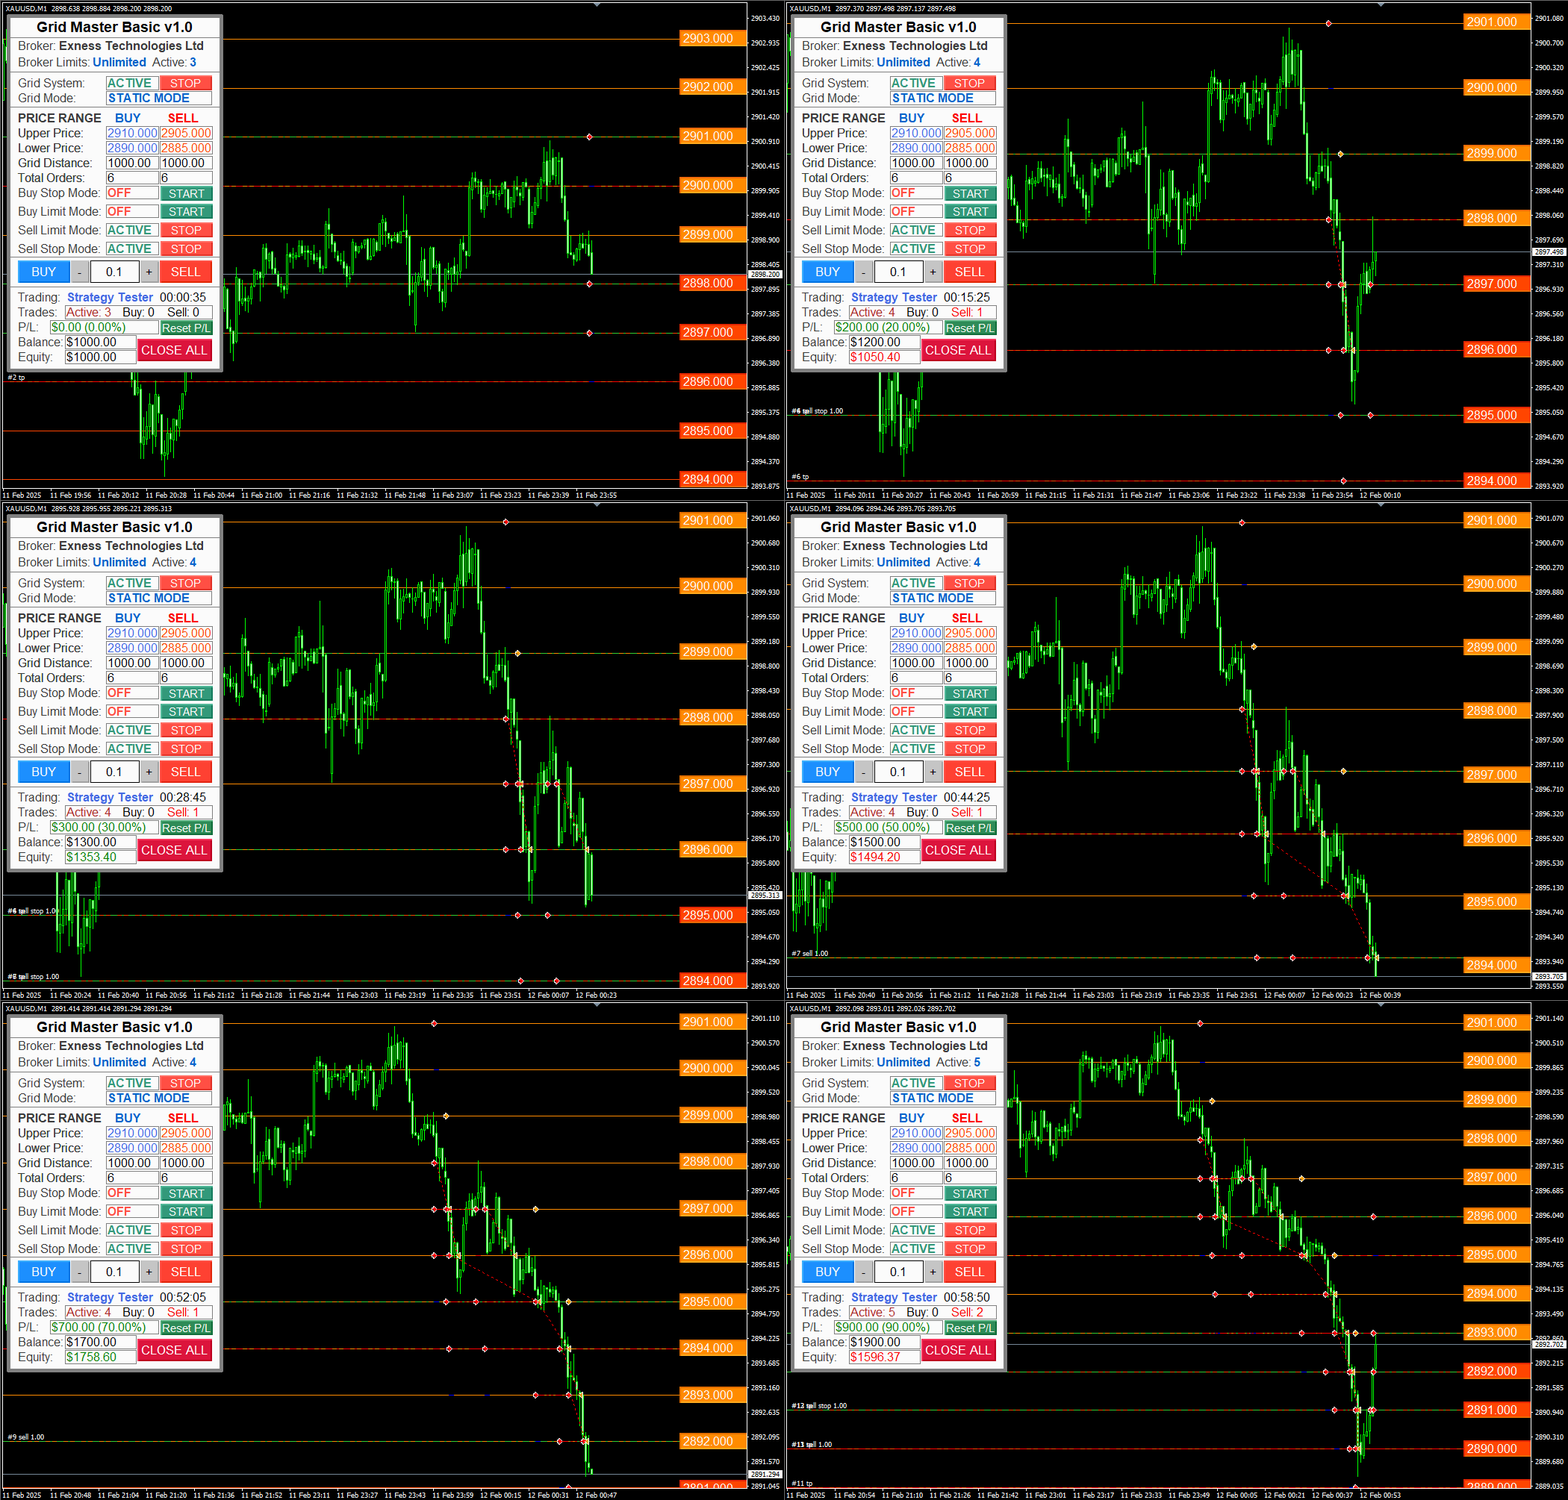
- Sell Limit (above current price) → 🟠 Orange (solid)
- Sell Stop (below current price) → 🔴 Red (solid)
- Both types at same level → Switches between Orange ↔ Red based on price movement.
- No active orders → ⚪ Gray (dashed)
Example of Static Grid Mode, XAU/USD, 1-Minute Chart, Sell Limit and Sell Stop Orders
3️⃣ Grid Line Labeling
Each grid line includes a boxed price label, making it easy to identify the exact price level on the chart. This is especially useful for quickly analyzing entry levels and current market conditions.
4️⃣ Activation & Deactivation of Grid Lines
A Boolean input lets users toggle grid line display:
- ✅ Recommended: Keep grid lines ON during live trading for real-time visual guidance.
- ❌ Optional: Turn OFF grid lines during backtesting to improve performance.
⚙️ Backtesting Optimization Tips:
- Use "Open Prices Only" in Strategy Tester for fastest performance.
- Stick to M5 timeframe for a good balance between speed and strategy insight.
- For wide-range optimizations, higher timeframes increase speed but reduce detail.
- All EA settings remain available as input parameters to ensure full compatibility in Strategy Tester.
⚠️ Important:
Never run the EA in Strategy Tester while it is live on any chart within the same MetaTrader terminal. This may cause data or logic conflicts.
✅ Use a separate MT4 terminal instance (with a different account) to avoid interference.
🎯 Purpose & User Scenario
These visualization tools are designed to help traders:
- Clearly distinguish between Buy/Sell zones.
- Instantly assess which orders are active, pending, or inactive via color-coded grid lines.
- Keep charts clean and readable through dynamic labels and optional grid visibility.
- Optimize Strategy Tester performance by disabling unnecessary visuals while preserving input access.
This makes Grid Master Basic EA user-friendly and suitable for both discretionary traders and testers who require high-performance simulations.
4. 📥 Order Placement Settings
This section outlines how to configure price ranges, order types, maximum order limits, lot sizes, and other key parameters for both Buy and Sell orders.
📈 Price Range Settings
🔹 Buy Price Range
- Upper Price: Highest price at which buy orders can be placed.
- Lower Price: Lowest price at which buy orders can be placed.
- Grid Distance: Step size (in pips) between each grid level.
Example: If the lower price is 1.0000 and the upper price is 1.0100, with a grid distance of 10 pips, the grid will place buy orders at 1.0000, 1.0010, 1.0020, etc.
🔸 Sell Price Range
- Upper Price: Highest price for placing sell orders.
- Lower Price: Lowest price for placing sell orders.
- Grid Distance: Step size (in pips) between each grid level for sell orders.
The Grid Master Basic EA comes with a default setting where both the upper and lower price of the grid price range are set to zero. In this configuration, the EA automatically calculates the price levels starting from the current market price. It rounds up the price levels and places orders accordingly. This behavior is intended for testing purposes only and does not follow a specific trading strategy.
When the default setting is used, certain key functionalities — like order modification, duplicate prevention, and other features relying on the upper and lower price range — are disabled. This is because they require actual price range input values to function correctly.
As a result, the default setting is not recommended for live trading. Once you enter your own price range, the default setting will be automatically disabled, and the Expert Advisor will operate as intended with full functionality in live trading.
🔢 Maximum Order Counts
- Maximum Buy Orders:
Limits the number of active or pending Buy Stop and Buy Limit orders.
Example: If set to 10 and 1 buy is active, up to 9 more can be pending.
- Maximum Sell Orders:
Works the same way for Sell Stop and Sell Limit orders.
🔧 Order Type Settings
🟩 Buy Orders
Both Buy Stop and Buy Limit share the same price range, but offer separate configuration settings:
- Activation Boolean: Turn Buy Stop or Buy Limit orders ON or OFF.
- Lot Size: Set individual lot size for Buy orders.
- Minimum Order Distance: Minimum pip distance from current price to place pending Buy orders.
- Take Profit / Stop Loss: Set TP and SL values separately for each Buy order type.
- Maximum Pending Orders: Caps how many Buy Stop or Buy Limit orders can remain pending at any time.
🟥 Sell Orders
Like Buy Orders, both Sell Stop and Sell Limit use the same price range with independent settings:
- Activation Boolean: Enable/disable Sell Stop or Sell Limit orders.
- Lot Size: Defines lot size for each Sell order type.
- Minimum Order Distance: Distance from current market price for placing pending Sell orders.
- Take Profit / Stop Loss: Set TP and SL values individually.
- Maximum Pending Orders: Max pending orders for Sell Stop or Sell Limit types.
🔄 Additional Notes on Order Modification & Closing Logic
- ✅ Live Adjustment: Changing TP or SL during live trading will automatically update both active and pending orders.
- ✅ Consistency: Ensures unified risk control, including orders initiated from the EA panel.
- ⚠️ Scope: Only orders with the correct magic number and mode mark are affected.
- ❌ Manual/External Orders: Orders placed manually or by another EA will not be altered.
❌ Order Closing Function
- Orders are only closed when Take Profit or Stop Loss is hit.
- EA only closes orders that match:
- The correct symbol
- The assigned magic number
- The relevant mode mark
- 🛡️ Manual or outside-EA orders remain untouched.
- 🧠 The closing logic is secure and reliable — only qualified orders are closed, ensuring clean, risk-controlled operation.
5. ⚙️ Smart Order Logic
🔁 Grid Level Tracking & Duplicate Order Prevention
🧠 Functionality Overview:
This system ensures that orders remain aligned with grid levels while avoiding duplicates. It continuously monitors market activity to maintain an efficient and organized grid structure.
✅ How It Works:
- Tracks Grid Levels:
- Each predefined grid level price
- Grid levels above and below the current market price
- Grid levels within the defined upper and lower price boundaries
- Grid-Level Validation:
Before placing a new pending order, the EA checks whether an existing order already occupies the same grid level (based on price and distance). - Slippage Handling:
If a pending order is triggered at a grid level but the price opens due to slippage and is closer to a different grid level, the system will not place a new pending order on the next grid level. Instead, it recognizes that the order is already triggered and opened near the next grid level, so no new order is placed at that level. - Maintains Order Count Balance:
- Actively monitors the total number of active and pending orders across all grid levels
- Ensures that the maximum configured order limits are not exceeded
🔄 Smart Order Modification
🎯 Purpose:
This mechanism ensures that pending orders adjust automatically in response to price movement, keeping them valid and correctly positioned within the grid.
✅ How It Works:
- Auto-Adjustment Based on Market Price:
- When price shifts, pending orders are modified to maintain their distance according to grid spacing and the minimum order distance rules
Example:
Market price drops from 1.0000 to 0.9990
Buy Stop at 1.0010 is modified to 1.0000 (or 0.9990, depending on spacing)
- Bulk Adjustment:
- Multiple pending orders are dynamically updated as the price moves
If market price drops further to 0.9980, pending orders at 1.0010 and 1.0020 are adjusted to 0.9990 and 1.0000
✅ Applies to All Order Types:
- 🟩 Buy Stop / Buy Limit
- 🟥 Sell Limit / Sell Stop
🛡️ Robust Mechanism
- Out-of-Range Orders:
- If an order moves beyond the defined price range, it is either:
- 🔁 Modified back into the valid range, or
- ❌ Deleted if the corresponding grid level is already occupied
- Order Limit Enforcement:
- If total orders exceed the configured maximum, excess orders are removed automatically
6. 🛡️ Risk Management Logic
This section outlines the EA’s flexible and automated risk controls, which help manage exposure by closing orders based on target price, profit, or loss. It supports both individual (Buy/Sell) and combined position closures. Additionally, it manages cleanup behavior when the EA is removed from the chart.
📘 Risk Management Modes
Grid Master Basic EA includes multiple risk management options, allowing users to automatically exit trades based on predefined price levels, profits, or losses. These controls can be applied to Buy Orders, Sell Orders, or Combined Orders.
✅ Buy Orders
- Close All Buy Orders at Targeted Price
Automatically closes all active buy orders once the market reaches a user-defined price level. - Close All Buy Orders at Targeted Profit
Closes all buy orders when the total combined profit of these orders reaches a specific amount (e.g., $100). - Close All Buy Orders at Targeted Loss
Closes all buy orders when the total combined loss of these orders reaches a defined threshold (e.g., -$100).
✅ Sell Orders
- Close All Sell Orders at Targeted Price
Closes all active sell orders when the market hits the specified target price. - Close All Sell Orders at Targeted Profit
Terminates all sell orders once the total profit from sell-side positions reaches a predefined level. - Close All Sell Orders at Targeted Loss
Closes all sell orders if the cumulative loss from those positions hits the set limit.
✅ Combined Orders (Buy + Sell)
- Close All Orders at Targeted Price (Buy + Sell)
Closes all active buy and sell orders once the market reaches a specific target price. - Close All Orders at Targeted Profit (Buy + Sell)
Exits all buy and sell positions when the combined profit across all orders reaches a predefined amount. - Close All Orders at Targeted Loss (Buy + Sell)
Terminates all buy and sell orders once the total loss across all positions hits the set limit.
🧹 EA Removal Cleanup
When the EA is removed from the chart, these optional settings determine how to handle open and pending orders:
- Delete All Pending Orders on EA Removal
If enabled, the EA will automatically delete all pending orders (Buy Limit, Sell Limit, Buy Stop, Sell Stop) upon removal. - Close All Open Orders on EA Removal
If enabled, all currently active open orders will be closed when the EA is detached from the chart.
🛑 Order and Risk Limitations
To protect users—especially beginners—from excessive risk, Grid Master Basic EA includes built-in safety constraints. These safeguards ensure more controlled trading behavior and help users avoid common pitfalls in grid systems.
⚠️ Core Limitations
- Maximum Total Orders
- The EA restricts the number of active orders.
- Buy and Sell orders are counted separately.
- Example: If the max is set to 10, you can have up to 10 Buy orders and 10 Sell orders (20 total).
- If exceeded, the EA will stop trading and display an alert prompting input adjustment.
- Maximum Lot Size
- Each individual order has a cap on the lot size.
- Example: If set to 1.0, any order above that (e.g., 1.1) will be blocked, and a warning will appear.
- Prevents over-leveraging, especially on smaller accounts.
- Maximum Grid Levels
- Controls the number of grid steps allowed per direction.
- Example: If the limit is 20, you must adjust your range or spacing to avoid exceeding it.
- Violations trigger an alert with guidance to correct the settings.
These limits ensure a responsible approach to trading, especially for those new to grid systems.
🛡️ Default Safety Settings (Grid Master Basic EA)
These default values are built into the Basic version to create a safer environment for newer traders:
- Maximum Grid Levels: Static Mode 51, Dynamic Mode 21
- Maximum Total Orders: 50 (tracked separately per Buy/Sell)
- Maximum Lot Size: 10.0 lot per order
These thresholds are designed to ensure low-risk exposure, encourage better discipline, and support gradual learning.
📝 Why These Limits Exist
Many traders underestimate how quickly risk can compound when using grid systems. These safeguards are designed to:
- Prevent accidental over-trading
- Protect accounts from oversized positions
- Make the EA more beginner-friendly without overwhelming the user
❓ Need More Flexibility?
Looking to trade more aggressively or with customized rules?
Check out the Advanced Version of Grid Master EA (coming soon on MQL5.com), which offers:
- Increased grid levels
- Higher max order caps
- Custom risk profiles
- Enhanced features for experienced users
7. 🖥️ Display Panel Features
The Expert Advisor includes a comprehensive and interactive on-screen display panel designed to help monitor and manage trading activity in real-time. Below is a breakdown of the core features grouped by functionality:
📊 Broker Information
• Broker Name
Displays the name of the currently connected broker.
• Order Limitations
Shows broker-specific constraints and current usage:
- Left Side: Displays the maximum number of orders allowed by the broker (e.g., "Limit: 100 orders" or "Unlimited").
- Right Side: Displays the current total active orders placed by the user (includes all open and pending orders — buy and sell combined).
🧭 Grid Mode Status
- Grid Mode Toggle
Indicates whether the grid trading system is currently enabled or disabled. - Mode Type Indicator
Displays the active grid mode: - Static
- Dynamic
💹 Price & Grid Display
- Buy/Sell Price Ranges
Shows the currently active price ranges for both Buy and Sell orders. - Grid Distance
Displays the spacing between grid levels (e.g., 10 pips). - Total Orders
Reflects the total number of Buy, Sell orders.
🔄 Order Type Toggles
Quickly enable or disable order types using interactive buttons on the panel:
- Buy Stop
- Buy Limit
- Sell Stop
- Sell Limit
🛒 Market Action Controls
- Market Buy / Sell Buttons
Place immediate Buy or Sell market orders directly from the panel. - Lot Size Adjusters (+/-)
Easily increase or decrease the trading lot size using on-screen plus/minus buttons.
🚦 Trading Status
- Status Indicator
Displays the current trading status: - Disabled
- Live Trading
- Testing
- Server Time
Shows the broker’s server time in real-time.
🔢 Total Order Overview
- Total Active Orders
Shows the number of all currently active and pending orders. - Total Buy Orders
Displays the total count of Buy orders (both pending and open). - Total Sell Orders
Displays the total count of Sell orders (both pending and open).
📈 Profit & Equity Panel
- Live Profit/Loss (P/L)
Displays the real-time profit or loss of all active positions. - Starting Balance
Shows the account balance at the time the EA was started or reset. - Current Equity
Reflects the live equity of the account, accounting for open trades
🧰 Utility Controls
- Reset Stats (24h)
Resets all tracked statistics (e.g., trade count, P/L) for the past 24 hours. - Close All Orders Button
Instantly closes all open orders with a single click.
8. 🚨 Master Switch Alert System
🎯 Purpose:
- Validates all EA input settings before any trading actions are taken
- Prevents user errors due to misconfiguration
- Ensures the EA operates under safe and logical parameters
⚙️ Features:
- Input Validation Logic
Detects incorrect or illogical configurations, such as: - Upper Price Range being lower than Lower Price Range
- Invalid or missing grid distances
- Exceeding maximum lot sizes or grid levels
- Real-Time Alerts
Notifications are triggered through: - On-screen pop-up messages during live trading
- Console alerts in backtesting or strategy tester environments
- Clean Execution Logic
- Prevents the EA from executing trades when invalid settings are detected
- Helps maintain consistent and error-free performance
- Minimizes risk from user mistake
9. 🧠 Tips, Use Cases & Strategy Ideas
Explore how to get the most out of the Grid Master Basic EA with these proven strategy templates, practical tips, and example configurations. Whether you’re a beginner or a seasoned trader, this section gives you clear guidance with flexibility to adapt.
✅ General Tips
- Start in Demo Mode
Test your grid setup on a demo account before going live. It helps fine-tune your risk, spacing, and TP levels without financial exposure. - Use Moderate Grid Distances
Avoid ultra-tight spacing (<5 pips) unless scalping in fast markets. A 10–20 pip range suits most pairs. - Start with Small Lot Sizes
Begin with 0.01–0.05 lots, especially on accounts under $1,000. Scale up gradually as confidence and equity grow. - Enable Master Switch Alert System
Keeps your setup input-safe and avoids accidental misconfiguration.
💡 Strategy Ideas
1. 🔁 Scalping Grid
- Grid Spacing: 5–10 pips
- Order Types: Buy Stop & Sell Stop
- Lot Size: Small (0.01–0.03)
- TP: Tight (e.g., $10–$20 or 5–10 pips)
- Best For: High-volatility sessions (London or NY open)
2. 🧱 Range Trading
- Grid Spacing: 15–30 pips
- Order Types: Buy Limit & Sell Limit
- Use Zone: Support and resistance levels
- TP: Static target, no SL (optional bounce strategy)
- Best For: Sideways/consolidating markets
3. 💥 Breakout Strategy
- Grid Spacing: Just outside consolidation range (e.g., 10–15 pips from range)
- Order Types: Buy Stop & Sell Stop only
- TP: Medium to wide
- Best For: News events or volatility spikes
4. 📈 Trend Ladder
- Grid Spacing: 20+ pips
- Order Types: Buy Stop (uptrend) or Sell Stop (downtrend)
- TP: Wide, with optional manual trailing SL
- Best For: Strong trend-following strategies
5. 🐢 Slow Accumulation
- Grid Spacing: 30–50 pips
- Lot Size: Low (0.01–0.02)
- Pairs: Stable pairs like EUR/CHF
- TP: Directional or combined profit-based close
- Best For: Low-volatility markets
💬 Share Your Ideas!
We've introduced strategy examples like Scalping Grid, Range Trading, Breakout Strategy, Trend Ladder, and Slow Accumulation to help you get started. But we know every trader has their own unique twist.
Got a strategy concept or feature idea?
Maybe you’d like to see:
- A custom order trigger logic
- Specific entry/exit conditions
- A unique method for trade closure or profit locking
Whatever it is — we want to hear from you!
💡 Post your suggestions in the comments section
Your idea might be featured in a future update of Grid Master Basic EA!
10. ❓ Troubleshooting & FAQ
🛠️ Common Issues
EA doesn’t place orders?
- Confirm trading is enabled (EA and platform settings).
- Check for invalid input via the Master Switch Alert System.
- Verify correct symbol name (e.g., EURUSD.m or Gold# as per broker).
Orders disappear after EA removal?
- If “Cleanup on EA Removal” is true, open/pending orders will auto-close.
- Disable that setting if you want to retain orders after EA removal.
Grid not appearing?
- Review grid spacing and price range inputs.
- Ensure you haven't exceeded allowed grid levels.
EA isn’t reacting to price?
- Check if correct order types are enabled.
- Ensure magic number is unique per chart.
- Confirm mode is set to Live or Testing (not Disabled).
🧑💻 Platform Tips
MT4 Users:
- Refresh indicators if panel doesn’t update.
- Use Strategy Tester for fast testing.
Use a VPS for better speed and reliability during live trading sessions.
📬 Support & Community
Need help or want to connect with other users?
- Public Support: Use the Comments tab on the EA’s MQL5 page to ask questions or report issues.
- Private Help: Message the author directly via MQL5 for personal assistance.
- Docs & Updates: See the Description and What’s New tabs for setup guides and version changes.
- Share Feedback: Post your strategies or results in the Reviews section.
🧠 Tip: Be sure you're logged into your MQL5 account to access all support features.
⭐️ Your Feedback Matters! ⭐️
If you find Grid Master Basic EA helpful, we’d love to hear your thoughts!
Your feedback helps shape future updates and ensures the EA continues to improve with features that matter to real traders like you.
👍 If you enjoy using it, please consider leaving a 5-star rating — it encourages us to keep building and refining tools that bring real value.
💬 Got suggestions or questions?
Drop a comment or message anytime — we’re here to help and always open to new ideas.
Thank you for your support!


