

Introduction to Breakout Strategy
Breakout strategies are based on the principle that price often accelerates once it moves beyond a defined range of support/resistance or high/low. These breakout points typically represent a shift in market sentiment and are often accompanied by increased volume and volatility.
In practical terms, a breakout occurs when price closes above a resistance level or below a support level that has been holding for a period of time. Traders use these moments to enter the market, aiming to capitalize on the momentum that often follows such a move. Breakouts can initiate new trends, making them valuable entry points for both short-term and long-term traders.
Popularity of Breakout Strategy
Breakout trading is one of the most widely adopted strategies among professional and retail traders for several reasons:
- Clear Entry and Exit Rules
Breakout strategies rely on predefined price levels, reducing ambiguity in trading decisions. - Momentum Alignment
Trades are aligned with directional momentum, increasing the probability of follow-through. - Applicability Across Markets
Effective in forex, commodities, indices, and even crypto, breakout principles are market-agnostic. - Effective During Volatility Spikes
News releases, session openings, and macroeconomic events often trigger breakouts, making the strategy effective during key time windows.
Its combination of simplicity and statistical edge makes it a cornerstone of many trading systems and Expert Advisors.
Advantage of Using a Breakout Strategy EA
Using an Expert Advisor (EA) to automate breakout trading introduces several performance and convenience benefits:
- Speed and Precision
The EA places and manages orders at precise levels and times without human delay. - Eliminates Human Emotion
The system executes trades based purely on logic and rules, avoiding emotional errors. - Time-Based Management
This EA includes features like time-to-cancel for untriggered orders and time-based profit-taking, enhancing control. - Box Sizing and Dynamic SL
The stop loss is intelligently based on the size of the breakout box, adapting to market conditions. - Trailing Stop Integration
Users can enable or disable trailing stop features for locking in profits after breakout. - Dual Mode: RBO and OBO
Supports both range-based and session-opening breakouts with full flexibility.
This allows for efficient, disciplined, and around-the-clock operation without the need for constant chart monitoring.
What is and Strategy of Range Breakout (RBO)
Definition:
Range Breakout (RBO) strategy identifies a horizontal price range formed over a specified time window—typically when the market is quiet or consolidating. The high and low within this range define a “box.” Stop orders are placed just outside the box in anticipation of a breakout in either direction.
Strategy Overview:
- Time Window:
Define the start and end time for the range (e.g., 01:00 to 05:00), and the duration of the box is (5 to 7hours). - Box Formation:
Measure the high and low during this period. - Order Placement:
Place Buy Stop slightly above the high, and Sell Stop below the low. - Stop Loss:
Based on the box size (range height). - Order Expiration:
If no breakout occurs within a set duration, cancel pending orders. - Profit Exit:
Via trailing stop or time-based close.
Use Case:
Commonly used during the Asian session to trade the London breakout. Ideal for capturing momentum once price escapes the quiet hours.
Using ICMarkets broker as an example, the box (support/resistance) is set from 03:00hour to 10:00hour, (10:00 is the start of London Session) with stop loss at the other side of the box and close positions at 18:30hour.
What is and Strategy of Opening Breakout (OBO)
Definition:
Opening Breakout (OBO) strategy focuses on capturing the volatility surge that often follows a major market session open (e.g., London or New York). It defines a short opening range, then places orders outside that range to catch the immediate price movement.
Strategy Overview:
- Opening Time Box:
Set a short period after market open (5 to 60min). - Box Formation:
Define high and low of price during this time. - Breakout Orders:
Buy Stop above the high, Sell Stop below the low. - Stop Loss and Take Profit:
Based on box height or via trailing logic. - Cancel Time:
Untriggered orders expire after a user-defined time. - Exit Options:
Time close, trailing stop, or fixed profit levels.
Use Case:
Ideal for trading the first burst of movement during the London or New York opening bell. Capitalizes on the surge of liquidity and directional momentum that often follows.
Starting of box (highest/lowest) is at New York Session (10:00hour) and end of box is 35 minutes from start. Use close by time option at 18:00hour
Terminology
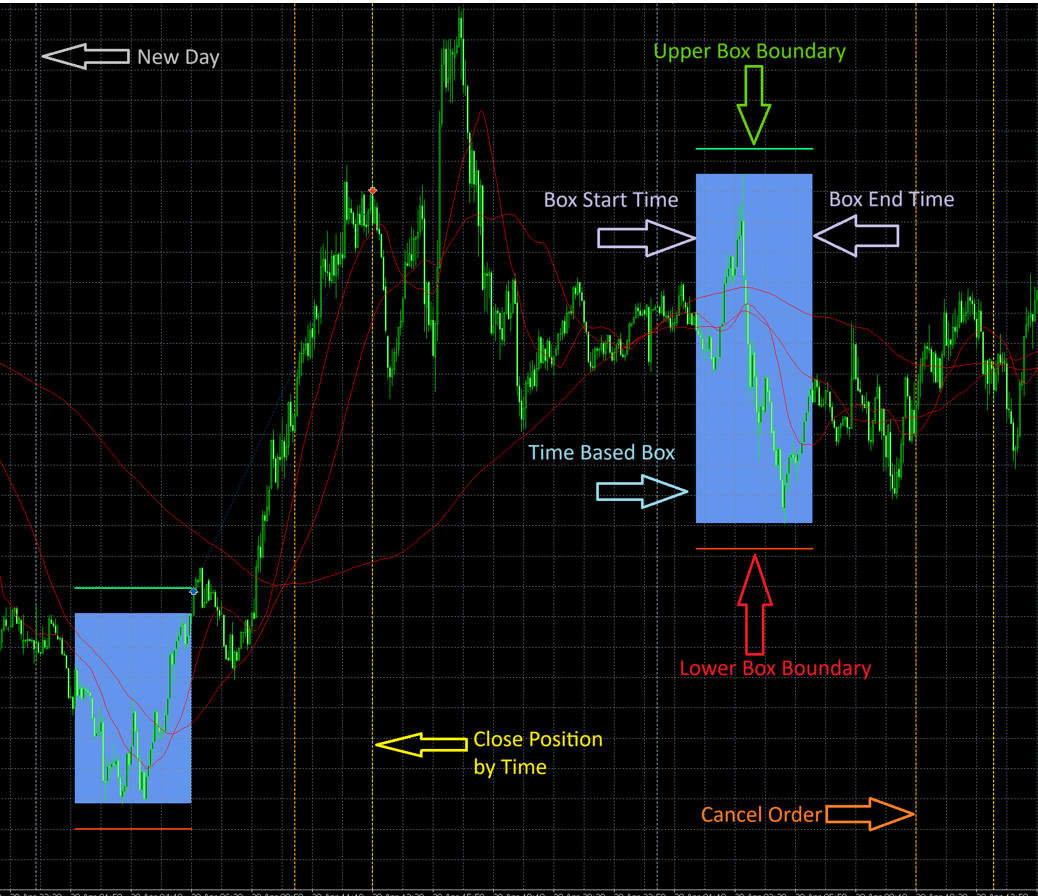
New Day (Grey Arrow)
Marks the beginning of a new trading day. The EA resets and starts tracking the new breakout box based on configured start time.
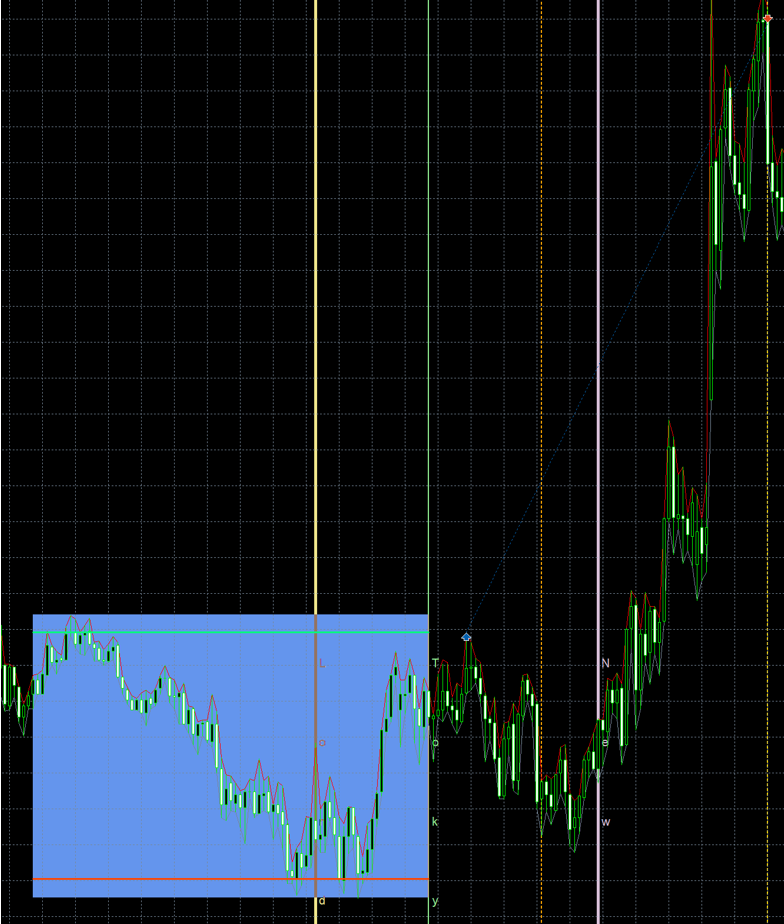
Box Range (Blue Rectangle)
Represents the defined Box Time Range, during which the EA measures the highest and lowest prices to form the breakout zone. An unfilled box indicates box range filter does not meet the criterial and thus no orders will be placed for that day.
Upper Box/Trade Boundary (Green Arrow)
Indicates the upper breakout level. If price breaks above this point, a Buy Stop order will be triggered (if conditions allow). This is box level plus offset.
Lower Box/Trade Boundary (Red Arrow)
Indicates the lower breakout level. If price breaks below this line, a Sell Stop order will be triggered (if conditions allow). This is box level minus offset.
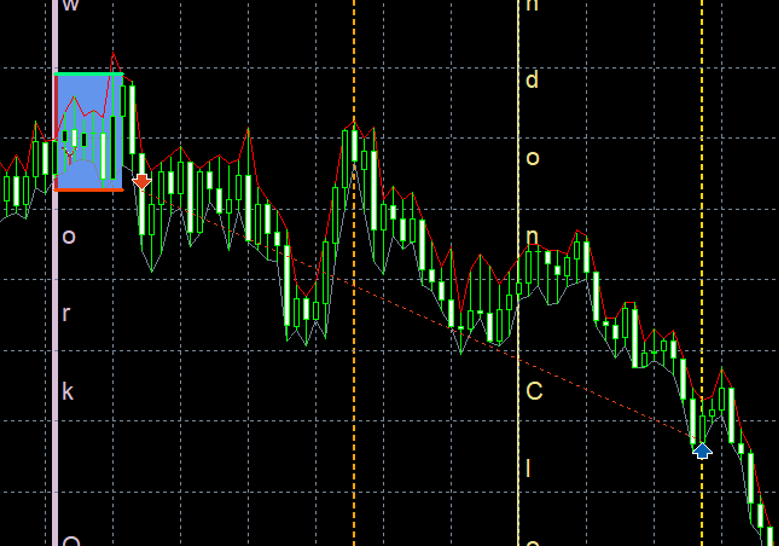
Cancel Order (Orange Arrow)
Occurs after a pre-defined Cancel Order Duration following the end of Box Time. Any pending Buy/Sell Stop orders are cancelled if not triggered by this point.
Close Position by Time (Yellow Arrow)
Defines the forced close time for any remaining open positions. This occurs after the cancel time, and ensures no trades carry forward into uncertain market hours.
Factor and Percentage
Factor and Percentage is always with respect to another setting/parameter/value. The main difference between factors and percentages is that factors are whole numbers that divide another number exactly, while percentages are fractions of 100 that describe proportional relationships.
Retest
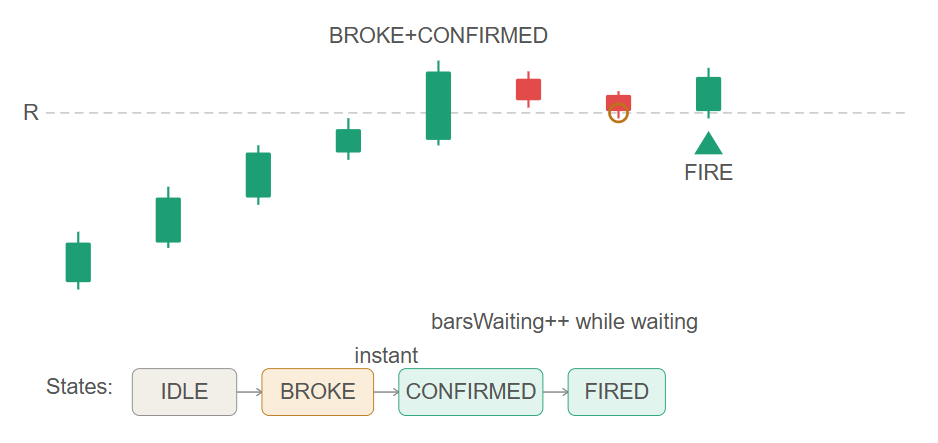
Mode A — RetestPlainTouch — the moment price crosses the level and then comes back to touch it, fire immediately. Fastest entry, but you're trusting a single tick. No confirmation needed — RST_BROKE collapses straight to RST_CONFIRMED in the code.
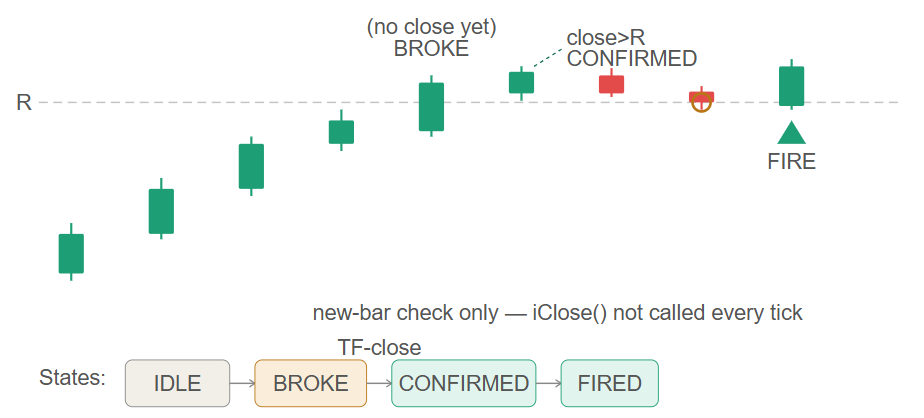
Mode B — RetestCloseBeyondTouch (default) — you wait for a full candle to close above the level (proving the break was real), then fire the moment price touches back. This is the balance — you skip the fakeout breaks but still enter on the first touch back.
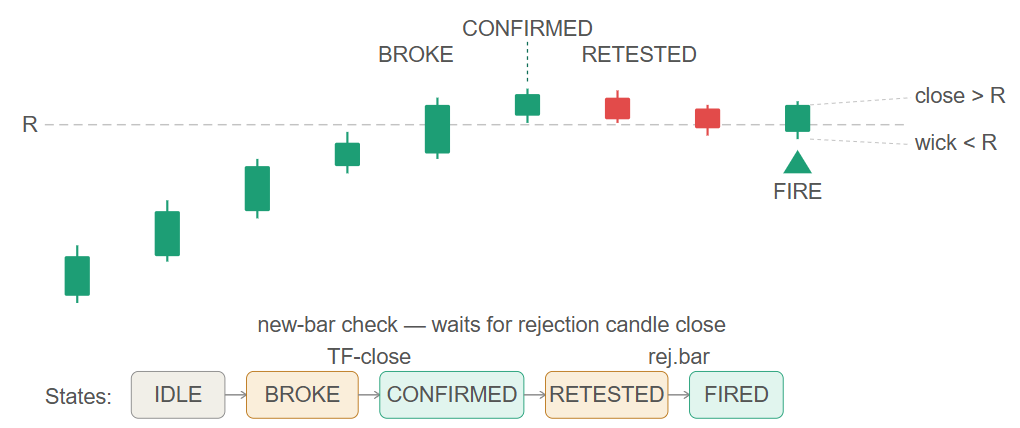
Mode C — RetestCloseBeyondReject — strictest. After the close-beyond confirmation, when price returns to the level you still don't fire. You wait for a rejection candle — one whose wick pierces the level but whose body closes back above it (bullish rejection). Only then fire. Highest confidence, fewest trades.
Setting and Setfiles:
https://www.mql5.com/en/blogs/post/765230
All-in-One EA can be found here:
https://www.mql5.com/en/market/product/134347


")
![[XAUUSD]: Weekly Liquidity Activation Points (timings), June 22-26, 2026](https://c.mql5.com/6/1013/splash-preview-771790.png "[XAUUSD]: Weekly Liquidity Activation Points (timings), June 22-26, 2026")
