

Introduction
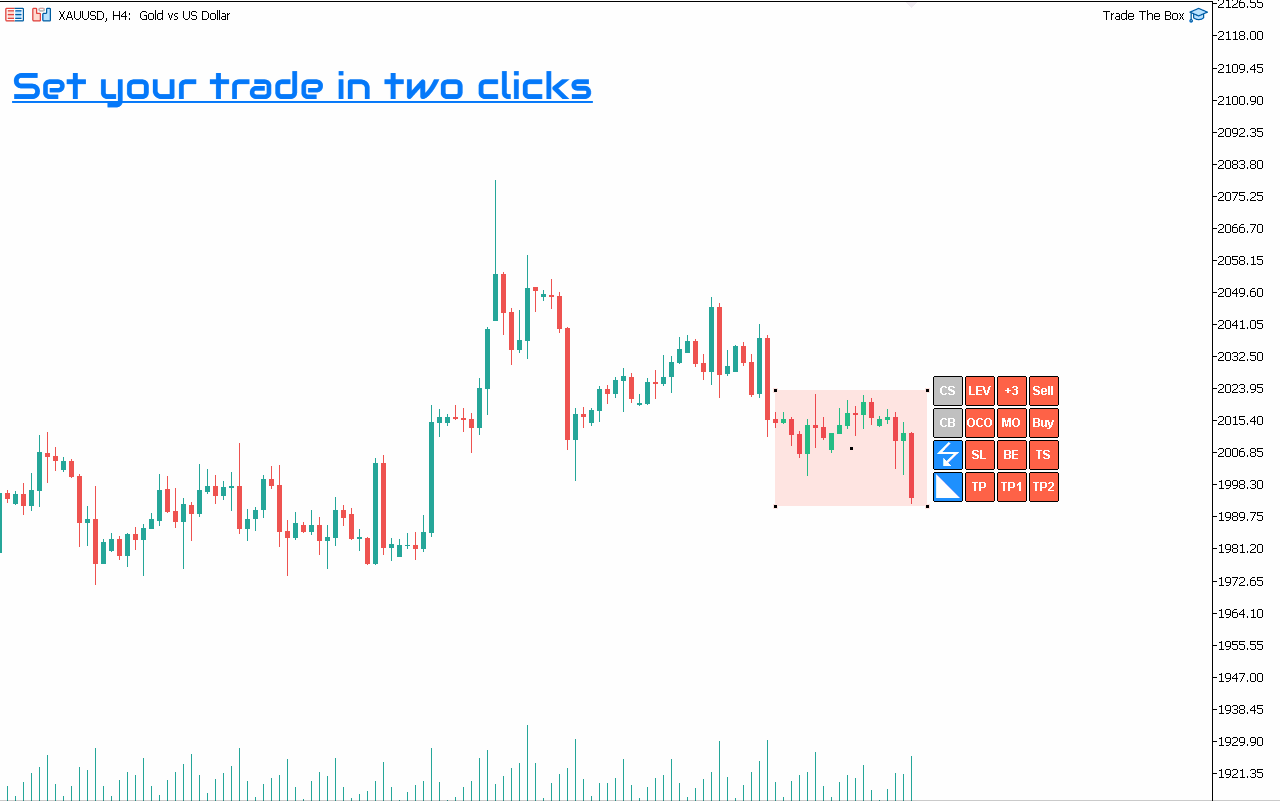
Trade the BOX It is the must-have utility to help you automate the execution of your trading plan, managing scale-up, partial profit booking, and trade managing. It is very intuitive. You need to load it on a chart, set your trading plan, select your range with the BOX, and double-click to activate the trades. Trade the BOX will take it over, ensuring your trading plan is mechanically executed without deviation.
As it is a bot handling your trades, Scalpers, you will adore this utility, as the execution is optimum and fast, allowing you to book every pip you want to add to your trading journal. Intraday traders, you can set your trade and let this secure the position, book partials, and trail your stop to book the maximum profit of a move. ICT and Smart Money concepts traders, this utility is for you. I use it daily to trade order blocks, fair value gaps (FVG), and ICT setups.
Need help or have questions? I am Lio, don't hesitate to reach out! We are always available to respond, help, and improve.
Where to download Trade the BOX
Trade the BOX is available for MT4 and MT5, you will find the direct link to the products below.
MT5 version available under: https://www.mql5.com/en/market/product/96058
MT4 version available under: https://www.mql5.com/en/market/product/96059
The EA functionalities
The EA's main goal is to execute your trading plan mechanically without deviation from your initial strategy. Its main advantage is that it can fit your trading style if you trade breakouts, trade ranging markets, and trade support and demand. You can control this in one click by changing the box trade mode.
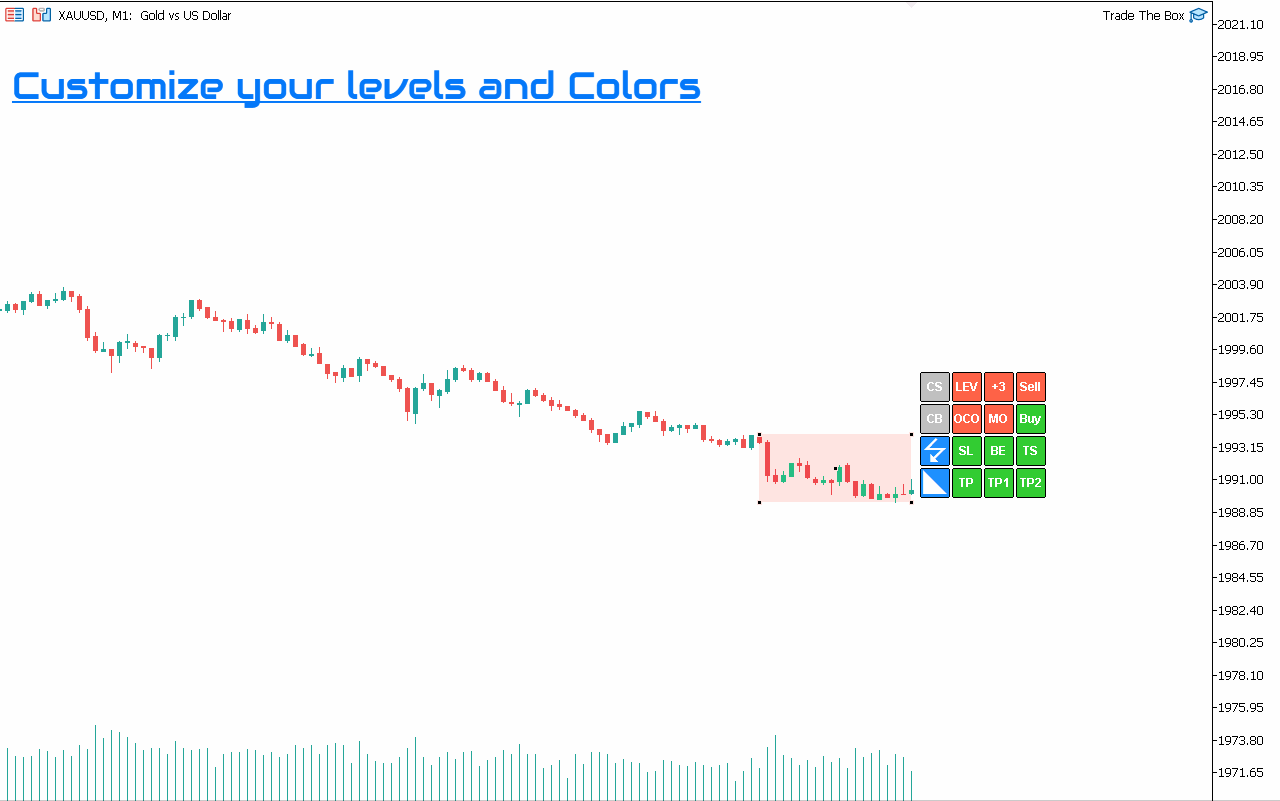
Easy to use, just in a few clicks, you can enable or disable the levels you want to include, like stop loss, take profits, break-even, and trailing stop. Its intuitive and easy-to-use panel will facilitate your trading. Before pulling the trigger, you can quickly show or hide those levels in your graph to confirm your plan.
Setting trades is as easy as double-clicking on the range. The range will become active, and pending orders will be open depending on your configurations. Another double click will close all the trades if they are still pending orders. You can access the panel to instantly close all buy or sell orders. The EA can also open a set of buy and sell orders with a predefined distance, a sort of grid. However, the EA will also manage the settings for every trade and follow your rules for stop loss, take profits, break-even and/or Trailing stops.
Once trades are in place, the configuration is no more changeable, and the EA will mechanically handle your trades, securing your trade and booking your profit.
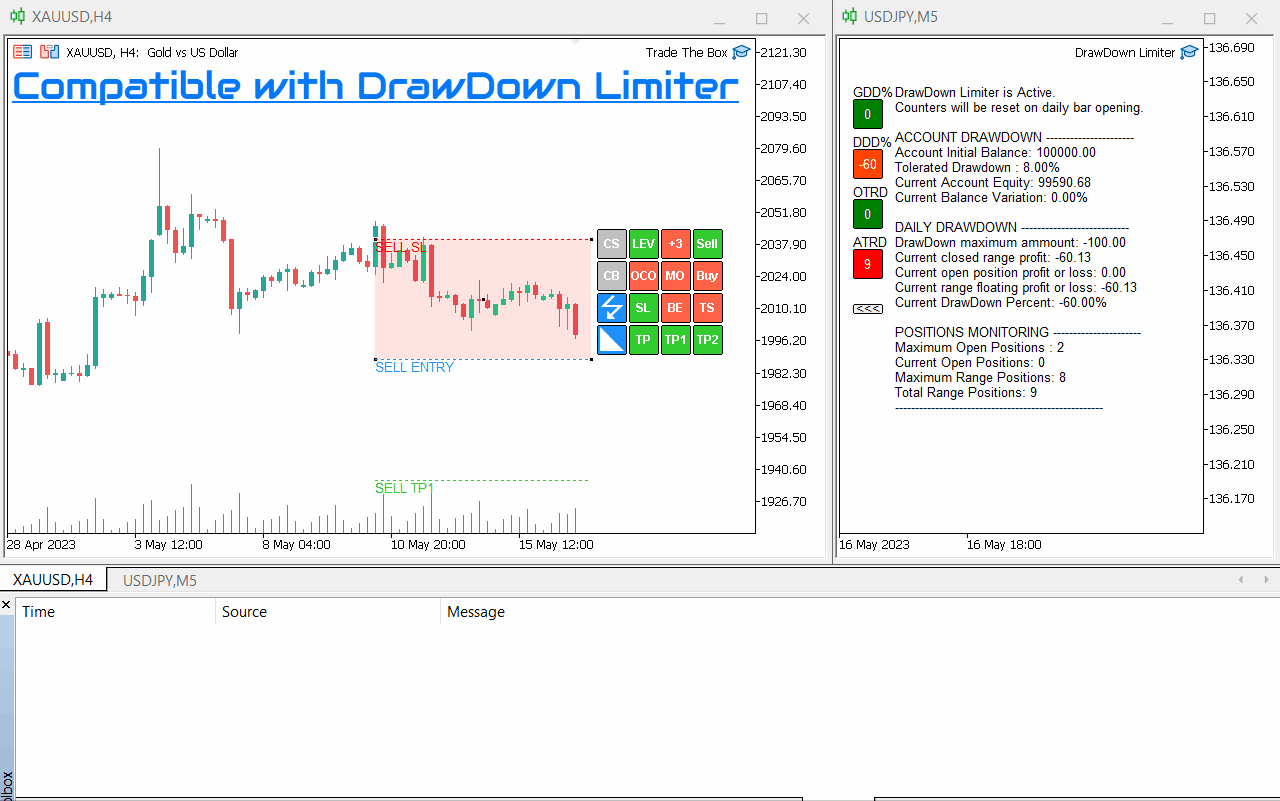
This EA is compatible with "DrawDown Limiter" together you will have a winning arsenal for every trading day.
How to use it?
Trade the BOX is an intuitive utility to use. You need simply to follow the five steps below:
- Add Trade the BOX to your chart, make sure to use a new Magic Number for each new instance
- Instruct the EA of your trading plan via the inputs tab
- Customize the colors and labels to match your style
- Activate the configurations from the panel
- Double click on the BOX to activate the trade
The Inputs
The inputs will help you to instruct "Trade the BOX" with your trading plan parameters so it can handle its execution once trades are in play.
The inputs of "Trade the BOX" are divided into four groups.
The first group is the EA general settings:
- Magic number: This is an essential parameter to pay attention to. It is a unique reference that ties your trade setup and automation to one instance of Trade the BOX. For example, you may load multiple Trade the BOX to your charts. You need to make sure each instance has its own Magic Number. If the same Magic Number is detected, you will receive an Alert message to choose another Magic Number.
- Trade comment: The trade comment will be present in each trade comment and as a prefix of any alert, message, or log that Trade the BOX may issue.
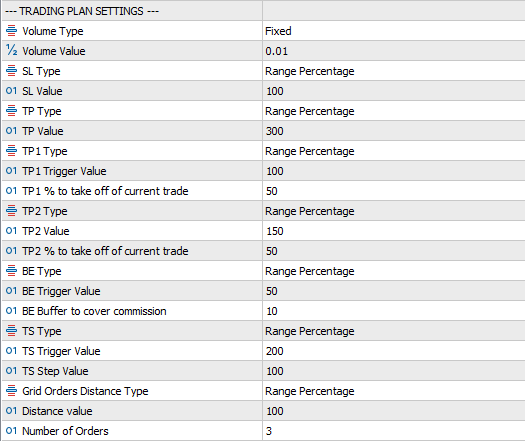
The second group is your trading plan. Those parameters will instruct Trade the BOX on managing your trades once it is active. Again, all the levels can be configured in points or a percentage of the box, considering the high and low prices. While the configuration is done from the inputs tab, activating or not the different levels is fully controlled by Trade the BOX panel.
- Volume Type: You can choose a fixed volume or a percentage of your balance.
- Volume Value: The value of the fixed volume value or the risk to calculate from your balance
- SL Type: SL can be set in points or a percentage of the box
- SL Value: The value in points, or the percentage to consider from the box
- TP Type: TP can be set in points or a percentage of the box
- TP Value: The value in points, or the percentage to consider from the box
- TP1 Type: TP1 can be set in points or a percentage of the box
- TP1 Trigger Value: Trigger on which TP1 will be executed. It can be set in points or a percentage of the box
- TP1 % to take off of current trade: The percentage to take out of the current trade volume
- TP2 Type: TP2 can be set in points or a percentage of the box
- TP2 Trigger Value: Trigger on which TP2 will be executed. It can be set in points or a percentage of the box
- TP2 % to take off of current trade: The percentage to take out of the current trade volume
- BE Type: Breakeven trigger can be set in points or a percentage of the box
- BE Trigger Value: Trigger on which BE will be executed. It can be set in points or a percentage of the box
- BE Buffer to cover commission: This value is only in points. It will allow you to book extra PIPs to cover your swap or commission when moving your trade to breakeven
- TS Type: Trailing stop trigger can be set in points or a percentage of the box. It is worth mentioning that the trailing stop is a trailing step by step. It is more advantageous than the standard trailing stop, as the step can be configured in points and is not fixed to one point.
- TS Trigger Value: Trigger on which TS will start. It can be set in points or a percentage of the box
- TS Step Value: This value is only in points. It will define the step value to move your stop loss forward and protect your profit
- Grid Orders Distance Type: In case you decide to activate grid and multiple trading levels, this parameter will help choose the type of distance, even in points or a percentage from the box
- Distance value: The distance value between orders
- Number of Orders: The number of additional orders that you will be adding
Inputs, trading plan settings
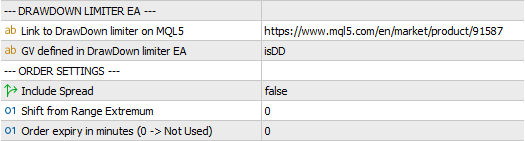
The third group is an advanced parameter to help you limit your drawdown using "Drawdown Limiter". Trade the BOX is compatible with "Drawdown Limiter" EA. Both EA will communicate to protect your account and prevent you from over-trading. Don't hesitate to check "Drawdown limiter" user guide on the following blog: https://www.mql5.com/en/blogs/post/752215.
- Link to DrawDown limiter on MQL5: It the link where you can find this product on www.mql5.com
- GV defined in DrawDown limiter EA: DrawDown limiter uses global variables to spread the decisions generated, make sure you are configured the same name in both EA to enable the auto-communication
The fourth group is additional parameters you may need to add to your trading plan.
- Include Spread: While placing the orders on the extremum of the box, the spread is automatically added to the distance
- Shift from Range Extremum: If you need to add an extra margin in point from the extremum while placing the orders
- Order expiry in minutes (0 -> Not Used): In case your trading plan includes an order expiry parameter
The last group is the box and trading levels configuration. This will allow you to have your own style and own level name printed on your charts. The configuration is quite dynamic in that you can configure your level if you are Fibonacci level in your trading plan, or simply sticking to RR ratios. We will not include in this guideline the details related to range and levels drawing settings as they are pretty simple to understand and configure.
The Panel
When you load Trade the BOX on a chart for the first time, you will notice you will have two elements tied to each other: the box itself and a panel of buttons that will allow you to ease your trade plan execution. At the first launch, all the settings are disabled.
Trade the BOX first launch

The Panel is composed of 16 different buttons. The buttons are divided into two groups: Actions Buttons and Settings Buttons.
Actions Buttons are the first column on the left. Those buttons are configured to execute actions. Their colors will go from BLEU ![]() when they are clickable or active, to GREY
when they are clickable or active, to GREY ![]() when they are not clickable or active. The four action buttons are as follows:
when they are not clickable or active. The four action buttons are as follows:
-
 Panel Button: this button once clicked, will show hide the Trade the BOX buttons panel. This button is permanently active.
 - Mode Button: Trade the BOX operates in three modes. This button allows you to switch between those modes. This button is active as long as no trades are in place and the box is inactive
-
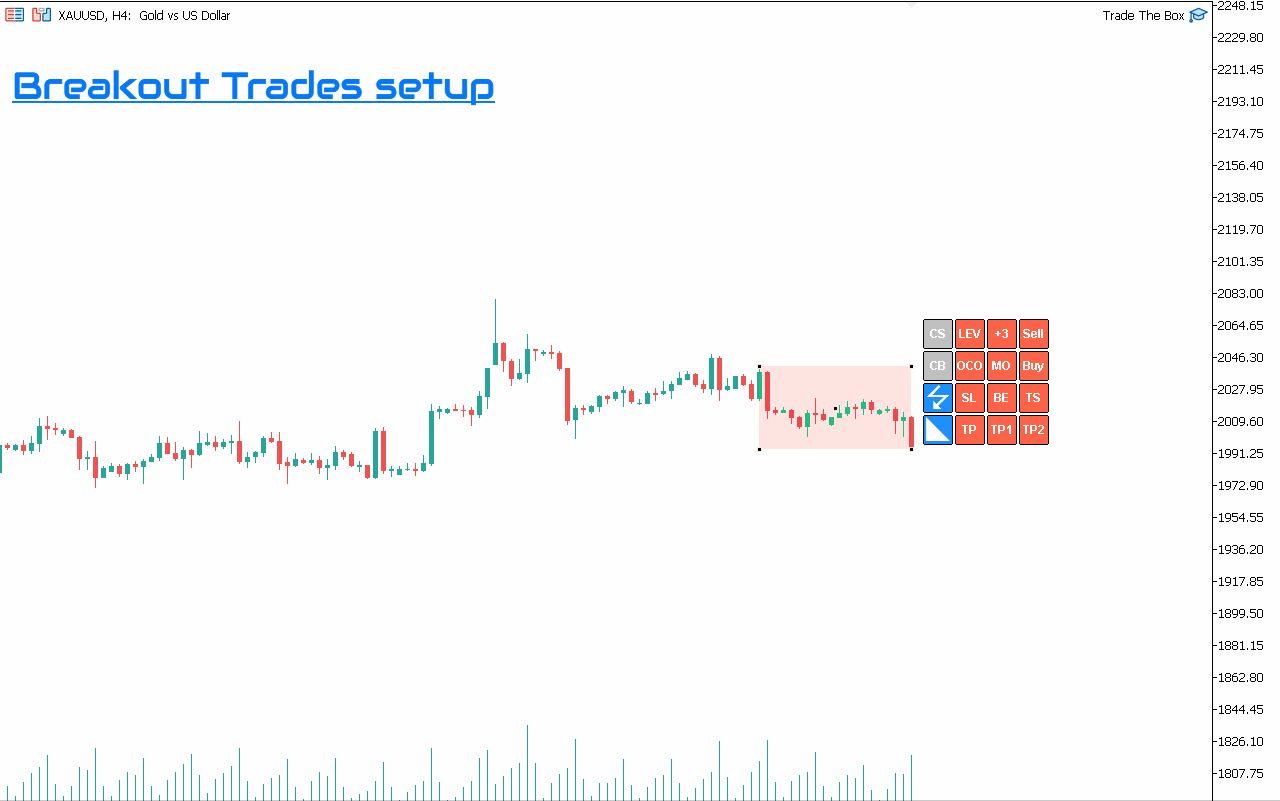
 Trade the BOX breakout: this will allow you to set breakout trades on the box extremities via a buy stop on the high and a sell stop on the low. This is very useful when trading open range breakout strategies, daily range breakout strategies, and many others.
 -
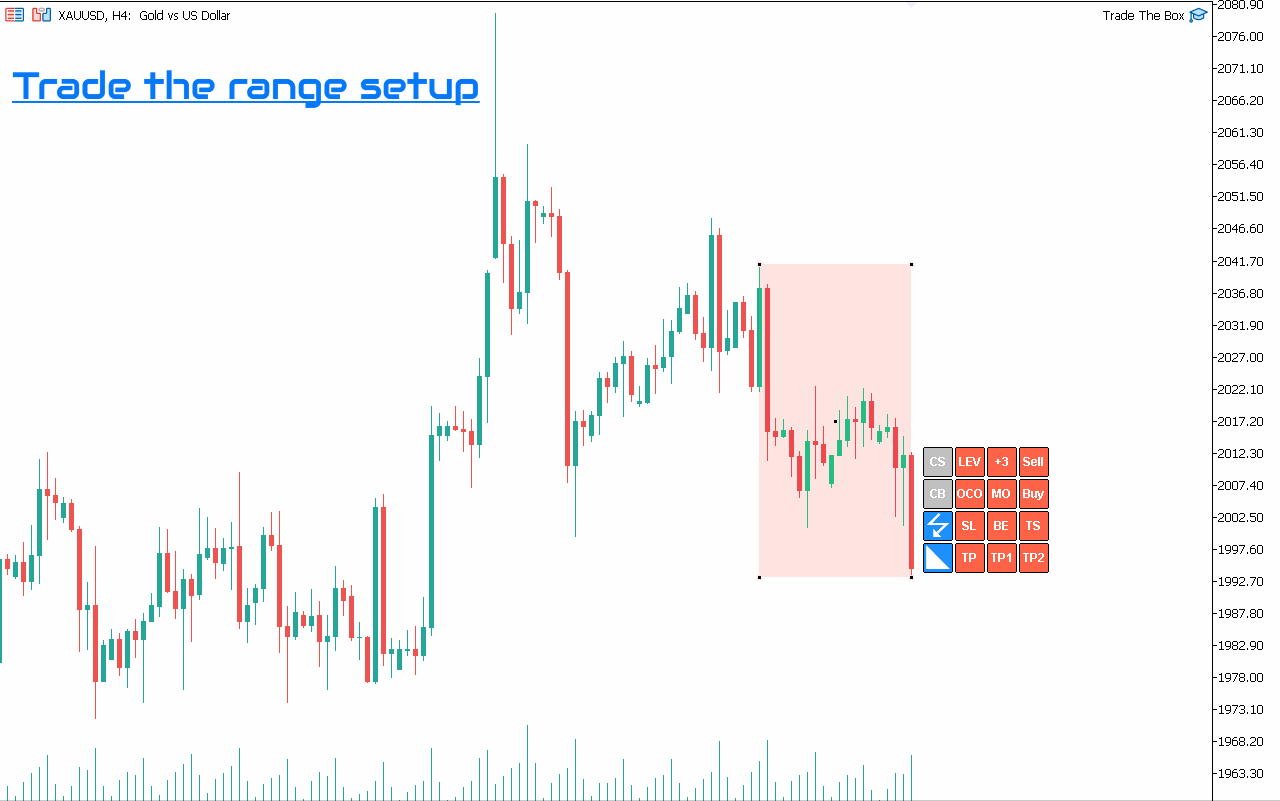
 Trade the BOX range trading: this will allow you to trade the internal range defined by the box via a buy limit on the low and a sell limit on the high. Ideal for ranging markets.
 -
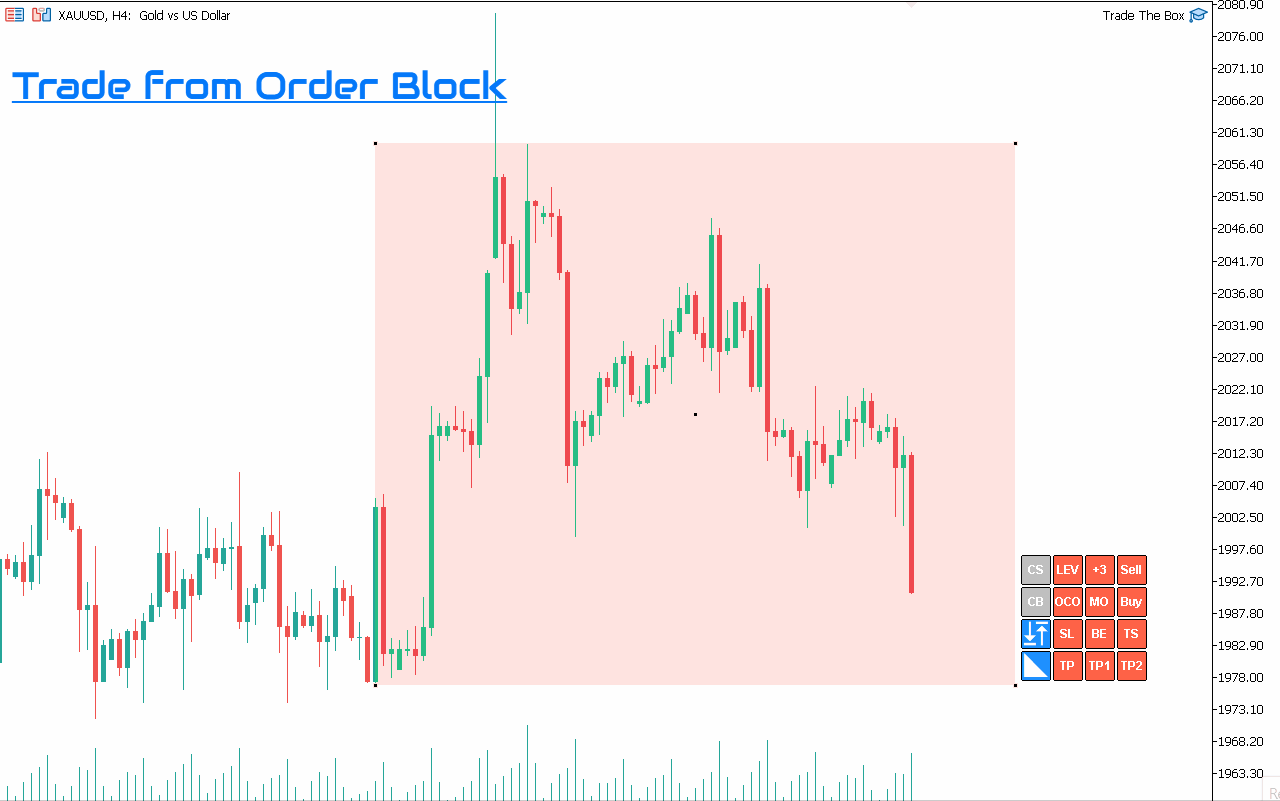
 Trade the BOX as a support and demand zone: this will allow you to set a sell limit on the low box or a buy limit on the high. Perfect to trade ICT concepts like order blocks and fair value gaps.
 -
 Close Buy button: This button is used to close at once all buy trades (Buy, Buy Limit, Buy Stop). It is active only when related trades are open.
 -
 Close Sell button: This button is used to close at once all sell trades (Sell, Sell Limit, Sell Stop). It is active only when related trades are open.
Settings Buttons are present on the right side of the panels. These buttons are more configuration buttons to turn on and off certain features. For example, their color will toggle between RED ![]() and GREEN
and GREEN ![]() if they are OFF or ON when the box is inactive and no trades in play. However, once the box is active, those buttons are no more clickable. Instead, their colors will change to Light RED
if they are OFF or ON when the box is inactive and no trades in play. However, once the box is active, those buttons are no more clickable. Instead, their colors will change to Light RED ![]() or Light GREEN
or Light GREEN ![]() to show the user the current trading plan. Only "Draw Levels" and "Open Close Other" buttons are exceptions to this last rule, as they can be activated or deactivated whatever the current box status is.
to show the user the current trading plan. Only "Draw Levels" and "Open Close Other" buttons are exceptions to this last rule, as they can be activated or deactivated whatever the current box status is.
-
 Take Profit button: turn ON/OFF TP
 -
 First Partial Take profit button: turn ON/OFF TP1
 -
 Second Partial Take Profit button: turn ON/OFF TP2
 -
 Stop Loss button: The SL level is needed when you are using "auto volume" In case auto volume size is chosen and SL is inactive, the minimum size allowed by your broker will be used
 -
 Break even button: turn ON/OFF BE
 -
 Trailing Stop button: turn ON/OFF TS
 -
 Open Close Opposite: When this button is active, once the trading servers execute a Buy order, all Sell pending orders will be closed and vice versa.
 -
 Market Order button: Sometimes, the spread is relatively high, primarily if you work on small timeframes compared to the candle size. For example, if this option is active, you will buy or sell at the market price if pending orders cannot be set due to the spread.
 -
 Buy button: allows you to activate/deactivate buy orders
 -
 Draw Levels button: will allow you to plot on the chart the different activity levels of your trading plan
 -
 Grid button: the text on this button will reflect the number of additional trades you will open in a grid schema. When activated, multiple orders will be opened per the grid configurations as soon as the box is activated.
 -
 Sell button: allow you to activate/deactivate sell orders
Trading ideas with Trade the BOX
Trade the BOX can be used in multiple ways to help you automate your trading plan. Below are a couple of examples. It is flexible, so I will let the rest of your imagination on how to use it and how it could benefit you.
- Trade range Breakout
- Trade inside the range
- Trade Order Blocks
- Trade Supply and Demand
- Trade Scalping breakouts
- Trade trending box
- You can even trade news
Limitations
While Trade the BOX is quite flexible and will help you automate your predefined trading plan, it has some limitations even related to technical aspects or simply because this utility is meant to do something other than do.
- A unique magic number per chart is needed
- Each instance of Trade the BOX can handle open trades on the current chart symbol and the current magic number
- TP1, TP2, TS, and BE levels are not meant to be graphically modified (drag and drop of levels) - Check T Manager if you are interested in such functions. SL and TP can still be modified as a default feature of the meta trader platform
- As of today, Trade the BOX does not manage the levels in money value
- Once a trade is in play, you can no more change your trade configuration and activate or deactivate
- High market spread and market slippage control are not part of this utility
- Trade the BOX uses Global Variables, which limit it only to manage a trade up to 40 days after it is open
- Deleting manually or via other EA any Global Variable created by Trade the BOX has a direct impact on how to manage the open trades


")

")