Introduction
The Kingfisher S expert advisor is an extremely powerful trading system with a lot of room for customization and fine-tuning. This guide should provide you with all the information necessary to understand and properly use the experts settings, in case you want to dive beyond the default setup.
The EA is available for both Metatrader 4 and Metatrader 5, the settings for both versions are identical.
Buy for MT4: https://www.mql5.com/en/market/product/73787
Buy for MT5: https://www.mql5.com/en/market/product/73788
Strategy
Kingfisher S uses a general trend direction (this can be determined automatically by the expert, by an external indicator, or manually by you) and an advanced interpretation of the stochastic oscillator to find trade entries. Opened trades are monitored by many flexible takeprofit and stoploss options and, if necessary, the risk is managed through a smart averaging algorithm.
In order to keep the risk from exploding uncontrollably, the expert applies an advanced deescalation system which seizes small changes in price direction to partially close positions and thus reduce their sizes.
Quick Tips
Enable Use Limits for closing in live operation but disable it in backtests. This option casts the predicted price targets of your takeprofit and stoploss settings into the actual takeprofit and stoploss levels of the currently opened orders, ensuring positions are closed, even if the system the expert is running on loses connection to the trade server, while also greatly increasing the speed with which positions are closed once the takeprofit or stoploss levels are reached. However, since the price prediction is based on the most recent tick value provided by your broker, it won't work correctly with historic data in backtests.
The recommended minimum deposit is $1000 for 0.01 lot with a takeprofit of $1. In order to increase the trading systems return, all three parameters should be increased equally. That means, if you want to double your investment with the default settings, you should have an account balance of at least $2000 and set the experts Initial Volume to 0.02 as well as the Takeprofit in Account Currency to $2 in the settings. For a lot size of 0.1 the currency takeprofit should be set so $10 with a minimum account balance of $10000 and so forth.
The recommended timeframe for the stochastic oscillator is M15. You can set this timeframe in the experts settings and then switch the chart to a different timeframe, the expert will still operate in M15 if set this way.
Panel
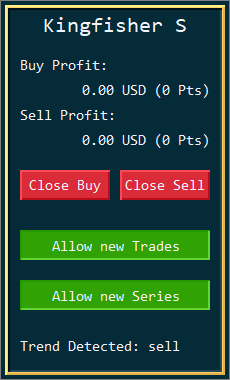
The experts panel gives you information about the currently opened positions and the option to immediately close those positions if you deem reasonable, otherwise they will be closed automatically once the set conditions are met.
If the button Allow new Trades is green, the expert will open new trades. Deactivate the button to set the expert into close-only mode, it will then open no new positions (not even for averaging) and only close already opened positions according to the settings.
The button Allow new Series behaves similarly, but, if turned off, still allows the expert to open averaging orders in case there is already an initial position open. However, no new order series will be opened after the current averaging basket has been closed. Note that if Allow new Trades is deactivated, Allow new Series will be overriden and no averaging orders will be placed.
The trend section of the panel changes its appearance based on the trend determination mode chosen in the settings. The three possible appearances will be described in the following.
If Trend Determination Mode is set to Auto, the panel will indicate the trend currently detected by the experts internal system.

If Trend Determination Mode is set to External, the panel will indicate the trend provided by the external indicator.

If Trend Determination Mode is set to Manual, the panel will present two buttons with which you can choose the trend direction yourself.
A green button indicates the trend is considered active, that means if you press the sell button and it turns green, the expert will look for sell entries.
Press the same button again to deactivate the trend. Both trend directions can be active at the same time, the expert will then trade in both directions.

Settings
- Inital Volume - the starting lot size for all base orders
- Maximum allowed Spread - if the spread is above this value, no new order will be placed (not even for averaging)
- Use Limits for Closing - cast closing levels into the orders takeprofit and stoploss parameters (highly recommended!)
- Trend Determination Mode - use the experts internal trend determination algorithm (Auto), use an external indicator to determine the trend (External), or set the trend yourself (Manual)
- External Trend Indicator Name - only relevant if previous setting is set to External; the name of the chart object which dictates the trend direction, can be found by right-clicking on chart, Objects List, List All; object must be on same chart as Kingfisher S and present its trend direction through a text containing the words "buy" or "sell"
Time Settings
- Start Time in Hours - server time in hours at which trading should start
- End Time in Hours - server time in hours after which no new orders should be placed (not even for averaging)
- Check Start Time at Weekdays - Weekdays at which the start time should be checked (1 = Monday, 2 = Tuesday, 3 = Wednesday, 4 = Saturday, 5 = Friday)
- Check End Time at Weekdays - Weekdays at which the end time should be checked (1 = Monday, 2 = Tuesday, 3 = Wednesday, 4 = Saturday, 5 = Friday)
- Close Trades outside of Trading Hours - close open positions if end time is reached
- Buffer Time in Hours for Closing - only relevant if previous settings is set to true; close profitable positions during the given hours before the end time is reached
Takeprofit Settings
- Use Point Takeprofit - enable point takeprofit
- Takeprofit in Points - target for point takeprofit if previous setting is enabled
- Use different Point Takeprofit outside of Trend - enable additional point takeprofit if trend changes
- Non-Trend Takeprofit in Points - target for point takeprofit if previous setting is enabled
- Use different Point Takeprofit for Averaging - enable additional point takeprofit if averaging orders are opened
- Averaging Takeprofit in Points - target for point takeprofit if previous setting is enabled
- Use Currency Takeprofit - enable money takeprofit
- Takeprofit in Account Currency - target for money takeprofit if previous setting is enabled
- Use different Currency Takeprofit outside of Trend - enable additional money takeprofit if trend changes
- Non-Trend Takeprofit in Account Currency - target for money takeprofit if previous setting if enabled
- Use different Currency Takeprofit for Averaging - enable additional takeprofit if averaging orders are opened
- Averaging Takeprofit in Account Currency - target for money takeprofit if previous setting is enabled
- Consider Commissions and Swaps for Currency Takeprofit - include commissions and swaps in profit calculations (only for money takeprofits)
Stoploss Settings
- Use Point Stoploss - enable point stoploss
- Stoploss in Points - target for point stoploss if previous setting is enabled
- Use different Point Stoploss outside of Trend - enable additional point stoploss if trend changes
- Non-Trend Stoploss in Points - target for point stoploss if previous setting is enabled
- Use different Point Stoploss for Averaging - enable additional point stoploss if averaging orders are opened
- Averaging Stoploss in Points - target for point stoploss if previous settings is enabled
- Use Currency Stoploss - enable money stoploss
- Stoploss in Account Currency - target for money stoploss if previous setting is enabled
- Use different Currency Stoploss outside of Trend - enable additional money stoploss if trend changes
- Non-Trend Stoploss in Account Currency - target for money stoploss if previous setting is enabled
- Use different Currency Stoploss for Averaging - enable additional money stoploss if averaging orders are opened
- Averaging Stoploss in Account Currency - target for money stoploss if previous setting is enabled
- Consider Commissions and Swaps for Currency Stoploss - include commissions and swaps in profit calculations (only for money stoplosses)
Risk Management Settings
- Use Averaging - open averaging orders if initial position is losing
- Ignore Trend for Averaging - open averaging orders even if the trend has changed
- Volume Increment Mode - select how the volume scaling should be interpreted (Linear = add value to volume with every order; Exponential = multiply volume with every order)
- Volume Increment Value - value with which the order size should be incremented with each additional order according to the mode selected
- Maximum Volume - highest lot size which should not be exceeded (larger averaging orders will be limited to this size)
- Minimum Distance between Orders - distance from the previous order after which a new order is allowed
- Distance Increment Mode - select how the distance scaling should be interpreted (Linear = add value to distance with every order; Exponential = multiply distance with every order)
- Distance Increment Value - value with which the minimum distance should be incremented with each additional order according to the mode selected
- Maximum Distance - distance after which the increment should not be applied anymore
- Maximum Number of Orders - limit for averaging orders (no further averaging orders will be opened if this number is reached)
- Use Deescalation - enable deescalation function to reduce sizes of losing positions
- Oder Number for Deescalation - number of orders at which deescalation should be applied
Stochastic Settings
- Timeframe - timeframe for the stochastic oscillator
- K Period - k-period for the stochastic oscillator
- D Period - d-period for the stochastic oscillator
- Slowing - slowing value for the stochastic oscillator
- MA Method - ma method for the stochastic oscillator
- Price - applied price for the stochastic oscillator
- Lower Threshold - lower threshold for the stochastic oscillator
- Upper Threshold - upper threshold for the stochastic oscillator
- Delay Trading Signal - wait for additional trigger before opening trades
- Timeframe for Delay - timeframe for the additional trigger
Miscellaneous Settings
- Panel Scale - panel scale factor
- Panel Offset in X Direction - panel horizontal position
- Panel Offset in Y Direction - panel vertical position
- Draw Orders in Chart - show orders in chart (only relevant for MT4, in MT5 you can set this by right-clicking on chart and toggling Trade History)
- Magic Number - identification number to associate trades with the expert advisor
- Order Comment - comment for orders
- Logging - write information about every operation into the terminals Experts tab
With this guide you should be well equipped to confidently work with the Kingfisher S expert advisor. In case you still have any unanswered questions or require further clarifications, please feel free to send me a message.
Good fortune and happy trading!


