ユーザー定義型

C ++のtypedefキーワードを使用すると、ユーザー定義のデータ型を作成できます。これを行うには、既存のデータ型に新しいデータ型名を指定するだけです。新しいデータ型は作成されません。代わりに既存の型の新しい名前が定義されます。アプリケーションの柔軟性はユーザー定義型によって向上します。typedef命令を置換マクロ(#define)に変えるだけで十分です。typedefを使用すると標準データ型にカスタム名を適用することができるため、コードの可読性もユーザー定義型によって向上します。ユーザー定義型を作成するためのエントリの一般的な形式は下記の通りです。

  typedef type new_name;

ここでtypeは任意のデータ型でnew_nameは型の新しい名前です。新しい名前は、既存の型の名前への追加(置換ではない)として設定されます。MQL5では typedefを使用して関数へのポインタを作成することも可能です。

関数へのポインタ

関数へのポインタは、通常、次の形式で定義されます。

  typedef function_result_type (*Function_name_type)(list_of_input_parameters_types);

ここではtypedefに続いて、関数シグニチャー(入力パラメーターの数と型、関数が返す結果の型)が設定されています。以下は、関数へのポインタの作成と適用の簡単な例です。

//--- 2つのintパラメーターを受け入れる関数へのポインタを宣言する
  typedef int (*TFunc)(int,int);
//--- TFuncは型で、関数に変数ポインタを宣言することは可能
  TFunc func_ptr; // pointer to the function
//--- TFuncの記述に対応する関数を宣言する
  int sub(int x,int y) { return(x-y); } // 1つの数を別の数から減算する
  int add(int x,int y) { return(x+y); } // 2つの数の和
  int neg(int x)       { return(~x);  } // 変数のビットを反転する
//--- func_ptr変数は後でそれを宣言するために関数のアドレスを格納することができる
  func_ptr=sub;
  Print(func_ptr(10,5));
  func_ptr=add;
  Print(func_ptr(10,5));
  func_ptr=neg;           // エラー:negの型はint (int,int) でない
  Print(func_ptr(10));   // エラー:2つのパラメータが必要

この例では、関数へのTFuncポインタで定義されているように、func_ptr変数はそれぞれint型の2つの入力を持っているsub関数とadd関数を受け取ることができます。これに比べてneg関数は異なるシグネチャーを持っているためfunc_ptrポインタには割り当てできません。

ユーザーインターフェイスでのイベントモデルの配置

関数へのポインタを使用すると、ユーザーインターフェイスの作成時にイベント処理を簡単に作成できます。CButtonセクションの例を使って、ボタンを作成してそれを押すための関数を追加する方法を示してみましょう。まず、ボタンを押して呼び出す TAction 関数へのポインタを定義し TActionの記述に従って3つの関数を作成します。

//--- カスタム関数型を作成する
typedef int(*TAction)(string,int);
//+------------------------------------------------------------------+
//| ファイルを開く                                                        |
//+------------------------------------------------------------------+
int Open(string name,int id)
 {
  PrintFormat("%s function called (name=%s id=%d)",__FUNCTION__,name,id);
  return(1);
 }
//+------------------------------------------------------------------+
//|  ファイルを保存する                                                    |
//+------------------------------------------------------------------+
int Save(string name,int id)
 {
  PrintFormat("%s function called (name=%s id=%d)",__FUNCTION__,name,id);
  return(2);
 }
//+------------------------------------------------------------------+
//|  ファイルを閉じる                                                      |
//+------------------------------------------------------------------+
int Close(string name,int id)
 {
  PrintFormat("%s function called (name=%s id=%d)",__FUNCTION__,name,id);
  return(3);
 }
 

その後CButtonからMyButtonクラスを作成し、関数へのTActionポインタを追加します。

//+------------------------------------------------------------------+
//| イベント処理関数を使用してボタンクラスを作成する                               |
//+------------------------------------------------------------------+
class MyButton: public CButton
 {
private:
  TAction           m_action;                   // チャートイベントハンドラ
public:
                    MyButton(void){}
                   ~MyButton(void){}
  //--- ボタンテキストとイベント処理関数へのポインタを指定するコンストラクタ
                    MyButton(string text, TAction act)
    {
     Text(text);
     m_action=act;
    }
  //--- OnEvent() イベントハンドラから呼び出されたカスタム関数を設定する
  void              SetAction(TAction act){m_action=act;}
  //--- 標準的なチャートイベントハンドラ
  virtual bool      OnEvent(const int id,const long &lparam,const double &dparam,const string &sparam) override
    {      
    if(m_action!=NULL && lparam==Id())
       {
        //--- カスタムm_action()ハンドラを呼び出す
        m_action(sparam,(int)lparam);
        return(true);
       }
    else
    //--- CButton親クラスからハンドラを呼び出した結果を返す
        return(CButton::OnEvent(id,lparam,dparam,sparam));
    }
 };

CAppDialogからCControlsDialog派生クラスを作成して、MyButton型のボタンを格納するためのm_buttons配列とAddButton(MyButton &button)及びCreateButtons() メソッドを追加します。

//+------------------------------------------------------------------+
//| CControlsDialogクラス                                              |
//| 目的:アプリケーションを管理するためのグラフィカルパネル                            |
//+------------------------------------------------------------------+
class CControlsDialog : public CAppDialog
 {
private:
  CArrayObj         m_buttons;                     // ボタン配列
public:
                    CControlsDialog(void){};
                   ~CControlsDialog(void){};
  //--- 作成する
  virtual bool      Create(const long chart,const string name,const int subwin,const int x1,const int y1,const int x2,const int y2) override;
  //--- ボタンを追加する
  bool              AddButton(MyButton &button){return(m_buttons.Add(GetPointer(button)));m_buttons.Sort();};
protected:
  //--- ボタンを作成する
  bool              CreateButtons(void);
 };
//+------------------------------------------------------------------+
//| チャートにCControlsDialogオブジェクトを作成する                             |
//+------------------------------------------------------------------+
bool CControlsDialog::Create(const long chart,const string name,const int subwin,const int x1,const int y1,const int x2,const int y2)
 {
  if(!CAppDialog::Create(chart,name,subwin,x1,y1,x2,y2))
    return(false);
  return(CreateButtons());
//---
 }
//+------------------------------------------------------------------+
//| define                                                           |
//+------------------------------------------------------------------+
//--- インデントとギャップ
#define INDENT_LEFT                         (11)     // 左からのインデント(境界幅の余裕を含む)
#define INDENT_TOP                          (11)     // 上からのインデント(境界幅の余裕を含む)
#define CONTROLS_GAP_X                      (5)       // ギャップのX座標
#define CONTROLS_GAP_Y                      (5)       // ギャップのY座標
//--- ボタン
#define BUTTON_WIDTH                        (100)     // サイズのX座標
#define BUTTON_HEIGHT                       (20)     // サイズのY座標
//--- 表示領域
#define EDIT_HEIGHT                         (20)     // サイズのY座標
//+------------------------------------------------------------------+
//| CControlsDialogパネルを作成してボタンを追加する                           |
//+------------------------------------------------------------------+
bool CControlsDialog::CreateButtons(void)
 {
//--- ボタン座標を計算する
  int x1=INDENT_LEFT;
  int y1=INDENT_TOP+(EDIT_HEIGHT+CONTROLS_GAP_Y);
  int x2;
  int y2=y1+BUTTON_HEIGHT;
//--- 関数ポインタとともにボタンオブジェクトを追加する
   AddButton(new MyButton("Open",Open));
   AddButton(new MyButton("Save",Save));
   AddButton(new MyButton("Close",Close));
//--- グラフィカルにボタンを作成する
  for(int i=0;i<m_buttons.Total();i++)
    {
     MyButton *b=(MyButton*)m_buttons.At(i);
     x1=INDENT_LEFT+i*(BUTTON_WIDTH+CONTROLS_GAP_X);
     x2=x1+BUTTON_WIDTH;
    if(!b.Create(m_chart_id,m_name+"bt"+b.Text(),m_subwin,x1,y1,x2,y2))
       {
        PrintFormat("Failed to create button %s %d",b.Text(),i);
        return(false);
       }
    //--- CControlsDialogコンテナにそれぞれのボタンを追加する
    if(!Add(b))
        return(false);
    }
//--- 成功
  return(true);
 }

これで、CControlsDialogコントロールパネルを使って、Open、Save、Closeの3つのボタンを持つプログラムを開発することができます。ボタンをクリックするとTActionポインタの形をもつ適切な関数が呼び出されます。

//--- オブジェクトをグローバルレベルで宣言してプログラムを起動するときに自動的に作成する
CControlsDialog MyDialog;
//+------------------------------------------------------------------+
//| エキスパート初期化に使用される関数                                        |
//+------------------------------------------------------------------+
int OnInit()
 {
//--- チャートにオブジェクトを作成する
  if(!MyDialog.Create(0,"Controls",0,40,40,380,344))
    return(INIT_FAILED);
//--- アプリケーションを起動する
  MyDialog.Run();
//--- アプリケーションがっ正常に初期化された
  return(INIT_SUCCEEDED);
 }
//+------------------------------------------------------------------+
//| エキスパート初期化解除に使用される関数                                    |
//+------------------------------------------------------------------+
void OnDeinit(const int reason)
 {
//--- ダイアログを破壊する
  MyDialog.Destroy(reason);
 }
//+------------------------------------------------------------------+
//| エキスパートチャートイベント関数                                            |
//+------------------------------------------------------------------+
void OnChartEvent(const int id,         // イベントID  
                const long& lparam,   // long型のイベントパラメータ
                const double& dparam, // double型のイベントパラメータ
                const string& sparam) // string型のイベントパラメータ
 {
//--- チャートイベントのハンドラを親クラス(ここではCAppDialog)から呼び出す
  MyDialog.ChartEvent(id,lparam,dparam,sparam);
 }

起動したアプリケーションの外観とボタンクリックの結果は、スクリーンショットで見られます。

panel_buttons


プログラムの完全なソースコードは下記の通りです。

//+------------------------------------------------------------------+
//|                                                Panel_Buttons.mq5 |
//|                        Copyright 2017, MetaQuotes Software Corp. |
//|                                             https://www.mql5.com |
//+------------------------------------------------------------------+
 
#property copyright "Copyright 2017, MetaQuotes Software Corp."
#property link     "https://www.mql5.com"
#property version   "1.00"
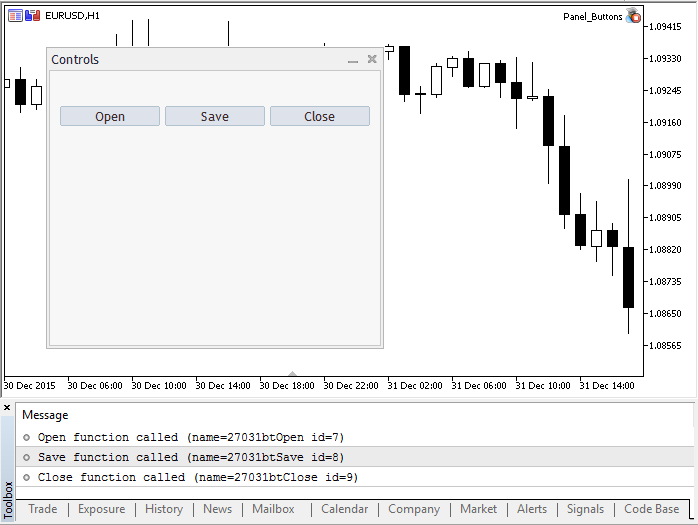
#property description "The panel with several CButton buttons"
#include <Controls\Dialog.mqh>
#include <Controls\Button.mqh>
//+------------------------------------------------------------------+
//| define                                                           |
//+------------------------------------------------------------------+
//--- インデントとギャップ
#define INDENT_LEFT                         (11)     // 左からのインデント(境界幅の余裕を含む)
#define INDENT_TOP                          (11)     // 上からのインデント(境界幅の余裕を含む)
#define CONTROLS_GAP_X                      (5)       // ギャップのX座標
#define CONTROLS_GAP_Y                      (5)       // ギャップのY座標
//--- ボタン
#define BUTTON_WIDTH                        (100)     // サイズのX座標
#define BUTTON_HEIGHT                       (20)     // サイズのY座標
//--- 表示領域
#define EDIT_HEIGHT                         (20)     // サイズのY座標
 
//--- カスタム関数型を作成する
typedef int(*TAction)(string,int);
//+------------------------------------------------------------------+
//| ファイルを開く                                                        |
//+------------------------------------------------------------------+
int Open(string name,int id)
 {
  PrintFormat("%s function called (name=%s id=%d)",__FUNCTION__,name,id);
  return(1);
 }
//+------------------------------------------------------------------+
//|  ファイルを保存する                                                    |
//+------------------------------------------------------------------+
int Save(string name,int id)
 {
  PrintFormat("%s function called (name=%s id=%d)",__FUNCTION__,name,id);
  return(2);
 }
//+------------------------------------------------------------------+
//|  ファイルを閉じる                                                      |
//+------------------------------------------------------------------+
int Close(string name,int id)
 {
  PrintFormat("%s function called (name=%s id=%d)",__FUNCTION__,name,id);
  return(3);
 }
//+------------------------------------------------------------------+
//| イベント処理関数を使用してボタンクラスを作成する                               |
//+------------------------------------------------------------------+
class MyButton: public CButton
 {
private:
  TAction           m_action;                   // チャートイベントハンドラ
public:
                    MyButton(void){}
                   ~MyButton(void){}
  //--- ボタンテキストとイベント処理関数へのポインタを指定するコンストラクタ
                    MyButton(string text,TAction act)
    {
     Text(text);
     m_action=act;
    }
  //--- OnEvent() イベントハンドラから呼び出されたカスタム関数を設定する
  void              SetAction(TAction act){m_action=act;}
  //--- 標準的なチャートイベントハンドラ
  virtual bool      OnEvent(const int id,const long &lparam,const double &dparam,const string &sparam) override
    {
    if(m_action!=NULL && lparam==Id())
       {
        //--- カスタムハンドラを呼び出す
        m_action(sparam,(int)lparam);
        return(true);
       }
    else
    //--- CButton親クラスからハンドラを呼び出した結果を返す
        return(CButton::OnEvent(id,lparam,dparam,sparam));
    }
 };
//+------------------------------------------------------------------+
//| CControlsDialogクラス                                              |
//| 目的:アプリケーションを管理するためのグラフィカルパネル                            |
//+------------------------------------------------------------------+
class CControlsDialog : public CAppDialog
 {
private:
  CArrayObj         m_buttons;                     // ボタン配列
public:
                    CControlsDialog(void){};
                   ~CControlsDialog(void){};
  //--- 作成する
  virtual bool      Create(const long chart,const string name,const int subwin,const int x1,const int y1,const int x2,const int y2) override;
  //--- ボタンを追加する
  bool              AddButton(MyButton &button){return(m_buttons.Add(GetPointer(button)));m_buttons.Sort();};
protected:
  //--- ボタンを作成する
  bool              CreateButtons(void);
 };
//+------------------------------------------------------------------+
//| チャートにCControlsDialogオブジェクトを作成する                             |
//+------------------------------------------------------------------+
bool CControlsDialog::Create(const long chart,const string name,const int subwin,const int x1,const int y1,const int x2,const int y2)
 {
  if(!CAppDialog::Create(chart,name,subwin,x1,y1,x2,y2))
    return(false);
  return(CreateButtons());
//---
 }
//+------------------------------------------------------------------+
//| CControlsDialogパネルを作成してボタンを追加する                           |
//+------------------------------------------------------------------+
bool CControlsDialog::CreateButtons(void)
 {
//--- ボタン座標を計算する
  int x1=INDENT_LEFT;
  int y1=INDENT_TOP+(EDIT_HEIGHT+CONTROLS_GAP_Y);
  int x2;
  int y2=y1+BUTTON_HEIGHT;
//--- 関数ポインタとともにボタンオブジェクトを追加する
  AddButton(new MyButton("Open",Open));
  AddButton(new MyButton("Save",Save));
  AddButton(new MyButton("Close",Close));
//--- グラフィカルにボタンを作成する
  for(int i=0;i<m_buttons.Total();i++)
    {
     MyButton *b=(MyButton*)m_buttons.At(i);
     x1=INDENT_LEFT+i*(BUTTON_WIDTH+CONTROLS_GAP_X);
     x2=x1+BUTTON_WIDTH;
    if(!b.Create(m_chart_id,m_name+"bt"+b.Text(),m_subwin,x1,y1,x2,y2))
       {
        PrintFormat("Failed to create button %s %d",b.Text(),i);
        return(false);
       }
    //--- CControlsDialogコンテナにそれぞれのボタンを追加する
    if(!Add(b))
        return(false);
    }
//--- 成功
  return(true);
 }
//--- オブジェクトをグローバルレベルで宣言してプログラムを起動するときに自動的に作成する
CControlsDialog MyDialog;
//+------------------------------------------------------------------+
//| エキスパート初期化に使用される関数                                        |
//+------------------------------------------------------------------+
int OnInit()
 {
//--- チャートにオブジェクトを作成する
  if(!MyDialog.Create(0,"Controls",0,40,40,380,344))
    return(INIT_FAILED);
//--- アプリケーションを起動する
  MyDialog.Run();
//--- アプリケーションがっ正常に初期化された
  return(INIT_SUCCEEDED);
 }
//+------------------------------------------------------------------+
//| エキスパート初期化解除に使用される関数                                    |
//+------------------------------------------------------------------+
void OnDeinit(const int reason)
 {
//--- ダイアログを破壊する
  MyDialog.Destroy(reason);
 }
//+------------------------------------------------------------------+
//| エキスパートチャートイベント関数                                           |
//+------------------------------------------------------------------+
void OnChartEvent(const int id,         // イベントID  
                const long& lparam,   // long型のイベントパラメータ
                const double& dparam, // double型のイベントパラメータ
                const string& sparam) // string型のイベントパラメータ
 {
//--- チャートイベントのハンドラを親クラス(ここではCAppDialog)から呼び出す
  MyDialog.ChartEvent(id,lparam,dparam,sparam);
 }


参照

変数関数