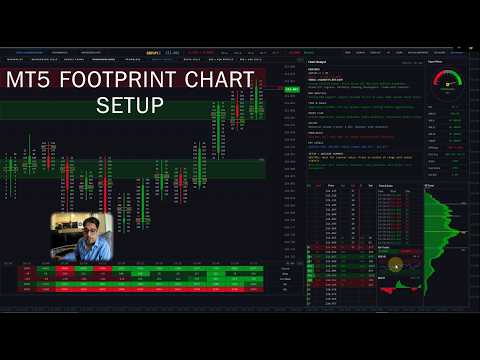
Order flow footprint chart
- Utilità
-
Abdul Jalil
 I am a multidisciplinary creator and market technician, combining the visual clarity of a graphics designer with the analytical depth of a trader and trading‑tools developer. My work lives at the intersection of design, technology, and financial markets.
 - Versione: 6.34
- Aggiornato: 27 febbraio 2026
- Attivazioni: 5
Version 6.34 | Professional tool for real traders | Institutional-Grade Visualization
DEMO USERS - PLEASE SELECT EVERY TICK / REAL TICK WHEN TESTING AND YOU HAVE DOWNLOADED HISTORICAL DATA. IF YOU SEE A WAITING SCREEN AND IT IS NOT DOWNLOADING, IT MEANS YOU HAVE LOW HISTORICAL DATA. TRY 1 MIN AND 5 MIN FIRST ON 1 DAY DATA. ONE DAY DATA SHOULD BE THE NEWEST AND MOST CURRENT DATE. PLEASE WAIT UNTIL THE MARKET HAS ROLLED OVER PERIOD.
IMPORTANT - Recommended Price Bucket in Points for Pairs:
| XAUUSD - 40 | BTCUSD - 1000 | UK100 - 30 | DE40 - 100 | CADJPY - 5 |
| GBPUSD - 5 | EURUSD - 5 | US30 - 100 | AUDCAD -5 | EURGBP -3 |
| GBPJPY - 10 | USDCAD - 5 | NAS100 - 100 | AUDJPY - 5 | EURJPY - 10 |
| USDJPY - 10 | USDCHF - 5 | SP500 - 30 | AUDUSD - 6 | GBPCAD - 5 |
My Futures OrderFlow Footprint Chart: https://www.mql5.com/en/market/product/174307
Overview
Footprint Chart Pro is a comprehensive, institutional-grade order flow visualization Expert Advisor for MetaTrader 5. Built entirely on a high-performance rendering engine, it delivers real-time bid/ask footprint data, market depth analysis, time & sales tracking, volume profiling, and intelligent market analysis — all within a single, fully configurable multi-panel interface.
Feature Summary
-
9 switchable footprint styles — Minimalist, Background Cells, Candle Frame, Volume Profile Candle, Frameless, Middle Candle, Delta Cells, Bid x Ask Profile, Bid x Ask Cells.
-
6-level cell intensity colouring — 3 buyer tiers + 3 seller tiers with configurable percentage thresholds.
-
3-tier diagonal imbalance detection with per-tier colours and text size boost.
-
Live DOM panel — broker order book feed, bid/ask depth, executed volume, flash alerts, bar totals.
-
Session Volume Profile — 3 modes, 4 display types (Total / Delta / Buy / Sell), POC + VAH + VAL.
-
Time & Sales tape — live tick stream with direction, volume, and large-order highlighting.
-
Embedded RSI and MACD indicators within the panel stack.
-
Signal Meter gauge — MA alignment, ATR regime, POC acceptance, and volume bias combined.
-
Chart Analyst panel — 9-category commentary with a 6-factor scored trade setup summary.
-
Automated Supply & Demand zones — swing detection, volume filter, ATR-scaled width.
-
Economic Fundamentals panel — upcoming news events with auto-refresh.
-
Mini Session Chart — compact overview for a defined session window.
-
Interactive button bar — Supply & Demand Zones, Fundamentals Panel, Mini Chart, Zoom In/Out, Up/Down, Reset, VP, Delta Bars, Side Panels.
-
Fully collapsible interface — style strip, summary table, and side panels each collapse independently.
-
Runtime toggles for per-bar Volume Profile overlay and Delta Bar strip.
-
16 built-in colour themes, dark/light palette, per-style imbalance colour sets, full per-element control.
-
Tick volume inference engine
-
Coloured Candle countdown timer
-
Dual font system — proportional for labels, monospace for all numerical data.
1. Nine Switchable Footprint Display Styles
The EA provides nine distinct visualisation modes, switchable on the fly via header buttons, each designed for a different analytical preference:
-
Minimalist — Clean text-only Bid x Ask display with no cell backgrounds, ideal for clutter-free reading.
-
Background Cells — Colour-filled cells where intensity is graded across six levels of volume dominance (three buyer tiers and three seller tiers), giving an immediate visual heat map across the bar. High, Medium, and Low thresholds are configurable as percentage values, and each of the six intensity colours is individually adjustable.
-
Candle Frame — Traditional hollow OHLC candle outline overlaid with internal bid/ask data, combining price action and order flow in one view.
-
Volume Profile Candle — Integrates a per-bar volume histogram directly inside the candle body, showing volume distribution by price level. The histogram applies the same six-level intensity colour system (three buyer tiers: High, Medium, Low; three seller tiers: High, Medium, Low) so dominant levels are instantly distinguishable. A neutral colour is applied to balanced levels, and all seven colours are independently configurable or can inherit the global theme.
-
Frameless — Thin candle on the left side with floating bid/ask data with no cell borders, providing a clean open layout.
-
Middle Candle — A compact centre-bar representation with POC outline highlighting, useful on smaller timeframes.
-
Delta Cells — Displays net delta (buy volume minus sell volume) per price level as a single value, cutting through noise to show net aggression.
-
Bid x Ask Profile — A horizontal profile bar chart overlaid on each bar representing cumulative bid and ask volume per level.
-
Bid x Ask Cells — Full cell-based presentation with separate bid and ask columns, mirroring professional footprint chart conventions
2. High-Performance Rendering Engine
The entire interface is drawn using MetaTrader 5's internal rendering engine API rather than chart objects, delivering significant performance advantages:
-
All panels (main footprint, DOM, Volume Profile, Time & Sales, Signal Meter, Analyst) are rendered as layers, minimising redraws.
-
Intelligent panel caching avoids unnecessary re-renders when data has not changed.
-
Configurable refresh rate in milliseconds (default 100 ms) allows traders to balance real-time responsiveness with CPU overhead.
3. Three-Tier Diagonal Imbalance Detection
The imbalance engine identifies diagonal bid/ask imbalances across adjacent price levels
-
Three independent ratio thresholds (Level 1, Level 2, Level 3) allow traders to distinguish between moderate, strong, and extreme imbalances.
-
Each imbalance tier renders with a distinct colour and optional text size boost (configurable per-level), making imbalance stacks immediately visible.
-
A minimum volume filter prevents false signals from illiquid price levels with negligible activity.
-
Imbalance colours are independently configurable per footprint style (all 9 styles have individual colour sets), meaning each display mode can carry its own visual language.
-
Once a historical bar's imbalances are computed they are locked, preventing recalculation overhead on bars that are no longer live.
-
The Chart Analyst panel uses imbalance count ratios across the 10 most recent bars to infer institutional directional activity.
4. Live Depth of Market (DOM) Panel
A dedicated DOM panel renders the live order book alongside executed volume data:
-
Supports real broker MarketBook depth feed (OnBookEvent) for live Level II data where available from the broker.
-
Displays pending Bid and Ask orders at each price level together with executed Buy and Sold volume, giving a complete picture of both passive and aggressive activity.
-
Net Delta column and total Volume column shown per level.
-
Current price row highlighted in a distinct colour for instant price location awareness.
-
Flash animation on levels where significant volume hits, providing visual alerts of large order absorption.
-
Configurable number of visible levels (default 12) and panel dimensions.
-
Optional grid lines for easier level-to-level reading.
5. Session Volume Profile (SVP) Panel
A right-side session volume profile provides a statistical view of volume distribution over a configurable time window:
-
Three operating modes: fixed bar count, session start time, or daily reset at 00:00 — covering intraday, session, and daily profile use cases.
-
Four display types: Total Volume, Delta (Buy minus Sell), Buy Volume Only, or Sell Volume Only, switchable via the input settings.
-
Point of Control (POC), Value Area High (VAH), and Value Area Low (VAL) lines drawn across the profile with configurable colours.
-
Bar width scale factor allows the profile histogram width to be expanded or compressed independently of the panel size.
-
Session POC line is also projected across the main footprint chart as a horizontal reference, automatically tracking as new data arrives.
-
Volume intensity colours inherit the global theme or can be overridden independently.
6. Time & Sales (T&S) Panel
A streaming tape panel captures and displays every inferred trade tick in real time:
-
Scrolling list of timestamped trades showing price, volume, and direction (Buy / Sell / Neutral), colour-coded for instant classification.
-
Configurable big-order threshold: trades above the threshold are highlighted with a distinct background to flag large participants.
-
Maximum trade history and visible row count are both configurable, allowing the list to be tuned to screen real estate.
-
Bar totals shown at the bottom of the T&S panel: cumulative Buy volume and Sell volume for the current bar alongside a Buy/Sell ratio.
-
The Chart Analyst panel reads the most recent 50 T&S trades and computes a buy/sell percentage split to generate a qualitative tape sentiment reading.
7. Embedded RSI and MACD Indicators
Two classic momentum indicators are built directly into the panel stack beneath the Time & Sales list:
-
RSI(14) rendered as a line chart with configurable overbought (default 70) and oversold (default 30) reference levels, period length, and line colour.
-
MACD with configurable fast EMA, slow EMA, and signal period displayed as a histogram with zero line for quick divergence spotting.
-
Both indicators share the same panel height settings and update every render cycle, staying in sync with live price action.
8. Signal Meter Panel (Gauge Dial)
A visual sentiment gauge provides an at-a-glance directional reading derived from multiple internal signals:
-
Analogue dial with a sweeping pointer indicating a spectrum from Strong Sell through Neutral to Strong Buy.
-
Signal calculation incorporates three moving averages (MA9, MA21, MA50 by default), ATR regime detection (trend vs. chop), POC acceptance logic, and volume bias.
-
ATR ratio thresholds allow the meter to distinguish between trending and ranging market regimes and modulate signal strength accordingly.
-
POC acceptance parameters (minimum bar count and tick distance) prevent premature signal generation before price has confirmed a level.
-
All colours — bullish, bearish, neutral, pointer, background — are independently configurable.
9. Chart Analyst Panel — Multi-Factor Intelligence Engine
The Chart Analyst is a standalone analysis panel that synthesises data from all active sub-systems into structured, human-readable market commentary:
Sections displayed:
-
Pair Info — Symbol, timeframe, daily price change (points and percentage).
-
Trend + Higher TF | ATR — MA alignment assessment across MA9/21/50 with H4 and D1 higher-timeframe confirmation. ATR(14) value shown in the section header.
-
DOM Analysis — Bid/Ask ratio from the live order book, differentiating between heavy stacking, moderate pressure, and balanced conditions, with near-level focus (within 5 levels of current price).
-
Time & Sales — Buy/sell volume percentage split from the most recent 50 tape trades, classified into five sentiment bands from aggressive buying to aggressive selling.
-
Order Flow — Bar delta and cumulative delta direction used to characterise buying or selling aggression with three intensity bands.
-
Volume — Ask/Bid volume ratio for the current bar, scaled across five categories from heavy buyer dominance to heavy seller dominance.
-
Imbalances — Count of buyer vs. seller imbalances across the 10 most recent visible bars, inferring likely institutional directional activity.
-
Key Levels — Session POC price and daily high/low range.
-
Setup + Advisor Summary — Price position within the daily range combined with trend and flow alignment to generate a directional trade bias recommendation. Final summary scores six independent factors (trend, HTF, order flow, volume, DOM, tape) and outputs a consensus bias label with a score out of six.
The analyst refreshes at a user-defined interval (default 30 seconds) to balance computational load. All commentary text is colour-coded bullish/bearish/neutral for immediate visual classification.
10. Automated Supply & Demand Zones
An integrated swing-based Supply and Demand zone detection engine renders institutional price zones directly on the footprint chart:
-
Zones are identified using swing-high/swing-low detection with configurable swing length and lookback period.
-
Volume ratio filter ensures only swings formed with above-average volume qualify as significant zones.
-
ATR-based zone width scaling adapts zone height to current market volatility rather than using a fixed pip value.
-
Separate colours for Supply (bearish) and Demand (bullish) zones, both defaulting to the active theme colour when set to clrNONE.
-
Zone opacity, maximum number of rendered zones, and volume lookback period are all configurable.
-
Zones render as semi-transparent rectangles on the canvas, updating as price action produces new qualifying swings.
11. Fundamentals Panel
An economic calendar panel displays upcoming fundamental news events relevant to the traded symbol:
-
Configurable panel dimensions and maximum displayed rows.
-
Shows event time, title, affected currency, country code, and importance level.
-
Auto-refreshes at a configurable interval (default 60 seconds).
-
Helps traders contextualise order flow activity against scheduled economic releases.
12. Mini Session Chart
A compact candlestick overview chart provides a higher-level perspective on intraday price action:
-
Renders M1 OHLC data between a configurable session start and end time in local time (HH:MM format).
-
Data is cached for performance, only refreshing when a new tick arrives within the active session window.
-
Panel dimensions are freely resizable.
-
Gives traders a session-level price structure view alongside the tick-by-tick footprint data.
13. Ticker / Info Bar
A header bar at the top of the main panel provides persistent market context:
-
Displays symbol name, current timeframe, and live bid price with up/down change.
-
Daily percentage change shown with bullish/bearish colour coding.
-
Current timeframe trend label (HTF-BULL / HTF-BEAR) derived from the higher-timeframe analysis.
-
MS label (MS-BULL / MS-BEAR) reflecting shorter-timeframe momentum state.
-
Navigation buttons for Zoom In, Zoom Out, scroll Up/Down, Bar Volume Profile toggle, Delta Bars toggle, and Side Panels toggle.
14. Summary Table
A scrollable data table below the main footprint bars displays per-bar statistics:
-
Volume, Delta, Cumulative Delta, and Ask volume rows — one column per visible bar.
-
Positive values rendered with a green background, negative values with a red background for instant sign identification.
-
Cumulative delta is computed and cached across up to 600 bars for historical accuracy.
-
Row height and colour scheme are configurable.
-
Candle countdown timer showing seconds and minutes remaining in the current bar, updating in real time using local clock with color changes with countdown.
15. Per-Bar Volume Profile Overlay
An optional histogram can be rendered inside each footprint bar showing the volume distribution across price levels:
-
Toggle on/off independently of the Session Volume Profile.
-
Configurable histogram width.
-
Separate colours for bid-side and ask-side volume, plus a distinct POC level colour.
-
Uses the same intensity theme as the main cells or a custom override colour set.
16. Delta Bar
A compact bar graphic rendered below each footprint candle provides a quick visual delta summary:
-
Bar fill direction and colour indicate net buying (positive) or net selling (negative) delta for the bar.
-
Configurable height, gap from the candle bottom, and separate positive/negative colours.
-
Delta text label displayed inside the bar, inheriting the global theme colours or using custom overrides.
17. Tick Volume Inference Engine
For brokers that do not provide native real volume, a sophisticated inference system estimates actualised trade volume from tick flow:
-
Each incoming tick is weighted by a scale factor and an additional multiplier for every price-step move in that tick, approximating the size of the market order that caused the movement.
-
Configurable minimum and maximum inferred volume per tick prevent outlier distortion.
-
Toggle switch to enable or disable inference, falling back to raw tick counts when disabled.
18. Extensive Colour Theming System
Every visual element of the EA carries independently configurable colours, with a high-level theme system for rapid global style changes:
-
Six-level cell intensity colour system for the Background Cells and Volume Profile Candle styles: three buyer tiers (Buyer High, Buyer Medium, Buyer Low) and three seller tiers (Seller High, Seller Medium, Seller Low). Each of the six colours is independently configurable. High and Medium intensity thresholds are set as percentage values (default 70% and 40%) — any level with dominance above the High threshold renders in the strongest colour, between High and Medium in the mid tone, and below Medium in the subtle shade, creating a natural visual gradient that immediately reveals where the most aggressive activity occurred within each bar.
-
16 built-in bull/bear colour themes: Classic Green/Red, Blue/Orange, Cyan/Magenta, Lime/Pink, Gold/Purple, Teal/Coral, Sky/Crimson, Mint/Rose, Orange/Dark Grey, Green/Dark Grey, Navy/Slate, Navy/Gold, White/Dark Grey, Emerald/White, Cherry/Teal, and Olive/Sandy.
-
Dark and Light panel palette modes affect all panel backgrounds simultaneously.
-
A global background colour synchronises all panels to a single base tone, with a one-click reset to defaults.
-
Theme Override All mode forces the selected bull/bear theme colours onto imbalance highlights as well, creating a fully unified visual style.
-
Individual imbalance colour sets for each of the 9 footprint styles, allowing each display mode to carry a unique colour language.
-
Full per-element colour control: candle bodies, fills, wicks, POC highlights, neutral cells, DOM rows, T&S rows, delta bars, signal meter components, and all analyst text states.
19. Flexible Layout and Panel Management
The entire interface is position-aware and freely resizable to accommodate different monitor sizes and chart layouts:
-
Main panel X/Y position and Width/Height configurable via inputs.
-
Each side panel (DOM, SVP, T&S, Signal Meter, Analyst, Fundamentals, Mini Session) has independent width and height settings.
-
Bar width and bar spacing are independently adjustable, allowing the footprint grid density to be tuned to the timeframe and screen resolution.
-
Cell gap and cell padding controls fine-tune spacing within each footprint cell.
-
Candle frame line width (1–4 px) and bid/ask separator width are configurable.
-
Side panels can be hidden as a group via the ticker bar toggle, maximising main chart space when detailed sub-panels are not needed.
20. Font Configuration
Two independent font families are used throughout the interface for typographic clarity:
-
Primary font (default: Segoe UI) used for labels, headers, and analyst commentary.
-
Monospace font (default: Consolas) used for all numerical data — prices, volumes, deltas — ensuring consistent digit-width alignment across all panels.
-
Base, small, and large font sizes configurable independently.
-
Per-level imbalance text size boost: three independent boost values allow imbalance labels to grow with signal severity, making strong imbalances stand out at a glance.
21. Interactive Header Controls & Button Bar
The ticker bar doubles as a full interactive control strip. All buttons are rendered as part of the canvas and respond to mouse clicks without requiring any external chart objects:
Left-Side Feature Toggle Buttons
-
Supply & Demand Zones — Toggles the automated Supply and Demand zone overlay on and off in a single click. The button label reflects the current active state, providing a clear on/off indicator at all times.
-
Fundamentals — Opens and closes the Economic Calendar panel. The panel slides in as an overlay when activated; clicking the button again dismisses it, keeping the main footprint chart unobstructed when macro data is not needed.
-
Mini Session Chart — Toggles the compact intraday candlestick overview panel. The session chart renders a full M1 OHLC view for the defined session window and disappears cleanly when toggled off.
Right-Side Navigation & View Buttons
-
RESET — Instantly restores the footprint chart to its default zoom level and vertical position, snapping the view back to a centred, calibrated baseline in a single click.
-
ZOOM IN — Increases the vertical cell height scale by 20% per click, expanding each price bucket row so individual bid/ask numbers become easier to read on faster timeframes or tighter price ranges.
-
ZOOM OUT — Decreases the vertical cell height scale by 20% per click, compressing the chart to display a wider price range simultaneously — useful for getting a broader context view on slower timeframes.
-
UP — Scrolls the entire footprint chart upward by a fixed pixel step , allowing traders to navigate to higher price levels without losing the current bar's data.
-
DOWN — Scrolls the footprint chart downward by the same step, bringing lower price levels into view. Both UP and DOWN support extended scrolling with a range of ±50,000 px.
-
BAR VOLUME PROFILE — Toggles the per-bar volume histogram overlay on and off at runtime, independently of the input settings. Allows traders to switch between clean cell view and profile view without reloading the EA.
-
DELTA BARS — Toggles the delta bar strip (rendered below each candle) on and off at runtime. Useful when the additional row height is needed for more price levels.
-
SIDE PANELS — Master toggle that shows or hides all right-side panels simultaneously (DOM, Session Volume Profile, Time & Sales, Signal Meter, Chart Analyst). Collapsing all side panels with a single click maximises the horizontal footprint chart area, ideal for focused trade execution or screen recording.
Hover State Feedback
Every button in the header bar responds to mouse hover with a colour highlight transition, giving clear visual confirmation of the active target before clicking. Hover states update continuously as the cursor moves across the panel.
22. Collapsible Panels — Full Minimalist Mode
Every major section of the interface can be collapsed independently, allowing traders to build a minimal, distraction-free layout without removing any functionality. Collapsed panels retain their state and re-expand instantly:
Style Strip (Footprint Style Selector Row)
-
The horizontal row of nine footprint style buttons sits in its own collapsible strip directly below the ticker bar.
-
A small +/− toggle button at the right edge of the strip collapses or expands the entire style row.
-
When collapsed, the strip reduces to a minimal tab height, reclaiming vertical chart space while still being accessible via a single click to re-expand.
Summary Table Strip (Timestamps + Volume/Delta Table)
-
The bottom strip containing bar timestamps, per-bar Volume, Delta, Cumulative Delta, and Ask rows is independently collapsible.
-
A +/− toggle at the right of the timestamp strip collapses the data table rows while keeping the timestamp bar visible as a minimal footer.
-
When collapsed, only the timestamp row remains, preserving time reference without the full statistical rows occupying vertical space.
Side Panels — Individual and Group Collapse
-
All five right-side analysis panels (DOM, Session Volume Profile, Time & Sales, Signal Meter, Chart Analyst) are controlled as a group by the SIDE PANELS button in the header bar.
-
A single click hides the entire side panel column, expanding the footprint chart to fill the full panel width — ideal for a clean chart view or during live trading when panel monitoring is not needed.
-
Clicking SIDE PANELS again instantly restores all panels to their previous positions and dimensions.
Minimalist Workflow
By collapsing the Style Strip, the Summary Table, and the Side Panels simultaneously, the entire interface reduces to a clean footprint chart with only the ticker bar visible — matching a professional minimalist layout while all data and controls remain one click away.
Compatibility & Requirements
-
Platform: MetaTrader 5 (MQL5). Not compatible with MT4.
-
Works on all symbols and all timeframes.
-
Real volume data enhances accuracy; tick volume inference is available for brokers without native volume.
-
Broker DOM feed required for live order book data
-
No external DLLs required.
-
Screen Resolution 1920x1080
-
Good laptop or PC
Best Practices
- Use on liquid instruments (Forex majors, indices, gold)
- Lower timeframes (M1-M15) show best order flow detail
- Combine footprint imbalances with DOM for confirmation
- Watch for POC tests as support/resistance
- Use Chart Analyst summary for quick bias assessment
- Monitor Time & Sales for institutional big orders.
Updates & Support
- Regular updates with new features
- Responsive customer support
- Detailed documentation included
- Video tutorials available
Start Trading Like a Professional
Stop guessing where the market will go. See the actual order flow and trade with confidence alongside institutional traders.
Questions? Contact us before purchasing - we're here to help!


Great Tool and A++ service