 MetaTrader 5
 Experts
 Indicators
 Scripts
 Libraries
 Storage
Join our fan page

Smart Money Concept Expert Advisor - Market Strucutre, FVG, Pullback - expert for MetaTrader 5

I build trading software for MetaTrader 4 and MetaTrader 5: Expert Advisors, custom indicators and graphical trade panels. Describe your idea and I will turn it into working, documented code.
WHAT I BUILD
- Views:
- 109
- Rating:
- Published:
-
 You are missing trading opportunities:
- Free trading apps
- Over 8,000 signals for copying
- Economic news for exploring financial markets
Registration Log inYou agree to website policy and terms of use
If you do not have an account, please register -
 Need a robot or indicator based on this code? Order it on Freelance
Go to Freelance
Need a robot or indicator based on this code? Order it on Freelance
Go to Freelance
This Expert Advisor trades fair value gaps in the direction of market structure, the way Smart Money Concepts describes it. It is the third step of a series that has been built one piece at a time: In previous shared codes, the SMC Pullback Indicator decided which highs and lows matter, the SMC Market Structure indicator turned those swings into a trend with BoS, CHoCH, IDM and liquidity sweeps, and this EA trades the result.
The structure engine is not reimplemented here. Both classes are included from SmcMarketStructure.mqh, the same code the indicator draws from, so what the EA acts on and what you see on the chart cannot disagree.
Read this before anything else: this EA is not a profitable system, and it is not presented as one.
Its purpose is to show how market structure and fair value gaps can be wired into a working Expert Advisor — how a BoS arms a setup, how an IDM confirms a leg, how gaps are found and filtered, how a structural stop turns into a position size. It is a teaching skeleton and a starting point, not a finished strategy.
A robust, genuinely profitable SMC strategy needs far more than what is here: multi-timeframe context so the lower timeframe is read in the direction of the higher one, pattern detection beyond a single gap type, proper risk and money management across trades rather than one fixed percent, order blocks and order flow, and entry rules considerably more selective than a first touch. Each of those is a project in itself.
What this code gives you is a clean, readable base with the structure engine already solved, so you can bolt your own proven ideas on top instead of starting from an empty file. Treat every default as a placeholder and test everything yourself.
The setup
Four things have to line up before a long trade. The short side is the exact mirror and is never described separately below.
| # | Condition | Why it is there |
|---|---|---|
| 1 | The trend is up and the last structural break was a BoS | Only continuation is traded. After a CHoCH the EA stands down completely until the first BoS of the new trend arrives. |
| 2 | That BoS marks the gaps | The scan runs once, from the structure low rightward to the breaking bar. Those gaps, and only those, are tradable. |
| 3 | The structure high is confirmed — price has taken the IDM | Until the inducement is taken the leg has no known high, so there is nothing to measure a retracement against. |
| 4 | Price trades back into a gap, deep enough into the leg | That touch is the entry. The depth filter throws away the shallow ones. |
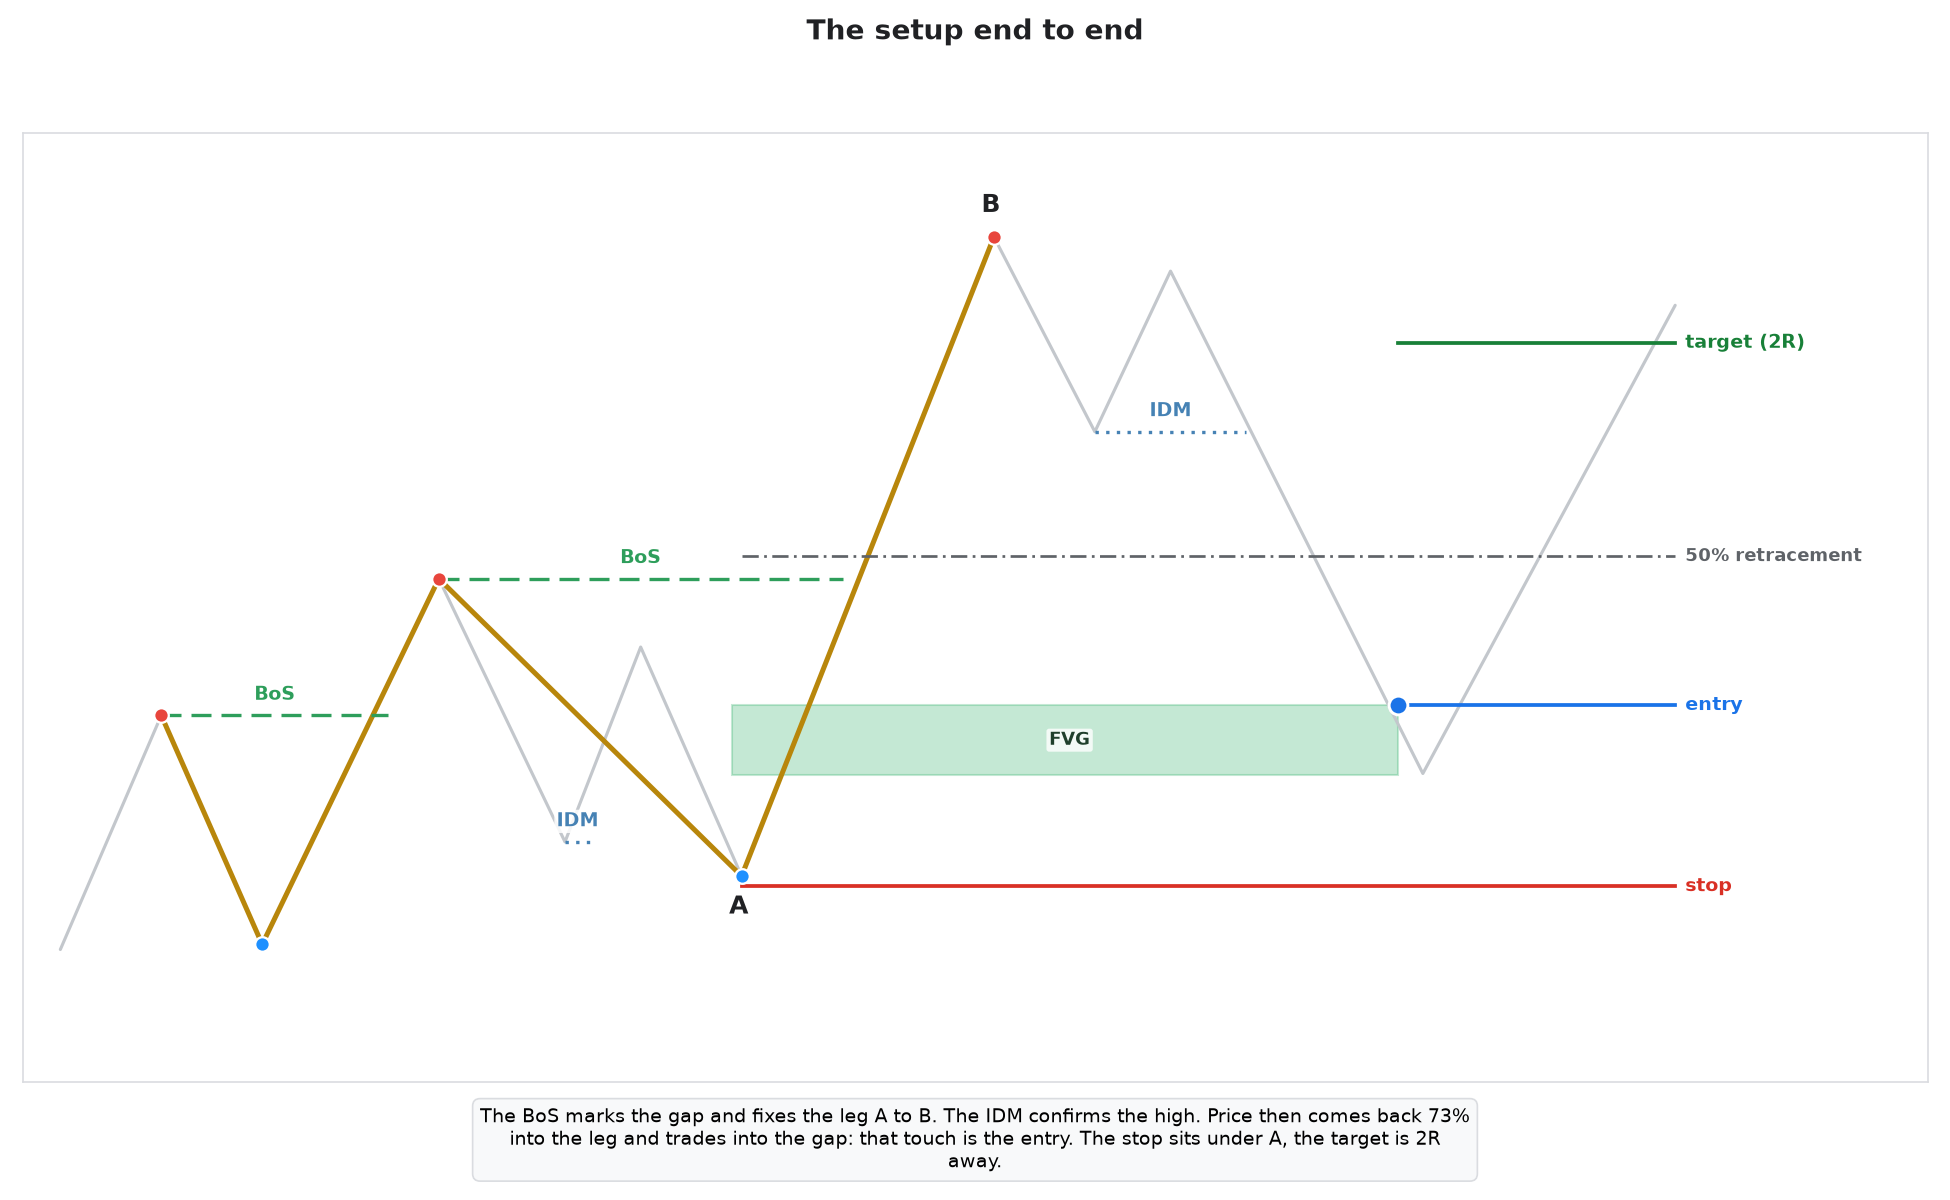
Everything in that figure is produced by the EA logic itself, not drawn by hand. The pale line is the pullback swings, the gold line is the structure, and A and B are the two points every later calculation refers to: A is the structure low the leg started from and B is the high the IDM confirmed.

What counts as a fair value gap
A gap is a three-candle pattern. The middle candle travels far enough that the third candle never trades back to the first, leaving a band of price that was skipped:
Bullish gap: the low of candle 3 is above the high of candle 1. Bearish gap: the high of candle 3 is below the low of candle 1. The band between those two levels is the gap.
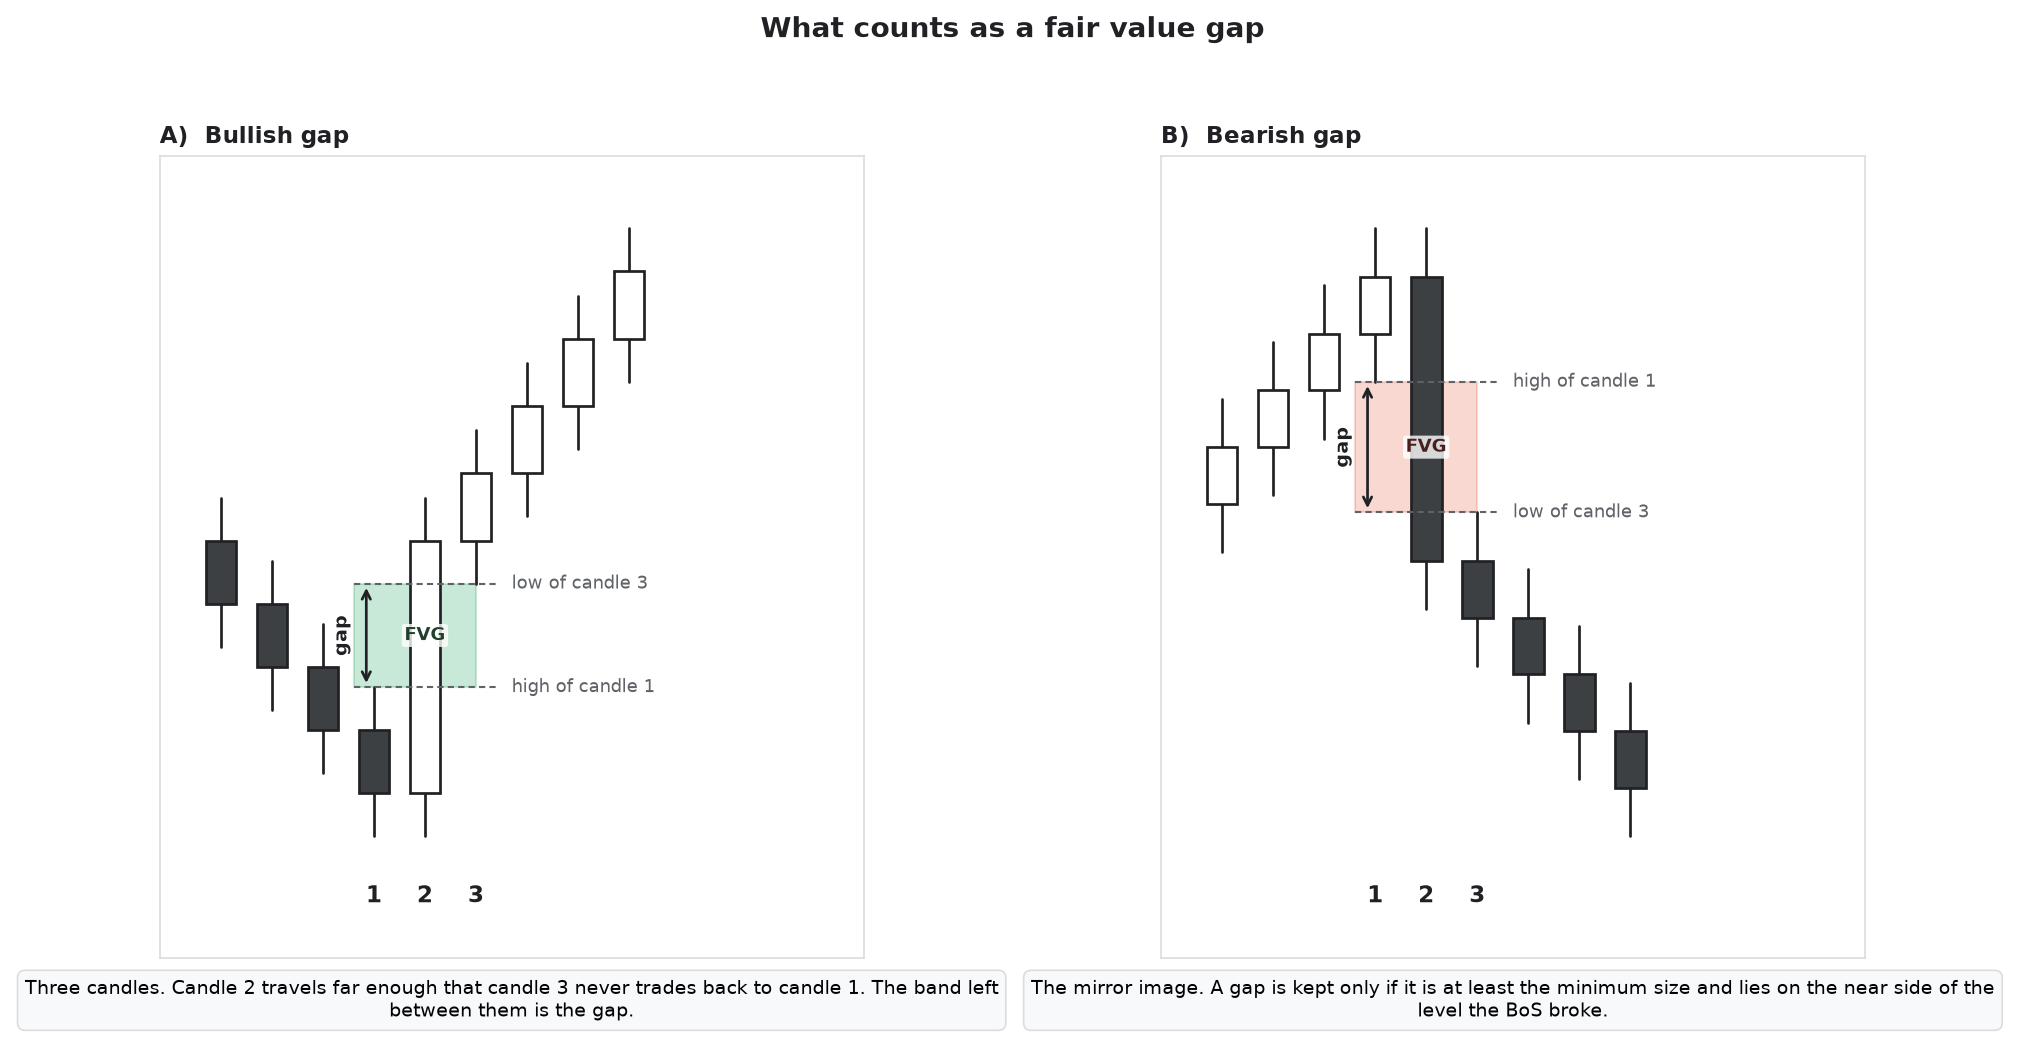
Finding gaps is easy; the useful part is deciding which ones matter. Three filters apply, and a gap has to pass all of them:
- Position. It must sit between the structure low and the bar that broke the level. Gaps older than the leg belong to a move that is already finished.
- Side. It must lie entirely below the level the BoS broke. A gap above that level is not a discount, it is chasing.
- Size. It must be at least the minimum width you set, in points or pips. This is the only noise filter in the strategy, and on a low timeframe it is the one that matters.
Each surviving gap is drawn as a box labelled FVG, and the box extends to the right with every new candle until price touches it. Once touched it stops growing, which leaves a visible record of how long the gap stood untested.
How deep price has to come back
A gap right under the high is a weak place to buy. Price has barely corrected, the move has not been tested, and the stop has to sit a long way off. The depth filter exists to refuse exactly that.
The leg is A to B. Depth is measured from B back towards A, so 0% is the confirmed high and 100% is the structure low itself. Set the minimum to 50% and price must return at least to the midpoint of the leg before any gap in it may be traded.
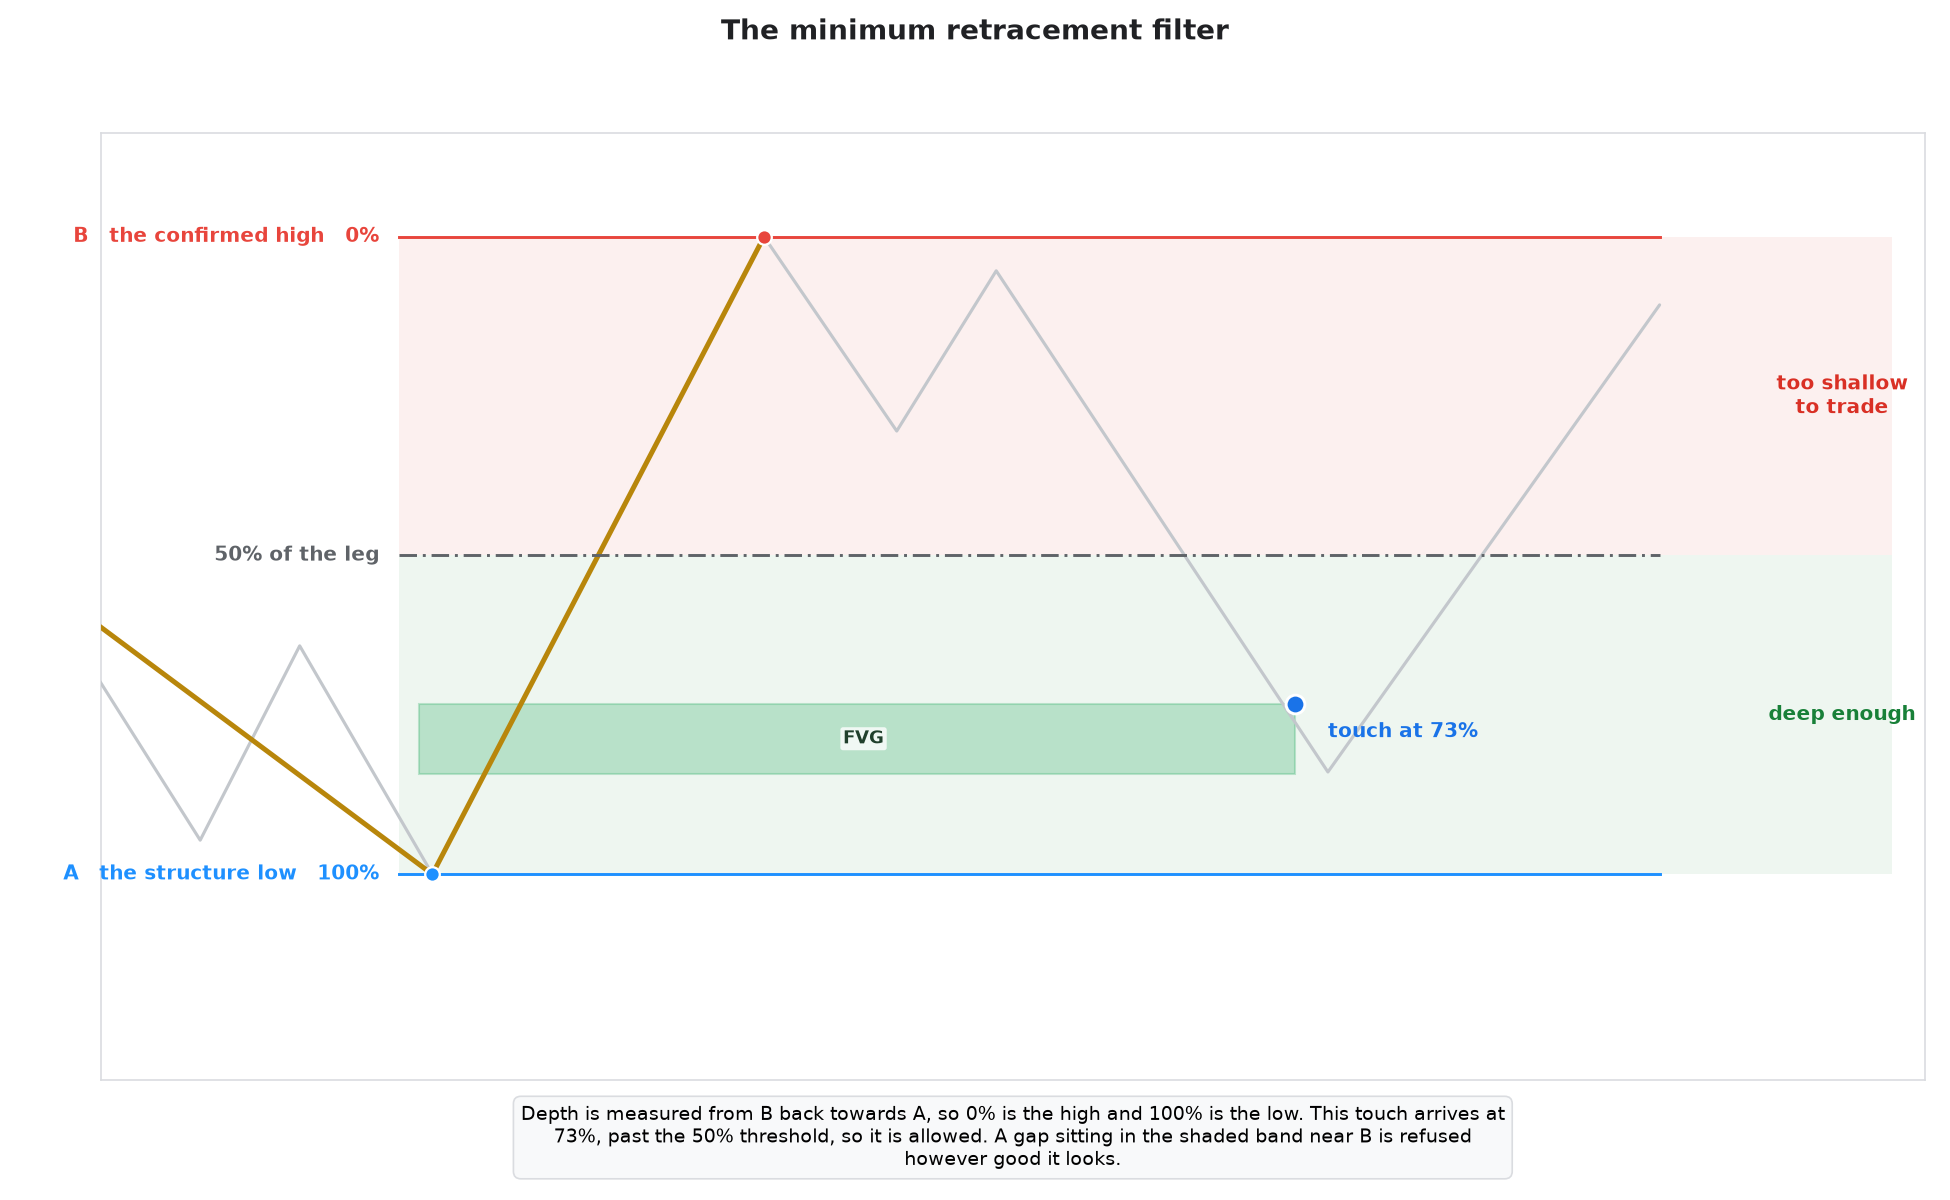
In the figure the touch arrives at 73% of the leg, past the 50% threshold, so it is allowed. Had the gap sat in the shaded band near B it would have been refused no matter how clean it looked. Setting the input to 0 turns the filter off.
Touching a gap and using a gap are not the same thing. A gap entered at its upper edge may still be too shallow, and price can come deeper into the same gap a few candles later. So a touched gap stops extending but stays live, and is reconsidered on every tick until it either trades or is traded straight through.
Entry, stop and target
The touch is the entry, at market. The rest follows from the structure rather than from a fixed distance:
| Level | Where it comes from |
|---|---|
| Entry | The moment price trades into the gap, long at the ask. |
| Stop | The structure low A, less a buffer you set in points or pips. If the low breaks, the reason for the trade is gone. |
| Target | A fixed multiple of the risk. With R set to 2, the target is twice the entry-to-stop distance. |
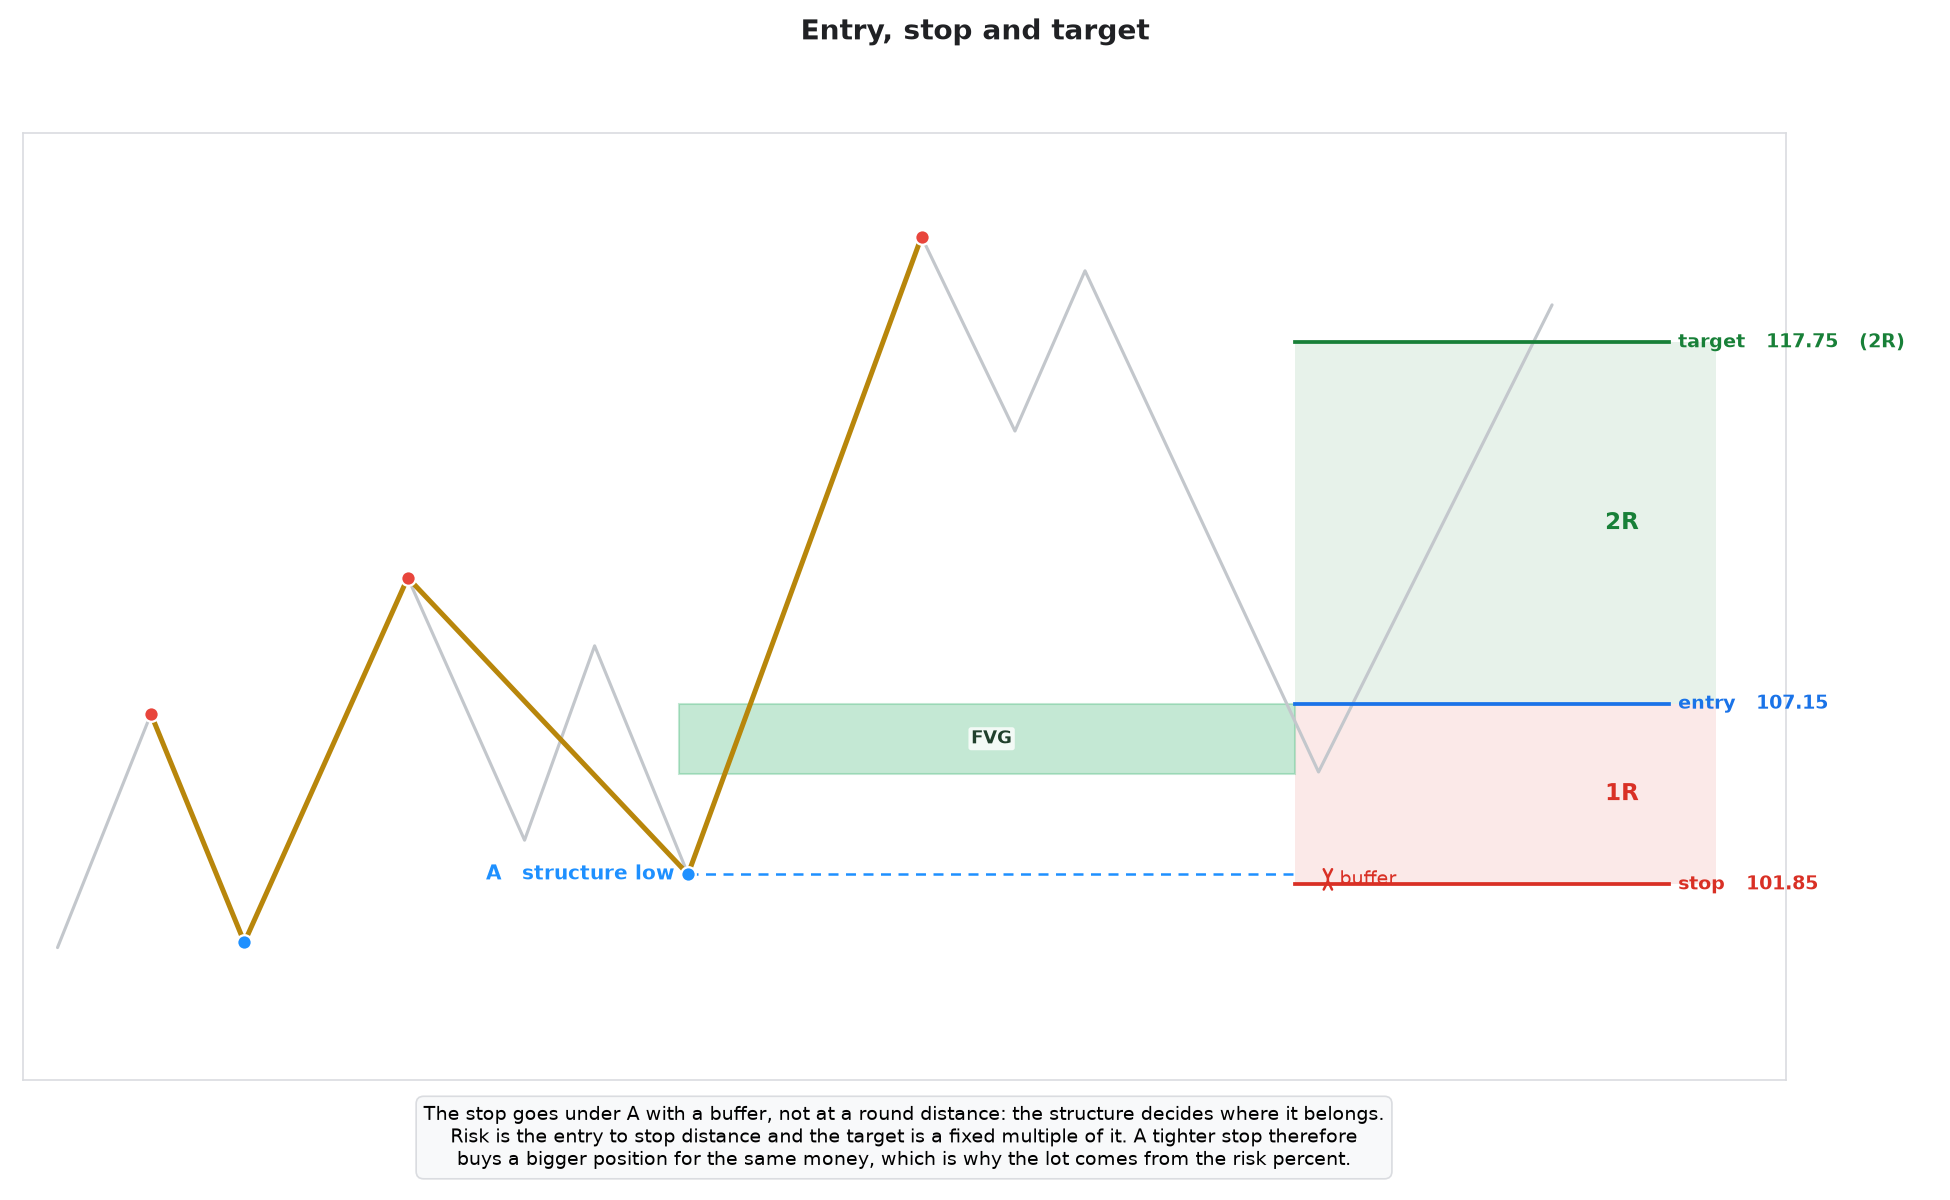
Because the stop is structural, its distance varies from trade to trade — and that is the point. The position size is worked out from the percent of balance you are willing to lose, so a tight stop buys a larger position and a wide one a smaller position, and every trade risks the same money. A fixed lot is available but it is not the default, because it would make a tight stop and a wide stop mean completely different things.
Two guards sit in front of every order: the EA refuses the trade if the stop would land on the wrong side of price, and if the distance is inside the broker's stop level. If the smallest tradable volume would risk more than your percentage allows, it says so in the log rather than quietly risking more.
Managing the position
Once a trade is open, two optional rules can move its stop. Both live in a separate class, CPositionManager, which knows nothing about market structure or gaps — only a symbol and a magic number — so it can be reused in any EA.
They share one rule that is not optional:
A stop only ever moves forward. Break even and trailing each propose a level, the better of the two wins, and the result is thrown away unless it improves on the stop already in place. A stop that can retreat is not a stop.
| Rule | Setting | What it does |
|---|---|---|
| Break even | Trigger | How far the trade must be in profit before the stop is moved to entry. |
| Offset | How far beyond entry the stop lands. An offset above zero locks a little profit instead of leaving a true scratch, and covers the spread and commission. | |
| Trailing | Trigger | How far in profit the trade must be before trailing begins at all. |
| Step | The smallest improvement worth a modify. Without it the stop would be rewritten on nearly every tick for a fraction of a point. | |
| Distance | How far behind price the stop is held once trailing is running. |
Both triggers and distances are read in the same unit as the rest of the EA — points or pips, whichever you selected. The two rules work together: break even typically fires first and parks the stop at entry, then trailing takes over as the move extends. A level the broker would reject for being too close to price is skipped rather than retried.
Standing down after a CHoCH
A CHoCH is the structure admitting the trend has turned. The EA does not treat it as a signal to trade the other way immediately — it clears every gap it was watching and does nothing at all until the first BoS in the new direction confirms the reversal has follow-through. This is the single biggest difference between it and a naive FVG bot, and it is what keeps it out of a range that is chopping back and forth.
A new BoS in the same direction has a similar effect on a smaller scale: the previous gaps are discarded and the scan runs again. Only the current leg is ever traded.
Inputs
Structure engine
These four match the indicator exactly. If you run both, keep them the same or the chart and the EA will be looking at different structures.
| Input | Default | What it does |
|---|---|---|
| Start by looking for | Swing high | Which side the first pullback leg searches for. Only affects the oldest bars. |
| Pullback break confirmed by | Wick | The sensitivity control for everything downstream. Close gives fewer, larger swings and therefore fewer, larger legs. |
| IDM taken when reference is | Wick | Whether the inducement has to be touched or closed through. |
| Bars of history to build on | 3000 | The structure is rebuilt from scratch every bar over this window, so bar indices can never drift as history loads. |
Fair value gaps
| Input | Default | What it does |
|---|---|---|
| Distance inputs are in | Points | Applies to the gap size and the stop buffer. Pips is ten points on a 3 or 5 digit symbol. |
| Minimum gap size | 50 | Gaps narrower than this are ignored. Raise it on a noisy symbol; 0 accepts every gap. |
| Only trade once the IDM is taken | true | Turning it off trades gaps as soon as the BoS marks them, without waiting for the leg to be confirmed. More trades, weaker ones. |
Trading
| Input | Default | What it does |
|---|---|---|
| Take profit, in R | 2.0 | Target as a multiple of the entry-to-stop distance. |
| Stop buffer beyond the structure | 20 | How far under A the stop hides, in your chosen unit. |
| Minimum retracement into the leg | 50% | The depth filter described above. 0 turns it off. |
| Max open positions | 1 | 1 means one trade at a time. Raise it and several gaps in the same leg can each take a trade — a gap never trades twice. |
| Position size from | Risk percent | Percent of balance risked on the stop, or a fixed lot. |
| Risk per trade | 1.0% | Of balance, measured against the actual stop distance. |
Break even and trailing
| Input | Default | What it does |
|---|---|---|
| Move the stop to break even | true | Turns the break even rule on. |
| Profit that arms it | 100 | Profit needed before the stop jumps to entry. |
| Offset beyond entry | 10 | Where the stop lands relative to entry. Keep it above your spread and commission. |
| Trail the stop | true | Turns trailing on. |
| Profit before trailing starts | 150 | Set it above the break even trigger so the two hand over cleanly. |
| Smallest move worth making | 20 | Minimum improvement before the stop is modified. |
| Distance held behind price | 100 | Too tight and the trail will take you out of a healthy pullback. |
The display group controls the gap boxes and the structure drawing. Turn the structure off for long optimisation runs — it redraws several hundred objects a bar, which is fine visually and wasteful otherwise.
What to know before running it
- Closed bars only. The structure is evaluated on closed candles; the forming candle is never used. Entries are checked on every tick, because a gap can be touched mid-candle.
- The structure repaints, by design. A pending extreme moves until its IDM is taken, and a liquidity sweep relocates a point backwards. Trades are only taken from confirmed legs, so this does not move a stop after the fact — but the picture before confirmation is provisional and is meant to be.
- It is a continuation strategy. It will sit out reversals entirely, and in a long range it will stand down after the first CHoCH and stay down.
- Trade management is deliberately plain. One entry, one target, and an optional break even and trailing stop. There are no partial closes, no scaling in, no grid and no recovery logic, because the point is to see whether the structure plus gap premise does anything on its own rather than to bury it under management.
- Test it before you believe it. There are no tuned parameters here and no presented backtest. The defaults are reasonable starting points, not recommendations.
Testing
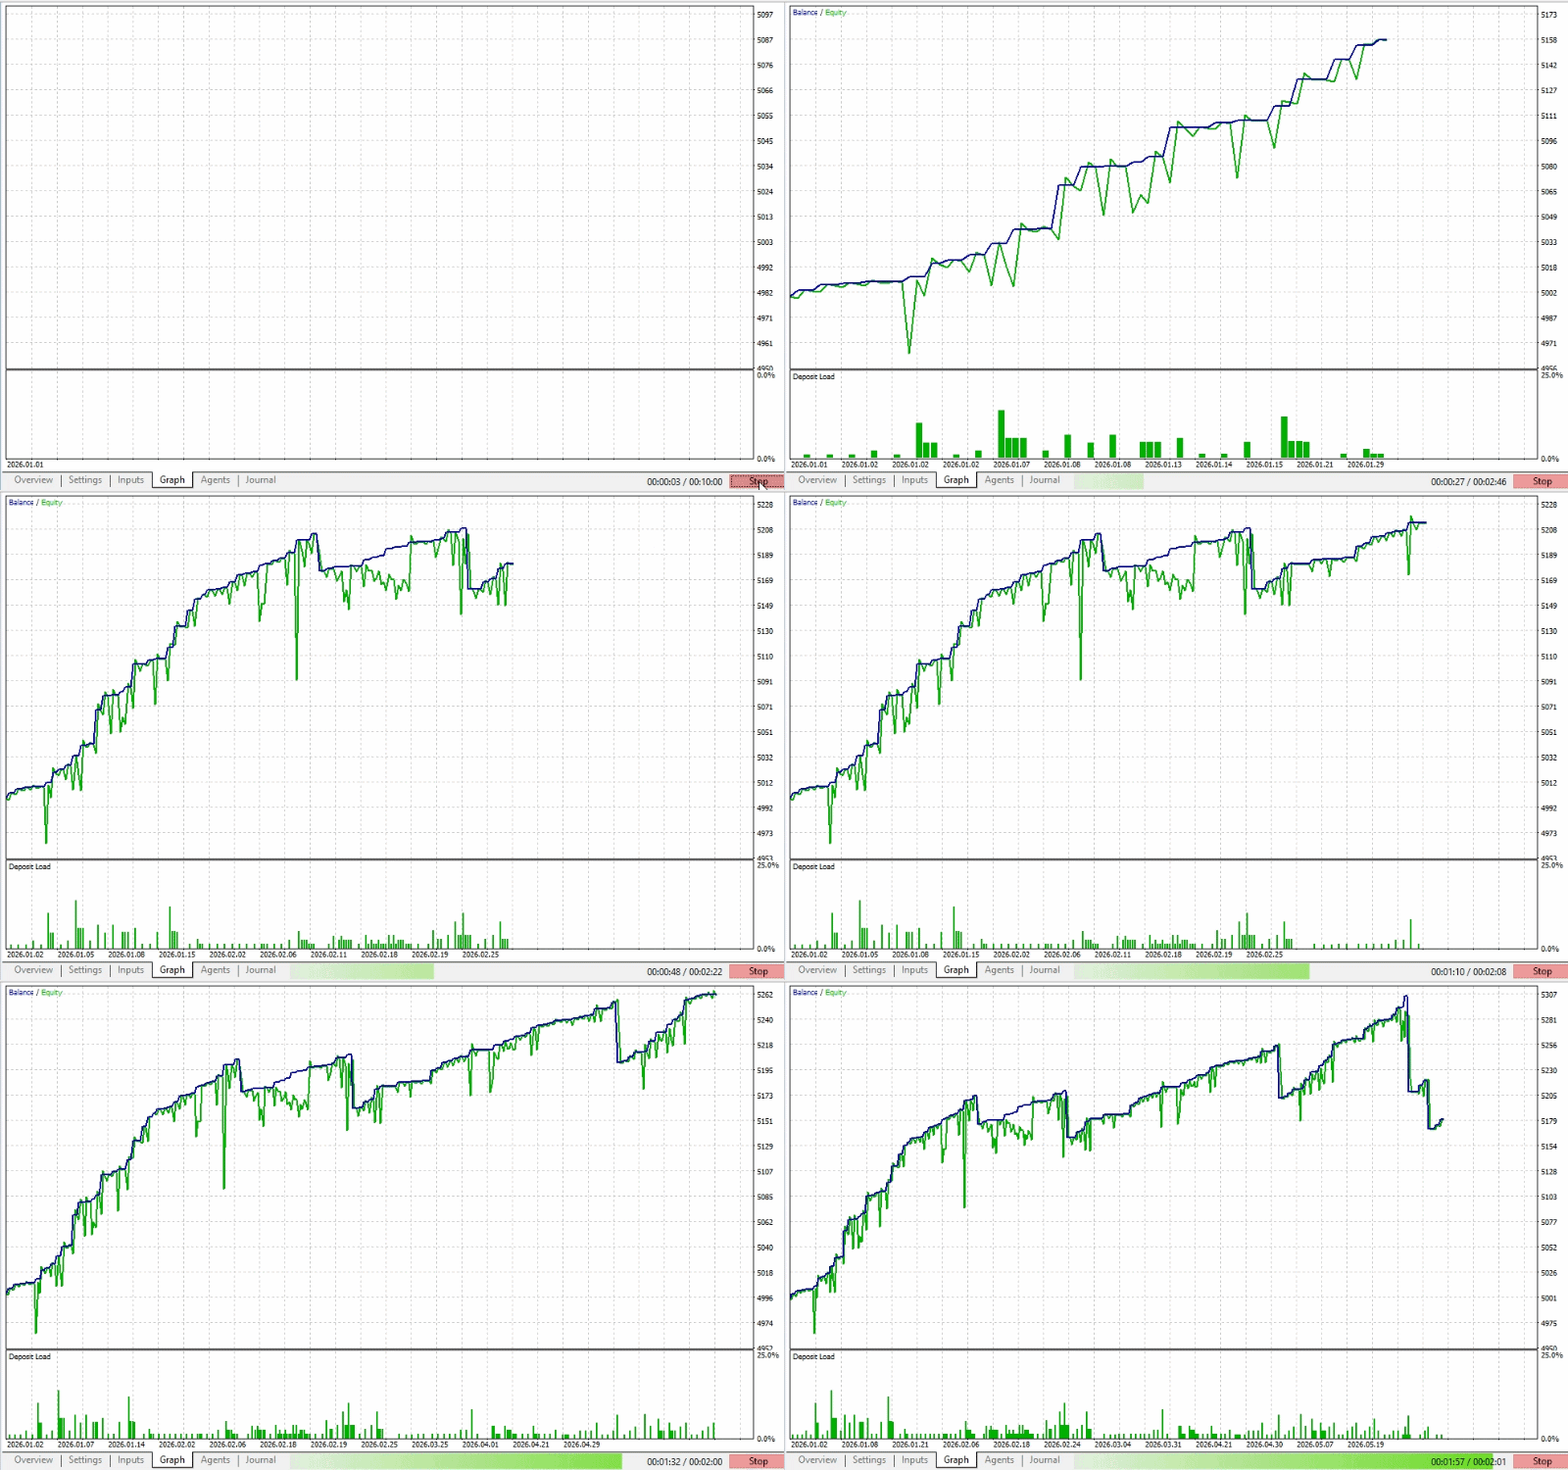
below represent a backtest results of EA in the Tester Mode on XAUUSD-M15
Files
| File | Contents |
|---|---|
| SMC_StructureFVG_EA.mq5 | The EA: the gap scan, the filters, the trade and the drawing. |
| PositionManager.mqh | Break even and trailing. Depends on nothing in this EA beyond a symbol and a magic number. |
| SmcMarketStructure.mqh | The two structure engines, unchanged from the indicator. Neither class touches a buffer or a chart object, so they drop into any EA that wants a trend, a structure chain and an event list. |
Put all three in the same folder and compile the .mq5; the includes are relative, so there is nothing to install anywhere else.
 Trend Finder Scanner
A quick market scan to identify sustainable trends. The script analyses all symbols from the ‘Market Overview’ in a matter of seconds and identifies instruments with the clearest and strongest price movements using R² linear regression and the ADX indicator.
 AIS Average Rank Speed
The indicator shows the average rank-based price velocity
Equity Guard - daily loss, max drawdown and profit target lock
Closes all trades and keeps the account flat when the daily loss limit, the maximum drawdown or a daily profit target is reached. Prop-firm style rules, an on-chart panel, and a state that survives terminal restarts.
Telegram Trade Notifier - opens, closes, pending orders and daily summary
Sends every opened and closed position, pending orders and a daily account summary to your Telegram chat. It never trades on your account.