Diamond Scalper MT5 — User Manual
Author: Lo Thi Mai Loan | MQL5 seller page | Support: https://t.me/diamondforextrading
Product Link: https://www.mql5.com/en/market/product/190894
Official product notice: Diamond Scalper is sold only through the official MQL5 Market listing. Any copy offered on a third-party website, "cracked" file-sharing site, or unsolicited message is not genuine and may contain malware or a tampered strategy. Only trust set files and updates sent directly by the author after a verified MQL5 purchase.
1. What is Diamond Scalper?
Diamond Scalper is an Expert Advisor (EA) for MetaTrader 5, built specifically for Gold (XAUUSD). It runs two independent trading modules inside one EA:
- Strategy 1 - a trend-following module.
- Strategy 2 - a breakout module.
You can run either one on its own, or both together - they are switched on/off independently and never interfere with each other. The exact entry logic of each strategy is kept private (that is the product itself), but every risk control around it - stop loss, take profit, trailing, spread filter, news filter, account protection - is fully documented below and fully in your hands.
Diamond Scalper does not use martingale (increasing lot size to chase losses), does not use a grid (stacking pending orders at fixed intervals), and does not hold opposing buy/sell positions as a hedge. Every position is sized once, gets its own stop loss, and is then managed by a shared trailing-stop engine until it closes.
2. Requirements
| Platform | MetaTrader 5 (MT5) - not MT4 |
| Symbol | XAUUSD (Gold) only - the EA is not designed for other instruments |
| Chart timeframe | M1 recommended. Internally, each strategy runs its own fixed timeframe regardless of the chart you attach it to, so a different chart timeframe will not break anything - M1 is simply the standard, tested setup. |
| Account type | Any account that allows Expert Advisors / algo trading |
| Starting balance | No fixed minimum - pick a money-management setting that matches your balance (see section 5) |
3. Broker Selection & Backtesting - Read This Carefully
Diamond Scalper scalps Gold, so spread quality and the accuracy of your broker's historical price data directly affect both live results and how trustworthy your own backtests are. Choosing the right broker matters as much as choosing the right settings.
Recommended broker - VantageFX (Top 1): the published Live Signal for this EA runs on VantageFX, and backtests on VantageFX have also produced the best results among every broker tested. If you are unsure which broker to pick, start here.
Other brokers are also supported. Diamond Scalper is not locked to any single broker - IC Markets, Tickmill, and other brokers known for low, stable XAUUSD spreads all work. Because results can still vary broker to broker (spread, execution, and historical tick data quality all differ), you are strongly encouraged to backtest on your own broker before trading live and confirm the results meet your expectations, rather than assuming every broker will behave identically to VantageFX.
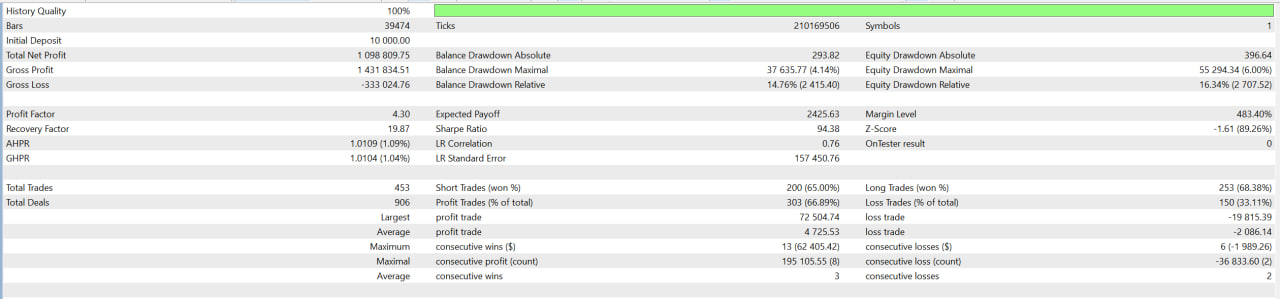
How to check your broker's backtest quality: in the MetaTrader 5 Strategy Tester, run a backtest using "Every tick based on real ticks" and check the Modelling quality percentage in the results report. A broker with high-quality historical tick data (close to 100%, based on real ticks going back through 2025) gives you a backtest you can actually trust; a broker with poor tick history will give you a backtest that does not reliably represent how the EA would have performed live. Some brokers publish 100% real-tick history from 2025 onward - these are the most reliable to backtest on.
VantageFX
Tickmill
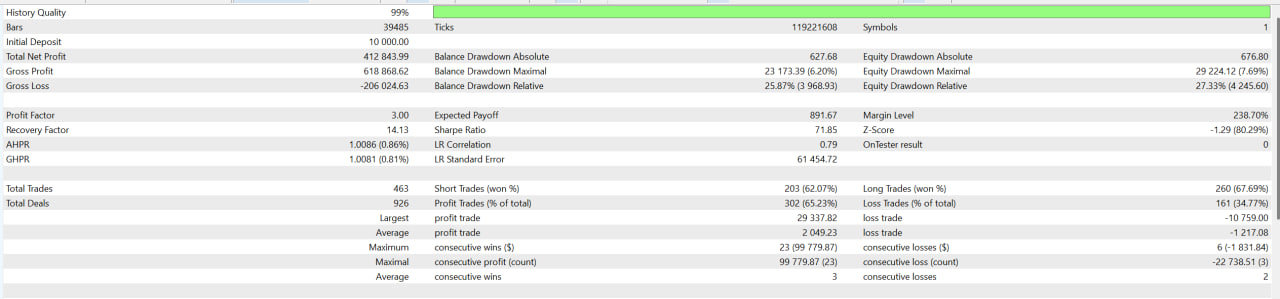
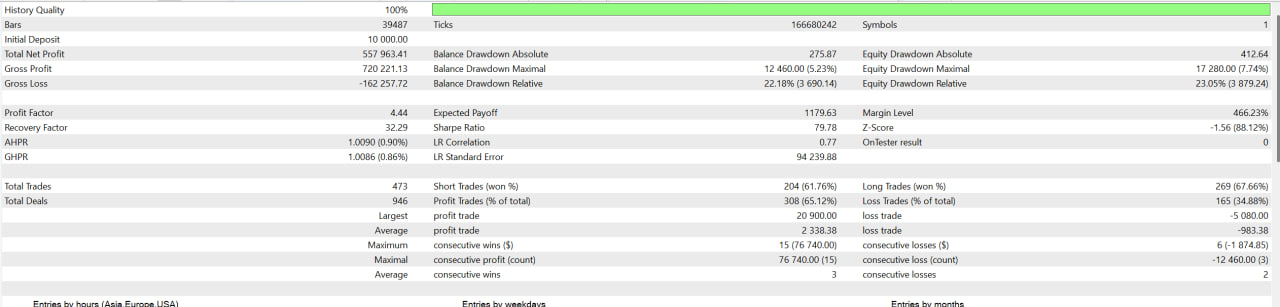
Bottom line: broker choice is not a minor detail for this EA. Backtest carefully, check the Modelling quality of your own broker's data, and choose a broker you trust with both tight Gold spreads and solid historical tick data - VantageFX first, or any other broker you have personally verified with a high-quality backtest.
4. Installation (step by step)
- Open MetaTrader 5 and make sure Algo Trading is enabled (top toolbar button, should be on).
- Open an XAUUSD chart. M1 is the standard/recommended timeframe.
- Drag Diamond Scalper from the Navigator's Expert Advisors list onto the chart.
- In the dialog that opens, go to the Inputs tab. If you were given a .set file, click Load and select it - this fills in every setting automatically. Otherwise, configure the settings manually using sections 5 and 6 below.
- Make sure "Allow Algo Trading" is checked in the same dialog's Common tab.
- Click OK. A smiling-face icon in the top-right corner of the chart confirms the EA is running.
That's it - one chart, one EA instance. You do not need to open a second chart or run a second copy for the two strategies; both run from the same single attachment.
5. Full Settings Reference
This section documents every setting exactly as it appears in the Inputs tab, grouped the same way MetaTrader displays them.
Diamond Scalper (info banner)
WARNING / Author / Link Mql5 / Contact-Support - informational only, not used by the trading logic. Confirms you have a genuine copy and shows where to get support.
Identification
| Comment | The text tag attached to every order this EA places. Leave the default unless you run several instances/accounts and want to tell them apart in your trade history. |
| Magic number | A hidden ID number that lets this EA recognize which trades are its own. If you ever run two instances of Diamond Scalper on the same symbol in the same account, each instance needs a different magic number, or they will manage each other's trades. |
Trading Mode
| Mode (1..10, 11 = SL200/TP1500) | Chooses a preset stop-loss/take-profit/trailing profile. Mode 1 is the tightest (smallest stop distance, suited to fast scalping); Mode 10 is the widest (suited to slower, day-trading-style moves). Mode 11 is a separate, fixed profile (200-point stop / 1500-point target) used specifically by Strategy 2. This single dropdown controls stop distance, pending-order padding, and trailing distance together. |
| Custom SL, points (0 = mode default) | Overrides just the stop-loss/take-profit distance from the mode above, while keeping that mode's trailing behaviour. Leave at 0 to use the mode's own distance. |
| Close pending orders after n bars | A pending (not-yet-triggered) order placed by Strategy 1 is automatically cancelled if it hasn't been hit within this many bars. |
| Enable Max Spread Filter / Max Spread (points) | Blocks new entries whenever the live spread is wider than the points value you set - protects you from entering during a temporary liquidity gap (e.g. around news or market open/close). |
Money Management
| Selected money management method | Chooses how position size (lot) is calculated: Fixed Volume (always the same lot), Fixed Risk (lot recalculated so a stop-out risks a fixed % of balance), or Custom Risk (lot increases in steps as balance grows). |
| Volume for each trade | The fixed lot size used when the method above is Fixed Volume. Ignored by the other two methods. |
| Risk percentage of balance | The % of your current balance the EA is willing to risk on a single stop-out, when the method is Fixed Risk. Ignored by the other two methods. |
| Money Step / Lot Size Step | Used only by Custom Risk: for every "Money Step" your balance grows by, lot size increases by "Lot Size Step". Ignored unless the method is Custom Risk. |
| Auto scale volume | An optional, advanced adjustment that can slightly increase the size of a new trade based on the pattern of your recent trade results. Off by default - leave it off unless you specifically understand and want this behaviour. |
Strategies
Enable Strategy 1 - turns the trend-following module on/off. Enable Strategy 2 - turns the breakout module on/off. Both default to on; turn one off if you want to run (or backtest) the other in isolation.
Account Protection
| Enable Equity/Drawdown Protection | Master switch for the account-wide safety net described in full in section 7. Off by default. |
| Max Daily Loss (% of day-start balance) | If today's losses reach this % of the balance you had at the start of the day, the EA stops opening new trades - automatically resuming the next day. Default 5%. |
| Max Drawdown (% from peak equity) | If your equity falls this % below the highest equity level reached since the EA started, the EA stops opening new trades for good until you restart it - a harder, longer-term stop. Default 15%. |
| Close positions/pending orders when triggered | If on, hitting either limit above also immediately closes all open positions and cancels all pending orders, not just stops new ones. Default on. |
News Filter
Enable News Filter (off by default) - pauses new entries around economic news. Pause Before News / Resume After News (minutes) sets how long before/after a qualifying event the EA avoids entries. "true = High only, false = Medium+High" chooses which news importance level triggers the pause. Delete EA pending orders / Close EA open positions during news window let you optionally clear the EA's own orders/positions during that pause (your other trades are untouched).
6. Choosing the Right Settings for You
There is no single "best" setting - the right combination depends on your account size, how much drawdown you can personally tolerate, and whether you're trading a personal account or a funded/prop-firm account. Use the profiles below as a starting point, then adjust.
Small or starter account: Fixed Volume with the smallest lot your broker allows (often 0.01). Start with a lower Mode number (tighter stop) rather than a high one. Turn on Account Protection - a small account can't absorb a long losing streak; Max Daily Loss around 3-5% and Max Drawdown around 10-15% is a sensible starting point.
Medium/balanced account: Fixed Risk with 0.5-1.5% risk per trade is a common, well-tested balance between growth and safety. A middle Mode (around 4-7) suits most traders. The default Account Protection (5% daily / 15% drawdown) is a reasonable middle ground.
Prop-firm / funded account: Account Protection is essential here. Set Max Daily Loss and Max Drawdown comfortably inside whatever your specific prop firm's own rules require - leave real margin, don't set the EA's limit exactly equal to the firm's limit, since the EA checks equity on each price tick, not continuously in-between. Turn "Close positions/pending orders when triggered" on so a breach is contained immediately. Prefer Fixed Risk or a modest Fixed Volume over an aggressive Custom Risk step schedule.
Larger / more risk-tolerant account: A higher Mode (8-10) or a larger Custom Risk step schedule can be reasonable if you have both the capital and the personal risk tolerance for wider swings. Even here, keeping Account Protection on with a Max Drawdown limit is good practice.
General rule: whatever you choose, test it on a demo account first, and watch it for at least a few weeks of live market conditions before increasing size. Past backtest or live-signal performance does not guarantee your results.
7. Understanding Account Protection
Account Protection is a safety net that sits above both strategies - it does not change how they trade, it simply decides whether they are allowed to open new trades right now.
Max Daily Loss is measured against the balance you had at the start of each day (broker/server day). It resets automatically the next day - one bad day pauses trading for the rest of that day, it does not end your trading.
Max Drawdown is measured against the highest equity your account has reached since the EA was last (re)started. Unlike the daily limit, it does not reset on its own - once triggered, the EA stops opening new trades until you manually remove and re-attach it (after reviewing what happened).
Both are off by default so nothing changes unless you deliberately turn them on.
8. Frequently Asked Questions
The Experts log shows "Modification failed... close to market" or a similar SL-modify message. Is something wrong?
No action needed. This happens when price moves in the brief moment between the EA deciding to move a stop and the broker's server actually processing that request - the EA detects the rejection and safely retries later. It is expected occasional behaviour, not a malfunction.
I don't see many trades. Why?
Most common reasons, in order of likelihood: (1) the Spread Filter is blocking entries because your broker's current spread is wider than your limit - try VantageFX or another broker from section 3, or raise the limit slightly; (2) both strategies are deliberately selective and will not force a trade just because time has passed - a quiet market can mean a quiet week for the EA too; (3) the News Filter or Account Protection is currently pausing entries - check whether either is enabled and why.
Can I run Diamond Scalper on more than one chart/symbol?
No - it is built and tested for XAUUSD only.
Can I run two copies on the same account?
Not recommended. If you do, each copy needs its own unique Magic Number, otherwise they will interfere with each other's trade management.
Do I need to configure the trailing stop separately?
No - trailing behaviour is bundled into the Mode you choose (section 5, Trading Mode). There is no separate trailing-stop input to set.
Public Group: Join here
Private Buyer Group: After purchasing, message the author on Telegram with your payment ID to be added - verified buyers receive set files, updates, and direct support.
Live Signal: https://www.mql5.com/en/signals/2382857
Product Link: https://www.mql5.com/en/market/product/190894
Risk Disclaimer: Trading leveraged products such as Gold CFDs carries a high level of risk and may not be suitable for everyone. No setting combination, mode, or protection limit described in this manual guarantees profit or prevents loss. Past performance (backtests or the published live signal) does not guarantee future results. Only trade with capital you can afford to lose, and test any configuration on a demo account before using it on a live account.