
Breakouts can fail. Reversal levels can be overrun by momentum. A pullback can also arrive only after the move is already exhausted.
That combination led me to use a simpler manual workflow: define a dynamic reaction zone, wait for price to leave the complete zone, and only consider a setup when price returns to its boundary.
The Dynamic Reaction Zone
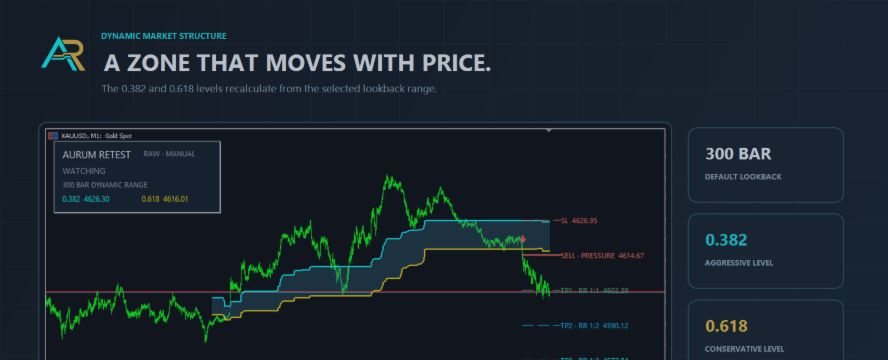
The baseline uses the highest high and lowest low from a rolling 300-bar range. Two levels are calculated inside that range:
- Upper level: 0.382
- Lower level: 0.618
These levels move when the rolling range changes. They are not fixed support and resistance lines, and they do not predict where price must reverse.
Their purpose is to create a consistent area for observing how price leaves a range and how it behaves when it returns.
The Sequence I Wait For
For a buy setup:
- Price moves from below and breaks through the complete 0.618-0.382 zone.
- Price remains outside the zone long enough to establish a valid break.
- Price returns toward the upper boundary.
- A rejection forms near that boundary.
- The setup is displayed with an entry reference, stop reference and three risk-to-reward targets.
The sell workflow is the opposite. Price first breaks below the complete zone and then returns toward the lower boundary before a rejection is considered.
I do not treat movement inside the zone as a directional signal. During sideways conditions, price can travel repeatedly between the two levels. Waiting for a complete break helps separate that behavior from a retest setup.
Why the Retest Matters
This approach does not try to buy the lowest price or sell the highest price. It also avoids entering only because price crossed a moving average or touched a static reversal level.
The sequence asks a different question:
Has price already demonstrated direction, and is it now returning to an area where risk can be defined more clearly?
That means some early movement is intentionally missed. The trade-off is that the trader does not need to chase every active candle or guess every turning point.
Raw and Filtered Modes
RAW mode keeps the basic Break, Retest and Rejection sequence visible.
FILTERED mode is more selective. It reduces repeated retests and some compressed conditions where price keeps interacting with the same area without establishing a clean departure.
Filtering does not remove losing setups. It simply changes the balance between signal frequency and selectivity.
Why I Use XAUUSD M1
This workflow was developed around XAUUSD M1. On this timeframe, the rolling zone can adapt to short intraday swings while keeping the distance between the entry reference and stop reference practical for manual observation.
Higher timeframes can be used, but signals may be less frequent and the required risk distance can become wider. XAUUSD M1 remains the recommended baseline.
Manual Decision Support
Aurum Retest does not open, manage or close trades. It displays the dynamic zone, setup state, confirmed arrows and a visual risk map with TP1 at 1:1, TP2 at 1:2 and TP3 at 1:3.
The indicator is intended to make one manual workflow easier to follow. It does not guarantee performance, and results can vary with spread, liquidity, symbol specifications and broker data.
The Free Demo can be tested in the MetaTrader 5 Strategy Tester:


