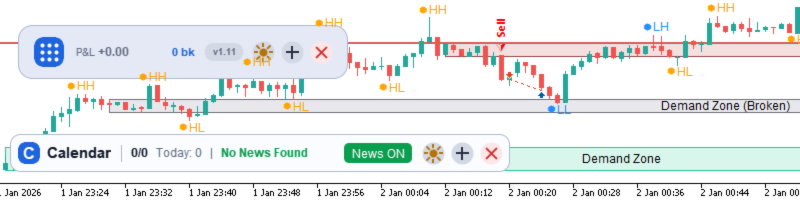
Grid Scalper Pro MT5: An Adaptive Grid Architecture for MetaTrader 5

Grid trading has a reputation problem, and most of it is deserved. The typical grid Expert Advisor opens a trade, waits for price to move against it, doubles down, and repeats until either the market turns or the account does. There is no view on structure, no sense of when adding another level is a bad idea, and no way to see what the basket is actually carrying without squinting at the terminal. Grid Scalper Pro was built on the opposite premise: that a grid is a management framework, and it deserves the same care in its entries, its spacing, and its exits as any other strategy. In this post we will walk through what the EA brings to MetaTrader 5 and how it fits into a trader's day.
Before we go deeper, here is where you can find the Expert Advisor on the Market.
Download the Demo/Purchase: https://www.mql5.com/en/market/product/188047
Snapshot
Grid Scalper Pro MT5 is a complete grid and recovery trading system for MetaTrader 5. It combines three independent signal engines:
- A spacing model that adapts as a basket deepens and two lot progression methods
- A market-structure cooldown that stops the grid from fighting a fresh trend
- A full canvas dashboard that reports the state of every basket in real time
It attaches to any symbol and any timeframe, works alongside your other charts through magic-number isolation, and stores its own state in a local SQLite database so a restart, a reconnect, or a terminal crash does not orphan a live basket.
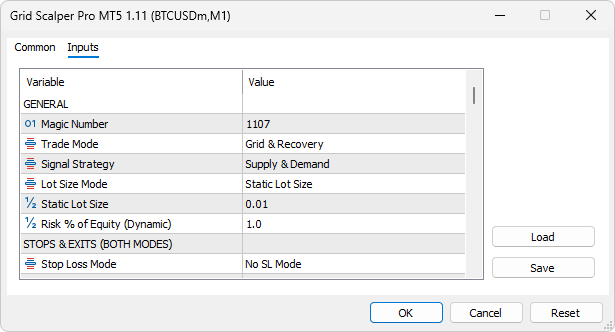
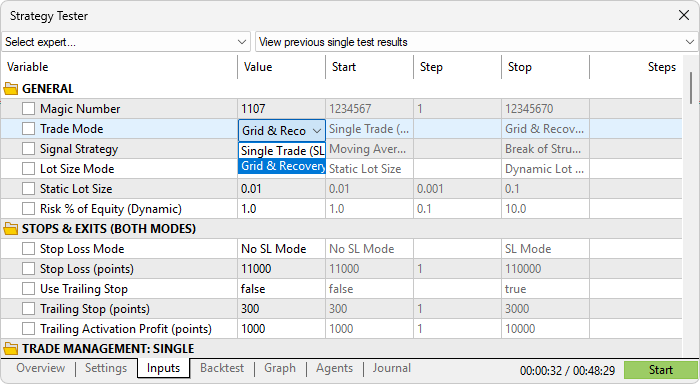
Everything below is controlled from one grouped input dialog. The groups are deliberately ordered so that Trade Mode is answered first, and the two mode-specific groups sit side by side under names that say which mode they belong to.
Two ways to manage a signal
The first decision is how a signal is handled once it has fired, and it is deliberately separate from how signals are generated. In Single Trade mode, a signal produces one position with a stop loss and a take profit, where the take profit is expressed as a multiple of the stop distance rather than as its own point value. That states the reward-to-risk directly and re-scales by itself when you change the stop, instead of quietly drifting to a different R.
In Grid & Recovery mode, a signal opens a basket. The first leg goes in at market, the next level is armed a fixed distance away, and every leg in the basket shares one take profit that is re-aimed each time the basket grows. Both modes share the same stop and trailing machinery, and both respect the same risk limits, so switching between them does not mean relearning the EA.
Three signal engines
Signal generation and trade management are separate paths, which means any of the three engines can feed either mode.
Moving Average is the simplest: a close that crosses the MA from below arms a buy, a close that crosses from above arms a sell, evaluated once per completed bar.
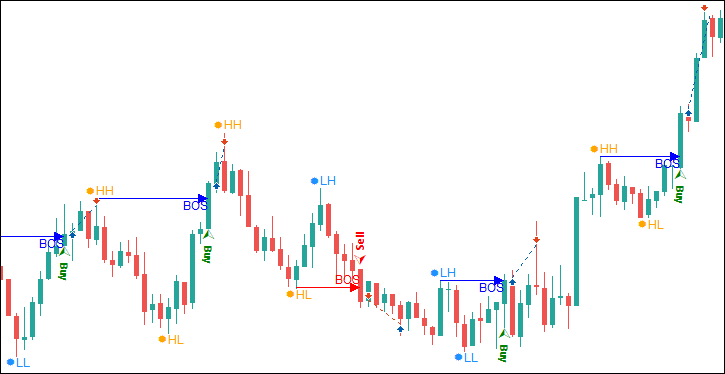
Break of Structure tracks swing highs and lows using a configurable lookback on each side, and fires when a completed candle closes beyond the most recent unbroken swing. Each break is drawn on the chart as a level line from the swing that produced it to the bar that broke it, so the reasoning stays visible after the fact.
Supply & Demand is the most involved of the three, and the default. It looks for a consolidation of a set number of bars whose total range stays inside a spread limit, then a breakout candle that closes clear of that range without violating the opposite side. The resulting box becomes a zone. If impulse validation is enabled, the zone starts life as a potential zone and is only promoted once price genuinely runs away from it by a multiple of the zone's own height within a set number of bars — weak breakouts are discarded rather than traded. A zone must then arm itself by moving a minimum distance clear before it will accept a test, and a candle that closes back through the far side marks it broken. You choose whether a zone can be traded once, a limited number of times, or as often as it stays valid, and whether zone size is restricted at all.
One detail worth calling out: zone age is measured in bars, not wall-clock time. A zone created late on a Friday used to expire in the middle of Saturday, because a bar count had been converted into a duration and the clock kept running while the bars did not. Age is now walked off the real series, so weekends, session breaks and holidays simply do not exist as far as zone lifetime is concerned.

Spacing that adapts as the basket deepens
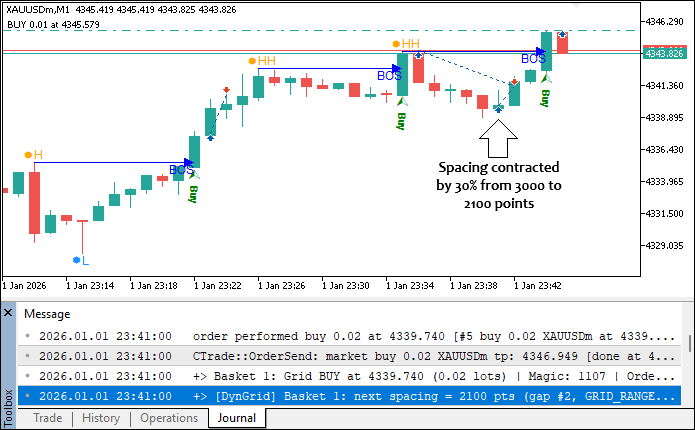
Most grids use one fixed gap forever. Grid Scalper Pro treats spacing as a curve. Alongside the base grid size in points, you pick a Grid Range Mode: static, contraction, expansion, or one of two hybrids that contract then expand, or expand then contract, with the switch level set by you. Each successive gap is scaled by a percentage per level, and an optional cap freezes the spacing after a chosen number of resize steps rather than resetting it. Whatever the calculation produces, it is clamped so that it never falls below the broker's own minimum working distance plus the current spread.
The practical effect is that you can start a basket tight to catch shallow retracements and then widen out as depth grows, or the reverse if you would rather commit early and slow down later.
Two ways to size the grid
Initial lots come from either a static value or a dynamic percentage of equity, sized against the grid distance and validated against the symbol's volume rules.
From the second leg onward, the Grid Lot Mode decides the progression. Multiplier does what you expect: each level is the previous lot times your multiplier. Recovery works backwards from the goal instead. It picks a target price a percentage of the current gap beyond the new entry, plus a small extra profit buffer, values every open leg in the basket at that price, and then solves for the exact lot the new leg needs so the whole basket lands on target. Where multiplier progression grows blindly, recovery sizing grows only as much as the arithmetic requires — and when the existing legs already cover the target, it drops to the minimum lot.
The basket target is re-aimed after every fill. In recovery mode it follows the recovery distance from the newest entry; in multiplier mode it sits a configurable number of points beyond the lot-weighted breakeven price of the whole basket. Every leg is then modified to share that one exit.
The ladder only moves when the broker says yes
There is a failure mode specific to progressive lot sizing that is easy to write and hard to spot, and it is worth describing because the EA is explicitly built against it.
If the lot ladder is advanced at the moment the decision to add a level is made, rather than at the moment the level is actually filled, then any rejected send leaves the size raised while the trigger that produced it is still armed. The next bar tries again — from the new, larger size. Nothing in that arrangement is bounded, so a run of requotes, a closed market, a stops-too-close error or a dropped connection compounds the volume for reasons that have nothing to do with price.
Grid Scalper Pro computes the next lot into a local value and leaves basket state untouched until the broker confirms the fill. If the send is rejected, or the pre-trade checks block it before it is ever sent, nothing has been mutated — there is nothing to roll back, the ladder and the grid trigger both hold, and the same level is simply retried on the next bar. That holds for every rejection cause rather than the handful that happen to be common. On a confirmed fill, the EA stores the volume the broker actually accepted rather than the one it requested, which matters once your progression pushes past the symbol's maximum volume: the two figures diverge at the cap, and storing the request would let an internal ladder keep compounding invisibly while the volume being sent stayed pinned. In recovery mode, a degenerate calculation holds the current lot rather than falling back to a multiplication, so a maths edge case can never quietly turn recovery sizing into a martingale.
Every rejection and every pre-trade block is reported in the Journal with the broker's return code, its description, and the lot size the ladder is being held at, so a basket that has stopped growing tells you exactly why.
Smart Grid: knowing when to stop adding
This is the part that separates the EA from a plain martingale. With Smart Grid enabled, the EA maintains its own read of trend from the swing sequence. When a basket's direction is confirmed to be against the prevailing trend — lower highs and lower lows against a buy basket, higher highs and higher lows against a sell — that basket enters cooldown and stops adding levels entirely. It does not close; it simply refuses to keep feeding a move it has no evidence is finished.
The grid resumes only on a Change of Character: a close back through the most recent lower high for a buy basket, or the most recent higher low for a sell. The CHoCH is drawn and labelled on the chart when it happens, the basket resumes from its current price with fresh spacing, and a basket that has already confirmed its CHoCH will not be pushed back into cooldown by the same trend read.

Risk controls that actually gate entries
The EA carries a stack of independent guards, each of which can be turned off if it does not suit you.
The geometry filter rejects a new signal in a direction where an existing position of the same direction sits closer than a percentage of the grid size — or of the stop distance in single mode. It is what prevents three near-identical baskets stacking on top of each other in a choppy hour. The daily drawdown limit measures the day's loss against the balance at the start of the day and halts new entries when the percentage is breached; while halted, the EA still trails profitable positions rather than abandoning them. Beyond that there is a cap on trades per basket with a choice of holding or closing everything when it is hit, a cap on concurrent baskets, a direction filter for buys-only or sells-only, a server-time session window, an optional per-position stop loss, and a trailing stop with its own activation profit.
Every order also passes a set of pre-trade checks — volume validation and limits, margin, and stop and target levels against the broker's requirements, with rectification where the levels are simply too close.
The news calendar
A built-in economic calendar panel reads MetaTrader's own calendar and gates entries around releases. You filter by importance, by currency group or a custom list, and by event name, then choose between pausing for the whole day of a qualifying event or pausing only within a window of hours and minutes before and after it. The panel itself is a full canvas table with time, currency, impact, event, actual, forecast, previous and a live countdown column, and it can be minimized out of the way. Because the EA writes downloaded events into its own database, you can also pull a date range down in live mode and then run the Strategy Tester offline with real news data behind it.

The dashboard
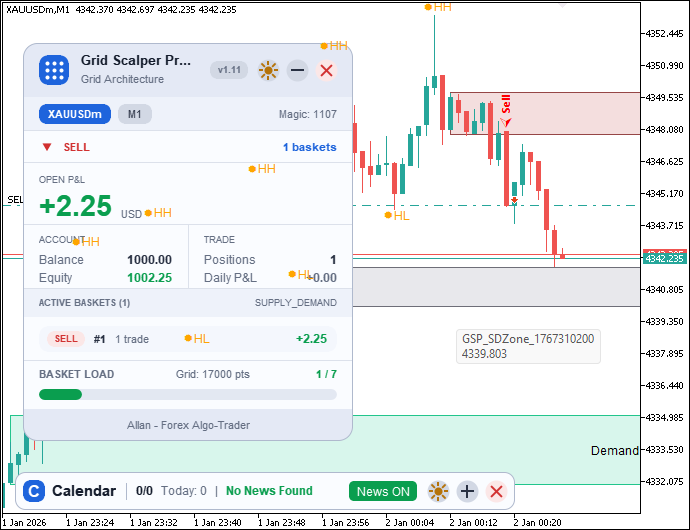
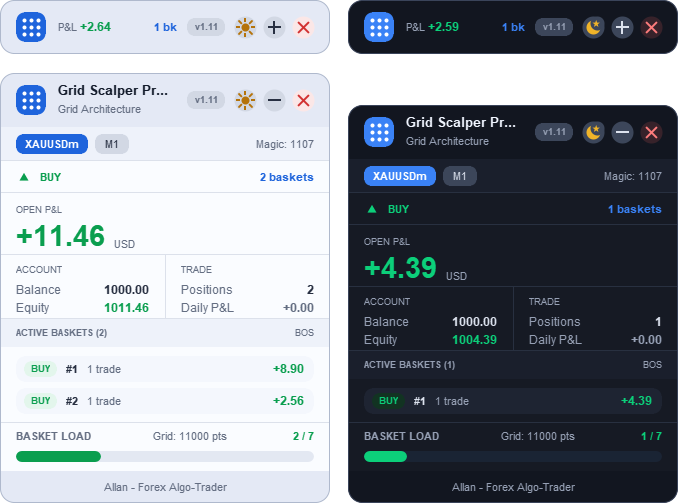
The dashboard is where the EA reports on itself. It shows account balance, equity and free margin; the active strategy, timeframe, magic number and version; open profit across the EA's positions and the profit or loss already closed today; the basket load against your cap; and a row for every open basket with its direction, leg count, live profit and its Smart Grid state, so a basket in cooldown or one that has confirmed its CHoCH is visible at a glance. Daily drawdown status sits alongside it, and the panel switches its own wording and figures when you are in Single Trade mode rather than presenting grid inputs that are not running.
It drags anywhere on the chart, minimizes to a compact strip, closes entirely, and comes in dark and light themes — and your theme, position and statistics persist across restarts. A separate notification strip reports entries, fills, filter rejections and CHoCH events as they happen, in colour, for a few seconds each.
First run
On its first run for a given version the EA opens an onboarding overlay with six tabs — About, Manual, How It Works, Inputs, FAQ and Contact — complete with diagrams for the recovery model, grid spacing, Smart Grid and each of the three strategies. Initialization waits until you have been through it, which means nobody's first experience of the EA is a live basket they did not expect.

Using it in practice
Attach the EA to a chart, work through the onboarding, and set your Trade Mode first. Pick a signal engine, set the grid size and basket target in points for your symbol's volatility, and decide between multiplier and recovery lots. Leave Smart Grid on unless you have a specific reason not to. Set a daily drawdown limit and a basket cap before you set anything else, then let the dashboard tell you what the EA is carrying.
A word worth saying plainly: a grid concentrates risk by design, and no amount of engineering changes that. The cooldown, the caps, the drawdown halt and the geometry filter exist precisely because the underlying method needs them. Test your settings on your own symbol and your own broker's conditions in the Strategy Tester before committing capital to them.
In short, Grid Scalper Pro MT5 takes the parts of grid trading that are usually left to luck — where to enter, how far apart to space, how much to add, when to stop adding, and when to walk away for the day — and puts each of them under an explicit, visible rule. Three signal engines, five spacing curves, two lot models, a market-structure cooldown, a news gate, and a dashboard that never leaves you guessing what the account is holding.
Cheers to many more coming our way and happy trading!


![[iVISTscalp5]: XAUUSD. Forecast First. Market Reaction Afterwards](https://c.mql5.com/6/1035/splash-preview-777232.png "[iVISTscalp5]: XAUUSD. Forecast First. Market Reaction Afterwards")

