

Expert Advisor Builder
This is the user manual for the Expert Advisor Builder, available on the MQL5 Market for MetaTrader 4 and MetaTrader 5.
Quick start
This quick start takes about 25-30 minutes.
Video version:
https://www.youtube.com/watch?v=NTbmngn-eUA
Function principle
The Expert Advisor Builder turns your trading ideas into automated strategies on MetaTrader 4 and 5, without any programming.
The entire workflow consists of three simple components working in perfect harmony:
-
Expert Advisor Builder (Web Application): design your trading logic visually in the browser. Each module is a complete, self-contained strategy.
-
Trading Modules (Text Files): strategies export as plain text files with all parameters and logic - fully transparent and editable, no black boxes.
-
Expert Advisor Builder (MetaTrader Runtime): runs inside MetaTrader (MT4 and MT5), reading your modules and executing trades. Modules can be added, removed or changed at runtime.
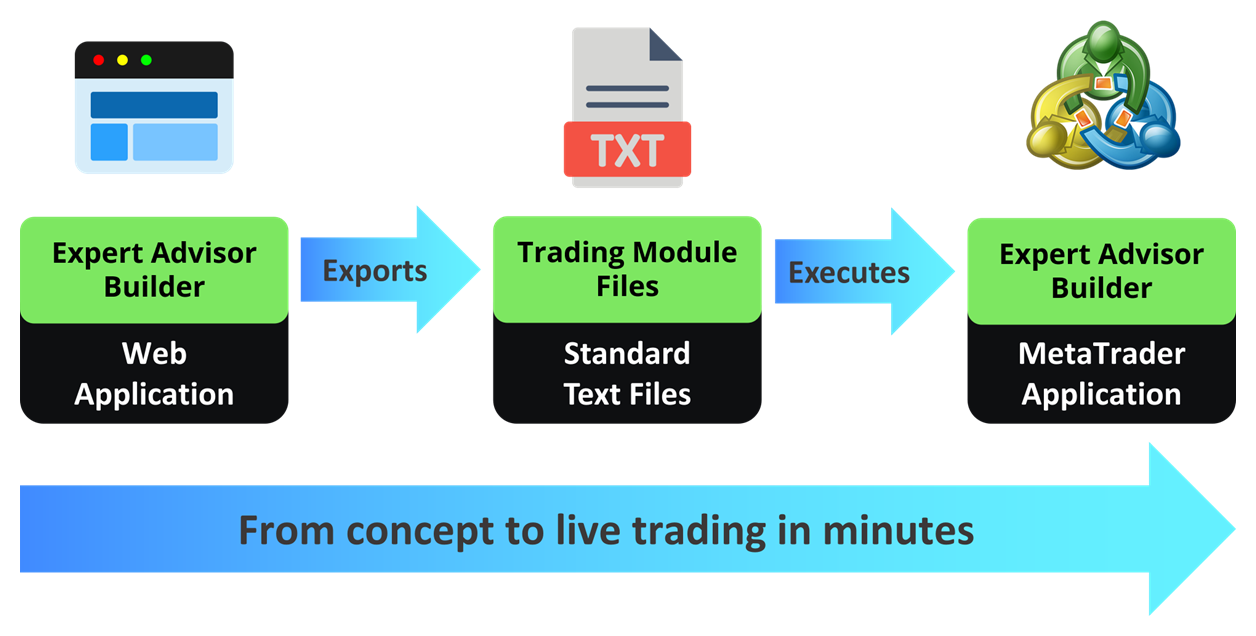
The system is simple and transparent: build complex multi-timeframe strategies through a visual interface, with many independent modules at once.
Visit our Expert Advisor Builder web application to start building.
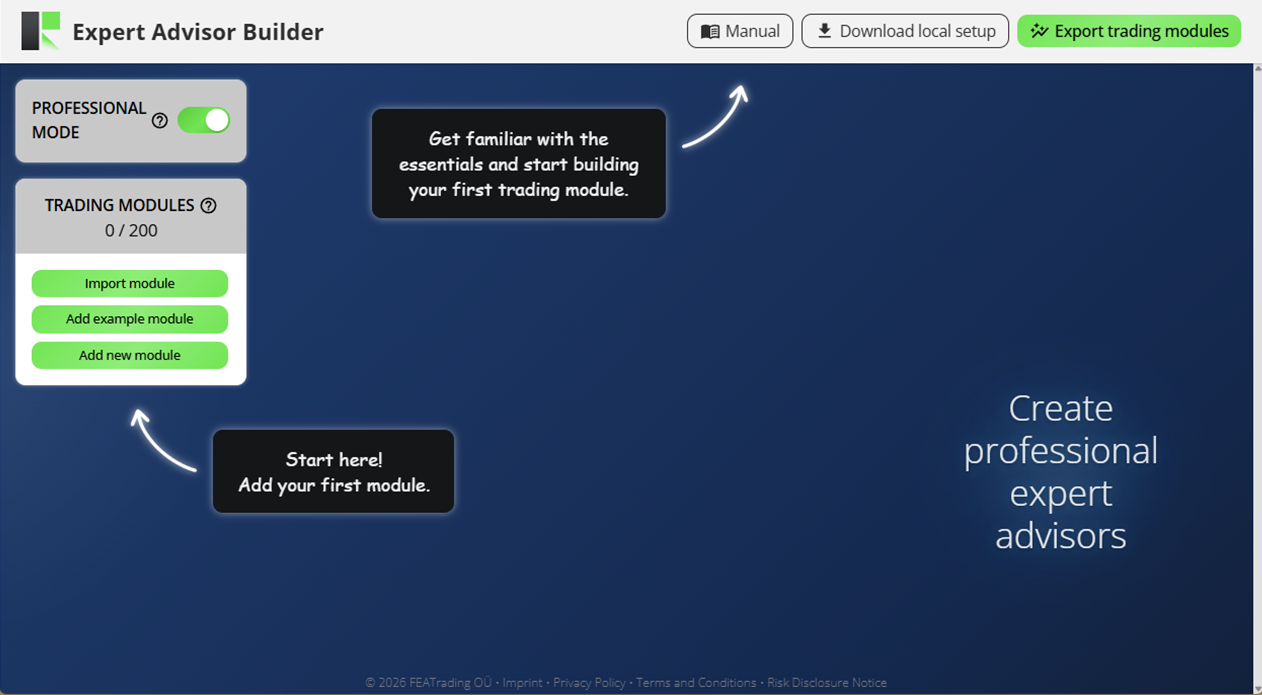
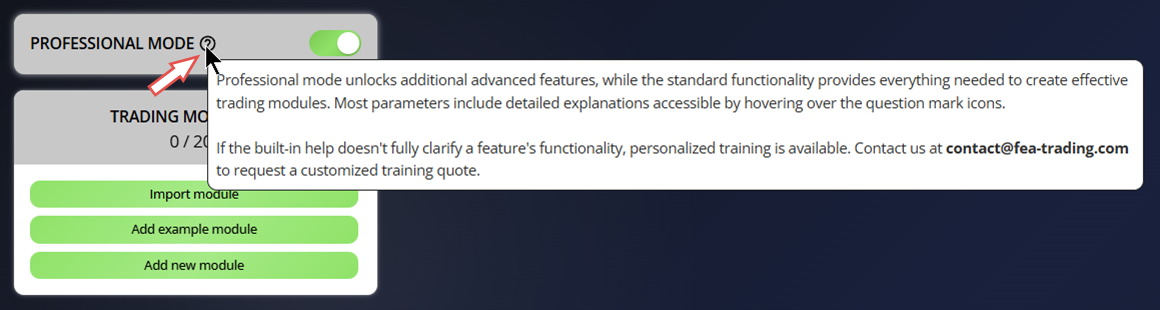
The Expert Advisor Builder includes integrated help. Hover over any question mark icon to view details about a specific setting.
Installing from the Market
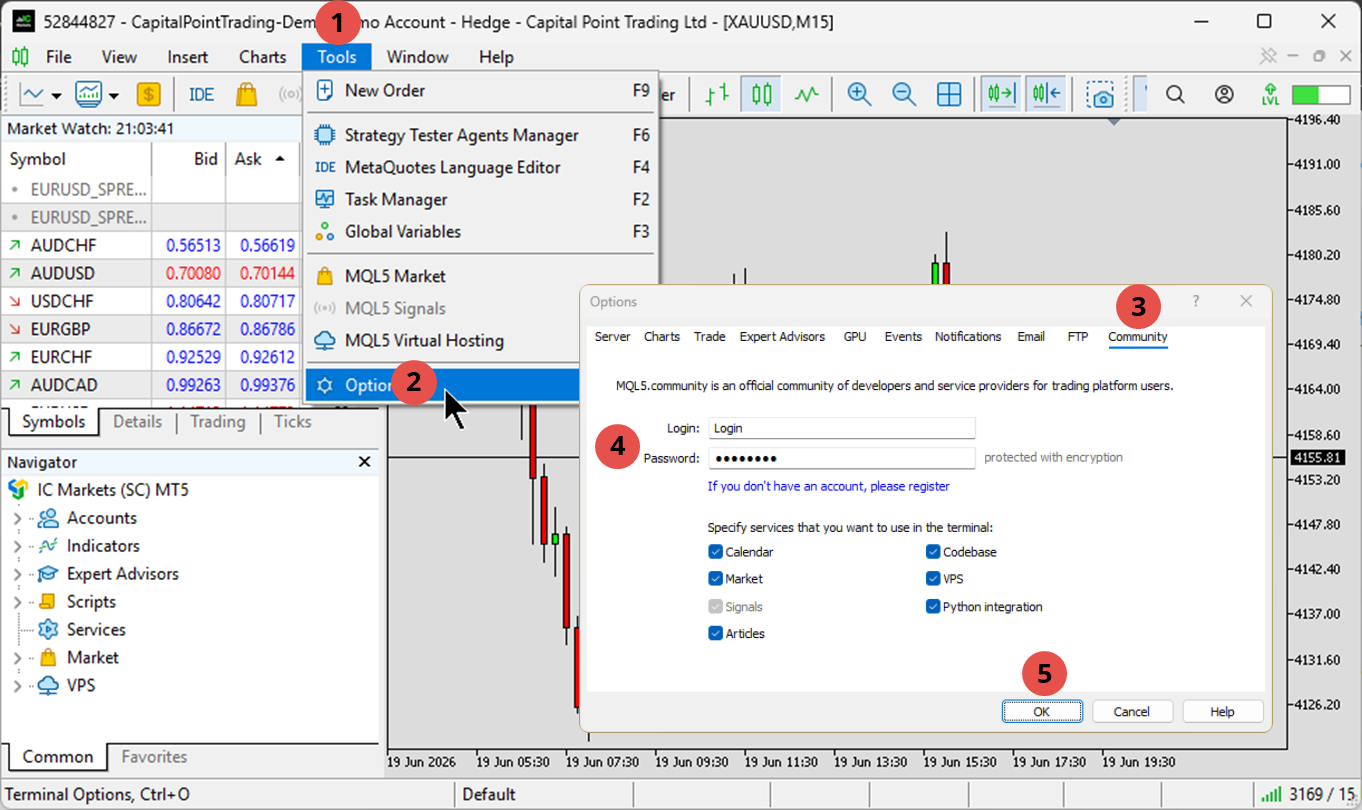
To download the application from the Market, you first need to enter your MQL5 account details into the MetaTrader platform. Open the MetaTrader 4 or 5 platform and, in the top menu, select Tools > Options > Community, then fill in the MQL5 account login and password fields.
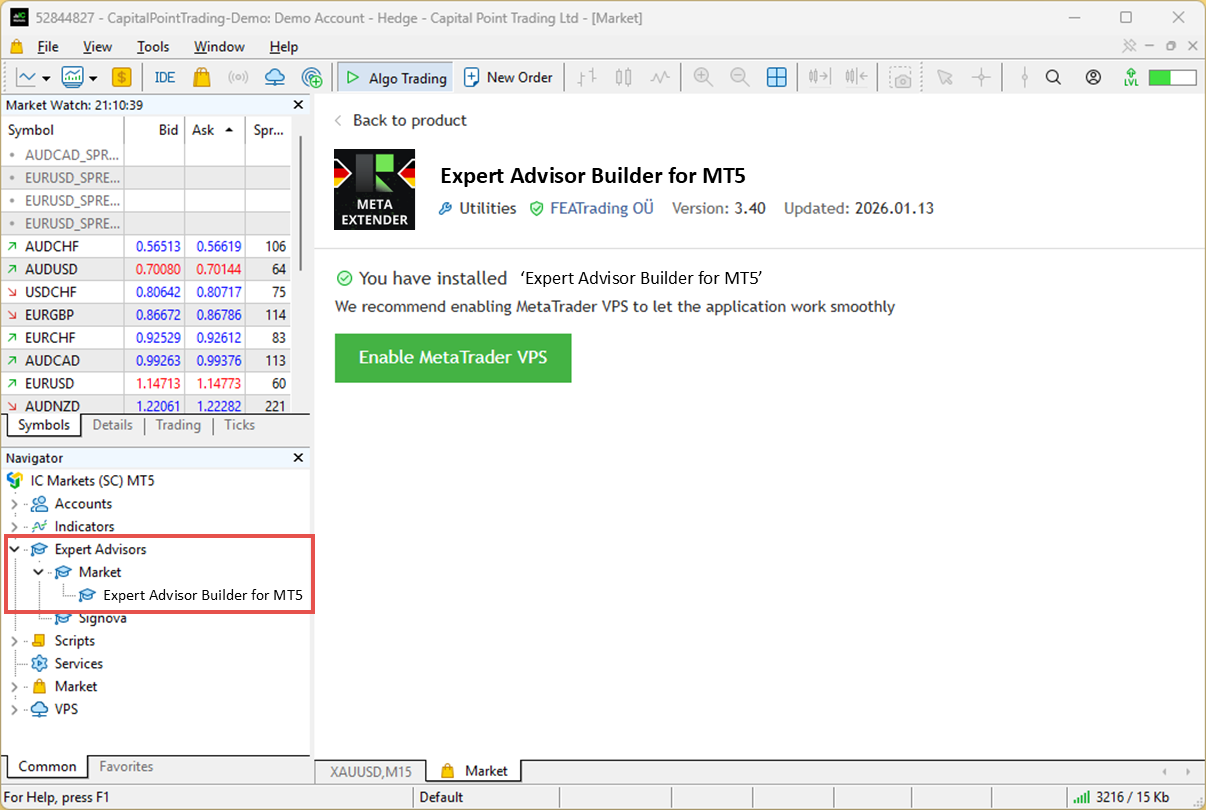
Downloading the Expert Advisor Builder MT5 app
In the Navigator, open the My purchases window. Next to the application, click Install, or Update if a new version has been released.
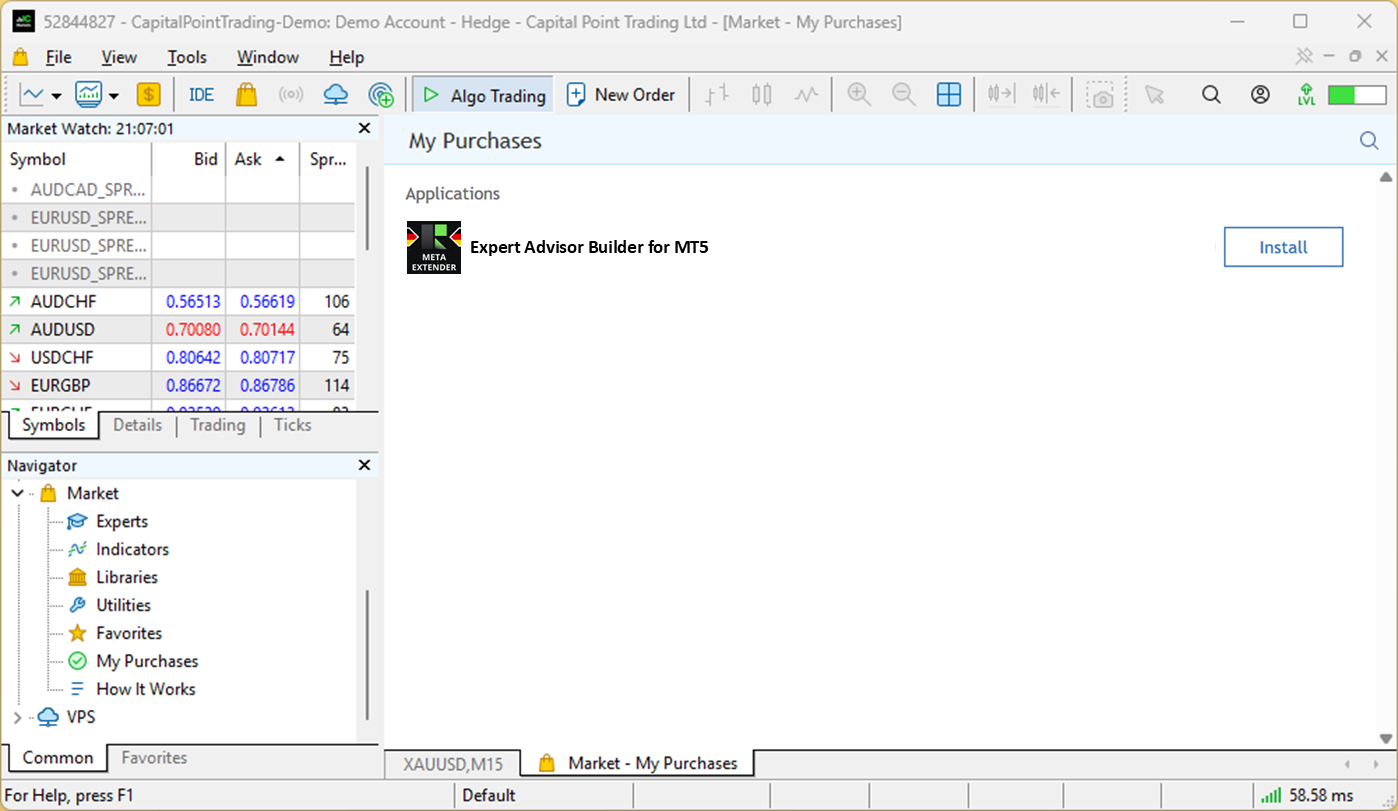
Downloads to the Expert Advisors > Market folder.
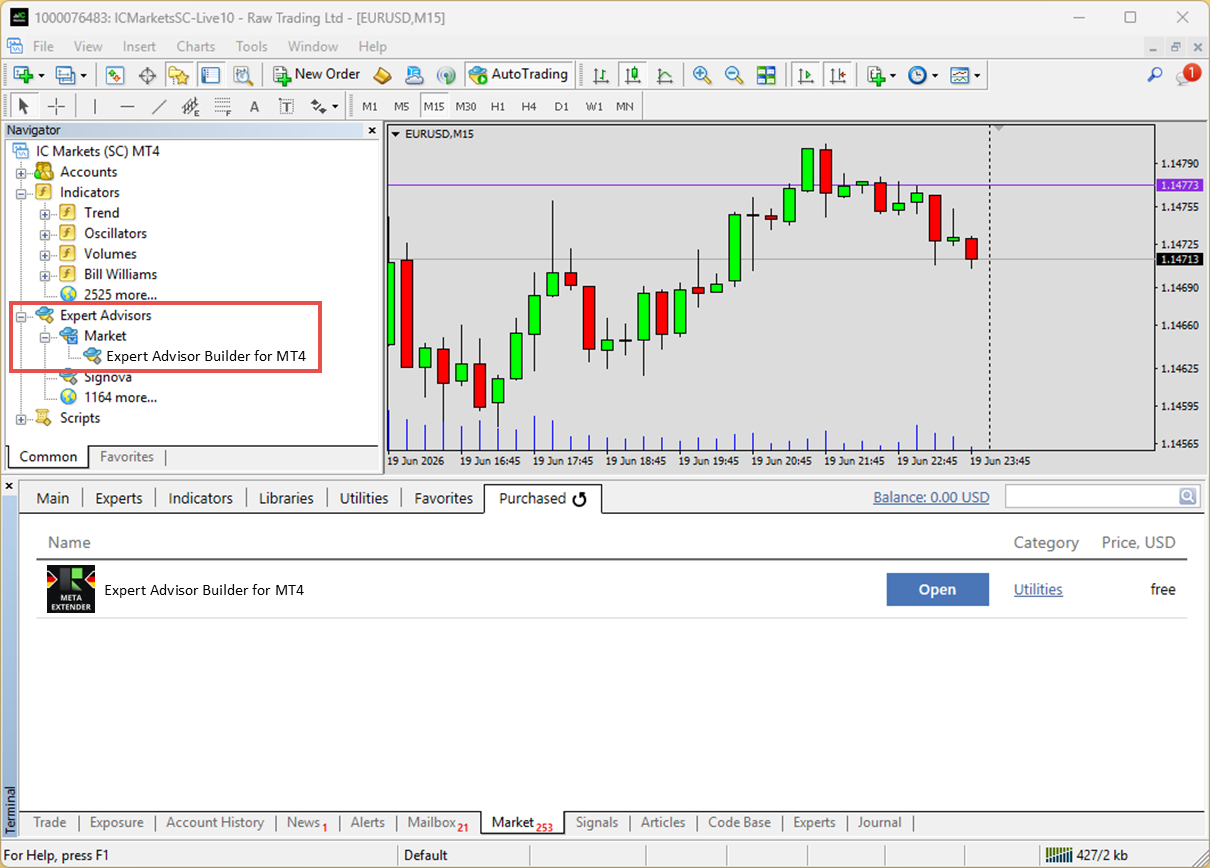
Downloading the Expert Advisor Builder MT4 app
In the Terminal window, open the Market > Purchases tab and click Install.
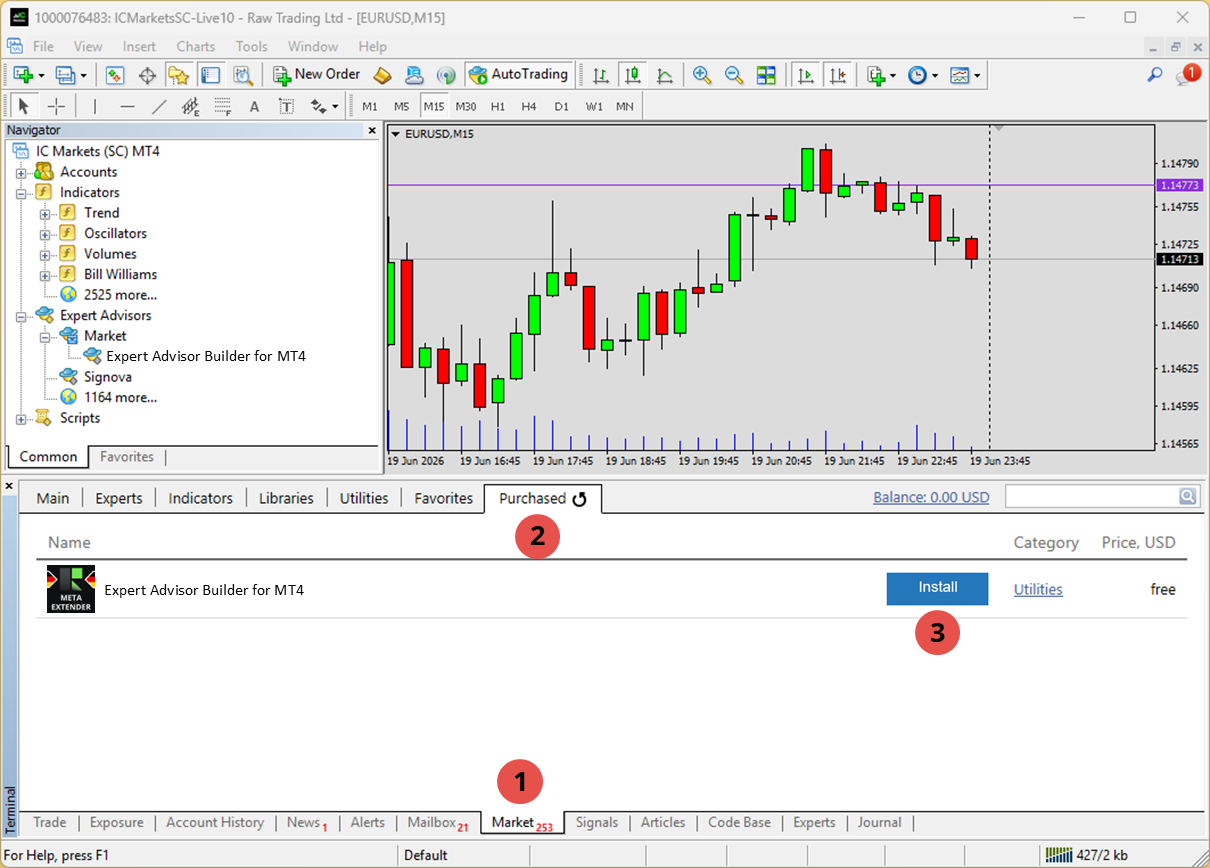
Downloads to the Expert Advisors > Market folder.
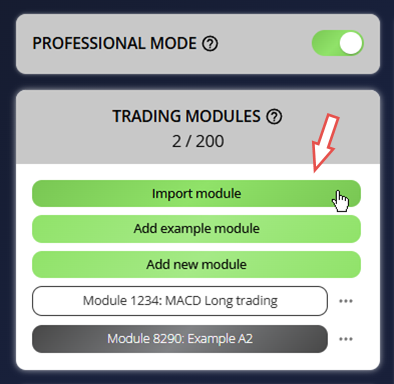
Build your first trading module
First module: MACD Long trading
Let's create your first module manually in the web application.
Step 1: Open the Expert Advisor Builder web application
No login is required and your progress is saved automatically, so closing or reloading the web app won't lose your work.
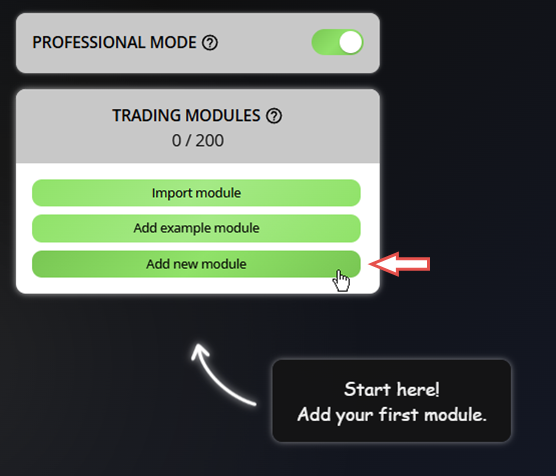
Step 2: Add a new module
Click Add new module to create a blank module. Every component already has sensible defaults, so you only change what you need rather than building from scratch.
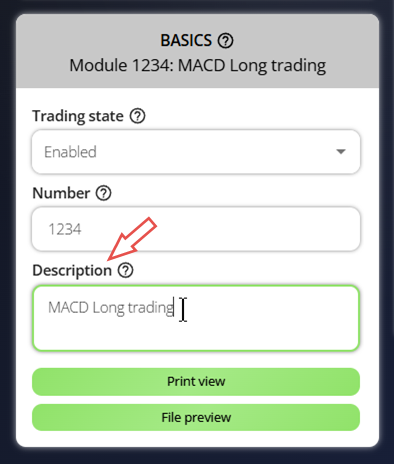
Step 3: Configure the module basics
A configuration window appears below the new module. Set:
-
Trading state = Enabled
-
Number = 1234
-
Description = MACD Long trading
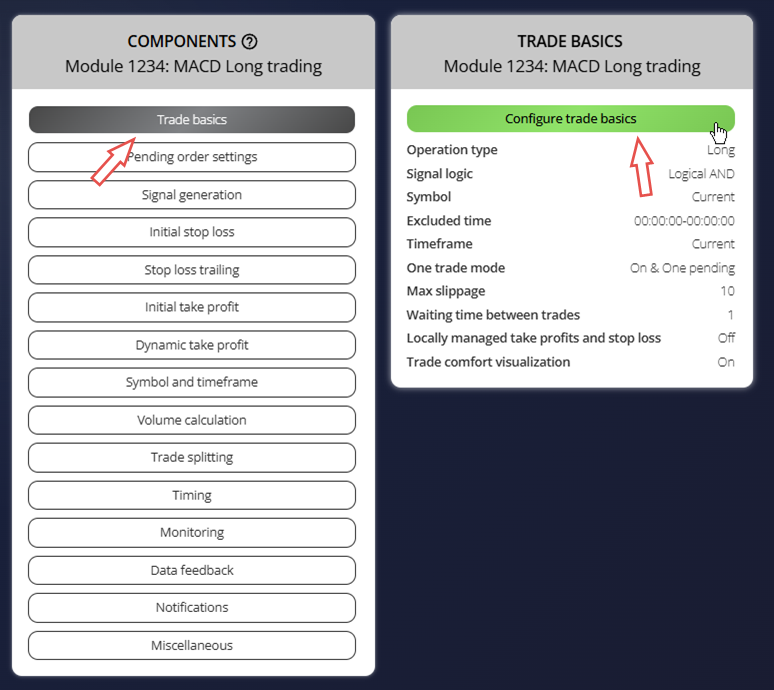
Step 4: Configure the trade basics
Open the Trade Basics component. Every component has a settings menu on top and the parameter overview below; click Configure trade basics to edit.
Set this parameter, press Save and Close:
-
Operation type = Long
Step 5: Add a standard deviation indicator
To set the stop loss, we'll use the standard deviation value. First add an indicator so its value is available to other components: go to Signal Generation and choose Indicators.

Click Add new indicator; its configuration menu opens. Set this parameter, press Save and Close:
-
Signal in use = On
-
Signal used for = Forward
-
Selected indicator = STD
-
Draw in chart = Off
-
Forward adjustment = 3.50
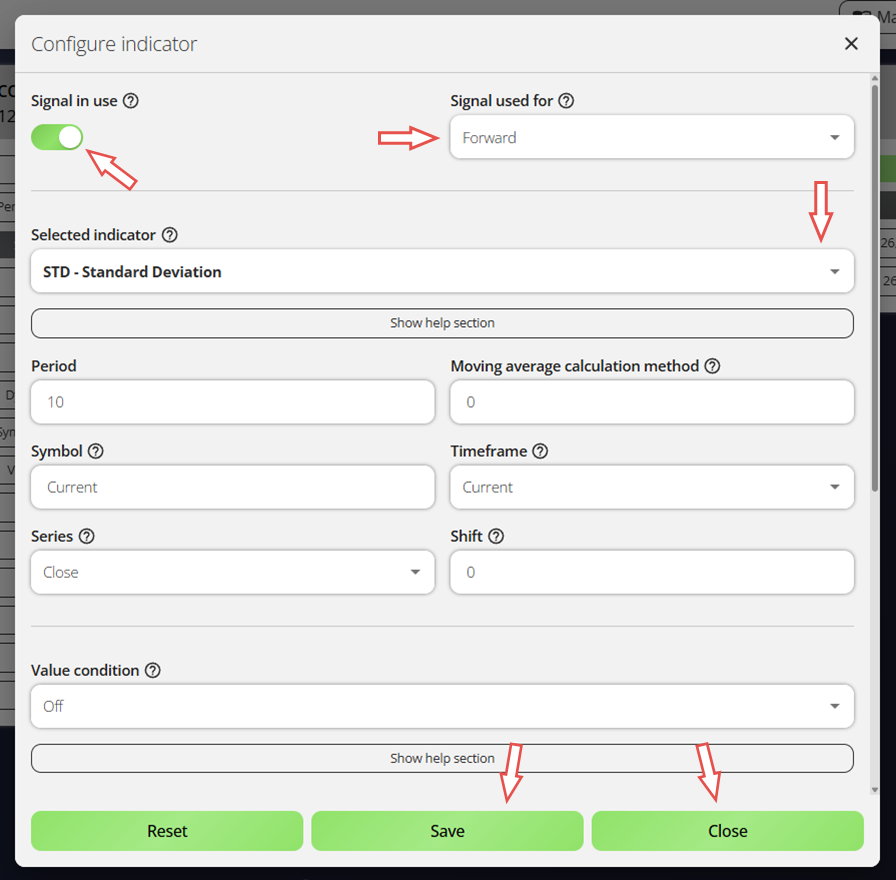
This indicator only sets the initial stop loss; it doesn't generate signals or affect entries and exits. We'll use it later.
Step 6: Set up the MACD signal
A module needs an entry signal. We'll use the MACD oscillator's two lines. Click Add new indicator again, set these parameters, press Save and Close:
-
Signal in use = On
-
Signal used for = Entry
-
Selected indicator = MACD
-
Line index = Main line
-
Draw in chart = On
-
Drawing slot = 1
So far we've set only the MACD's Main line; each indicator component handles one line. To add the Signal line, duplicate this one: click the three dots next to the MACD indicator, choose Duplicate, then set the copy's Used line to Signal line. Confirm these settings, press Save and Close:
-
Signal in use = On
-
Signal used for = Entry
-
Selected indicator = MACD
-
Line index = Signal line
-
Draw in chart = On
-
Drawing slot = 2

Now connect the two MACD lines: open the Indicator Combinations component, just below Indicators.

Click Add new indicator combination to relate the two lines. Set these options, press Save and Close:
-
Signal in use = On
-
Signal used for = Entry
-
Input indicator 1 = MACD (Main line)
-
Input indicator 2 = MACD (Signal line)
-
Value relation = Value 1 cross value 2
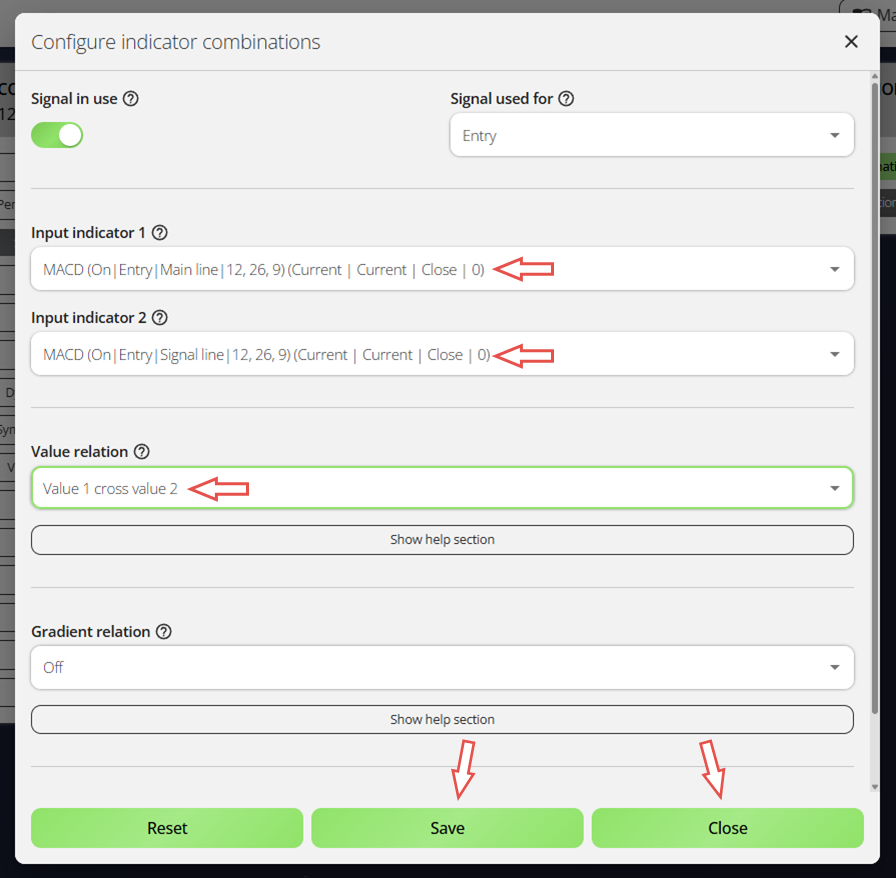
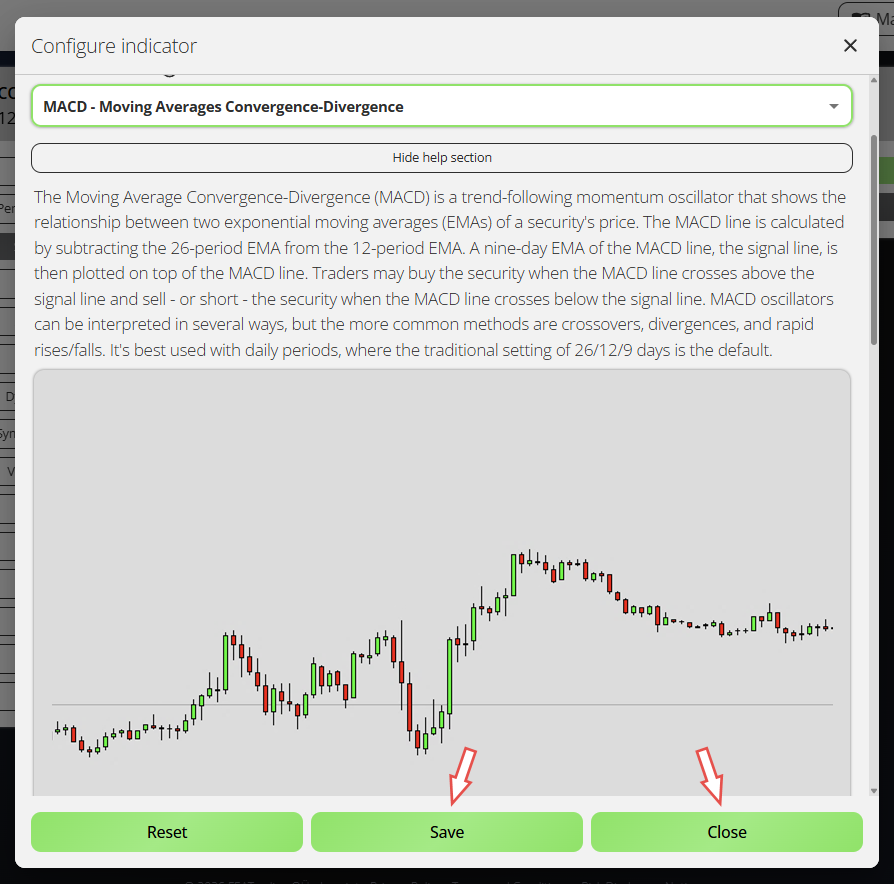
Many parameters have expandable help sections - for example, explaining what Value 1 cross value 2 means (see below).

You've created your first signal from the MACD's two lines. The system supports up to 50 indicators and combinations, plus signals from a chart analyzer, news events, and candle/chart/Fibonacci scanners - enough for almost any strategy.
Step 7: Configure the initial stop loss
Now we'll use the standard deviation (STD) indicator set to Signal used for = Forward. Open the Initial Stop Loss component and click Configure initial stop loss.
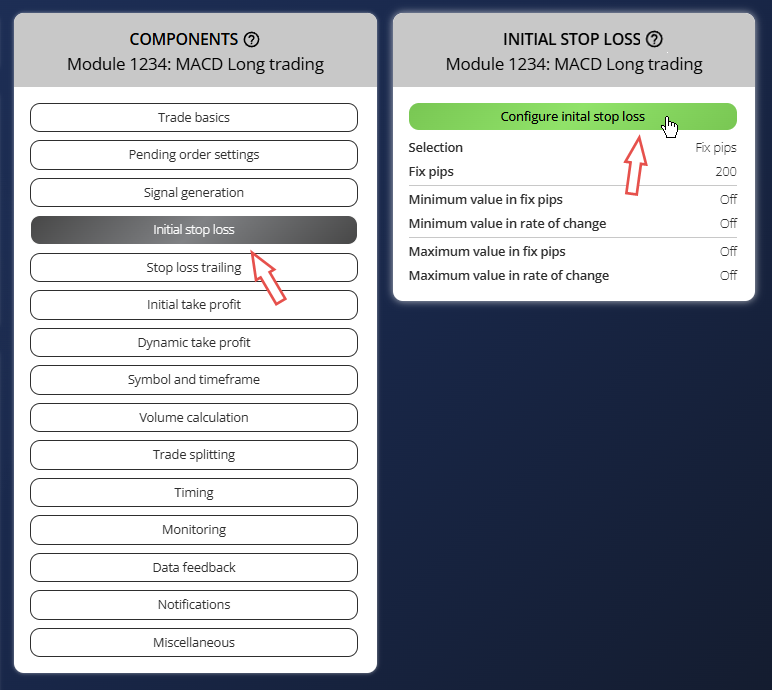
Set these parameters, press Save and Close:
-
Selection = Indicator
-
Used indicator = STD
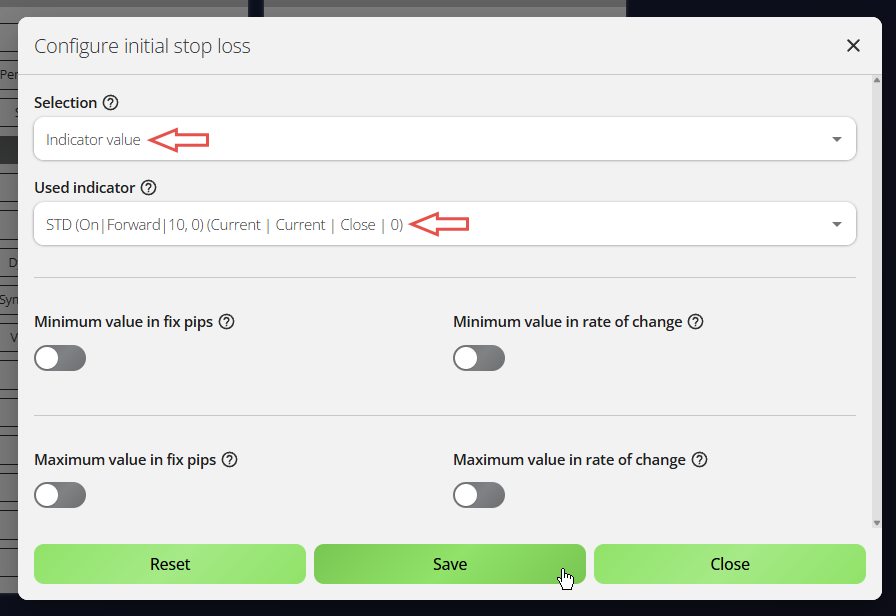
Only indicators set to Signal used for = Forward appear here; their value passes to other components. Forward adjustment scales it - higher places the stop loss farther from entry.
Step 8: Configure the initial take profit
Now set the initial take profit: open the Initial Take Profit component and click Configure initial take profit.
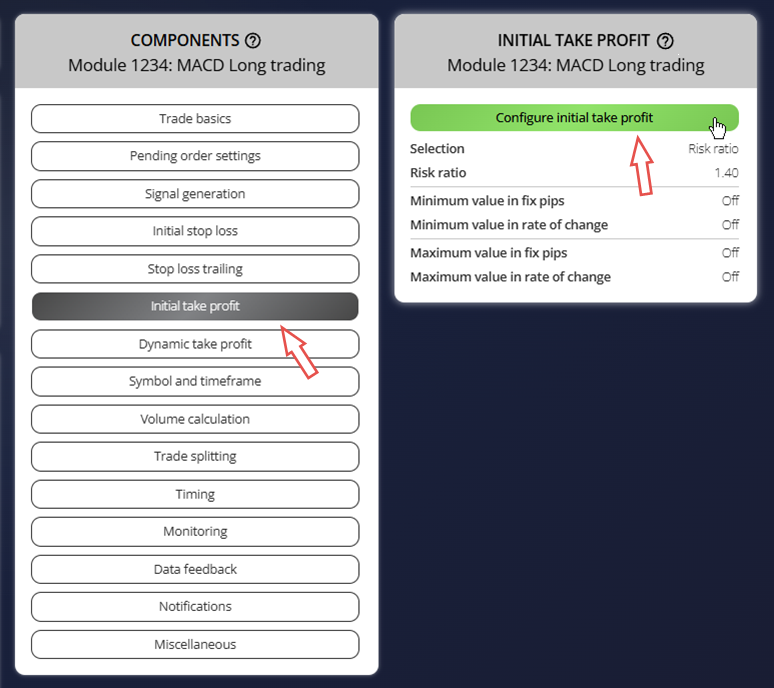
Set these parameters, press Save and Close:
-
Selection = Risk ratio
-
Used indicator = 1.40
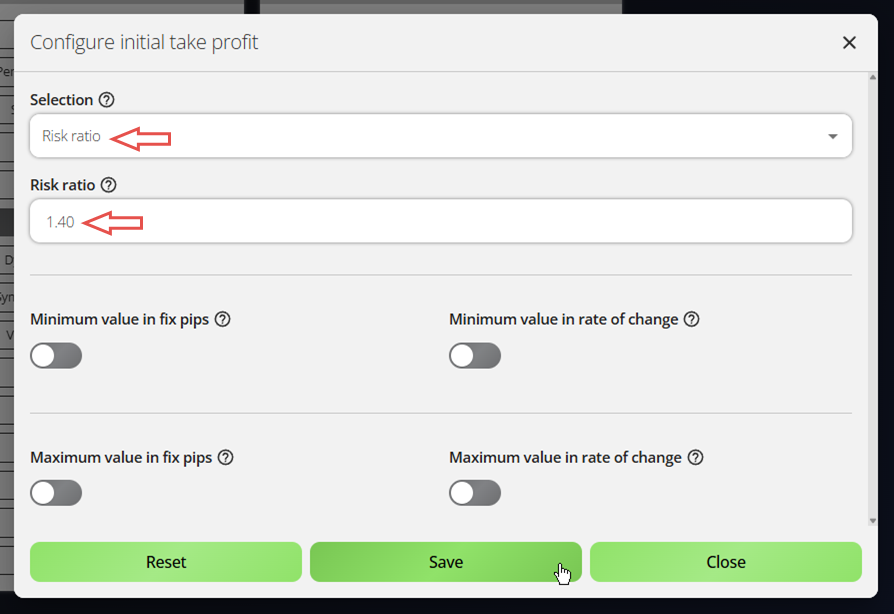
A risk ratio of 1.40 sets the take profit 40% beyond the risk taken, a favourable risk-reward balance.
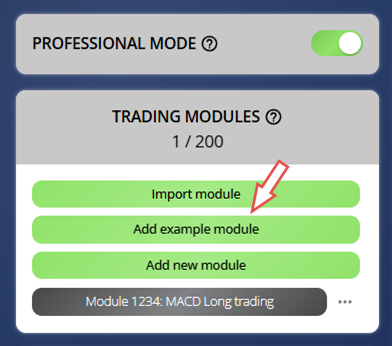
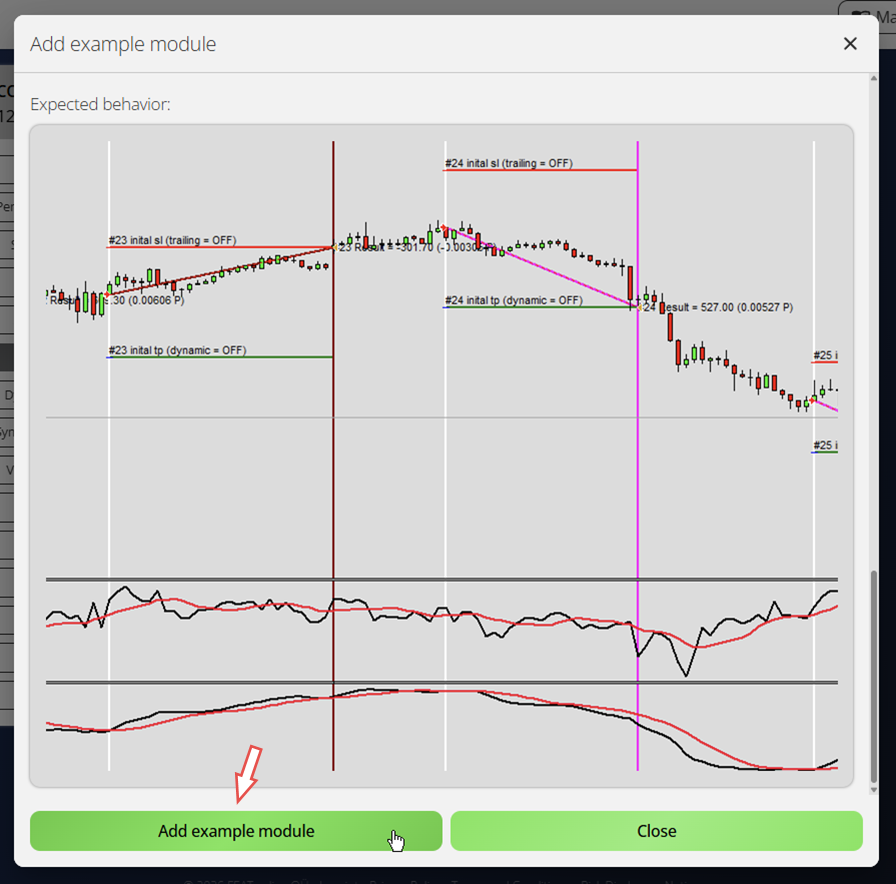
Add an example module
Second module: MACD Short trading
For the second module, we'll use the example import feature. The Expert Advisor Builder includes many ready-made examples (see further down), from simple settings demos to solid starting points for real strategies.
Step 1: Open the Examples menu
On the far left, click Add example module to open the list of pre-built examples. Each shows a description, its parameters, and a sample chart.
Step 2: Choose an example from the list
Select Example Trading Strategy | Example A2: MACD Short trading. It mirrors the MACD Long module you built, but opens short trades with the MACD lines combined in reverse order.
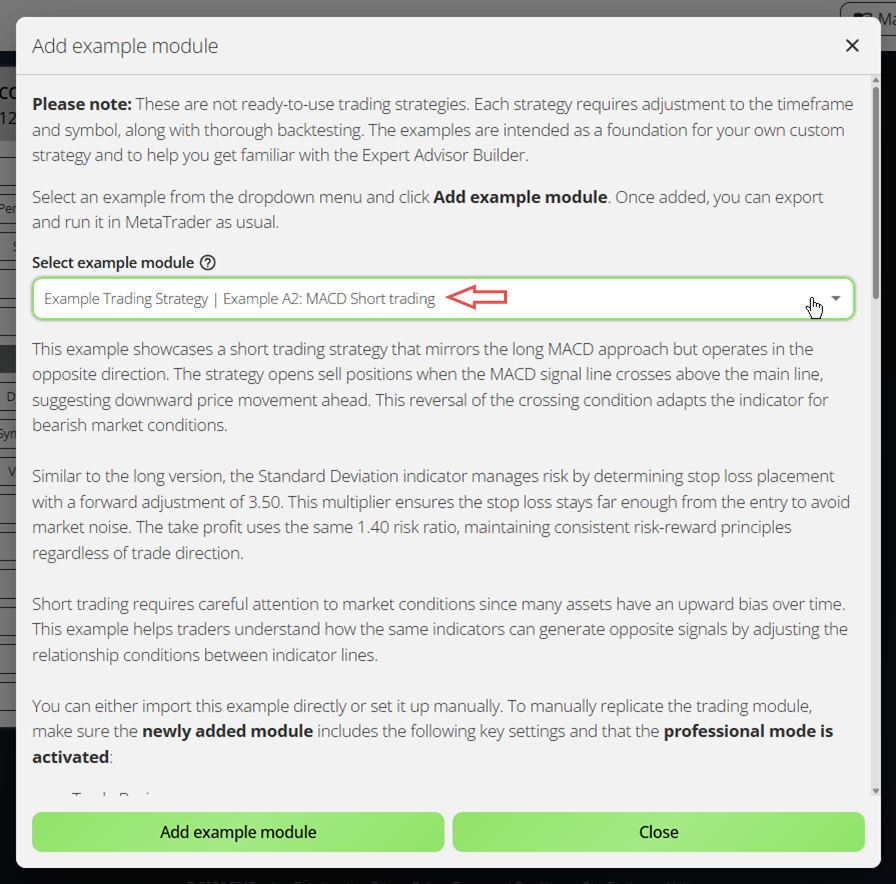
Step 3: Import the selected module and review its configuration
Click Add Example Module to import it, fully configured per the example.
Setup complete. Let's move on.
Export trading modules
Exporting modules is simple: export them all together as a ZIP, or one by one as separate text files.
Step 1: Export the configured trading modules
Click the three dots next to the module and select Export. It downloads a file named by module number (e.g. Module1234.txt) - keep the filename, as names must stay unique. Export both modules.
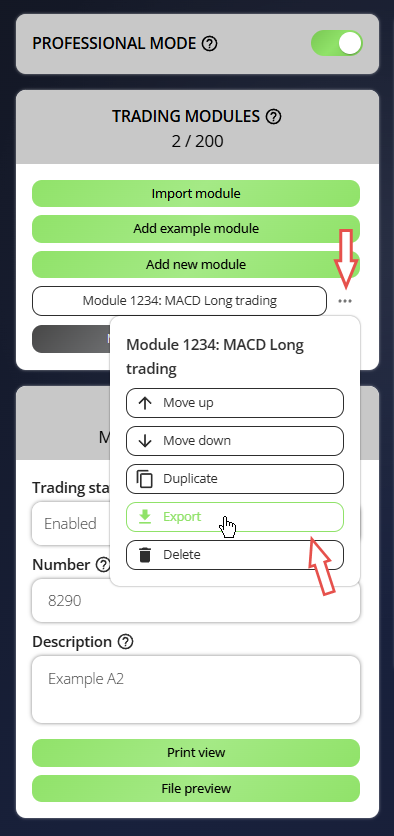
The modules are now in your downloads folder.
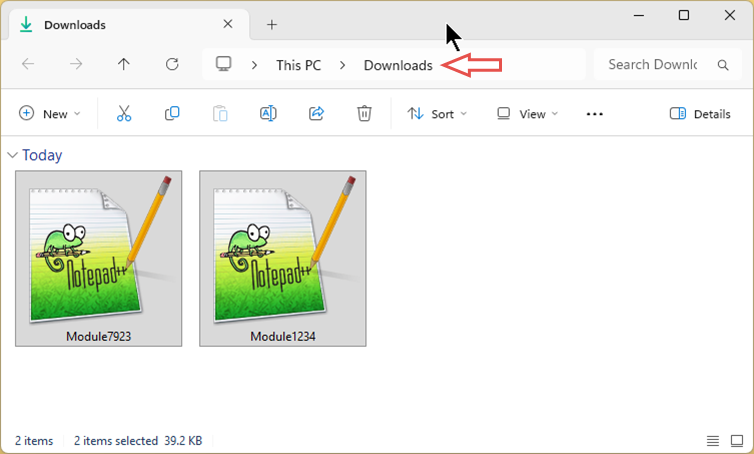
Step 2: Move the modules to the Expert Advisor Builder's input folder
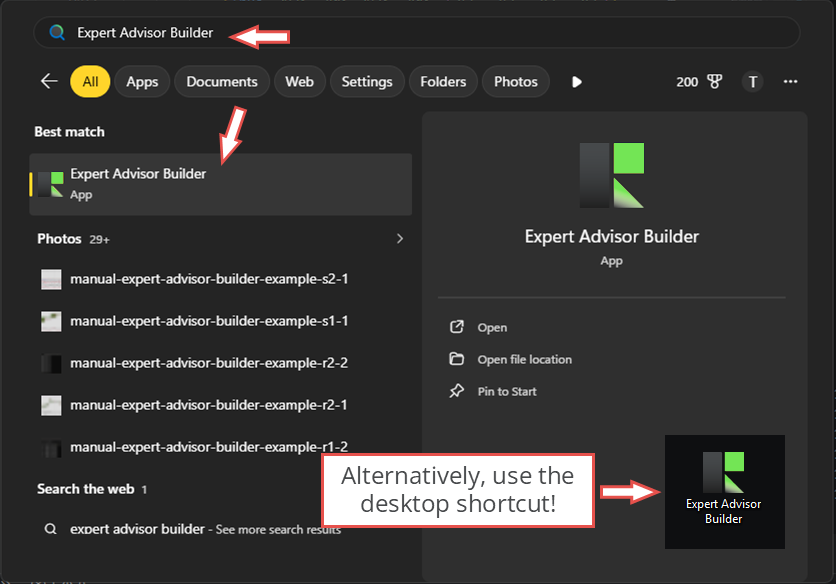
A default input folder is created during installation. Find it in several ways:
-
Open the Windows Start menu, search for Expert Advisor Builder, and open that folder. Then navigate to Expert Advisor Builder\default\Configuration
-
Use the Expert Advisor Builder shortcut on your desktop and navigate to Expert Advisor Builder\default\Configuration
-
Open Windows Explorer and paste this path into the address bar: %AppData%\MetaQuotes\Terminal\Common\Files\Expert Advisor Builder\default\Configuration
All three open the same folder, the only one the Expert Advisor Builder reads. Move both module files into it.
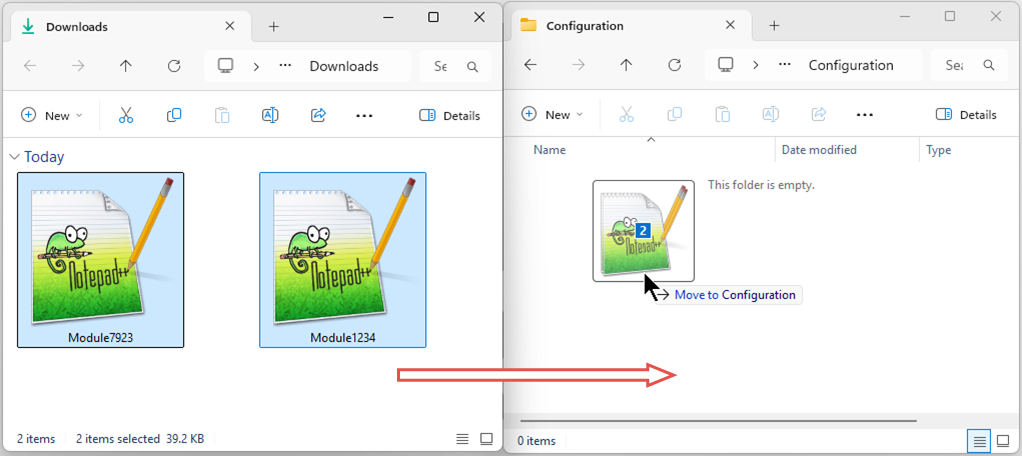
The path contains a default profile folder. You can create several and pick one at startup (e.g. one for testing, one for live). Module files always go in a Configuration subfolder.
For now, we'll continue using the default folder.
Automatically copy module files
Moving files by hand gets repetitive. The ModuleAutoMove_START script copies exported modules from your downloads folder into the correct Configuration folder automatically.
On first run it downloads a small portable Python (nothing is installed on your system), and if you have several profiles it lets you choose the target one.
After that it watches your downloads folder: when new module files appear, it backs up the current ones in the Configuration folder and copies the new ones in - no manual handling.

Test your trading strategy
Every strategy needs thorough testing on quality tick data; few work without optimization. See our article on proper strategy testing, and our MT5 Tick Data solution for accurate data going back up to 20 years.
Always test before going live with the MetaTrader strategy tester. MetaTrader 5 gives tick-accurate backtests; MetaTrader 4 is simpler and faster in visual mode.
Step 1: Open the MetaTrader platform where you installed the Expert Advisor Builder
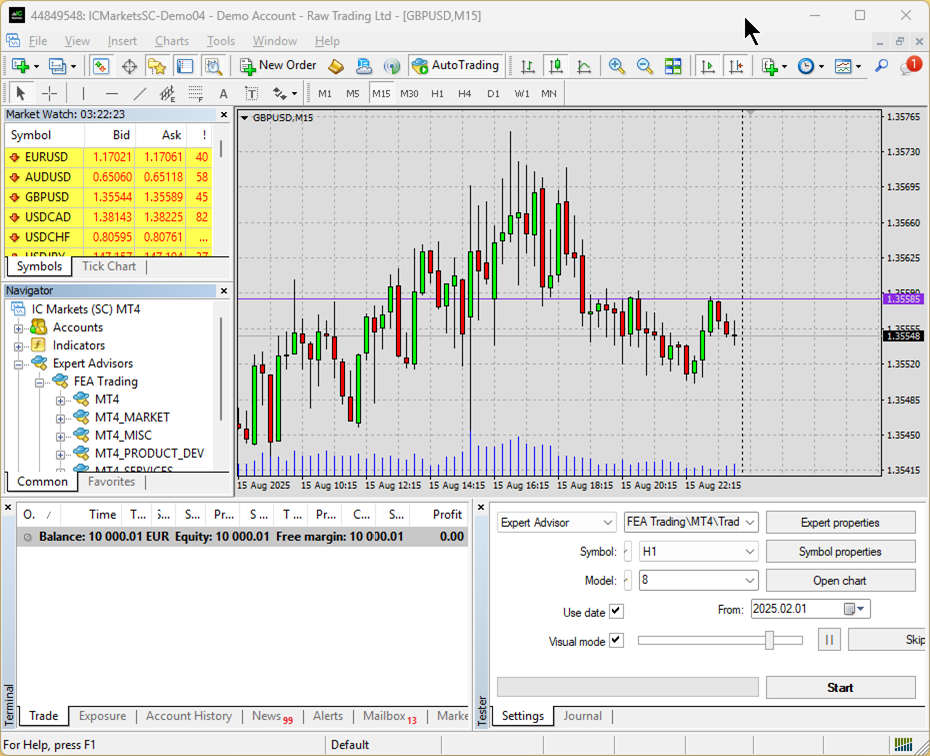
Step 2: Set up the Strategy Tester
For this getting started guide, we're using the MetaTrader 4 strategy tester. The process in MetaTrader 5 is nearly identical.
Open the strategy tester (View - Strategy Tester or Ctrl+R), go to the Settings tab, and configure:
-
Expert Advisor: Expert Advisor Builder.ex4
-
Symbol: EURUSD
-
Period: M15
-
Spread: 8
-
Model: Open price only
-
Use date: Enabled
-
Date range (From/To): Previous 4 weeks
-
Visual mode: Enabled
-
Optimization: Disabled
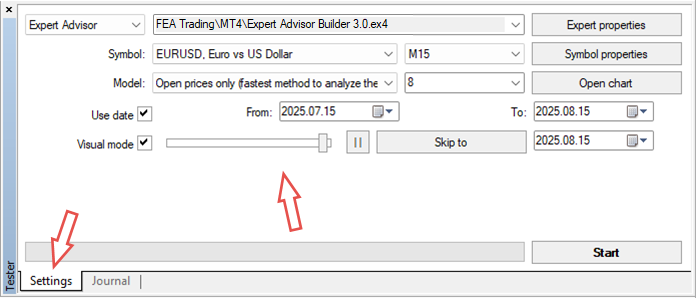
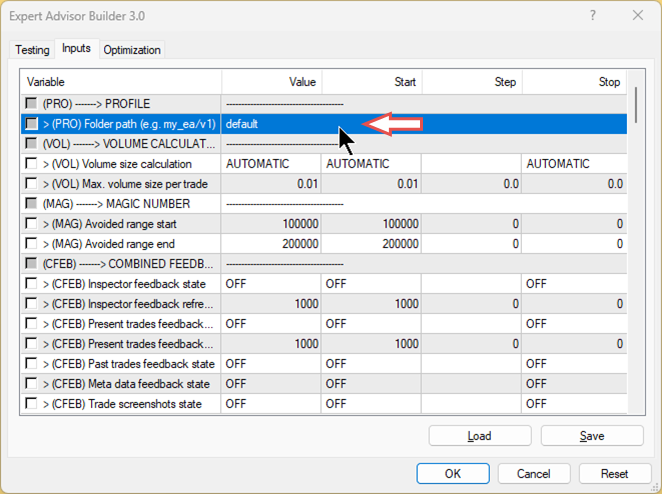
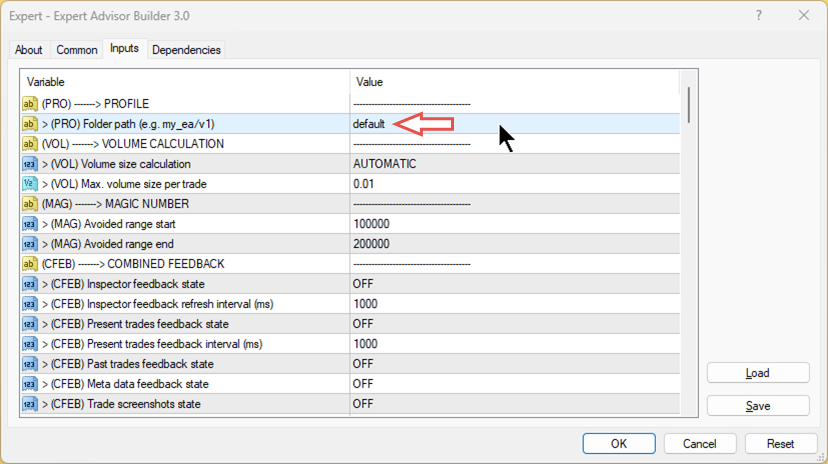
Open Expert Properties to view the inputs. The trading logic comes from the module files, so you don't need to change anything here - just note that > (PRO) Folder path (e.g. my_eas/v1) is set to default, pointing to the default profile. A full explanation of every input is in the Inputs configuration chapter (see further down).
Step 3: Start the strategy test
Close this window and click Start. The test begins shortly:
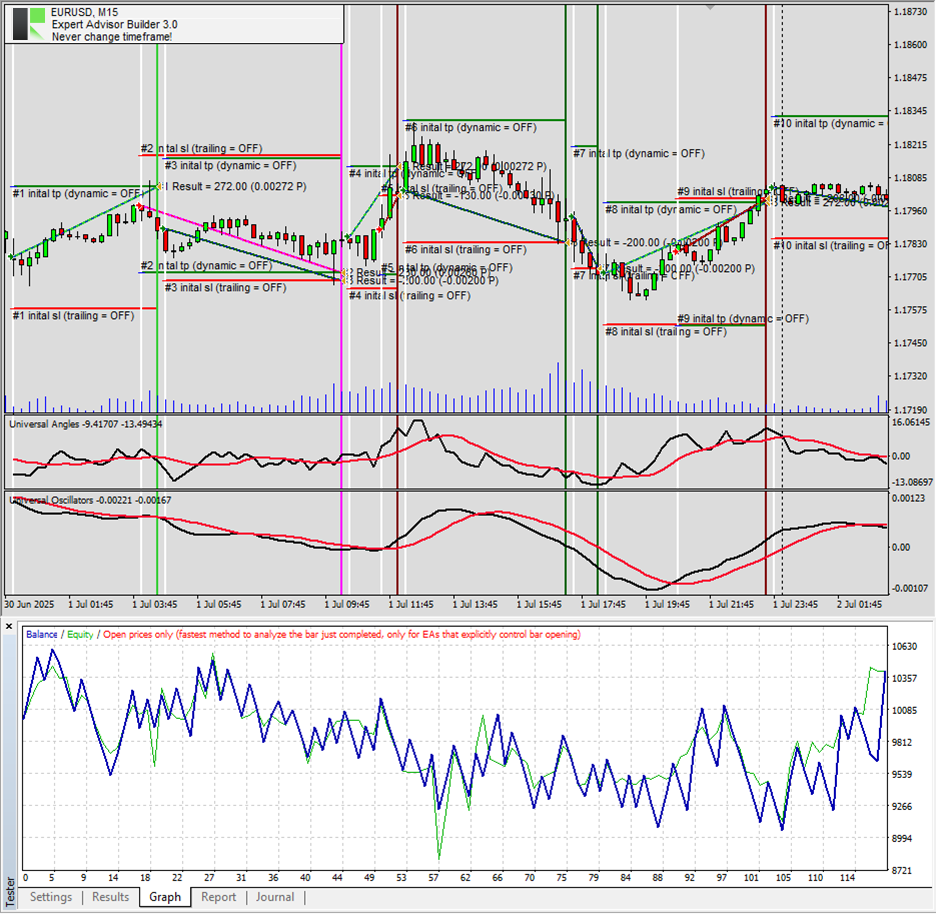
Congratulations - you've built and tested your first automated trading system without any code!
Activate on live chart
We recommend doing these steps on a demo account first, to practice risk-free.
You can also run it on a live chart. The strategy here is for demonstration only and unlikely to be profitable as-is - real strategies need testing first. Let's activate it to see how it behaves.
Step 1: Preparing the live chart
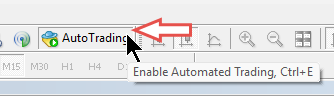
Ensure that your account settings allow automated trading before proceeding.
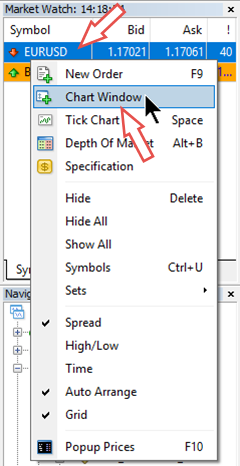
Next, open a new EURUSD chart with a 15-minute (M15) timeframe.
Step 2: Activate the Expert Advisor Builder
Drag the Expert Advisor Builder from the Navigator (under Experts) onto your EURUSD M15 chart. Right-click and choose Refresh if it isn't listed yet.
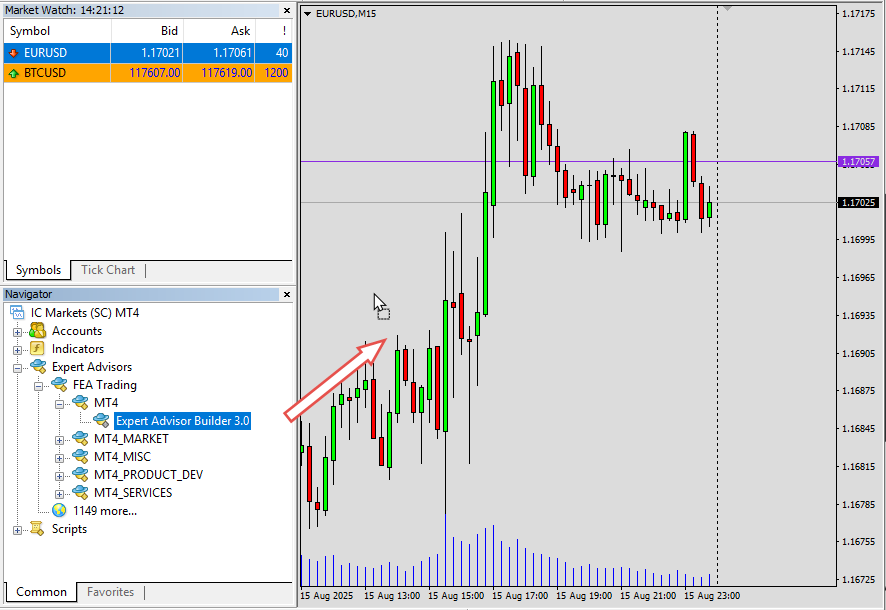
The settings dialog appears. Confirm the folder path points to your tested modules (the default folder here) and click OK. A smiley face in the top-right means it's running.
Step 3: Confirm your trading modules are loaded
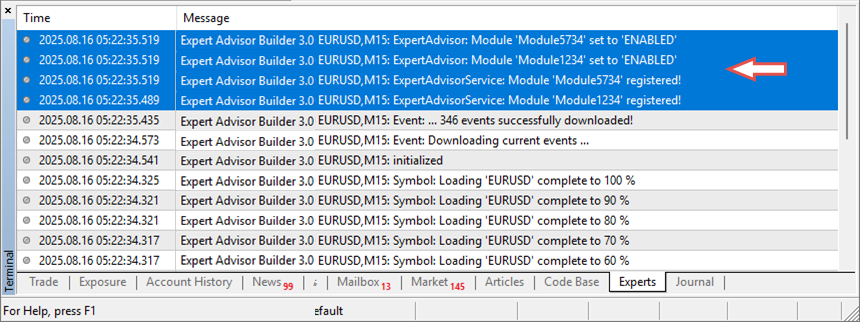
In the terminal (View - Terminal), open the Experts tab to confirm both modules in the default folder are loaded and active.
Your automated trading system is now live!
Optional Step: Change the trading status
You can change a module's trading status while it runs: open the module file, edit the second line as instructed inside it, and the change appears immediately in the Experts tab.
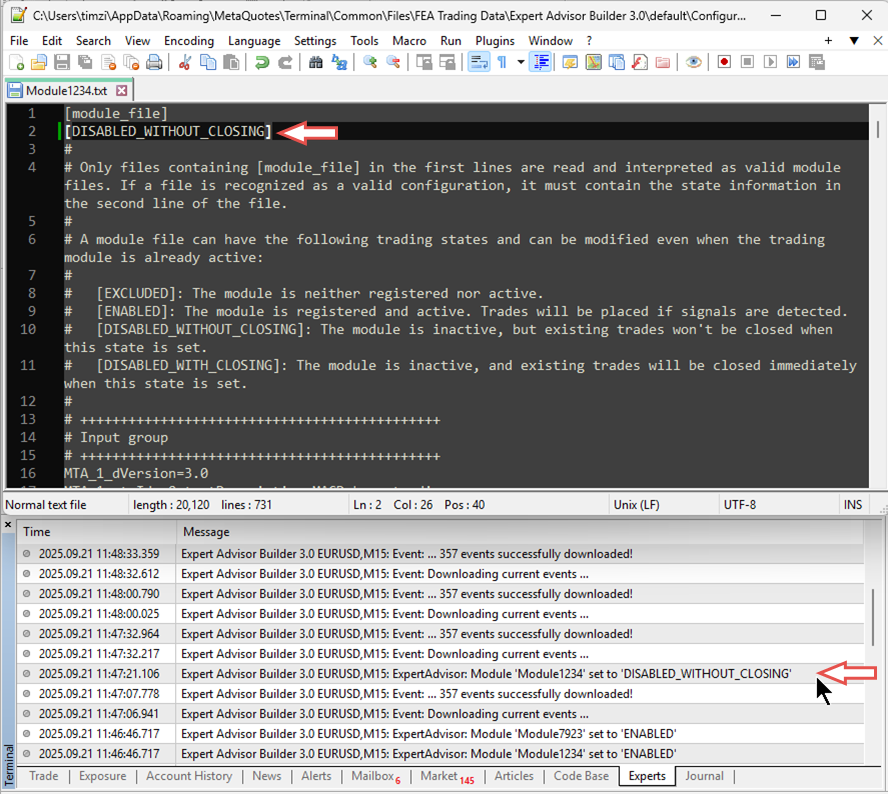
While a module is running, you can change its trading state at any time.
Iterative modifications
Many automated trading strategies require occasional adjustments. You have two options for making changes:
Option 1: Manual file editing
You can edit the module text files directly: find the parameter and change its value. This requires knowing the file structure.
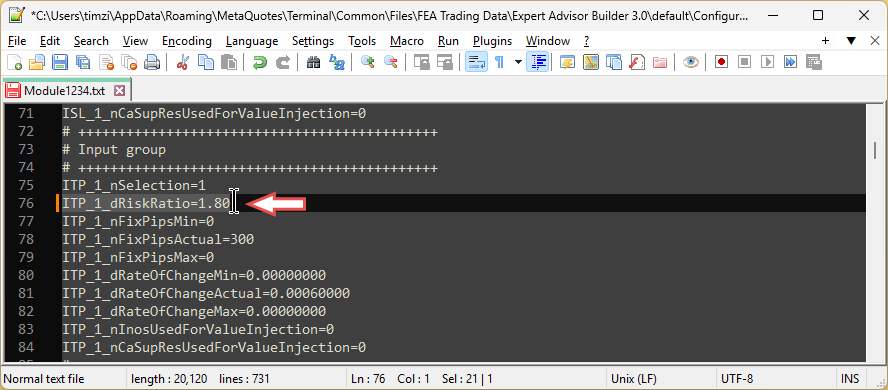
To reload during runtime, move the module out of the input folder, then add the new version (overwriting in place won't work, for security reasons). If the module isn't running, just edit and save the file.
Option 2: Using the Expert Advisor Builder
Reimport the module, edit it in the interface, and export the updated version.
This guide uses Option 2, editing via the Expert Advisor Builder.
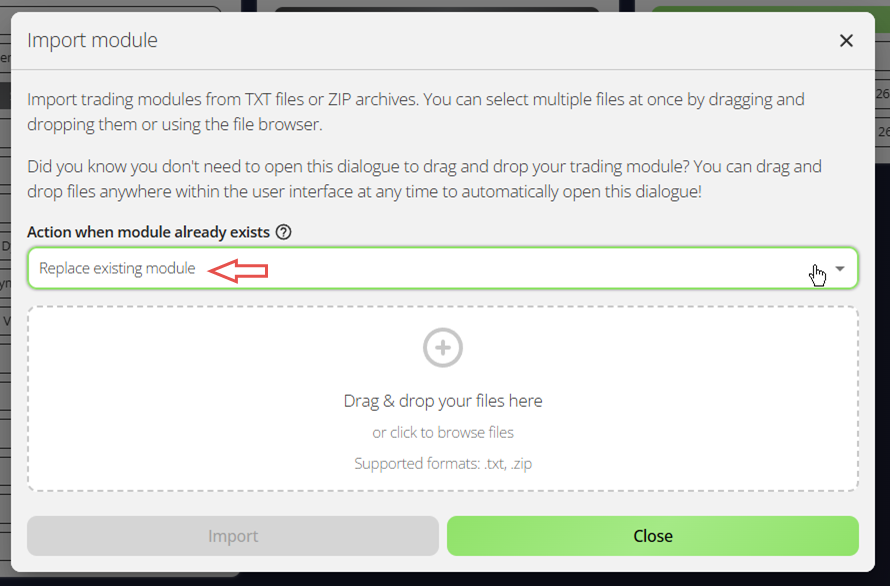
Step 1: Import the Trading Module
Open the Expert Advisor Builder and click Import module, or drag module files into the web interface.
The import dialog opens. By default it skips modules that already exist, but here you want to replace the existing one to avoid version conflicts. Set:
-
Action when module already exists: Replace existing module
Step 2: Load and modify module settings
Drag your module files from the modules folder into the interface. All settings load instantly, and you can now adjust any parameter to change the trading logic.
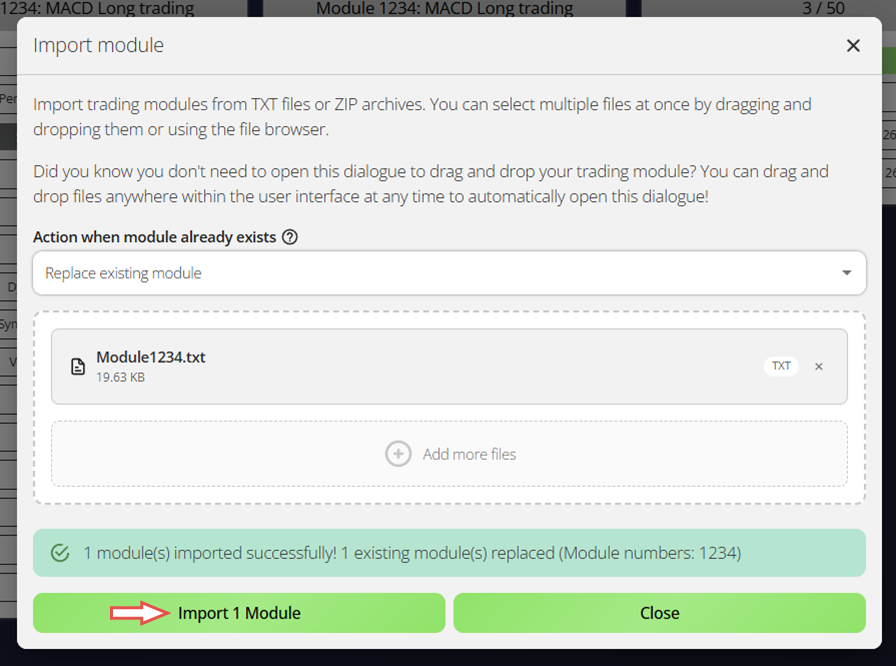
Step 3: Export and apply the updated trading system
When done, export the updated module, replace the old file in the profile folder with it, and restart the Expert Advisor Builder to apply the changes.
To reload during runtime, move the module out of the input folder, then add the new version; overwriting in place won't work, for security reasons.
Need help?
If you have any questions or need help, our support team is happy to assist.
Full user manual
To keep this post readable, the chapters below are not included here. They are part of the full user manual, which is officially provided on our website and explains everything in much more detail. You can find the link to the official user manual in the source link at the bottom of this page or via our profile.
The full manual additionally covers:
- Integrated help - the built-in help and the available extended manuals.
- Inputs configuration - every input parameter in detail: PRO (Profile), VOL (Volume calculation), MAG (Magic number), CFEB (Combined feedback), AISP (All Inspector), FIHA (File handling), NOTI (Notifications) and PAOV (Parameter override).
- Standard examples - how to load a ready-made example, plus the full catalog of example trading strategies.


")
![[XAUUSD]: Weekly Liquidity Activation Points (timings), June 22-26, 2026](https://c.mql5.com/6/1013/splash-preview-771790.png "[XAUUSD]: Weekly Liquidity Activation Points (timings), June 22-26, 2026")
")