

Trade Command Center (TCC) is a professional trade management tool for MetaTrader 4 and MetaTrader 5. It sits on your chart and handles everything from placing orders with precise risk sizing to protecting your account with automatic stop management and prop firm safety rules.
You do not need to type in lot sizes manually. You set a risk amount or percentage, set your stop loss distance, and TCC calculates the correct lot size for you.
Download Trade Command Center MT5 on MQL5 Market: https://www.mql5.com/en/market/product/164935
Download Trade Command Center MT4 on MQL5 Market: h https://www.mql5.com/en/market/product/184655
Platform Support: This documentation covers features available in both MetaTrader 4 and MetaTrader 5 versions of Trade Command Center. Separate builds are provided for each platform - please ensure you download and install the correct version for your trading platform.
1. Overview
What TCC does:
- Calculates lot size automatically based on your risk
- Places market and pending orders with one click
- Lets you drag SL/TP visually on the chart before placing
- Manages open positions: break-even, trailing stop, partial close with up to 5 TP levels
- Grid pending orders — place multiple orders at equal intervals for scaling strategies
- Protects against prop firm rule violations (max lot, daily drawdown, close time)
- Advanced Risk Guard — tracks hourly, daily, weekly, and monthly loss limits with real-time dashboard
- MarketIntel — News Protection filter and Correlation Matrix for smarter trade decisions
- Keyboard shortcuts for instant order execution
- Shows your trading performance stats
2. Installation
- Copy the EA to your Experts folder in MetaTrader 4 or MetaTrader 5
- Drag it onto any chart
- Allow automated trading (click the play button in the toolbar)
- The panel will appear in the top-left corner of the chart
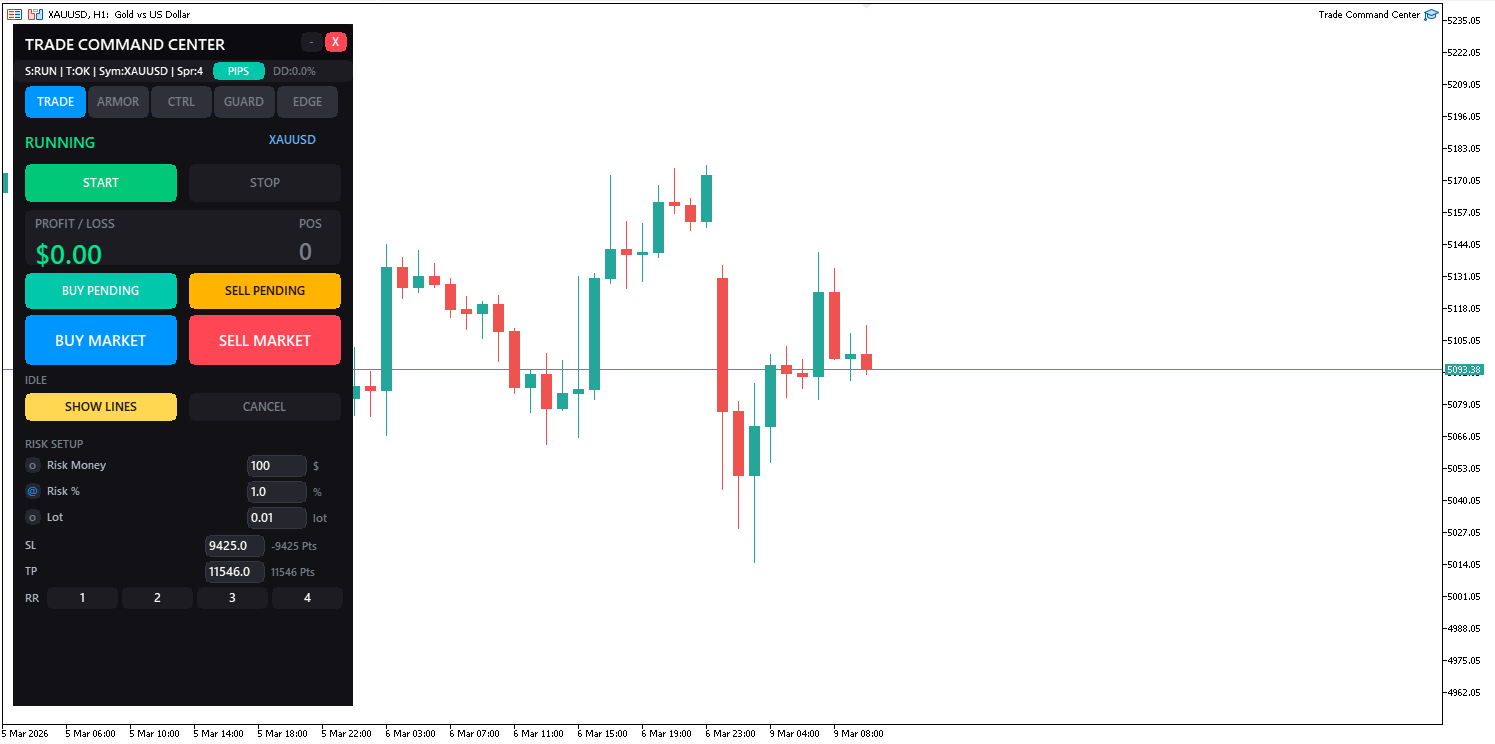
3. Panel Layout
| Element | Description |
|---|---|
| Header | Shows "TRADE COMMAND CENTER" title. Click and drag to move the panel. Displays real-time drawdown percentage. |
| Status Bar | Shows current trade state. Also has PTS/PIPS toggle and drawdown info. |
| PTS / PIPS Button | Switches all distance displays between Points and Pips. |
| Tab Bar | Five tabs: TRADE · ARMOR · CTRL · GUARD · EDGE |
| – (minimize) | Collapses the panel. Use Space hotkey to toggle quickly. |
| X (close) | Closes the panel (EA stops). |
Floating Panels: When MarketIntel features are enabled, additional floating panels appear on the chart:
- News Panel — Shows upcoming high-impact news events and protection status
- Correlation Panel — Displays correlation matrix between tracked currency pairs
- Risk Guard Monitor — Advanced metrics dashboard for hourly/daily/weekly/monthly tracking (opens from GUARD tab)
All floating panels are draggable and can be minimized independently.
4. TRADE Tab
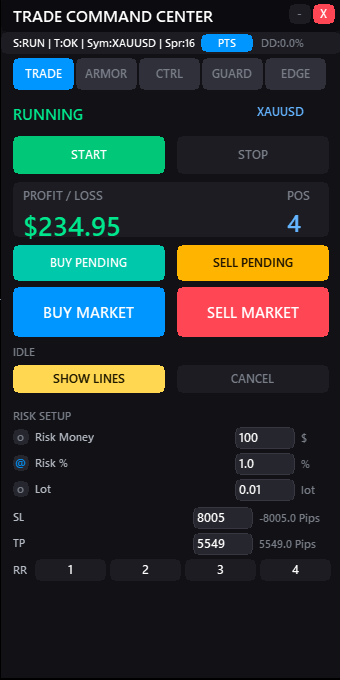
This is your main tab for placing new trades. You will spend most of your time here.
4.1 START / STOP
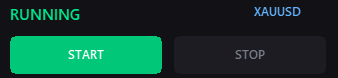
| Button | What it does |
|---|---|
| START | Arms the EA. Must be pressed before placing trades. |
| STOP | Disarms the EA. No new trades will be placed. |
4.2 P/L Display

Shows real-time total profit/loss across all open positions managed by TCC, and the number of active positions.
4.3 Order Buttons
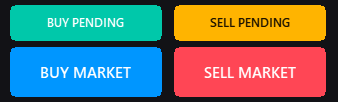
| Button | What it does |
|---|---|
| BUY PENDING | Opens Visual Mode for a buy pending order (limit or stop, detected automatically based on your entry vs. current price). |
| SELL PENDING | Opens Visual Mode for a sell pending order. |
| BUY MARKET | Opens Visual Mode for a buy market order (executes at current Ask). |
| SELL MARKET | Opens Visual Mode for a sell market order (executes at current Bid). |
All four buttons open the Visual Mode box on your chart. You drag the entry, SL, and TP lines to the exact prices you want, then confirm.
4.4 Visual Mode Controls

Once Visual Mode is active, two buttons appear:
| Button | What it does |
|---|---|
| SHOW LINES / HIDE LINES | Toggles the visual box visibility on the chart. |
| CANCEL | Cancels Visual Mode entirely, no order placed. |
The Visual Mode state label shows: IDLE / ARMED BUY / ARMED SELL / (HIDDEN)
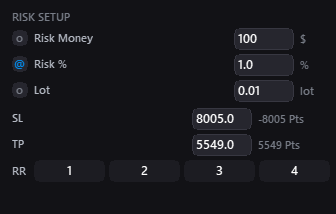
4.5 Risk Setup
This section controls how lot size is calculated for every order.
Risk Mode (pick one)
| Mode | How it works |
|---|---|
| Risk Money ($) | You specify a dollar amount to risk per trade. E.g. $100. |
| Risk % | You specify a percentage of your account balance. E.g. 1%. |
| Lot | Fixed lot size, no automatic calculation. |
SL and TP Fields
- SL — Stop loss distance in points or pips (depends on your PTS/PIPS toggle).
- TP — Take profit distance in points or pips.
These are your default values when you open Visual Mode. You can still drag them to different prices on the chart. The gray labels next to SL/TP show the equivalent pip value for reference.
RR Quick Buttons (1 · 2 · 3 · 4)
![]()
Click a number to instantly set your TP to that Risk:Reward ratio relative to your SL.
4.6 Grid Pending Orders
Located below the Risk Setup section in the TRADE tab, Grid Pending allows you to place multiple pending orders at equal intervals.
| Control | Description |
|---|---|
| Enable Grid | Checkbox to activate grid functionality for pending orders. |
| Count | Number of additional orders (1-50). Total orders = Count + 1 main order. |
| Spacing (pips) | Distance between each order level. |
| Lot per Order | Fixed lot size for each grid order. 0 = use calculated risk lot. |
| Max Total Lots | Maximum combined lot size across all grid orders. 0 = no limit. |
| Expiry (min) | Auto-cancel pending orders after this time. 0 = no expiry. |
When grid is enabled, Visual Mode shows preview lines for all grid levels. See Section 9 for detailed grid strategy guidance.
5. ARMOR Tab
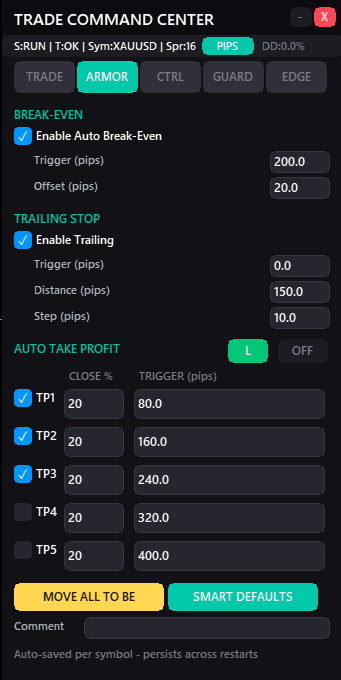
ARMOR protects your open positions automatically after they are placed. It handles break-even, trailing stop, and automatic partial take profit.
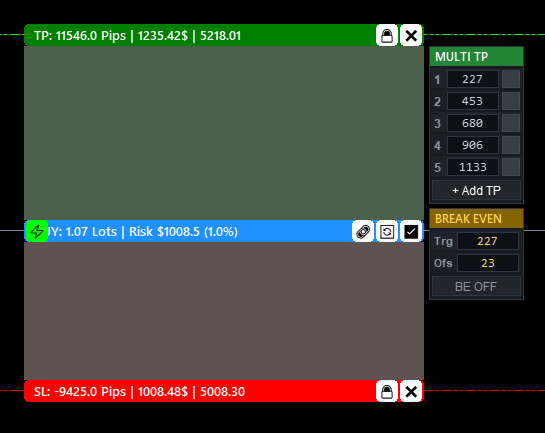
5.1 Break-Even
Moves your Stop Loss to entry price (break-even) once the trade reaches a certain profit distance.
| Field | Description |
|---|---|
| Enable Auto Break-Even | Check to activate for all new trades. |
| Trigger (pts) | How far in profit the trade must be before SL moves to break-even. |
| Offset (pts) | How many points above entry to place the new SL (to cover spread). |
5.2 Trailing Stop
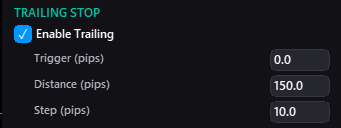
Moves your Stop Loss behind the price as it moves in your favor.
| Field | Description |
|---|---|
| Enable Trailing | Check to activate. |
| Trigger (pts) | Profit required before trailing starts (0 = starts immediately). |
| Distance (pts) | How far behind the current price the SL trails. |
| Step (pts) | Minimum move before the SL updates (reduces overtrading). |
5.3 Auto Take Profit (Multi-TP)
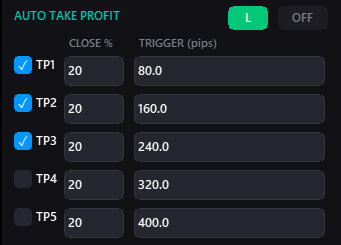
Automatically closes a portion of your position at up to 5 price levels.
| Control | Description |
|---|---|
| TP1–TP5 checkboxes | Enable/disable each level. |
| CLOSE % | What percentage of the position to close at this level. |
| TRIGGER (pips) | How many pips in profit to trigger this level. |
| L button | Show/hide TP lines on the chart. |
| OFF / ON button | Master on/off for Auto TP. |
5.4 Quick Actions
| Button | What it does |
|---|---|
| MOVE ALL TO BE | Instantly moves all open positions to break-even. |
| SMART DEFAULTS | Resets SL/TP/BE/Trail values to smart defaults based on the symbol's average spread. |
5.5 Comment Field
Sets the order comment that gets attached to trades. Useful for identifying trades in your history.
6. CTRL Tab
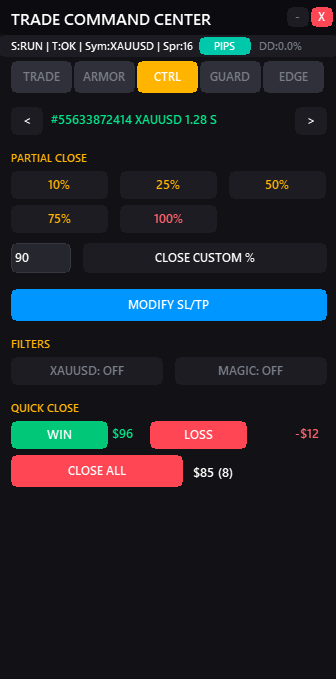
CTRL is for managing positions that are already open — closing, modifying, and filtering.
6.1 Position Navigator

Use the < and > arrows to cycle through your open positions. The selected position name and direction are shown in the center. All partial close and modify actions apply to the currently selected position.
6.2 Partial Close
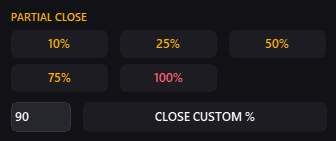
Close a specific percentage of the selected position instantly.
| Button | Closes |
|---|---|
| 10% | 10% of current position size |
| 25% | 25% of current position size |
| 50% | 50% of current position size |
| 75% | 75% of current position size |
| 100% | Entire position |
| Custom % | Type any value in the input box, then click CLOSE CUSTOM % |
6.3 Modify SL/TP
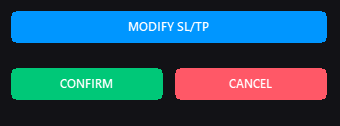
MODIFY SL/TP opens the Visual Mode box on your chart for the selected position. Drag the SL and TP lines to new prices. When modify mode is active, the button is replaced by:
- CONFIRM — Applies the new SL/TP to the position.
- CANCEL — Discards changes, no modification sent.
6.4 Filters
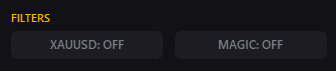
Filters control which positions are affected by the Quick Close buttons below.
| Button | Effect when ON |
|---|---|
| SYMBOL: ON | Only positions on the current chart symbol are included. |
| MAGIC: ON | Only positions with the EA's magic number are included. |
6.5 Quick Close
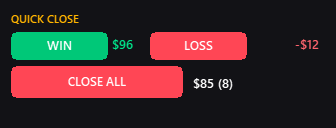
| Button | What it closes |
|---|---|
| WIN | All profitable positions (after filter). The dollar amount shown is a live running total. |
| LOSS | All losing positions (after filter). The dollar amount shown is a live running total. |
| CLOSE ALL | All positions (after filter). |
7. GUARD Tab
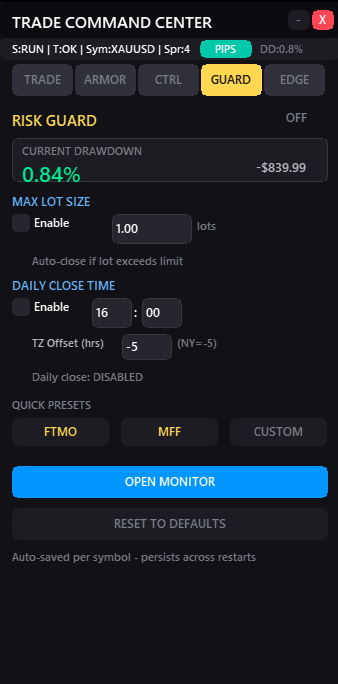
GUARD is your risk protection layer — especially useful for prop firm accounts where you must not exceed daily loss limits or lot size rules.
7.1 Drawdown Display
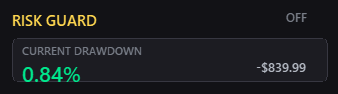
Shows your current daily drawdown in both percentage and dollar amount, updated in real time.
7.2 Max Lot Size
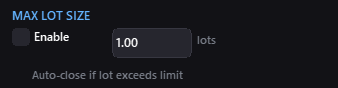
| Field | Description |
|---|---|
| Enable | Activates lot size enforcement. |
| Lots field | Maximum allowed lot size per trade. |
7.3 Daily Close Time
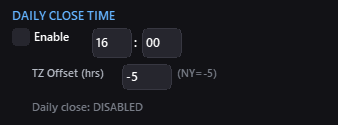
Automatically closes all positions at a specified time.
| Field | Description |
|---|---|
| Enable | Activates daily close. |
| Hour : Minute | Time to close all trades (e.g. 16:00). |
| TZ Offset (hrs) | Difference between your broker's server time and your target timezone (e.g. -5 for New York). |
The countdown Time until close: HH:MM updates live.
7.4 Quick Presets
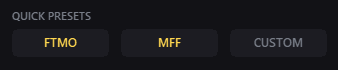
One-click configuration for common prop firm rules:
| Preset | What it sets |
|---|---|
| FTMO | Configures max lot and daily drawdown for standard FTMO challenge rules. |
| MFF | Configures for MyForexFunds rules. |
| CUSTOM | Opens manual configuration. |
7.5 Monitor
OPEN MONITOR — Opens the Advanced Risk Guard mini-dashboard which shows hourly, daily, weekly, and monthly loss tracking.

8. EDGE Tab
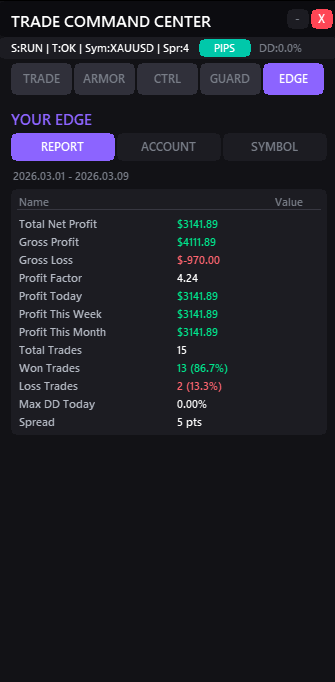
EDGE shows your trading performance statistics directly on the chart — no need to export a report.
8.1 Sub-views
| View | Shows |
|---|---|
| REPORT | Stats for positions managed by TCC (Win rate, profit factor, avg win/loss, etc.) |
| ACCOUNT | Overall account performance stats. |
| SYMBOL | Stats filtered to the current symbol only. |

9. Grid Pending Orders
Grid Pending Orders allows you to place multiple pending orders automatically at equal intervals above or below your entry price. This is useful for scaling into positions or building a grid trading strategy.
9.1 Grid Settings (TRADE Tab)
Grid controls are located in the TRADE tab below the Risk Setup section.
| Field | Description |
|---|---|
| Enable Grid | Master on/off toggle for grid functionality. |
| Count | Number of pending orders to place (1-50). Total orders = Count + 1 main order. |
| Spacing (pips) | Distance between each pending order in pips. |
| Lot per Order | Fixed lot size for each pending order. If 0, uses calculated lot from Risk Setup. |
| Max Total Lots | Safety limit: total lots across all grid orders. 0 = no limit. |
| Expiry (minutes) | Auto-cancel pending orders after this time. 0 = no expiry. |
9.2 How It Works
When Grid is enabled and you place a BUY PENDING or SELL PENDING order:
- The main order is placed at your entry price (set in Visual Mode).
- Additional pending orders are placed at intervals above (for buy stop) or below (for sell stop) the entry.
- Each order shares the same SL/TP distance from its own entry price.
- Grid preview lines appear on the chart in Visual Mode showing where each order will be placed.
9.3 Use Cases
- Breakout scaling: Place multiple buy stops above resistance to scale in as momentum builds.
- Range trading: Place sell limits at intervals above current price, buy limits below.
- Averaging: Grid of buy limits below current price to average down on dips.
10. MarketIntel
MarketIntel is a suite of intelligent market analysis tools that help you avoid high-risk trading conditions and understand correlation between instruments.
10.1 News Protection
Automatically prevents trading or closes positions during high-impact news events.
How to Enable
News Protection is configured in the EA Properties (Inputs) before attaching to a chart:
| Input Parameter | Description |
|---|---|
| NewsProtection_Enable | Enable news filter (default: false). |
| NewsProtection_MinutesBefore | How many minutes before news event to activate protection (default: 15). |
| NewsProtection_MinutesAfter | How many minutes after news event to keep protection active (default: 15). |
| NewsProtection_ImportanceLevel | Minimum importance: LOW / MEDIUM / HIGH (default: HIGH). |
| NewsProtection_ActionMode | What to do during news: BLOCK_NEW / CLOSE_ALL / ALERT_ONLY. |
| NewsProtection_CurrencyOverride | Filter news by currency (e.g. "USD,EUR"). Empty = auto-detect from symbol. |
Action Modes
| Mode | Behavior |
|---|---|
| BLOCK_NEW | Prevents placing new trades during news window. Existing positions remain open. |
| CLOSE_ALL | Closes all open positions before news event and blocks new trades. |
| ALERT_ONLY | Shows warning notification but allows trading. |
News Panel
When News Protection is enabled, a floating News Panel appears on your chart showing:
- Upcoming news events for the next 24 hours
- Event time, currency, importance level, and description
- Countdown timer to next event
- Current protection status (Active / Inactive)
The panel can be dragged to reposition it on the chart. Click the minimize button to collapse it.
10.2 Correlation Matrix
Shows real-time correlation coefficients between multiple currency pairs. Helps you avoid over-exposure by identifying when pairs move together.
How to Enable
Correlation is configured in the EA Properties (Inputs):
| Input Parameter | Description |
|---|---|
| MarketCorrelation_Enable | Enable correlation analysis (default: false). |
| MarketCorrelation_Symbols | Comma-separated list of symbols to track (e.g. "EURUSD,GBPUSD,USDJPY"). |
| MarketCorrelation_Timeframe | Timeframe for correlation calculation (default: H1). |
| MarketCorrelation_Bars | Number of bars to analyze (default: 100). |
| MarketCorrelation_UpdateMinutes | How often to recalculate correlation (default: 15 minutes). |
| MarketCorrelation_Method | Calculation method: PEARSON / SPEARMAN (default: PEARSON). |
Understanding Correlation Values
| Value Range | Meaning |
|---|---|
| +0.8 to +1.0 | Strong positive correlation — pairs move together. Avoid trading both in same direction. |
| +0.5 to +0.8 | Moderate positive correlation — some tendency to move together. |
| -0.5 to +0.5 | Low/no correlation — pairs move independently. |
| -0.8 to -0.5 | Moderate negative correlation — pairs tend to move opposite. |
| -1.0 to -0.8 | Strong negative correlation — pairs move in opposite directions. |
Correlation Panel
When Correlation is enabled, a floating Correlation Panel appears showing a matrix of all tracked pairs with color-coded correlation values:
- Green: Strong positive correlation
- Red: Strong negative correlation
- Gray/White: Low or no correlation
The panel updates automatically based on the configured update interval. Drag to reposition, click minimize to collapse.
11. Keyboard Shortcuts
TCC supports keyboard shortcuts for faster trading. Hotkeys work when the chart window is active and TCC is running.
11.1 Default Hotkeys
| Key | Action |
|---|---|
| B | Open Visual Mode for Buy Market order |
| S | Open Visual Mode for Sell Market order |
| Shift + B | Open Visual Mode for Buy Pending order |
| Shift + S | Open Visual Mode for Sell Pending order |
| ESC | Cancel Visual Mode / Cancel drag operation |
| Enter | Confirm Visual Mode order (when lines visible) |
| C | Close all positions (filtered by current CTRL tab filters) |
| Space | Toggle panel minimize/maximize |
11.2 Tips for Using Hotkeys
- Press B to instantly arm a buy order, drag your levels, press Enter to execute — no mouse clicks on buttons needed.
- Press ESC at any time to cancel if you change your mind.
- Hotkeys respect the EA's running state — if TCC is stopped, hotkeys won't place trades.
12. Visual Mode (In Depth)
Visual Mode is TCC's most powerful feature. Instead of typing in numbers, you draw your trade directly on the chart.
9.1 Opening Visual Mode
- Click any of the 4 order buttons (BUY MARKET, SELL MARKET, BUY PENDING, SELL PENDING).
- A color-coded trade box appears on the chart.
- Green zone = TP area, Red zone = SL area, Gray line = Entry.
9.2 Moving Lines
- Click a zone — the cursor changes to indicate drag mode.
- Move your mouse to the desired price.
- Click again to lock the position.
- Press ESC to cancel drag mode.
9.3 Buttons on the Visual Box
| Button | Function |
|---|---|
| ✓ (Confirm) | Executes the order with the current SL/TP/Entry prices. |
| × (Entry type) | Switches between Market / Limit / Stop order type. |
| SL / TP lock icons | Lock a line so it doesn't move when the box is dragged. |
| SL / TP disable | Remove SL or TP (trade without a stop, use carefully). |
| RR Sync | Locks the Risk:Reward ratio — moving SL adjusts TP automatically. |
| BE bar | Drag the Break-Even trigger line inside the TP zone. |
| Multi-TP panel | Shows TP1–TP5 levels as lines inside the TP zone. Click to toggle each level on/off. |
12.4 Enhanced Multi-TP in Visual Mode
When Visual Mode is active, you can configure Multi-TP levels directly on the chart:
- Multi-TP Panel: A floating panel appears showing TP1-TP5 checkboxes and close percentages.
- Click checkbox: Toggle each TP level on/off.
- Drag TP lines: Adjust each TP level's price by dragging its line in the green zone.
- Click percentage: Opens edit overlay to change the close percentage for that level.
- Add TP button: Adds the next TP level (up to 5 total).
Multi-TP settings configured in Visual Mode are saved per-position, overriding the global Multi-TP settings from ARMOR tab for that specific trade.
12.5 Break-Even Control in Visual Mode
A Break-Even (BE) panel appears when Visual Mode is active, showing:
- BE checkbox: Enable/disable auto break-even for this trade.
- Trigger field: Profit distance required before moving to BE.
- Offset field: Points above entry to place SL (covers spread).
- BE line: Visual line showing where BE will trigger (draggable).
Click the edit icon next to Trigger or Offset to modify values directly on the chart.
9.4 Calculated Lot Size
The lot size calculated from your risk settings is shown on the visual box in real time. It updates as you drag the SL line.
9.5 Modifying an Existing Position
- Go to CTRL tab.
- Navigate to the position with the < > arrows.
- Click MODIFY SL/TP.
- Drag to new prices.
- Click CONFIRM or CANCEL — no tab switching needed.
13. Tips & Best Practices
General
- Always press START before trading sessions and STOP when done.
- Use the PIPS/PTS toggle to work in the unit you're most comfortable with.
- Settings are auto-saved per symbol — switching charts keeps your risk setup intact.
Risk Management
- Use Risk % mode for consistent position sizing as your balance grows.
- Set ARMOR's break-even early in your journey — it eliminates the risk of a winner turning into a loser.
- Use Multi-TP to lock in partial profits while letting the rest run.
Prop Firm Accounts
- Use GUARD to set a hard daily loss limit matching your firm's rules.
- Enable Max Lot protection to prevent accidentally exceeding size limits.
- Set Daily Close Time to match your firm's 5PM NY cutoff (TZ Offset = -5 for NY).
- Use FTMO or MFF quick presets as a starting point.
Grid Pending Strategy
- Use Grid Pending for breakout strategies — place multiple buy stops above key resistance levels.
- Set Expiry time when using grid to avoid accumulating stale pending orders.
- Monitor Max Total Lots to prevent over-exposure if all grid orders trigger.
- Grid works best in trending markets with clear breakout levels — avoid in choppy conditions.
MarketIntel Usage
- Enable News Protection on volatile pairs (GBP, USD majors) to avoid getting caught in whipsaws.
- Set CLOSE_ALL mode for high-impact news (NFP, FOMC, CPI) if you trade intraday.
- Use BLOCK_NEW mode for medium-impact news — protects entries while letting runners continue.
- Check Correlation Matrix before opening multiple trades — avoid doubling exposure on highly correlated pairs.
- If two pairs show >+0.85 correlation, treat them as the same trade for risk sizing purposes.
Hotkey Efficiency
- Learn the core hotkeys (B, S, Enter, ESC) — they cut execution time in half.
- Use Space to quickly minimize the panel when analyzing the chart.
- Press ESC immediately if you accidentally trigger Visual Mode — no need to click Cancel.
Advanced Risk Guard
- Enable Advanced Risk Guard for hourly, daily, weekly, and monthly loss tracking.
- Open the Monitor dashboard (GUARD tab → OPEN MONITOR) to see all metrics in real-time.
- Set Max Day Loss as your hard stop — the EA will close all positions and block trading when hit.
- Use Max Equity DD for drawdown-based protection (useful for prop firm accounts).
- The dashboard is draggable — position it where it doesn't block your chart view.
Beginner Workflow
- Open chart → Start EA → Press START.
- Set Risk % to 1%.
- Set SL distance based on your setup.
- Click SHOW LINES to check Visual Mode is working.
- Click BUY MARKET or SELL MARKET.
- Drag lines to desired levels on the chart.
- Click Confirm (✓) on the visual box.
- The trade is live — ARMOR handles the rest.
Advanced Workflow
- Enable News Protection and Correlation Matrix in EA Properties.
- Set up Advanced Risk Guard with daily/weekly loss limits matching your risk plan.
- Configure Multi-TP in ARMOR tab (e.g., 20% at 1R, 20% at 2R, 60% at 3R).
- Use hotkeys (B/S) to enter Visual Mode instantly.
- Adjust Multi-TP levels directly on the visual box if your setup differs from default.
- Press Enter to execute when levels are set.
- Monitor the floating News Panel for upcoming events — avoid trading 15 minutes before high-impact news.
- Check EDGE tab weekly to track your win rate and profit factor.


")
")
")