")

Indicators Available here:
MT4 Version:
https://www.mql5.com/en/market/product/160816/
MT5 Version:
https://www.mql5.com/en/market/product/160817/

Introduction
Order blocks show you where big institutions bought or sold in size before a major price move.
And here’s the important part:
When price comes back to those same areas later, it often reacts again — because that’s where smart money is willing to step in.
This guide will show you:
-
What order blocks really are
-
How to spot them correctly
-
How to avoid bad signals
-
And how to actually trade them with confidence
What Are Order Blocks?
An order block forms when price moves sideways in a very tight range (usually 0.1% to 1%) while volume quietly builds up.
This is institutions accumulating or distributing positions without moving the market too much.
Then — boom — price breaks out.
That quiet zone before the explosion is your order block.
Think of it like this:
Big players can’t just buy or sell all at once. That would move price against them.
So instead, they:
-
Accumulate quietly
-
In tight ranges
-
With higher-than-normal volume
When you spot that combination, you’re probably looking at institutional activity.
There are two types:
Bullish Order Blocks
-
Form before a strong move up
-
Later act as support
Bearish Order Blocks
-
Form before a strong move down
-
Later act as resistance
The key idea:
It is difficult to spot fake or true breakouts right after an OB forms. Trick is to wait and watch for bounce back.
Price might not bounce back, but instead go through the block, in which case it was not a strong SR area and will thus be deleted.
But if price does bounce, it will start forming a range near it. Best trades are to wait for this range and then a strong price reversal candle:

Core Features (Quick Overview)
This indicator gives you:
-
Automatic detection of consolidation zones
-
Volume filtering to remove noise
-
Multiple volume calculation methods
-
Automatic removal of invalidated blocks
-
Forward projection of blocks
-
Entry and exit Orderblock alerts
Confluence Is King 👑
Order blocks work best when combined with:
-
Previous swing levels
-
Moving averages
-
Support & resistance (Pivots or Quarter areas)
-
Trendlines
More confirmations = stronger trade
Volume Matters
-
3.0x+ volume = very strong block
-
2.0x volume = weaker
-
The indicator helps filter these automatically

Best Settings by Timeframe
Scalping (15M+)
-
Consolidation: 2–3 bars
-
Volume lookback: 10–15
-
Threshold: 1.5x – 2.5x
-
Extension: 200–300 bars
Day Trading (H1)
-
Consolidation: 3–4 bars
-
Volume lookback: 20
-
Threshold: 2.5x – 3.5x (or better yet - remove upper threshold by setting to 0)
-
Extension: 500 bars
Swing Trading (4H/Daily)
-
Consolidation: 4–5 bars
-
Volume lookback: 20–30
-
Threshold: 3x – 0 (remove upper threshold by setting to 0)
-
Enable Extend Till Current Bar
Trend Following (4H)
-
Consolidation: 3 bars
-
Volume lookback: 25
-
Threshold: 3.5x – 5.0x
-
Only trade with the trend
How the Indicator Works (In Simple Terms)
Consolidation Detection
-
It looks for 3+ candles in a very tight range
-
If volume is higher than normal → it marks it as an order block
Tight ranges = controlled, professional accumulation
Volume Calculation Methods
-
Simple: Basic comparison
-
Relative: Adjusts for market conditions (best for most people)
-
Weighted: Focuses more on recent volume
Volume Strength Filtering
You can choose to only show blocks between:
-
Example: 1.2x to 3.0x
This helps avoid weak signals.
You can also use the VolumeCandles.ex4 to see if a high volume bar bounces off the range forming near order block.
This indicator is attached below at end of post. Main idea is to look for confirmation.
Block Extension
-
Blocks are projected into the future
-
Default: 500 bars
-
Shows:
-
How long a zone stays relevant
-
Which zones are still in play
-
If Extend Till Current Bar is enabled, all blocks extend to the present candle.
Mitigation (Invalidation)
If price fully breaks through a block, it gets:
Automatically removed.
No more trading dead levels.
Full Settings
Main Settings
-
Object Prefix: For running multiple versions
-
Consolidation Lookback:
-
Lower = more signals, lower quality
-
Higher = fewer signals, higher quality
-
-
Breakout Threshold %:
-
Lower = tighter, stronger blocks
-
-
Maximum Order Blocks: How many are shown
Volume Settings
-
Method: Simple / Relative / Weighted
-
Lookback: Usually 20
-
Threshold Range: Your acceptable volume strength
-
Refresh Rate: Speed vs CPU usage
Extension Settings
-
How far blocks project
-
How far back to scan
-
Whether to extend to current candle
-
Whether to avoid projecting too far into the future
Colors & Alerts
-
Customize bullish/bearish colors
-
Alerts for:
-
Entry
-
Exit
-
true/false: Exit in direction of Order block type only: Trend-only exits
-
Why Order Blocks Actually Work
Institutions don’t chase price.
They:
-
Accumulate quietly
-
In tight ranges
-
Then defend those levels later
Order blocks let you see exactly where that happened.
So instead of guessing:
You’re trading where big money already committed.
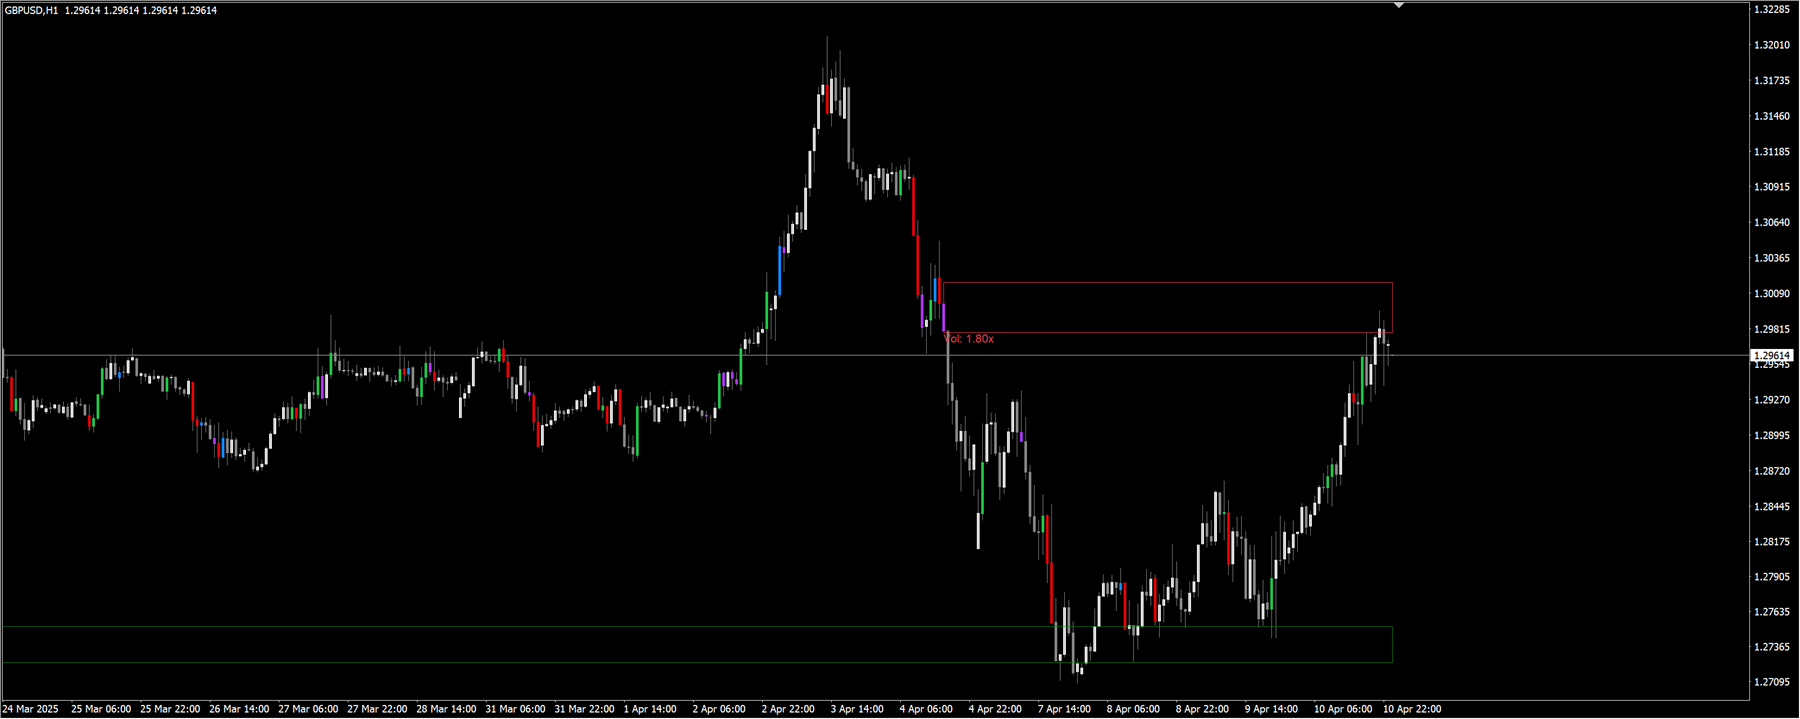
Good volatility sideways market, price will keep closing the gaps between order blocks:
Common Questions
Which blocks should I trade?
-
The strongest volume ones
-
The most recent ones
-
The ones that line up with structure
Touched vs Broken?
-
Touch + reversal = valid
-
Clean break through = invalid (mitigated)
Should I trade every block?
No.
Always check:
-
Trend
-
Structure
-
Confluence
Best timeframe?
-
Works best: H1 to H4 (maybe even daily). But best is H1.
-
Too noisy on M1-M15
-
Too rare on Weekly
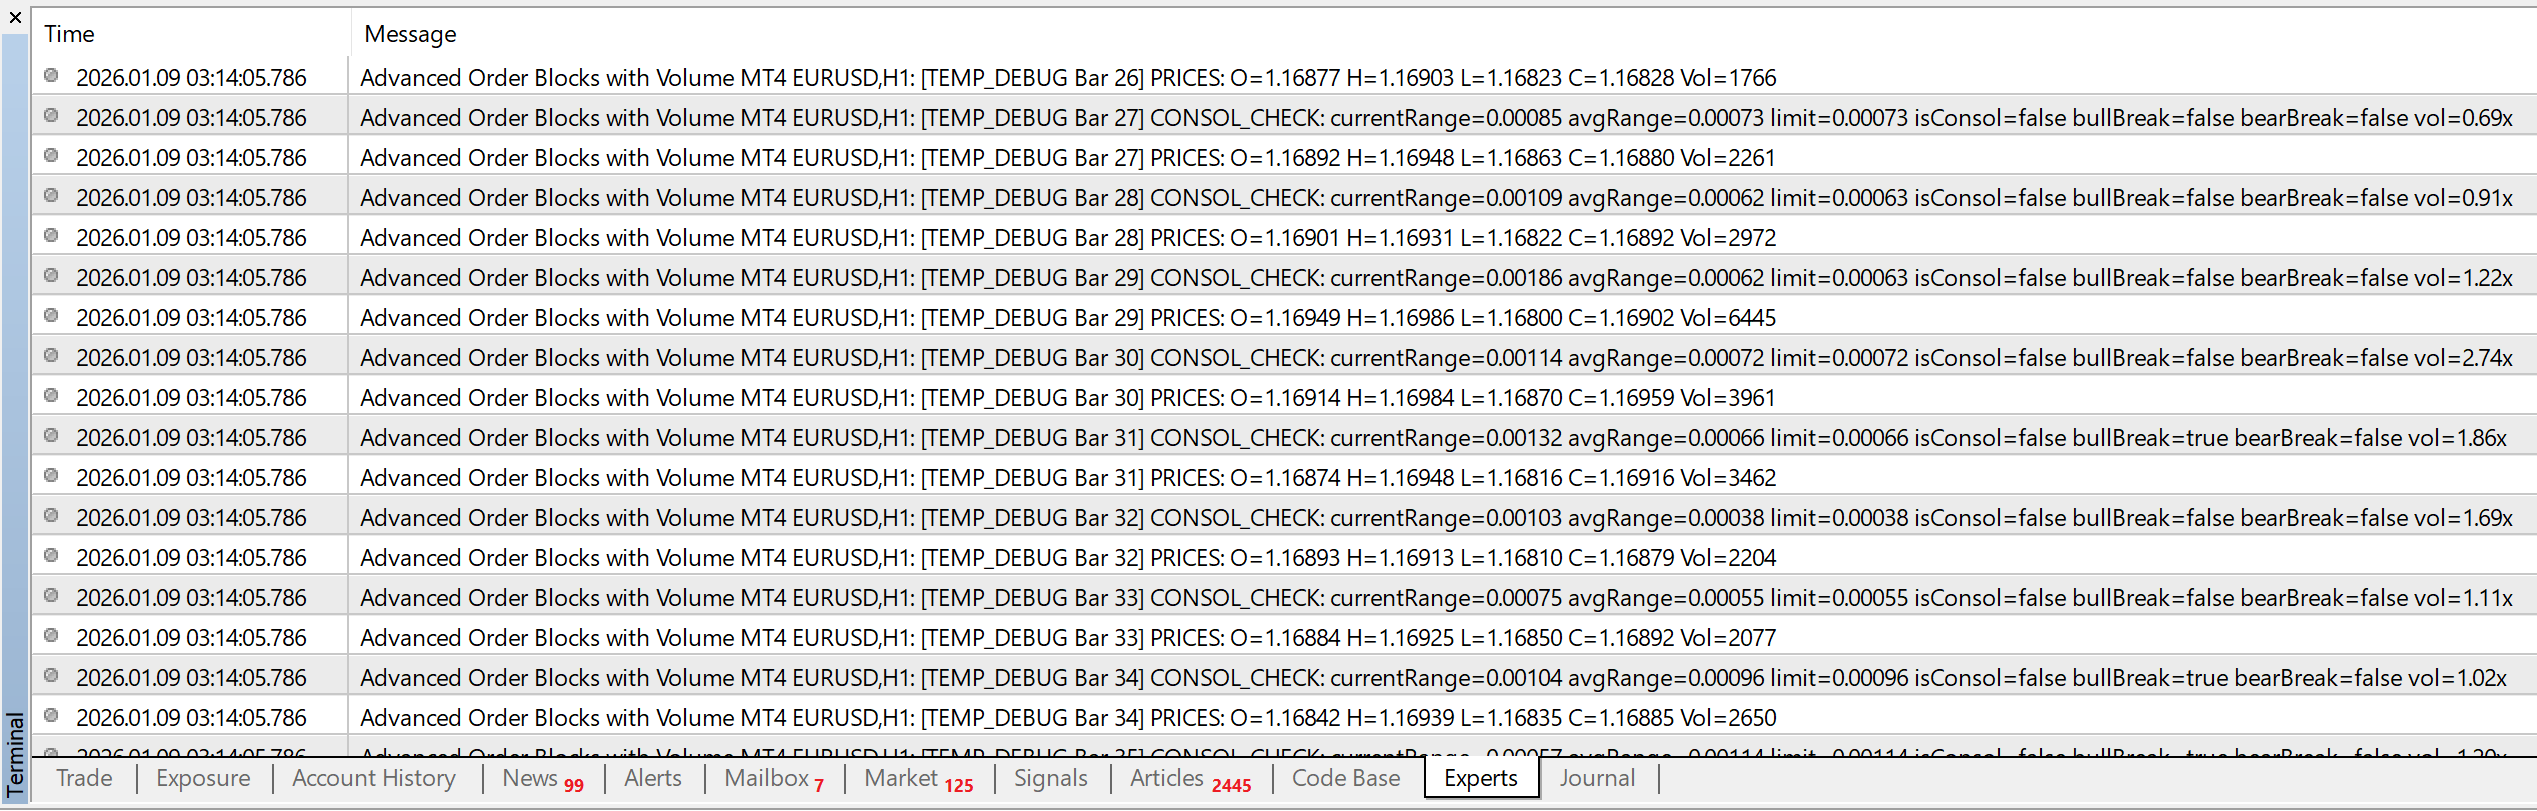
Debugging Known Issues:

Different timeframes/pairs will have different volume multipliers. Like EURUSD will have different volume ranges than somethings less traded like some stocks etc.
All default values are based on forex.
Keep Debug Buffers true. And set debugging bars. Then look at experts tab logs:
Conclusion
Order blocks show you where institutions actually did business.
That’s a massive edge.
But remember:
The money is not in trading every block.
The money is in trading the best blocks.
Start by watching how price reacts to different blocks. Because different pairs work best with different settings.
Even without trading, this will train your eye fast.
And keep making .set files for your best settings. It will be awesome if you shared those right here with everyone.
Trade with structure.
Trade with volume.
Trade with order blocks! 😎


 Trading Guide")
