
LEARNING TO USE THE ICT-SMC CONCEPTS INDICATOR - PART 1: ORDER BLOCKS AND BREAKER BLOCKS

Order Blocks
Order Blocks are a fundamental pillar of the ICT-SMC indicator. In this indicator, you can visualize them, customize their colors and define how they are obtained according to your preferences.
The basic structure of an Order Block and its representation on the chart is explained below:
-
Price 2:
In a bearish Order Block, this price represents the lower part of the rectangle; while in a bullish Order Block, it indicates the upper part. -
Price 1:
For a bearish Order Block, Price 1 marks the top of the rectangle, while for a bullish Order Block, it is at the bottom.
This definition will help you better understand the dynamics of Order Blocks and how they are integrated into market analysis through ICT-SMC.
Bullish Order Block:
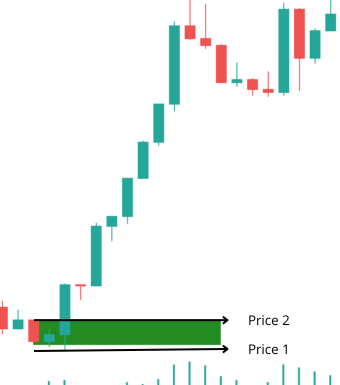
Image 1: Price 1 and 2 of the bullish order block
Bearish order block
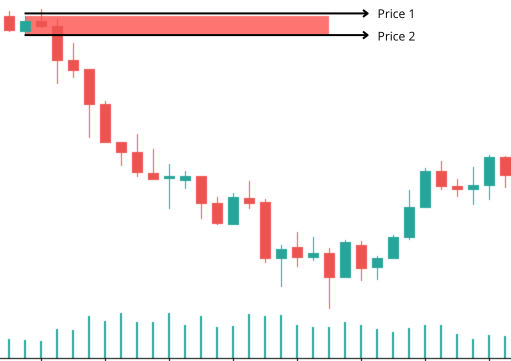
Image 2: Price 1 and 2 of the bearish order block
With this in mind you can choose the price for the "Price1" and "Price2" of an order block from:
4 Prices which would basically be the OHCL of a candle:
- O: Open
- H: High
- C: Close
- L: Low

Image 3: OHCL of the candles
This configuration will be applied to the candlestick preceding the strong move. Once this concept is understood, we continue with the next section:
The indicator has three general parameters:
Order Blocks
-
Minutes to delete the order block after being invalidated:
This parameter defines the time, in minutes, to wait to remove an Order Block from the chart and from memory, once it has been invalidated (i.e. when it is no longer updated on the chart). -
Show the middle line of an order block?:
Allows you to enable or disable the display of the Order Block center line on the chart.
true:

Image 4: Order blocks with the parameter Show the middle line of an order block? set to true
false:

(mage 5: Order blocks with the parameter Show the middle line of an order block? set to false
Order Blocks Obtaining mode
The "Order blocks Obtaining mode" parameter allows you to select the method that will be used to identify and generate the Order Blocks. There are four main modes:
-
ORDER_BLOCKS_TICK_VOLUME:
It is based solely on tick volume. -
ORDER_BLOCKS_MARKET_DEPTH:
It uses market depth to determine Order Blocks. -
ORDER_BLOCKS_PATTERN:
Identifies Order Blocks by consecutive candles, and strict rules on candle wicks. -
ORDER_BLOCK_LIQUIDITY_SWEEP:
This mode, added by me, focuses on identifying an Order Block from a liquidity sweep. That is, it detects a liquidity sweep and waits for the candlestick that caused the sweep to break, marking the beginning of a significant movement.

image 6: Structure of an order block by sweep)
As you can see in the image, we look for a liquidity sweep and then wait for the candlestick that caused the sweep to break.
It should be noted that you will also find other ways of obtaining orderblocks in the indicator, which are combinations of the methods described above.
General properties of the order block rectangle/“General properties of the order block rectangle”.
- Fill Order Blocks?: Choose whether the rectangle will have a background or not:
true:

Image 7: Order block with “fill” parameter set to false
false:

Image 8: Order block with “fill” parameter set to true
"Bullish order block"/ Order block alcista
- Choose the Bullish Order Block Color:
Allows you to select a color from the entire palette available or to define a custom color for bullish Order Blocks.
- Color of the Middle Line of the Bullish Order Blocks:
Defines the color of the central line of the bullish Order Block.
- Choose Price1 Bullish Order Block:
This parameter allows you to choose the Price 1 value for the bullish Order Block. By default, it is set to low (see Figure 1).
- Choose Price2 Bullish Order Block:
Here you can select the Price 2 value for the bullish Order Block, set by default to high.
"Bearish order block"/Order block bajista
- Choose the Bearish Order Block Color y Color of the Middle Line of the Bearish Order Blocks:
These options allow you to define, respectively, the color of the downward Order Block and the color of its center line.
- Choose Price1 Bearish Order Block:
Allows you to choose the Price 1 value for the bearish Order Block, which by default is set to high (see Figure 2).
- Choose Price2 Bearish Order Block:
"Settings order block by sweep"
This section is crucial for those who have selected the sweep-based acquisition mode, such as:
ORDER_BLOCK_LIQUIDITY_SWEEP, //Only OrderBlock Liquidity Sweep (or combinations that include this method).
First, it is necessary to define the number of candles that will be used to identify a swing high or swing low. This is configured using the “Num bar of swings to identify swing points” parameter.
- Swing low:

Image 9: Swing lows
- Swing high:

Image 10: Swing high
Generally, it is recommended to keep this parameter in a moderate range (between 2 and 5).
-
Very low values (less than 2, but greater than 0) will detect more order blocks, although less likely to provide a solid rejection when breaking the order block.
-
Very high values (between 8 and 15, or even higher than 20 in extreme cases) may hinder or prevent the detection of order blocks.
Types of Rupture
-
BREAKUP_SWING – Breakout of a bullish/bearish swing:
This method indicates that the breakout occurs when a swing (bullish or bearish) is formed above or below the opening of the “manipulator” candlestick.-
It is a stricter method, since it is not based on the closing of a candle, but on the formation of the swing.
-
It helps filter out false breakouts and ensures that the price continues in the expected direction.
-
Due to its rigor, it can generate fewer order blocks in the chart.
-
-
BREAKUP_VELA_ROPTURA_SWING – Breakout of the candle that swept away liquidity:
This is the default method and is based on the breakout of the candlestick that performed the liquidity sweep, following the concept explained above.
Maximum Waiting Time for Breakage
The "maximum wait in bars to break a swing or open of a candle" parameter determines the maximum number of candles (at the current timeframe) that the indicator will wait for the breakout to occur, either by swinging or by closing the manipulating candle.
-
Higher values:
They provide greater “patience” to the indicator, which may result in the appearance of larger rectangles. -
Lower values:
They make it more difficult for the conditions necessary to confirm the rupture to be met.
A range of between 10 and 20 is recommended, although the ideal setting will depend on the rigidity of your strategy and the way you trade according to the ICT system.
This setting will allow you to customize the detection of sweep-based order
blocks, adapting the indicator to your trading style and ensuring accurate interpretation of liquidity movements in the market.
Alerts Section
In this section you configure the activation and type of alerts.
- Activate alerts when an order block is touched
Choose whether you want to trigger an alert when an order block is mitigated. Use true to enable and false to disable this option.
- Types of alerts when an order block is touched
Select the type of alert to be sent when an order block is mitigated. For more information, see the post. General settings
Breaker Blocks:
Initial Parameters
-
Minutes to Delete Breaker Blocks After Being Invalidated:
This parameter determines the time, in minutes, that must elapse after the mitigation of a Breaker Block for it to be removed both from the main array that stores it and from the graph. -
Way to Get the Breaker Blocks:
Allows selection of the identification method for the Breaker Blocks.
Type of obtaining for Breaker Blocks
-
GET_BB_BY_BREAKOUT_OF_OB – Breaker Blocks por Ruptura de Order Blocks
This type is the simplest to implement. It is generated as follows:-
Break of Price 1 downwards in a bullish Order Block: a bearish Breaker Block is formed.
-
Price 1 breakout to the upside in a bearish Order Block: a bullish Breaker Block is generated.
-
-
GET_BB_BY_SWINGS – Breaker Blocks por Sweeps de Liquidez - "Configuration of Breaker blocks per sweep"
This method is a bit more complex and, like Order Blocks by sweeps, follows a similar structure but with some key differences.-
Main difference:
Instead of drawing the rectangle up to the maximum (as in a traditional Order Block), the upper limit is located at the high/close of the candle that performed the manipulation. -
As for Order Blocks by sweeps, two additional parameters are used:
-
parameter "High and low swing (number of candles)": to define the period of the swings.
-
parameter "Maximum wait to break the high/low swing after the sweep": determines the maximum time (in number of candles) that the indicator will wait to confirm the end of the sweep.
-
-

Image 11: Structure of the breaker blocks for sweep/GET_BB_BY_SWINGS
"General properties of breaker blocks rectangles"
-
Fill Breaker Block?:
Decide if the Breaker Block will have a colored background. -
Breaker Block Rectangle Line Style:
Allows to modify the style of the line that delimits the Breaker Block. see post: Types of lines in MT5.
Bullish breaker block.
- Bullish Breaker Block Color:
Defines the color for the bullish Breaker Block.
- Color of the Middle Line of the Bullish Breaker Block:
Sets the color of the center line of the bullish Breaker Block.
-
Bearish Breaker Block Color:
Select the color for the downstream Breaker Block. -
Color of the Middle Line of the Bearish Breaker Block:
Choose the color of the center line of the downward Breaker Block.
Alerts Section
In this section, you configure the activation and type of alerts.
- Activate alerts when an breaker block is touched
Choose whether you want to trigger an alert when a breaker block is mitigated. Use true to enable and false to disable this option.
- Types of alerts when an breaker block is touched
Select the type of alert to be sent when a breaker block is mitigated. For more information, see the post General settings


")

![[XAUUSD]: Weekly Liquidity Activation Points (timings), June 22-26, 2026](https://c.mql5.com/6/1013/splash-preview-771790.png "[XAUUSD]: Weekly Liquidity Activation Points (timings), June 22-26, 2026")